Table of Contents
Advertisement
Advertisement
Table of Contents

Subscribe to Our Youtube Channel
Related Manuals for DeVilbiss Healthcare drive Scout


Summary of Contents for DeVilbiss Healthcare drive Scout
- Page 1 Scout Scooter Instructions for use...
-
Page 2: Table Of Contents
CONTENTS 1. INTRODUCTION 2. CONTACT INFORMATION 3. PRODUCT DESCRIPTION 3.1 Environment 3.2 Intended User Group 3.3 Intended Use 3.4 Indications 3.5 Product Overview 4. SAFETY 4.1 Warnings & Cautions 4.2 Risk Assessment 4.3 Contraindications 4.4 Scooter Loading 4.5 Training 4.6 General Warnings 5. -
Page 3: Introduction
Keep this manual with the scooter, or in a safe place. Contact Drive DeVilbiss Healthcare Ltd. or check our website for the latest version of this document. Users with visual, reading or cognitive disabilities should seek advice from a professional care provider for an appropriate format. -
Page 4: Product Description
3. PRODUCT DESCRIPTION 3.1 Environment The Scout Scooter can be used in both indoor and outdoor environments where appropriate. The Scout Scooter can be used on flat, even path surfaces, however the user should avoid grass, gravel, gradients greater than 8° and motorised roads. -
Page 5: Safety
4. SAFETY 4.1 Warnings & Cautions Warnings in this user manual highlight potential hazards that if disregarded could lead to injury or death. Warning Cautions in this user manual highlight potential hazards that if disregarded could lead to equipment damage or failure. Caution 4.2 Risk Assessment Before using the scooter, a risk assessment must be performed by a... -
Page 6: Scooter Loading
Maximum user weight is the sum of the user mass and the mass of any ancillary attachments or accessories. Exceeding the maximum weight capacity will void your warranty. Drive DeVilbiss Healthcare Ltd. will not be held responsible for injury and / or damages resulting from failure to observe weight capacities. -
Page 7: General Warnings
4.6 General Warnings • Do not use a damaged or badly worn scooter — risk of harm. • Check the functionality of the scooter before every use, using the method listed in section 8.3. Check the current fastest speed setting is appropriate. (It is recommended to use a slower speed setting at the beginning of every use, gradually increasing the speed setting as appropriate.) •... - Page 8 • Modification of the Scout Scooter, its parts or features is not allowed without the permission of Drive DeVilbiss Healthcare Ltd. — a hazard could be introduced. • The scooter is electrically operated, so should not be used in oxygen-rich environments, in the presence of flammable gases, sources of heat or naked flames —...
-
Page 9: Transport & Storage
If your scooter is stored for a prolonged period, flat spots may develop in the wheels, causing an uneven sensation when driving. This should work itself out over time. Drive DeVilbiss Healthcare Ltd. suggests placing a sturdy platform under the frame to lift the wheels off the ground and take weight off the wheels during storage. -
Page 10: Disassembling The Scooter
5.1 Disassembling the scooter All models can be disassembled in to four pieces without tools: seat, front section, rear section and battery pack. The procedure for disassembly is the same for all scooters. Please perform the following steps: 1. Push the Seat Rotate Lever, whilst pulling up on the seat to remove. -
Page 11: Re-Assembling The Scooter
5.2 Re-assembling the scooter 1. Line up the two sections of base. Lift up the handle and use the handle to slowly lower the two parts so they lock together, lining up the red markers. 2. Unlock front tiller by pulling the locking knob out and turning 90º. -
Page 12: Symbol Definition
6. SYMBOL DEFINITION The following symbols are found on this scooter: Symbol Description Warning Beware of potential hazard Caution Beware of potential product damage Refer to instructions for use - Recommended Failure to read the instructions for use could introduce a hazard Refer to instructions for use - Mandatory Failure to read the instructions for use could introduce a hazard Medical Device... - Page 13 Symbol Description Serial number Product code Importer code Quantity UK Responsible person Authorised EU Representative Manufacturer Date of manufacture Importer Distributor W.E.E.E Label - Found on individual parts of electrical system (Waste Electrical and Electronic Equipment) Refer to section 12) Keep away from rain Beware of trapping points This device must not be used as a seat in a motor vehicle.
-
Page 14: Parts Identification
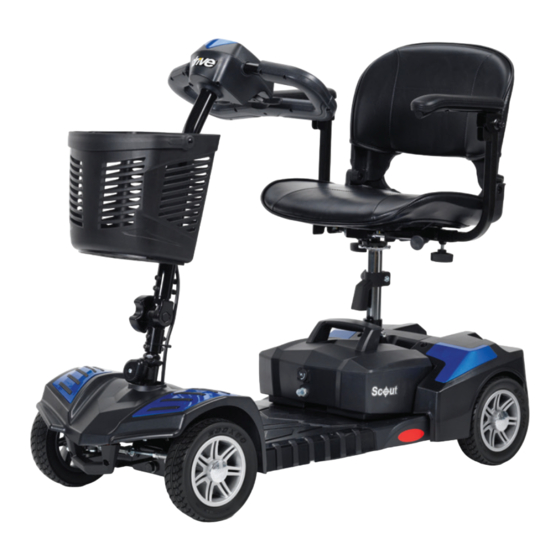
7. PARTS IDENTIFICATION Control Unit Backrest Handlebar Seat Seat post Tiller adjustment knob Tiller lock Drive Battery Front Wheel Wheel Freewheel lever Anti-tip Wheel The approximate weights of the major component parts are below: • Seat – 8kg (18lb) • Front Section – 16kg (35lb) •... -
Page 15: Charging & Preparing For Use
Do not attempt to fold / unfold the scooter while in use. • Only competent persons are to prepare the scooter for use. If in doubt, contact Drive DeVilbiss Healthcare Ltd. Warning • Ensure a risk assessment in line with local health and safety policy is undertaken to ensure that staff are not put at risk when performing assembly activities. -
Page 16: Checking Before Use
The battery pack can be charged either when it is installed or removed from the scooter. To Charge through the battery pack (applies to all models) • Switch the key ignition off. • If required, remove the battery pack. • Open the charging socket cap on the charging point. -
Page 17: Operation Of The Scout Scooter
9. OPERATION OF THE SCOUT SCOOTER 9.1 Operational Limits Ambient temperature: -10°C to +50°C Operating Humidity: 20% to 85% RH 9.2 Scooter Controls Please refer to the diagram below to identify your scooter controls and their functions. Familiarise yourself with the terminology to better understand references throughout these instructions. - Page 18 Key Ignition The key ignition acts as the power switch for the scooter. To switch the power on, turn the key clockwise and battery gauge should illuminate. To switch the power off, turn the key anticlockwise, after which the battery gauge should switch off and the key can be removed.
- Page 19 Moving and Braking To move forward, pull the right hand side of the wigwag paddle with your hand towards you whilst resting the palm of your hand on the lower handle bar. Pull the left hand side of the wigwag paddle towards you and the scooter will move backwards, emitting an audible reversing alarm.
- Page 20 Seat The seat can be rotated and locked in position at 45º intervals. Lift up the seat lever and swivel the seat. Release the lever and then continue swivelling the seat until it locks in position. Return the seat to the forward position before driving.
- Page 21 Count the number of flashes to determine the problem. If you experience any flash sequences, first restart the scooter, ensuring the wigwag paddle is released. If this does not remedy the problem recharge the batteries. If the error persists contact your Drive DeVilbiss Healthcare Dealer. Tiller Adjustment The tiller can be adjusted in to many different positions to suit each user.
- Page 22 Freewheel Lever The lever located on the right-hand rear side of the scooter is used to engage the scooter motors to the wheels. When the lever is pushed Neutral downwards, the scooter is in drive mode. The 'FREEWHEEL' controls will operate the scooter and the brakes mode will be engaged.
-
Page 23: Driving The Scooter
9.3 Driving the Scooter You must exercise awareness, caution, care, and common sense when operating your scooter. Always keep in mind your own limitations and substance use. Users may encounter difficult manoeuvring situations such as narrow doorways, travelling up and down ramps, cornering, and travelling on uneven terrain. -
Page 24: Steps, Kerbs & Fixed Obstacles
9.4 Steps, Kerbs & Fixed Obstacles Use extreme caution when operating your scooter near kerbs, porches, stairs, escalators, drop-offs, unprotected ledges, and raised areas. Approach slowly, and make sure the front of the scooter is perpendicular to the obstacle. To manoeuvre up a fixed obstacle – Increase the forward speed until the scooter has cleared the obstacle, and then you may reduce the speed. -
Page 25: Inclines
9.5 Inclines Use caution when approaching inclines or declines. If necessary, lower the speed before travelling on a slope. When travelling up an incline try to keep the scooter moving forward. If you must come to a stop, use caution and slowly accelerate the scooter forward. When travelling down an incline, lower the speed on your scooter to the slowest setting, and proceed cautiously. -
Page 26: Outdoor Operation & Inclement Weather Precautions
9.6 Outdoor Operation & Inclement Weather Precautions Exposure to inclement weather should always be avoided. Monitor weather forecasts before starting a journey to reduce risks. If you find yourself caught in inclement weather while operating your scooter, proceed to the closest shelter immediately. -
Page 27: Cleaning
10. CLEANING • Never use direct contact with water to clean the scooter. This could cause damage to the electrical components and put the user at risk. Only a damp cloth should be used. • Always disconnect the Scout Scooter from the mains supply prior to cleaning. -
Page 28: Maintenance & Servicing
Routine maintenance is required to ensure the maximum use of your scooter. While some of the maintenance can be done by yourself, you may need assistance from an authorised service engineer. If you have any doubts, contact Drive DeVilbiss Healthcare Ltd. - Page 29 Check the frame and all components for loose fasteners and tighten where appropriate The following conditions may indicate a serious problem with your scooter. Contact Drive DeVilbiss Healthcare Ltd. if one of the following conditions occurs: • Motor or gearbox noise •...
-
Page 30: Fault Resolution
If this does not resolve the issue, recharge the battery and repeat the above procedure. If the fault is still not resolved, do not use the scooter, turn off the power and contact Drive DeVilbiss Healthcare Ltd. 11.3 Repair Contact your provider to discuss the replacement of components on the scooter. -
Page 31: Disposal Of Parts
For further information about disposal, contact your local waste agency, recycling centre, or provider. If in doubt, contact Drive DeVilbiss Healthcare Ltd. The Scout Scooter and any associated parts are to be decontaminated before disposal to avoid the risk of cross- contamination. -
Page 32: Electromagnetic Compatibility (Emc)
20 V/m. For specific emissions and immunity information relating to the scooter, contact Drive DeVilbiss Healthcare Ltd. Report EMI incidents to Drive DeVilbiss Healthcare Ltd. using the details provided in section • Do not operate hand-held transceivers or turn on personal communication devices while the scooter is powered on. -
Page 33: Specification
14. SPECIFICATION Product name: Scout (MS008) / Scout Venture (MS009) Product codes: MS008PB, MS008RD / MS009PB, MS009RD Manufacturer code: WT-T4KD Top Speed* 4 mph (6.4 kph) Maximum Range* 9.9 miles (16 km) / 13 miles (20 km) Rated Slope 8º Maximum Stability Angle 9º... - Page 34 Product name: Scout Explorer Product codes: MS010SIL Manufacturer code: WT-T4SD Top Speed* 4 mph (6.4 kph) Maximum Range* 14 miles (20 km) Rated Slope 8º Maximum Stability Angle 9º (static) 8º (dynamic) Ground Clearance 6 cm (2.5”) Minimum Turning Radius 140 cm (55”) Scooter Dimensions: Unfolded (L ×...
-
Page 35: Warranty
In no event will Drive DeVilbiss Healthcare Ltd. be liable for punitive, special, or consequential damages. Except as provided herein, this warranty will not apply to any Drive DeVilbiss Healthcare Ltd. products that have been (a) damaged by lightning, water, or power surges, (b) neglected, altered, abused, or used for a purpose other than the purpose for which they were designed, (c) repaired by you or any other party without Drive DeVilbiss Healthcare Ltd. -
Page 36: Maintenance Schedule
✓ Battery Condition ✓ Wheel Condition ✓ Motors General Device ✓ Inspection ✓ Cleaning SUGGESTION – Once a year, take your scooter to a service engineer for inspection and maintenance who are authorised on behalf of Drive DeVilbiss Healthcare Ltd. -
Page 37: Notes
17. NOTES... - Page 38 17. NOTES...
- Page 39 17. NOTES...
- Page 40 No. 31, VSIP II, Road 6, Thu Dau Mot City, Binh Duong Province, Vietnam NB. IMAGES CONTAINED IN THIS DOCUMENT ARE FOR ILLUSTRATION AND PARTS IDENTIFICATION PURPOSES ONLY, AND MAY NOT REFLECT FINAL PRODUCT OUTLOOK APPEARANCE. Drive DeVilbiss Healthcare Ltd. provide these instructions for use and product markings. Issue: 2023-02 Rev2...
Need help?
Do you have a question about the drive Scout and is the answer not in the manual?
Questions and answers