Bionaire BBLF01 - Bladeless Fan Manual
- Instruction manual (2 pages) ,
- Instruction manual (15 pages) ,
- Instruction manual (21 pages)
Advertisement
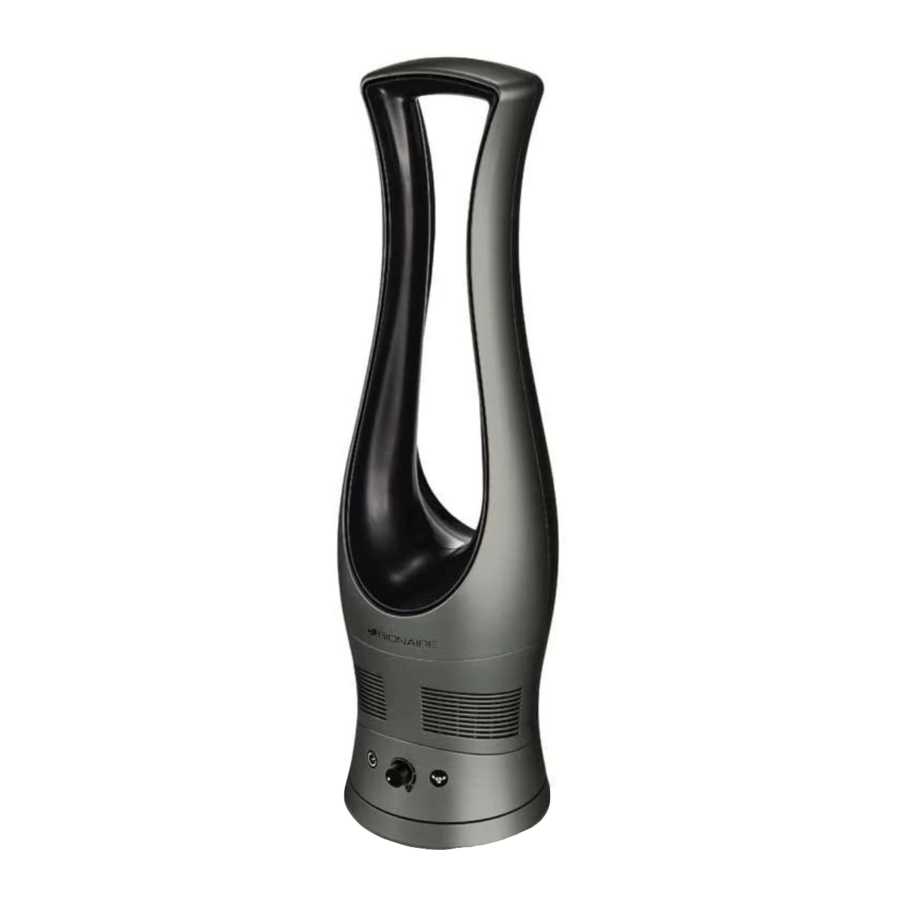
Congratulations on the purchase of your Bionaire™ bladeless fan. This fan features innovative bladeless technology to deliver smooth air flow and a variable speed dial for cooling comfort and control.
IMPORTANT SAFETY INSTRUCTIONS
U.K. and IRELAND
PLEASE READ AND SAVE THESE IMPORTANT SAFETY INSTRUCTIONS
When using electrical appliances, basic safety precautions should always be taken including the following:
- Use the fan only for purposes described in the instruction manual.
![shock hazard]() To protect against electrical shock, do not immerse the fan, plug or cord in water or spray with liquids.
To protect against electrical shock, do not immerse the fan, plug or cord in water or spray with liquids.- Close supervision is necessary when any appliance is used by or near children.
- Unplug from the electrical outlet when not in use, when moving the fan from one location to another, before putting on or taking off parts and before cleaning.
- Avoid contact with any moving parts.
- Do not operate in the presence of explosive and/or flammable fumes.
- Do not operate fan until fully assembled with all parts properly in place.
![]()
To avoid fire hazard, NEVER place the cord under rugs or any parts near an open flame, cooking or other heating appliance.- Ensure that the fan is switched off from the supply mains before removing the guard.
- Do not operate any appliance with a damaged cord, plug, after the appliance malfunctions, or has been dropped/damaged in any manner.
- The use of attachments not recommended or sold by the appliance manufacturer may cause hazards.
- Do not use outdoors.
- Do not let the cord hang over the edge of a table or counter, or come into contact with hot surfaces.
- To disconnect from the electrical supply, grip the plug and pull from the wall outlet. DO NOT pull on the cord.
- Always use on a dry, level surface.
- Do not operate without the fan grills properly in place.
- This product is intended for household use ONLY and not for commercial or industrial applications.
- Should the fan stop working, first check the fuse in the plug (UK only) or fuse/circuit breaker at the distribution board is operating, before contacting the manufacturer or service agent.
- If the supply cord or plug is damaged, it must be replaced by the manufacturer or its service agent or a similarly qualified person in order to avoid hazard.
- This appliance is not intended for use by persons (including children) with reduced physical, sensory or mental capabilities, or lack of experience and knowledge, unless they have been given supervision or instruction concerning use of the appliance by a person responsible for their safety. Children should be supervised to ensure that they do not play with the appliance.
 To protect against electrical shock, do not immerse the fan, plug or cord in water or spray with liquids.
DESCRIPTION OF APPLIANCE


- Air output vents
- Air intake vents
- Sleep timer button
- Variable speed dial
- Power light
- Oscillation button
- Power Jack
- Power Adapter
Technical Parameters
| Adaptor | Rated input: 100-240V~/50-60Hz Rated output: 12V Wire length: 8M Weight: 0.12kg Operating temperature: 0-40°C |
| Unit | Rated input: 12V  Rated power: 18W Operating temperature: 0-40°C Operating humidity: 85% Product Dimensions: L146mm X W146mm X H500mm Weight: 1.18kg Package Dimensions: L182mm X W177mm X 543mm |
OPERATING INSTRUCTIONS
- Set fan on a dry, level surface.
- Connect the power adapter to the power jack located on the rear base of the fan.
- Plug power adapter into the appropriate outlet.
- To turn the fan on, turn the variable speed dial clockwise until the dial clicks. The power light will glow blue.
- To adjust the speed, continue to turn the variable speed dial in the clockwise direction to increase the speed as desired. The speed level may be lowered by turning the dial counterclockwise.
- To turn the fan off, simply turn the dial counterclockwise until it clicks and the power light shuts off.
OSCILLATION FUNCTION
- If you would like the fan to oscillate, push the oscillation button located to the right of the speed dial. To stop oscillation, push the button again.
SLEEP TIMER
- Your bladeless fan is equipped with a onehour sleep timer. To activate, push the sleep timer button located to the left of the speed dial. The power light will blink blue while the sleep timer function is in use. When time is up, the power light will glow red. If you wish to resume operation after the timer has run out, push the sleep timer button again. To shut off the power light after the timer has run out, turn the speed dial counterclockwise until the dial clicks and the light shuts off.
CLEANING AND MAINTENANCE
Follow these instructions to correctly and safely care for your fan.
- Always unplug the fan before cleaning.
- Be sure to clean your fan with a soft cloth moistened with a mild soap solution.
- Do not allow water to drip on or enter into the fan motor housing.
- Do not use gasoline, thinner, or benzene as a cleaner.
- Lightly run a vacuum cleaner nozzle over the fan vents to remove any dust or dirt that may have accumulated.
- Clean the fan with a soft, damp cloth.
Do not allow the motor or other electrical components to be exposed to water.
UNIT STORAGE
When storing your fan please use the original box. It is important to keep it in a safe, dry location.
- Store your fan in the original box or an appropriately sized box.
- Protect the fan vents from dust.
- Store your fan in a dry location.
Installation of a plug
Applicable to U.K. and Ireland
NOTE: If you are unsure or in doubt about the installation of the plug please contact a qualified electrician. If a 13A 3-pin plug is fitted, it must be an ASTA approved plug, conforming to BS1363 standard. Replacement 3A fuse must be BSI or ASTA BS1362 approved.

The wires in the mains lead are coloured as such:
BROWN - LIVE
BLUE - NEUTRAL
Please note that the colour of these mains wires may not correspond with the colour markings that identify the terminals in your plug. Please proceed as follows:
The BROWN coloured wire must be connected to the terminal, which is marked with the letter "L" or is coloured RED.
The BLUE coloured wire must be connected to the terminal, which is marked with the letter "N" or is coloured BLACK.
DO NOT CONNECT either of these wires to the earth terminal in the plug.
The earth terminal plug is marked with the letter "E", or with the earth symbol ![]() or coloured GREEN and YELLOW.
or coloured GREEN and YELLOW.
GUARANTEE
Please keep your receipt as this will be required for any claims under this guarantee.
This appliance is guaranteed for 3 years after your purchase as described in this document.
During this guaranteed period, if in the unlikely event the appliance no longer functions due to a design or manufacturing fault, please take it back to the place of purchase, with your till receipt and a copy of this guarantee.
The rights and benefits under this guarantee are additional to your statutory rights, which are not affected by this guarantee. Only Holmes Products (Europe) Ltd. ("Holmes") has the right to change these terms.
Holmes Products (Europe) Ltd
1 Francis Grove
London SW19 4DT
England
Fax: +44 (0)20 8947 8272
Email: enquiriesEurope@jardencs.com
Website address: www.jardencs.com
UK - Free phone Customer Service Helpline – 0800 052 3615
© 2011 Sunbeam Products, Inc. doing business as Jarden Consumer Solutions. All rights reserved.
Distributed by Holmes Products (Europe) Ltd., 1 Francis Grove, London SW19 4DT, United Kingdom. Printed in PRC

Documents / Resources
References
Download manual
Here you can download full pdf version of manual, it may contain additional safety instructions, warranty information, FCC rules, etc.
Advertisement


Need help?
Do you have a question about the BBLF01 and is the answer not in the manual?
Questions and answers