
Related Manuals for HOTATA 3106

Summary of Contents for HOTATA 3106
- Page 1 User Manual Model No: 3106 IMPORTANT: Read the instructions carefully before operating the appliance and keep them for future reference. Version 1.0...
- Page 3 Customer Service 1 Year Warranty Lifetime Customer Support Quality Assurance Support Return and Exchange aftersale@hotata.com Email US: Check out our video tutorials available at https://www.youtube.com/ @hotataaftersale/playlists Scan QR code for video tutorials aftersale@hotata.com...
-
Page 4: Table Of Contents
Contents Components List Installation Guide Programming Guide Factory Default Reset Change Programming Code Advanced Stting Options System Alerts FCC Warning Template aftersale@hotata.com... -
Page 5: Components List
Interior Assembly Mounting Plate Deadbolt Strike Plate ③ 3/4"(19mm)Screws-2 pcs ④ ⑤ Entry Key Optional Reinforcement Keypad Assembly Deadbolt Latch (2 ea.) screws (1 set) Tools Required Tools Required for Installation on Pre-drilled Doors: ·Phillips Screwdriver (DO NOT USE POWER DRILL!) aftersale@hotata.com... -
Page 6: Installation Guide
(60 or 70mm) 2-1/8" 54mm 3.Measure to confirm that the hole in the 4.Measure to confirm the thickness of the door edge is 1"(25mm) door is between 1-3/8"and 2"(35 and 50mm) 1-3/8" and 2" (35 and 50mm) 1" 25mm aftersale@hotata.com... - Page 7 Twist the latch and adjust Proceed to next step. the bolt length. (As shown below) 2-3/4"70mm 2.Install strike on the door frame. Actural Size 3/4"(19mm)Screws-2 ea. Make sure the hole in the door frame is drilled a minimum of 1"(25mm) deep. aftersale@hotata.com...
- Page 8 Installation Guide Install the exterior assembly Locking lever transversal through the latch cable Route the cable through the The key must be pulled out when door below the bolt and installing. push the keypad onto the door. aftersale@hotata.com...
- Page 9 4.Ensure tight cable connection. 5.Tighten screws evenly. Insert key and test latch.if latch does not If the keypad and mounting plate are deflection. please loose mounting plate screws and adjust. extend or retract smoothly. please adjust mounting plate screws. aftersale@hotata.com...
- Page 10 ② Enter preset code: 1234, press , the latch bolt retracts by itself. If the latch bolt doesn't extend or retract smoothly,please check the direction switch ! or re-install the lock.Green lights means successfully installed.Red lights means unsuccessfully installed. Successful Unsuccessful Green aftersale@hotata.com...
-
Page 11: Programming Guide
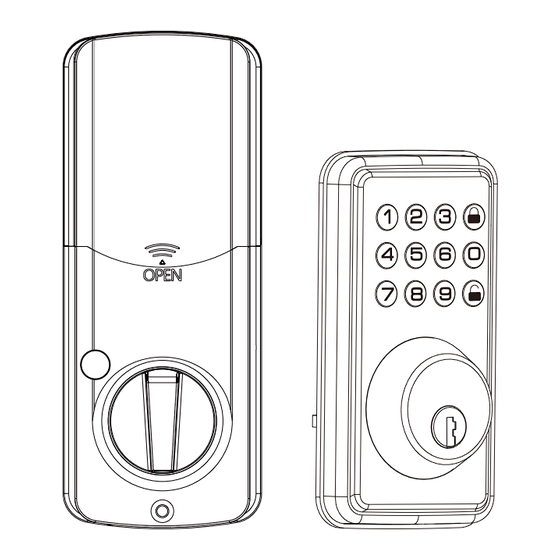
Programming Code User Code (4-8Digits) User ID (01-50) 2Digits Type-C emergency power port Factory default settings ! The lock is in experience mode Programming Code: 123456 User Code: 1234 or any 4-8Digits Indoor unlock / lock button Reset button aftersale@hotata.com... -
Page 12: Factory Default Reset
Find a paper clip, put it into the hole at the bottom, long press for 5 seconds, until the buzzer beeps. Find a paper clip, put it into the hole at the bottom, long press for 5 seconds, ! until the buzzer beeps. aftersale@hotata.com... -
Page 13: Change Programming Code
Programming Symbols Factory default settings ! The lock is in experience mode Lock Unlock / Programming Programming Code:123456 Programming Code User Code: 1234 or any 4-8Digits User Code (4-8Digits) Indoor unlock / lock button User ID (01-50) 2Digits Reset button aftersale@hotata.com... -
Page 14: Advanced Stting Options
If the operation is successful:the green light and beeps 1 second. If the operation is wrong:the red light flashes 3 times with 3 beeps. If you do not enter any buttons within 5 seconds:the red light flashes 3 times with 3 beeps,system will exit the programming mode. aftersale@hotata.com... -
Page 15: System Alerts
Battery run out key to unlock then replace battery The keypad and lightindicator no respond Bad cable connection Re-connect the cable lf you have any questions, please contact us at any time. Email: Aftersale @hotata.com aftersale@hotata.com... -
Page 16: Fcc Warning
This device complies with part 15 of the FCC Rules.Operation is subject to the following two conditions: (1) This device may not cause harmful interference, and (2) this device must accept any interference received, including interference that may cause undesired operation. aftersale@hotata.com... -
Page 17: Template
aftersale@hotata.com... - Page 20 Scan the QR code or visit the link: https://www.youtube.com/@hotataaftersale/playlists to watch video tutorials, which can help you better understand the installation and usage of the product. Scan QR code for video tutorials aftersale@hotata.com...
Need help?
Do you have a question about the 3106 and is the answer not in the manual?
Questions and answers