Advertisement
Quick Links
PLEASE READ CAREFULLY THIS INSTRUCTION MANUAL
AND KEEP IT IN A SAFE PLACE FOR FUTURE REFERENCE!
INSTRUCTION MANUAL
FOR KIDS' TOY TRICYCLE
„FUTURO"
This product
is produced in accordance with Toy safety
Directive 2009/48/EC of the European Parliament and the Council,
the standards applicable for this toy and the regulations of national legislation.
Advertisement

Related Manuals for Chipolino FUTURO


Summary of Contents for Chipolino FUTURO
- Page 1 PLEASE READ CAREFULLY THIS INSTRUCTION MANUAL AND KEEP IT IN A SAFE PLACE FOR FUTURE REFERENCE! INSTRUCTION MANUAL FOR KIDS’ TOY TRICYCLE „FUTURO” This product is produced in accordance with Toy safety Directive 2009/48/EC of the European Parliament and the Council,...
- Page 2 FOLLOW ALL WARNINGS, INSTRUCTIONS AND RECCOMENDATIONS IN THIS MANUAL IN ORDER TO GUARANTEE THE SAFE USE OF THIS PRODUCT: CAUTION! WARNINGS! CAUTION! USE ONLY UNDER DIRECT ADULT SUPERVISION! CAUTION! THIS TOY HAS NO BRAKES! CAUTION! THE TOY IS NOT SUITBALE FOR CHILDREN UNDER 1,5 YEARS! ...
-
Page 3: Product Features
IMPORTANT! WARNINGS AND GUIDELINES FOR BATTERY USE After installation of batteries, always secure the battery compartment with the cover. Do not allow children to access or play with the batteries! Use only batteries of the designated type and power. Do not use batteries of different types. -
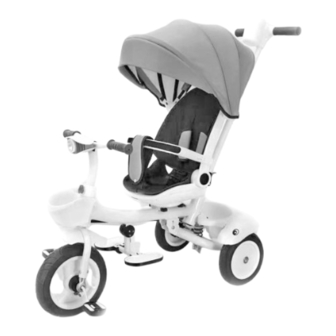
Page 4: Main Parts
MAIN PARTS Rear wheels Fork set Frame Handlebar axles Rear wheels Lower tube of Parking device Seat Push handle push handle Guiding axle Cup/bottle Safety bumper holder Canopy Front basket Rear basket Remark: The fabric seat is not shown here. Light with Mud guards music... - Page 5 ASSEMBLY 1. ASSEMBLY OF FORK (WITH FRONT WHEEL AND MUD GUARD) TO THE TUBE ON FRAME Insert the fork tube in the frame front tube opening. 2. ASSEMBLY OF THE HANDLEBAR 2-1 – Install the front basket on the fork tube, as shown in the figure. 2-2 – Insert the handlebar in the fork tube and press the pin. 2-3 –...
- Page 6 9. ASSEMBLY OF FRONT BUMPER 9-1 – Insert each of the bumper arms in the side openings on the seat as shown in the figure. Press until you hear a click and they are fixed. To remove the bumper, press the button and pull out the bumper. 10. PLACING THE FABRIC PART 10-1 – Place the fabric part on the seat. Insert the clips of the fabric part in the corresponding opening. 10-2 – Thread the belt through the seat opening as shown in the figure.
- Page 7 19. FOLDING THE TRICYCLE FRAME The folding lever is located on the inside of rear frame tube. Press the lever and fold the frame as shown in the figure. 20. GUIDING THE TRICYCLE BY THE PUSH HANDLE 21. DRIVING THE TRICYCLE BY THE CHILD (AFTER REMOVING THE PUSH HANDLE AND CANOPY) WARNING! The push handle may be removed after you are sure that the child can drive the tricycle on his own.
- Page 8 lever tighten “click” cup/bottle holder screwdriver screw mudguard washer seat folding/unfolding screw button release button clips “click” opening washer 10-1 belt 10-4 10-2 opening 10-3 screw...
- Page 9 Unfolding Folding additional sunshade rotation button press light and melodies buttons screws battery compartment Batteries: 2pcs type AA/1,5 V 2-fold folding lever 1-press folded frame...
- Page 10 MAINTENANCE GUIDELINES Periodically check the good working order of the tricycle parts. Do not wash it and do not soak it in water. Use a soft damp cloth and water or neutral liquid detergent. Do not use aggressive detergents, containing abrasive particles, ammonia, bleach or spirits. ...
- Page 11 CHIPOLINO LTD., 1 Goliamokonarsko Shosse Str, Plovdiv, BULGARIA www.chipolino.com...
Need help?
Do you have a question about the FUTURO and is the answer not in the manual?
Questions and answers