Advertisement
Quick Links
IMPORTANT! PLEASE READ CAREFULLY THIS INSTRUCTION MANUAL
AND KEEP IT IN A SAFE PLACE FOR FUTURE REFERENCE!
INSTRUCTION MANUAL FOR
KIDS' TOY TRICYCLE
„BOLIDE"
This product
is produced in accordance with requirements
of Toy safety Directive 2009/48/EC of the European Parliament and the Council,
Regulation regarding Essential Requirements and Conformity Assessment of
Toys, Regulation regarding Conformity Marking and the standards applicable
for this toy.
Advertisement

Subscribe to Our Youtube Channel
Related Manuals for Chipolino BOLIDE


Summary of Contents for Chipolino BOLIDE
- Page 1 IMPORTANT! PLEASE READ CAREFULLY THIS INSTRUCTION MANUAL AND KEEP IT IN A SAFE PLACE FOR FUTURE REFERENCE! INSTRUCTION MANUAL FOR KIDS’ TOY TRICYCLE „BOLIDE” This product is produced in accordance with requirements of Toy safety Directive 2009/48/EC of the European Parliament and the Council,...
- Page 2 FOLLOW ALL WARNINGS, INSTRUCTIONS AND RECOMMENDATIONS IN THIS MANUAL IN ORDER TO GUARANTEE THE SAFE USE OF THIS PRODUCT: CAUTION! WARNINGS! CAUTION! USE ONLY UNDER DIRECT ADULT SUPERVISION! CAUTION! THIS TOY HAS NO BRAKES! CAUTION! THE TOY IS SUITABLE FOR CHILDREN AGED 1.5 YEARS AND UP AND WEIGHING NOT MORE THAN 25 kg! ...
-
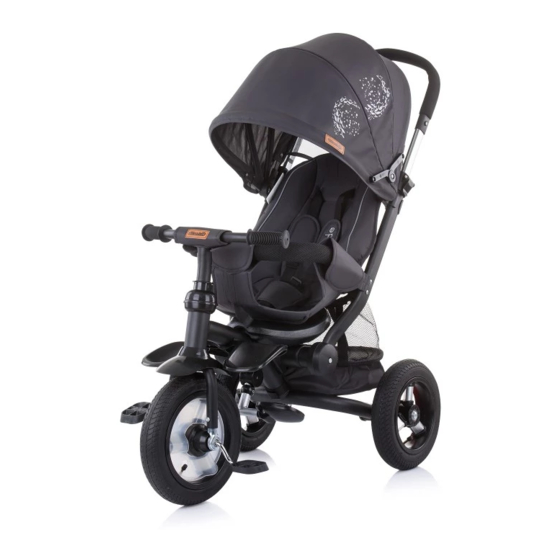
Page 3: Product Features
PRODUCT FEATURES This is a functional TOY whose purpose is to create in the child initial skills to coordinate its arms and feet when riding a tricycle or bicycle. IMPORTANT! Remove the parent handle when you are sure that the child can ride the tricycle on his own and unaided. -
Page 4: Assembly And Mounting
А Frame М6х45 Screw Rear axle Front fork Bracket Mudguard Rear wheels Steering bar Front wheel Back rest Seat Push bar (bottom) Storage basket Safety bumper Q-1 Parking device parts 1 М6х30 Screw Seat pad М6 Cap nut Push bar (top) Q-2 Parking device parts 2 6 mm Shim Canopy... - Page 5 necessary tools 5. Place the parking device parts 2 (Q-2) to the rear tubes of the frame A (fig.3). 6. Place the parking device parts 1 (Q-1) to the rear tubes of the frame C (fig.3). 7. Place each of the rear axles (M) on to the rear wheels as shown on fig.3.
- Page 6 13. Fig. 5 – Step 1: Remove the screw, nut and plastic ends of the lower foot rest (L). Put the lower foot rest on to the respective place in the tube of the frame so that the openings in the foot rest and the frame will match.
- Page 7 step 1 the pins are located at the back side step 2 fig. 7 23. WARNING! When assembling the upper push bar (J) the pins must remain at the back side of the frame (fig.7 – Step 1). Lift up the plastic lever located on the tubes of the bottom push bar. Insert the tubes of the upper push bar (J) on to the openings in the tubes of the bottom push bar.
- Page 8 FUNCTIONS The foot rest can be retracted to the frame by push- ing the button and moving the foot rest up until you hear a click and it is fixed (fig. 9). To use the foot rest, press the pin and move it down until you hear a click and it is fixed.
- Page 9 fig. 12 The back rest can be adjusted in several positions by means of a mechanism on the back (fig. 12-1). To lower the back rest, press with fingers the buckle on the mechanism (fig. 12-2) and pull the buckle down.
- Page 10 Fig. 14 shows the assembled tricycle, which can be pushed by the adult. The push bar and the foot rest can be removed and child can drive the tricycle alone. Fig. 15 shows the tricycle which the child can drive. fig.
- Page 11 Bulgaria, Plovdiv, Str. Golyamokonarsko shosse № 1 www.chipolino.com...
Need help?
Do you have a question about the BOLIDE and is the answer not in the manual?
Questions and answers