
Subscribe to Our Youtube Channel
Related Manuals for RS PRO RS-1161


Summary of Contents for RS PRO RS-1161
- Page 1 Instruction Manual RS-1161 127-8297 Datalogger Thermo-Hygro-Barometer...
-
Page 3: Table Of Contents
Datalogger Thermo-Hygro-Barometer / EN CONTENTS Title Page 1. INSTRUCTION ....................1 2. FEATURES AND APPLICATIONS ..............2 3. SPECIFICATIONS ..................... 3 4. PARTS & CONTROLS ..................4 4-1 Description of Parts & Control keys ............4 4-2 Description of Display ................6 5. -
Page 4: Instruction
Datalogger Thermo-Hygro-Barometer / EN 1. INSTRUCTION The meter is designed for measurement of temperature, relative humidity, atmospheric pressure and pressure tendency. Measured values can be stored in programmable interval into internal microSD CARD 4GB and transferred anytime to a PC. Measured values are displayed on a three line LCD display. -
Page 5: Features And Applications
Datalogger Thermo-Hygro-Barometer / EN 2. FEATURES AND APPLICATIONS Features: Triple LCD displays Barometric pressure, Temperature, and Relative humidity. Dew point and Wet bulb temperature reading. Absolute humidity, Mixing ratio and Enthalpy reading. Water vapor pressure and Water saturation pressure reading. ... -
Page 6: Specifications
Datalogger Thermo-Hygro-Barometer / EN 3. SPECIFICATIONS Measurement range: Humidity: 0% to 100%RH Temperature: -40 ℃ to +100 ℃ (-40 ℉ to +212 ℉ ) Atmospheric pressure: 300 to 1200hPa Resolution: 0.1% RH, 0.1℃, 0.1℉, 0.1hPa Accuracy: Temperature: ±0.4℃(at +5℃ to +60℃) ±0.8℃(at -20℃... -
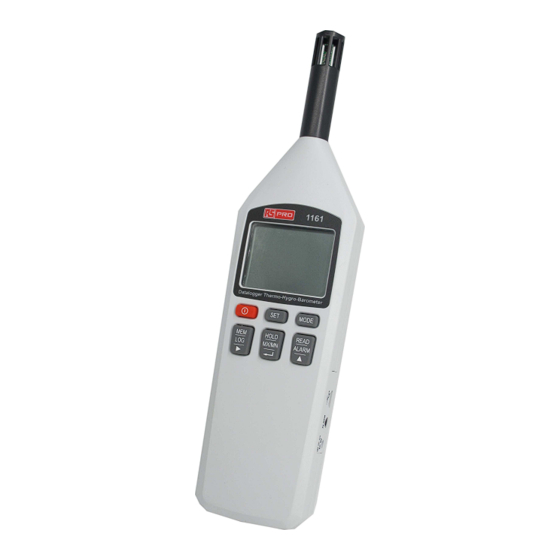
Page 7: Parts & Controls
Datalogger Thermo-Hygro-Barometer / EN 4. PARTS & CONTROLS 4-1 Description of Parts & Control keys: (1) Humidity, Temperature and Pressure Sensor tube. (2) Display Power key : Press Power key to turn the meter on or off. (4) SET key: Press SET key to enter the setting mode. Press key to exit this mode or press SET key for 3 seconds to exit setting mode. - Page 8 Datalogger Thermo-Hygro-Barometer / EN SET 05: Alarm sound on/off setting mode. SET 06: Auto power off time setting mode. SET 07: Auto datalogging interval time setting mode. SET 08: No-cycle timer datalogging setting mode. SET 09: Auto-cycle timer datalogging setting mode. SET 10: Clear the manual memorized data mode.
-
Page 9: Description Of Display
Datalogger Thermo-Hygro-Barometer / EN (9) Micro-USB (10) Alarm output jack: Allow output of a alarm signal is available from this jack. (11) AC adaptor power input jack (DC 9V). (12) Battery cover. (13) microSD CARD 4GB. (14) Tripod mounting: 1/4”-20 unc-female thread. 4-2 Description of Display: SET HOLD A : Datalogging mode indication. - Page 10 Datalogger Thermo-Hygro-Barometer / EN T: Difference of T and Td/f (T=T-Td/f) indication. Tw: Wetbulb temperature indication. Traditionally, the wet bulb temperature is the temperature indicated by a thermometer wrapped in a wet cotton sheath. а: Absolute humidity indication. Absolute humidity refers to the mass of water in a unit volume of moist air at a given temperature and pressure.
- Page 11 Datalogger Thermo-Hygro-Barometer / EN Pw: Water vapor pressure indication. Water vapor pressure is the pressure exerted by the water vapor present in air. Pws: Saturation vapor pressure indication. Saturation vapor pressure temperature dictates the maximum partial pressure of water vapor. g/kg, gr/lb: Mixing ratio units.
- Page 12 Datalogger Thermo-Hygro-Barometer / EN : Auto power off indication. ALM: Enable the alarm function indication. : Setting the high limit value indication. : Setting the low limit value indication. : Setting the hysteresis value indication. 02/15/17 Version No. 00...
-
Page 13: Operating Instructions
Datalogger Thermo-Hygro-Barometer / EN 5. OPERATING INSTRUCTIONS 5-1 Selecting Measurement units 1. Press key to turn on the meter. 2. Press SET key one time to enter the units setting mode, the “ SET ” mark is displayed. 3. Press key to select “℃” or “℉” this will now flash on the display. If “℃”... -
Page 14: Taking Measurements
Datalogger Thermo-Hygro-Barometer / EN 3. Using key to position the cursor on the date or time element to adjust. 4. Using key to change the selected date or time element value. 5. Press key to complete the action and exit this mode. 5-3 Taking Measurements 1. -
Page 15: Taking Maximum (Mx) & Minimum (Mn) Recorder Measurements
Datalogger Thermo-Hygro-Barometer / EN 5-4 Taking Maximum (MX) & Minimum (MN) Recorder Measurements 1. Press key to turn on the meter. 2. Press MX/MN key for 3 seconds to enter the previous recorded data mode, the “ ” mark is displayed. 3. -
Page 16: Setting The Display Refresh Mode
Datalogger Thermo-Hygro-Barometer / EN 5-5 Setting the Display Refresh Mode Battery life depends on select display refresh mode. In FAST mode, display is refreshed in shortest possible interval with highest current consumption. In dynamic mode display is refreshed in intervals up to 5s in case measured values remain stable. - Page 17 Datalogger Thermo-Hygro-Barometer / EN Mode 1: Only “high” setpoint set. MODE 2: Only “low” setpoint set. measured measured value value time Alarm is ON when value is Alarm is ON when value is above the setpoint. below the setpoint. Mode 3: Both setpoints set Mode 4: Both setpoints set “high”...
- Page 18 Datalogger Thermo-Hygro-Barometer / EN b). Press SET key 4 times to enter the alarm limit values setting mode, the “ SET ALM ” mark appears for 2 seconds then to enter the temperature limit value setting mode, the “ SET ALM T ℃ ”...
-
Page 19: Taking Data Filtering Measurements
Datalogger Thermo-Hygro-Barometer / EN o). Press key to store the dewpoint setting data. p). Press key again to exit the alarm limit values setting mode. 3. Setting the alarm sound ON/OFF a). Press key to turn on the meter. b). -
Page 20: Setting The Auto Power Off Time
Datalogger Thermo-Hygro-Barometer / EN 5. Press key to select the desired filter mode “ ”, “ ” (Standard), or “ ” (Weighted average). 6. Press key to exit. ” is selected, press key to position the cursor on the factor value If “... -
Page 21: Auto Datalogging
Datalogger Thermo-Hygro-Barometer / EN c). Press MODE key to display the measured and calculated reading and the stored date and time. d). Press key to exit the READ mode. 5-10 Auto Datalogging Only microSD CARD 4GB can be used. 1. -
Page 22: Auto-Cycle Timer Datalogging
Datalogger Thermo-Hygro-Barometer / EN 5-11 Auto-Cycle Timer Datalogging The auto cycle timer means the start-time and the record time is valid at all times. 1. Perform setting the Real-Time. (refer to 5-2) 2. Press SET key 9 times to enter the ON/OFF selecting mode, the “SET ”... -
Page 23: User Friendly Calibration Procedure
Datalogger Thermo-Hygro-Barometer / EN 4. Press key to enter the Stop-Time setting mode, the “STOP” mark is displayed. 5. Repeat step 3 above to complete the stop-time setting. 6. Press key to enter the Interval-Time setting mode, the “ ”... -
Page 24: Maintenance
Datalogger Thermo-Hygro-Barometer / EN g). Press key to complete the first point calibration and exit (1-point calibration) or to enter the second point calibration mode (2-point calibration), the “ ” mark is will blink on the display. h). Repeat step e and f above to complete the second point adjustment. i).
Need help?
Do you have a question about the RS-1161 and is the answer not in the manual?
Questions and answers