
Related Manuals for Leader LD-TF3.0

Summary of Contents for Leader LD-TF3.0
- Page 1 LD-TF3.0 FIVE-STAGE DISPENSER User Manual V1.0 2023.03 Please read this book carefully and keep it properly before using this product If you have any questions, please contact the sales personne...
-
Page 2: Cautions
Cautions Try not to plug and unplug the OSDK cable with power, otherwise it may cause damage to the OSDK interface, and the damage phenomenon is that the device cannot be controlled (under the premise of normal use before). Once damaged, you need to return to the factory to repair the OSDK interface of the drone, please pay attention to the order when operating, and both ends of the OSDK cable should be plugged in before the drone is powered on. -
Page 3: Table Of Contents
Catalogue Cautions ...............................1 Introduction ............................3 LD-TF3.0 ............................3 Part Name ............................. 3 Installation ............................4 Preparations ..........................4 Mount installation ........................4 Remote control APP installation ...................6 Control and Operation ......................18 Mount item operation ......................18 Remote control operation ....................19 Signal mode switching operation ..................20... -
Page 4: Introduction
Introduction LD-TF3.0 This product is based on DJI OSDK development of five-stage UAV airdrop device, its advantage is: OSDK communication control does not occupy the gimbal interface, customers do not need to purchase dual gimbal kit can use. The main... -
Page 5: Installation
Installation Preparations The following items need to be prepared before installation and use: M300RTK drone, remote control, TF card with APP installation package, quick release mount, five-stage dropper, OSDK special cable. Mount installation After the preparation is done, first install the quick release pylons under the drone, first remove the two fixing screws of the gimbal pylon, install the quick release pylons to the same hole, and use the attached screws and tools to install the four fixing screws. - Page 6 Install the five-segment injector to the quick-release pylon, align and push in, and after hearing the click, it means that it is locked, and the injector can be shaken to confirm whether the installation is secure.
-
Page 7: Remote Control App Installation
Insert the fuselage end of the special cable into the OSDK interface on the top of the drone, pay attention to the direction requirements, plug the single slot, face the outside of the drone, insert it to ensure the end and firm, and then insert the other end of the connection line into the OSDK interface of the five-segment injector, regardless of forward and reverse. - Page 8 Turn on the power of the remote control, the power of the drone, connect the remote control to a reliable WIFI or mobile phone hotspot after starting. Then click the menu icon in the lower right corner Click File Management...
- Page 9 Click on SD card Find and click on Lide.apk...
- Page 10 Click Next Click to install...
- Page 11 Wait for the installation to complete The application installation is complete, click Open...
- Page 12 The permission interface will pop up, and click Allow for all After waiting for the button to turn blue, click the GO button to log in (Note: If you have not registered successfully for a long time, press the back button to return to the application interface, and you can complete the registration after entering the APP again)
- Page 13 Pop-up prompt: Please open the floating window permission, click "Lide" APP, and enter the APP opening window Turn on switches that allow appearance on other apps...
- Page 14 When prompting "Floating window permission has been opened", press the back button and click "GO" again to log in Click DJI pilot2 to enter the app...
- Page 15 Enter the flight interface Skip pre-flight inspection...
- Page 16 Enter the camera interface Press the back button to return to the application interface and enter the Lide app again...
- Page 17 Click "GO" to log in The floating window will automatically appear in the application interface, click DJI pilot2 again to enter the app...
- Page 18 Skip the flight interface and pre-flight inspection and enter the camera interface (the floating window can be dragged according to personal operating habits)
-
Page 19: Control And Operation
Control and Operation Mount item operation After the installation of the APP and equipment to complete the connection with the drone and power on, the five-stage projector will automatically enter the initial position. Then tap the physical button on the five-stage dropper, press the physical button each time, open a casting claw, when opened, move the rope of the item to be placed within the locking range of the casting claw, press it five times in turn, and after mounting five drop items, you can take off. -
Page 20: Remote Control Operation
Remote control operation By observing the vertical view of the camera to the ground, when flying above the mission target, tap the SW1 icon in the floating window to start the delivery, when the button is blue, it is the drop state, and when gray, it is the reset state. When blue: delivery status When gray: reset state After returning to the take-off point, you can use the physical buttons to mount the... -
Page 21: Signal Mode Switching Operation
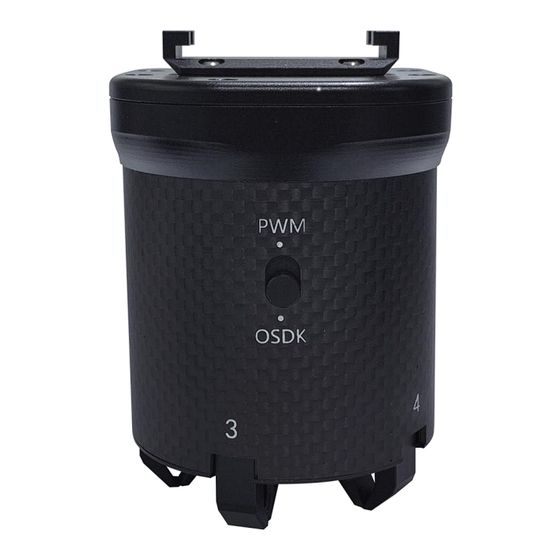
Signal mode switching operation When using the M300RTK drone, turn the signal selection knob to the direction of OSDK. When customers need to use a third-party drone, they can use an external receiver or PWM signal line to connect the PWM interface of the 5-segment injector, the interface specification is DuPont 2.54mm 3P, pay attention to the shell wiring definition, the interface provides a 5V2A DC power supply, the identification signal frequency is 1.0ms ~ 2.0ms 50HZ two-step switching signal, can not use a voltage... -
Page 22: Spec
SPEC Specifications Product size 62mm*62mm*92mm Outer packing box 252mm*217mm*121mm Weight 295g Electrical interface OSDK Rated power Supply voltage Input voltage of type-c port 5~24V Control mode OSDK+APP control Same communication distance with UAV (M300RTK) Control distance If a third party UAV is used for mounting, the control distance depends on the remote control Installation method Quick-release type...
Need help?
Do you have a question about the LD-TF3.0 and is the answer not in the manual?
Questions and answers
معي مشكله وهيا بعد تركيب الحامل وتثبيت التطبيق من SD وبعد ان يطلب الاذونات وتمكينها لم يتم تسجيل الدخول فانا أريد حل المشكلة
هل المنتج قابل للاستخدام في الطائرة ماترس 350 وكيف طريقة الاستخدام