Table of Contents
Advertisement
Available languages
Available languages
Quick Links
©Anker Innovations Limited. All rights reserved.
NEBULA and the NEBULA logo are trademarks
of Anker Innovations Limited, registered in the
United States and other countries. All other
trademarks are the property of their respective
owners.
Model:
D2323
www.ankerjapan.com
support@anker.com
+1 (800) 988 7973 (US) Mon-Fri 9:00am - 5:00pm (PT)
+44 (0) 1604 936200 (UK) Mon-Fri 6:00 - 11:00 (GMT)
+49 (0) 69 9579 7960 (DE) Mo-Fr 6:00 - 11:00
+81 03 4455 7823 ( 日本 ) 月 - 金 9:00-17:00
V01
Advertisement
Table of Contents

Related Manuals for Anker Nebula Mars II Pro


Summary of Contents for Anker Nebula Mars II Pro
- Page 1 +81 03 4455 7823 ( 日本 ) 月 - 金 9:00-17:00 ©Anker Innovations Limited. All rights reserved. NEBULA and the NEBULA logo are trademarks of Anker Innovations Limited, registered in the United States and other countries. All other trademarks are the property of their respective owners.
- Page 2 Nebula Mars II Pro Mars Ⅱ User Manual Owner’s Manual...
- Page 3 English Deutsch Español Français Italiano Português Türkçe 日本語 简体中文 لع َ ر َ ب ِ ية ע ִ ב ְר ִ ית...
-
Page 4: Safety Instructions
Safety Instructions Read and understand all instructions before you use this device. Do not make any changes or settings that are not described in this manual. If physical injury, loss of data or damage is caused by failure to follow instructions, the warranty does not apply. - Page 5 Power Supply • Use only the provided power adapter. • Power off the device before removing the power supply from the socket. • Protect the power cord from being walked on or pinched, particularly at plugs, convenience receptacles, and the point where they exit from this device.
- Page 6 Cleaning • Power off the device and remove it from the power supply before cleaning the surface. • Use a soft, lint-free cloth. Never use liquid, gaseous, or easily flammable cleansers (like sprays, abrasives, polishes, and alcohol). • Do not use any liquid cleaning agents to clean the lens as they may damage the protective coating on the lens.
-
Page 7: What's Included
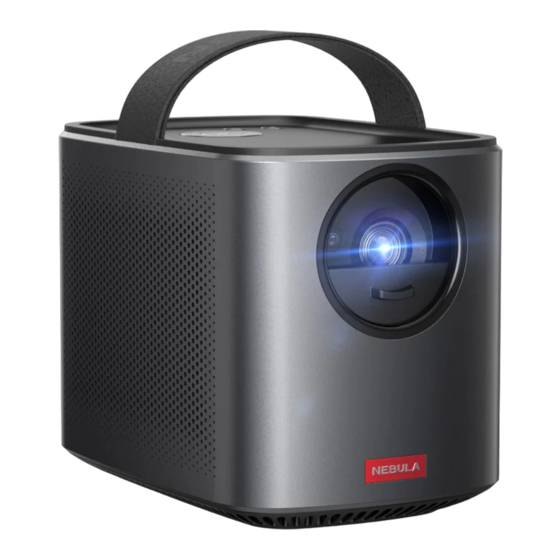
What’s Included Main unit Remote control with batteries Owner’s Manual Power Adapter Power cord Manual Overview 1. Front View Lens Handle Lens cover • Slide down to power on and automatically adjust focus • Slide up to power off Loudspeaker... -
Page 8: Rear View
2. Rear View DC IN • Connect to power supply HDMI • Connect to a playback device with HDMI output • Connect to a USB storage device • Charge a USB device as a power bank AUDIO OUT • Connect to a headphone or an external speaker Infrared Receiver Air ventilation (outlet) Air ventilation (inlet) -
Page 9: Top View
3. Top View LED indicators • Power level Navigation buttons • Navigate menus or adjust the selected contents • Press to confirm a selection or entry • Pause / resume play • Volume up / down • Return to the previous menu •... -
Page 10: Bottom View
4. Bottom View Tripod socket 5. Remote Control... - Page 11 Adjust Focus Navigation Back Power On / Off Mouse mode Confirm the selected content Home System Settings Volume Up / Down...
-
Page 12: Getting Started
Getting Started 1. Placement Place Mars II Pro on a stable, flat foundation in front of the projection surface. For the best results, the projection surface should be white and flat. The distance between the projector and the projection surface must be a minimum of 1 meter (39.4 inches) and a maximum of 3 meters (118 inches). -
Page 13: Prepare The Remote Control
2. Prepare the Remote Control ① For first-time use, remove the plastic battery insulation tab to activate the remote control batteries. ② To replace the battery, slide off the battery compartment backplate to open the battery compartment, insert new batteries (matching the polarity (+/-) indicated), and close the battery compartment. -
Page 14: Nebula App
Nebula App To easily control the projector, we recommend you to download the devoted Nebula App, Nebula Connect. Using this app, you can use your smartphone’s keyboard to input text and control the projector by operating a mouse on the screen. ①... - Page 15 Projector Mode You can connect Bluetooth headphones or a speaker to Mars II Pro while it’s in projector mode. ① On the home menu, select [Settings] > [Bluetooth] and press ② Follow the on-screen instructions to complete the Bluetooth connection. 3.
-
Page 16: App Manager
4. App Manager ① On the home menu, select [Settings] > [App Manager] and press ② Select an app and check the current version, open or force stop, check the storage used, clear data or cache, or uninstall it. When more than 3 apps are installed, you can select [All] at the bottom line of the home page to enter the [Apps] page. - Page 17 Using the Nebula Mars II Pro 1. Connect to HDMI Playback Devices This projector supports connections with various HDMI playback devices such as TV stick, TV box, DVD player, set-top box (STB), game console or other devices. ① Connect this projector to an HDMI playback device with an HDMI cable (not provided).
- Page 18 Certain content may be unavailable to be cast due to copyright restrictions. In this case, you can stream the content via the same app installed in your Nebula Mars II Pro. 3. Select an App Once connected to a wireless network, you can access online services, enjoy movies, music, and pictures, and browse online.
-
Page 19: Specifications
Specifications Specifications are subject to change without notice. Power supply: DC 19V Power consumption: < 57W Standby power consumption: < 0.5W Display technology: 0.3 inch 1280 × 720p DLP Light source: RGB LED Projection image size: 30 - 150 inch Resolution: 1280 ×... -
Page 20: Troubleshooting
Troubleshooting ① Fail to power on by the remote control? • Make sure that the device is connected to the power supply. • Slide down the lens cover. ② Fail to power on by sliding down the lens cover? • Make sure that the device is connected to the power supply. •... - Page 21 Declaration of Conformity This product complies with the radio interference requirements of the European Community. Hereby, Anker Innovations Limited. declares that this device is in compliance with the essential requirements and other relevant provisions of Directive 2014/53/EU. For the Declaration of Conformity, visit the Web site www.seenebula.com.
- Page 22 interference, and (2) This device must accept any interference received, including interference that may cause undesired operation. Warning: Changes or modifications not expressly approved by the partly responsible for compliance could void the user’s authority to operate the equipment. Note: This equipment has been tested and found to comply with the limits for a Class B digital device, pursuant to part 15 of the FCC Rules.
-
Page 23: Warranty
® The Bluetooth word mark and logos are registered trademarks owned by the Bluetooth SIG, Inc. and any use of such marks by Anker Innovations Limited is under license. Other trademarks and trade names are those of their respective owners. - Page 24 Sicherheitsinformationen Lesen Sie alle Anweisungen sorgfältig durch, bevor Sie dieses Gerät verwenden. Nehmen Sie keine Änderungen oder Einstellungen vor, die nicht in diesem Handbuch beschrieben sind. Wenn Personenschäden, Datenverluste oder Schäden auf eine Missachtung der Anweisungen zurückzuführen sind, greift die Garantie nicht. Einrichtung •...
- Page 25 Plastikbeutel zu versiegeln, bevor Sie es in einen anderen Raum bewegen. Warten Sie danach ein bis zwei Stunden, bis Sie das Gerät wieder aus dem Beutel nehmen. Stromversorgung • Verwenden Sie ausschließlich das mitgelieferte Netzteil. • Schalten Sie das Gerät aus, bevor Sie das Netzteil aus der Steckdose ziehen.
- Page 26 Reinigung • Schalten Sie das Gerät aus und trennen Sie es von der Stromversorgung, bevor Sie die Oberfläche reinigen. • Verwenden Sie ein weiches, fusselfreies Tuch. Verwenden Sie niemals flüssige, gasförmige oder leicht entzündliche Reinigungsmittel (wie Sprays, Scheuermittel, Polituren und Alkohol). •...
- Page 27 Im Lieferumfang Hauptkörper Fernbedienung mit Batterien Main unit Remote control with batteries Owner’s Manual Ladegerät Ladekabel Bedienungsanleitung Power Adapter Power cord Manual Übersicht 1. Vorderseite Objektiv Griff Objektivabdeckung • Nach unten ziehen, um das Gerät einzuschalten und den Fokus automatisch anzupassen •...
- Page 28 2. Rückseite DC IN • Verbindung zur Stromversorgung HDMI • Verbindung zu einem Wiedergabegerät mit HDMI®-Ausgang • Verbindung zu einem USB-Speichergerät • USB-Gerät als Powerbank aufladen AUDIO OUT • Verbindung zu einem Kopfhörer oder einem externen Lautsprecher Infrarotempfänger Belüftung (Austritt) Belüftung (Einlass) RESET •...
- Page 29 3. Oberseite LED-Anzeigen • Ladestand Navigationstasten • Navigieren in den Menüs oder Anpassen der ausgewählten Inhalte • Zum Bestätigen einer Auswahl oder Eingabe drücken • Pause / Wiedergabe fortsetzen • Lauter / leiser • Zurück zum vorherigen Menü • Zum Aktivieren / Deaktivieren des Bluetooth-Modus drücken •...
- Page 30 4. Unterseite Stativsockel 5. Fernbedienung...
- Page 31 Fokus anzupassen Navigation Zurück Ein- / Ausschalten Mausmodus Bestätigen Sie den ausgewählten Inhalt Home Systemeinstellungen Lauter / leiser...
- Page 32 Erste Schritte 1. Platzierung Platzieren Sie den Mars II Pro auf einer stabilen, ebenen Oberfläche vor der Projektionsfläche. Die besten Ergebnisse erzielen Sie mit einer weißen und ebenen Projektionsfläche. Der Abstand zwischen dem Projektor und der Projektionsfläche muss mindestens 1 Meter und darf höchstens 3 Meter betragen.
-
Page 33: Vorbereiten Der Fernbedienung
2. Vorbereiten der Fernbedienung ① Entfernen Sie vor der ersten Verwendung die Batterieschutzfolie von der Fernbedienung. ② Zum Auswechseln der Batterien öffnen Sie die Batteriefachabdeckung, legen Sie die neuen Batterien ein (unter Beachtung des Polaritätsdiagramms [+/-]), und schließen Sie die Batteriefachabdeckung wieder. 3. - Page 34 Nebula App Zur leichteren Bedienung dieses Projektors empfehlen wir Ihnen den Download von Nebula Connect, einer speziell für Nebula entwickelten App. Mit dieser App können Sie Text über die Tastatur Ihres Smartphones eingeben und das Display als Maus verwenden. ① Laden Sie die Nebula Connect-App aus dem App Store (iOS-Geräte) oder bei Google Play (Android) herunter.
- Page 35 Projektor-Modus Während der Mars II Pro sich im Projektor-Modus befindet, können Sie eine Bluetooth-Verbindung zu einem Kopfhörer oder einem Lautsprecher herstellen. ① Wählen Sie im Home-Menü [Einstellungen] > [Bluetooth] aus und drücken Sie auf ② Befolgen Sie die Bildschirmanweisungen, um die Bluetooth- Verbindung herzustellen.
- Page 36 4. App-Manager ① Wählen Sie im Home-Menü [Einstellungen] > [App-Manager] aus und drücken Sie auf ② Wählen Sie eine App aus. Sie können nun die aktuelle Version prüfen, die App öffnen oder das Beenden erzwingen, den belegten Speicherplatz überprüfen oder Daten löschen bzw. den Cache leeren oder die App deinstallieren.
- Page 37 Version der Firmware vorzunehmen. [Info] Alle Daten im integrierten Speicher werden [Zurücksetzen] gelöscht. Verwenden des Nebula Mars II Pro 1. Verbindung zu HDMI-Wiedergabegeräten Dieser Projektor unterstützt Verbindungen mit verschiedenen HDMI- Wiedergabegeräten, z. B. TV-Box oder -Stick, DVD-Player, Set-Top-Box (STB), Spielkonsole oder anderen Geräten.
- Page 38 Inhalte nicht verfügbar. In diesen Fällen können Sie den Inhalt direkt über dieselbe App abspielen, die auf Ihrem Nebula Mars II Pro installiert ist. 3. Auswählen einer App Sobald die Verbindung zu einem WLAN besteht, können Sie auf Online- Services zugreifen, Filme, Musik und Bilder genießen und im Internet...
-
Page 39: Technische Daten
4. Verbindung zu einem USB-Speichergerät Sie können mit diesem Projektor über ein OTG-Kabel (nicht im Lieferumfang enthalten) Musik, Videos und Bilder von einem USB 2.0-Speichergerät genießen oder darauf abgelegte Apps installieren. ① Wählen Sie im Home-Menü [Datei-Manager] aus und drücken Sie ②... -
Page 40: Fehlerbehebung
Kapazität: 3350 mAh 14.52 V Videowiedergabekapazität: 3 Stunden Musikwiedergabekapazität: 30 Stunden Batterien der Fernbedienung: CR2032 x 2 Betriebstemperatur: 0° C bis 35 °C Betriebsluftfeuchtigkeit: 15 % ~ 85 % (nicht kondensierend) Lagertemperatur und Luftfeuchtigkeit: < 65 °C, < 90 % relative Luftfeuchtigkeit Abmessungen (B x H x T): 122 × 138 × 178 mm Gewicht: 1.483 g Fehlerbehebung ①... -
Page 41: Garantie
Garantie Unkomplizierte 30-Tage-Geld-zurück-Garantie Wenn Sie das unbeschädigte Produkt in der unbeschädigten Originalverpackung innerhalb von 30 Tagen ab Kaufdatum zurückgeben, wird Ihnen der GESAMTE KAUFPREIS ERSTATTET. Wenn der Grund für die Rücksendung allerdings kein Qualitätsmangel ist, trägt der Kunde die Versandkosten für die Rücksendung. 12 Monate Garantie bei qualitätsbezogenen Problemen Nebula Produkte sind für einen Zeitraum von 12 Monaten ab dem Kaufdatum gegen Material- und Verarbeitungsfehler garantiert. -
Page 42: Instrucciones De Seguridad
Instrucciones de seguridad Lea y comprenda todas las instrucciones antes de utilizar este dispositivo. No realice cambios ni ajustes que no estén descritos en este manual. En caso de producirse daños físicos, pérdida de datos o daños por no seguir las instrucciones, no se aplicará la garantía. Configuración •... - Page 43 selle el dispositivo en una bolsa de plástico antes de moverlo a otra habitación y espere una o dos horas antes de sacarlo de la bolsa. Fuente de alimentación • Utilice solo el adaptador de alimentación suministrado. • Apague el dispositivo antes de retirar la fuente de alimentación de la toma.
- Page 44 Limpieza • Apague el dispositivo y desconéctelo de la fuente de alimentación antes de limpiar la superficie. • Utilice un paño suave y sin pelusa. No utilice limpiadores líquidos, gaseosos o fácilmente inflamables (como pulverizadores, abrasivos, ceras o alcohol). • No utilice agentes de limpieza líquidos para limpiar la lente, ya que podrían dañar el revestimiento de protección.
-
Page 45: Descripción General
Contenido Unidad Principal Control Remoto con pilas Main unit Remote control with batteries Owner’s Manual Cargador de Cable de Manual de Usuario Power Adapter Power cord Manual Alimentación Corriente Descripción general 1. Vista frontal Lente Cubierta de la lente • Deslizar hacia abajo para encender y ajustar el enfoque automáticamente •... -
Page 46: Vista Posterior
2. Vista posterior Entrada de CC • Conectar a una fuente de alimentación HDMI • Conectar a un dispositivo de reproducción con salida HDMI • Conectar a un dispositivo de almacenamiento USB • Cargar un dispositivo USB como una batería externa SALIDA DE AUDIO •... -
Page 47: Vista Superior
3. Vista superior Indicadores LED • Nivel de potencia Botones de navegación • Navegar por los menús o ajustar los contenidos seleccionados • Pulsar para confirmar una selección o entrada • Pausar/reanudar la reproducción • Subir/bajar volumen • Volver al menú anterior •... -
Page 48: Vista Inferior
4. Vista inferior Soporte para trípode 5. Mando a distancia... - Page 49 Ajustar enfoque Navegación Atrás Encender/Apagar modo ratón Confirmar el contenido seleccionado Inicio Configuración del sistema Subir/Bajar volumen...
-
Page 50: Primeros Pasos
Primeros pasos 1. Colocación Coloque el dispositivo Mars II Pro sobre una superficie plana y estable, delante de la superficie de proyección. Para obtener los mejores resultados, la superficie de proyección debería ser blanca y plana. La distancia entre el proyector y la superficie de proyección debe ser de un mínimo de 1 metro y un máximo de 3 metros. -
Page 51: Preparación Del Mando A Distancia
2. Preparación del mando a distancia ① La primera vez que lo use, retire la lengüeta de plástico protectora de la batería para activar las pilas del mando a distancia. ② Para reemplazar las pilas, retire la tapa posterior del compartimento de las pilas para abrirlo, inserte las pilas nuevas (haciendo coincidir la polaridad (+/-) como se indica), y cierre el compartimento. - Page 52 Aplicación Nebula Para controlar fácilmente este proyector, le recomendamos que descargue la aplicación Nebula Connect de Nebula. La aplicación le permite usar el teclado de su smartphone para introducir texto y usar la pantalla a modo de ratón. ① Descargue la aplicación Nebula Connect desde App Store (dispositivos iOS) o Google Play (dispositivos Android).
- Page 53 Modo de proyector Puede conectar un altavoz o unos auriculares Bluetooth a Marte II mientras se encuentra en el modo de proyección. ① En el menú de Inicio, seleccione [Configuración] > [Bluetooth] y pulse ② Siga las instrucciones que aparecen en pantalla para completar la conexión Bluetooth.
- Page 54 4. Gestor de aplicaciones ① On the home menu, select [Settings] > [App Manager], and press ② Seleccione una aplicación para comprobar la versión actual, abrirla o forzar el cierre, comprobar el almacenamiento usado, borrar datos, borrar la memoria caché o desinstalarla. Cuando haya más de 3 aplicaciones instaladas, seleccione [Todas] en la parte inferior de la página de inicio para acceder a la página [Aplicaciones].
- Page 55 Se borrarán todos los datos guardados en el [Recuperación] almacenamiento integrado. Uso de Nebula Mars II Pro 1. Conexión a dispositivos de reproducción HDMI Este proyector es compatible con diversos dispositivos de reproducción HDMI, como TV Box, TV Stick, reproductores de DVD, set-top box (STB), consolas de videojuegos y otros dispositivos.
- Page 56 Es posible que no puedan compartirse ciertos contenidos debido a restricciones de copyright. En este caso, podrá reproducir el contenido directamente utilizando la misma aplicación instalada en Nebula Mars II Pro. 3. Selección de una aplicación Una vez conectado a una red inalámbrica, puede acceder a los servicios en línea, disfrutar de películas, música y fotografías, y...
-
Page 57: Especificaciones
4. Conexión al dispositivo de almacenamiento USB Con este proyector puede disfrutar de música, vídeos e imágenes, o instalar aplicaciones guardadas en un dispositivo de almacenamiento USB 2.0 mediante el cable OTG (no incluido). ① En el menú de Inicio, seleccione [Administrador de archivos] y pulse ②... -
Page 58: Resolución De Problemas
Duración de la reproducción de vídeo: 3 horas Duración de la reproducción de música: 30 horas Pilas del mando a distancia: CR2032 × 2 Temperatura de funcionamiento: de 0 °C to 35 °C Humedad de funcionamiento: 15 % ~ 85 % (sin condensación) Temperatura y humedad de almacenamiento: < 65 °C, < 90 % humedad Dimensiones (anchura x altura x profundidad): 122 ×... - Page 59 Garantía Garantía de devolución del dinero de 30 días por cualquier motivo Puede devolver el producto y el embalaje intactos en un plazo de 30 días desde la compra para recibir un REEMBOLSO COMPLETO por cualquier razón. Si el motivo de la devolución no está relacionado con la calidad, el cliente deberá...
-
Page 60: Consignes De Sécurité
Consignes de sécurité Veuillez lire et comprendre toutes les instructions avant d’utiliser cet appareil. N’apportez pas de modifications ou de paramètres qui ne sont pas décrits dans ce manuel. En cas de lésions corporelles, de pertes de données ou de dommages pour cause de non-respect des instructions, la garantie ne s’applique pas. - Page 61 b) après le réchauffement d’une salle froide ; c) lorsque l’appareil est placé dans une salle humide. Pour éviter toute humidité, sceller l’appareil dans un sac plastique avant de le déplacer vers une autre pièce, et attendre une à deux heures avant de le retirer du sac. Alimentation •...
- Page 62 Nettoyage • Mettre l’appareil hors tension et le déconnecter de l’alimentation avant de nettoyer la surface. • Utiliser un chiffon doux non pelucheux. Ne jamais utiliser de produits liquides, gazeux, ou facilement inflammables (comme des aérosols, des produits abrasifs, des produits à polir ou de l’alcool). •...
-
Page 63: Ce Qui Est Inclus
Ce qui est inclus Unité principale Télécommande avec piles Main unit Remote control with batteries Owner’s Manual Cordon Manuel Power Adapter Adaptateur Power cord Manual d'alimentation secteur Présentation 1. Vue avant Objectif Poignée Couvercle de l’objectif • Faire glisser vers le bas pour mettre sous tension et régler automatiquement la mise au point... -
Page 64: Vue Arrière
2. Vue arrière ENTRÉE CC • Raccordement de l’alimentation HDMI • Connexion d’un périphérique de lecture avec sortie HDMI • Connexion à un périphérique de stockage USB • Chargement d’un périphérique USB comme un chargeur SORTIE AUDIO • Connexion à un casque ou à un haut-parleur externe Récepteur infrarouge Ventilation (sortie d’air) Ventilation (entrée d’air) -
Page 65: Vue De Dessus
3. Vue de dessus Voyants LED • Niveau d’alimentation Boutons de navigation • Parcourir les menus ou ajuster le contenu sélectionné • Appuyer pour confirmer une sélection ou une saisie • Mettre en pause/reprendre la lecture • Augmenter/diminuer le volume •... - Page 66 4. Vue de dessous Attache du trépied 5. Télécommande...
- Page 67 Ajuster la mise au point Navigation Arrière Marche/arrêt mode souris Confirmer le contenu sélectionné Accueil Paramètres du système Augmenter/diminuer le volume...
-
Page 68: Pour Démarrer
Pour démarrer 1. Placement Placer Mars II Pro sur une table stable et plate, en face de la surface de projection. Pour de meilleurs résultats, la surface de projection doit être de couleur blanche et plane. La distance entre le projecteur et la surface de projection doit être de 1 mètre (39,4 pouces) minimum et 3 mètres (118 pouces) maximum. -
Page 69: Préparer La Télécommande
2. Préparer la télécommande ① Pour la première utilisation, retirer la languette de protection en plastique des piles pour activer les piles de la télécommande. ② Pour remplacer les piles, faire glisser le fond du compartiment de piles pour ouvrir le compartiment, insérer de nouvelles piles (en faisant correspondre la polarité... - Page 70 Application Nebula Pour contrôler facilement ce projecteur, nous vous recommandons de télécharger l’application Nebula dédiée, Nebula Connect. Cette application vous permet d’utiliser le clavier de votre smartphone pour saisir du texte et utiliser l’écran comme une souris. ① Télécharger l’application Nebula Connect sur l’App Store (appareils iOS) ou Google Play (appareils Android).
- Page 71 Mode projecteur Vous pouvez connecter un casque Bluetooth ou un haut-parleur à Mars II Pro pendant qu’il est en mode projecteur. ① Dans le menu d’accueil, appuyer sur [Paramètres] > [Bluetooth] et appuyer sur ② Suivre les instructions à l’écran pour établir la connexion Bluethooth. 3.
-
Page 72: Gestionnaire D'application
4. Gestionnaire d’application ① Dans le menu d’accueil, sélectionner [Paramètres] > [Gestionnaire d'application] et appuyer sur ② Sélectionner une application pour en vérifier la version actuelle, l’ouvrir ou en forcer la fermeture, vérifier l’espace utilisé, effacer des données ou le cache, ou la désinstaller. Lorsque plus de 3 applications sont installées, vous pouvez sélectionner [Toutes] en bas de la page d'accueil pour accéder à... - Page 73 Toutes les données sur le stockage interne paramètres d’usine] seront effacées. Utilisation de Nebula Mars II Pro 1. Se connecter à des dispositifs de lecture HDMI Ce projecteur prend en charge la connexion à divers dispositifs de lecture HDMI tels que Ies récepteurs TV, les clés TV, les lecteurs DVD, les boîtiers décodeurs, les consoles de jeux ou autres appareils.
- Page 74 Screen Cast en raison de restrictions de droit d'auteur. Dans ce cas, vous pouvez en reproduire le contenu directement via la même application installée sur votre Nebula Mars II Pro. 3. Sélectionner une application Une fois connecté à un réseau sans fil, vous pouvez accéder aux services en ligne, profiter de films, de musique et d’images, ainsi que...
-
Page 75: Spécifications
4. Se connecter à un dispositif de stockage USB Avec ce projecteur, vous pouvez reproduire de la musique, des vidéos et des images, ou installer des applications stockées sur un dispositif de stockage USB 2.0, en utilisant le câble OTG (non fourni). ①... -
Page 76: Dépannage
Capacité : 3350 mAh 14.52 V Durée de lecture de la vidéo : 3 heures Durée de lecture de la musique : 30 heures Piles de la télécommande : 2 × CR2032 Température de fonctionnement : 0 °C à 35 °C / 32 °F à 95 °F Humidité de fonctionnement : 15 % ~ 85 % (sans condensation) Température et humidité... - Page 77 Garantie Garantie de remboursement sous 30 jours pour toute raison Vous pouvez retourner votre produit en bon état et dans son emballage dans les 30 jours suivant l’achat pour recevoir un remboursement complet pour quelque raison que ce soit. Si le motif de retour n’est pas lié...
-
Page 78: Informazioni Sulla Sicurezza
Informazioni sulla sicurezza Leggere e comprendere tutte le istruzioni fornite in questo manuale prima di utilizzare il dispositivo. Non apportare modifiche o effettuare impostazioni non descritte in questo manuale. La garanzia non si applica in caso di lesioni fisiche, perdita di dati o danni causati dal mancato rispetto delle istruzioni. - Page 79 in una stanza umida. Per evitare la formazione di umidità, sigillare il dispositivo in una busta di plastica prima di spostarlo in un’altra stanza e attendere da una a due ore prima di estrarlo dalla busta. Alimentazione • Utilizzare solo l’adattatore di alimentazione fornito in dotazione. •...
- Page 80 Pulizia • Spegnere il dispositivo e rimuoverlo dalla presa di alimentazione prima di pulire la superficie. • Utilizzare un panno morbido e privo di lanugine. Non utilizzare mai detergenti liquidi, gassosi o facilmente infiammabili (come spray, detergenti abrasivi, lucidanti e alcol). •...
- Page 81 Contenuto Unità principale Telecomando con Main unit Remote control with batteries batterie Owner’s Manual Adattatore di Cavo di Manuale Power Adapter Power cord Manual alimentazione alimentazione Panoramica 1. Vista anteriore Obiettivo Maniglia Coperchio obiettivo • Scorrere verso il basso per accendere e regolare automaticamente la messa a fuoco •...
-
Page 82: Vista Posteriore
2. Vista posteriore DC IN • Collegamento all’alimentazione HDMI • Collegamento a un dispositivo di riproduzione con uscita HDMI • Collegamento a un dispositivo di archiviazione USB • Caricamento di un dispositivo USB come power bank AUDIO OUT • Collegamento delle cuffie o di un altoparlante esterno Ricevitore a infrarossi Aerazione (uscita aria) Aerazione (ingresso aria) -
Page 83: Vista Dall'alto
3. Vista dall’alto Indicatori LED • Livello di carica Pulsanti di navigazione • Per spostarsi nei menu o modificare i contenuti selezionati • Per confermare una selezione o un’immissione • Mette in pausa/riprende la riproduzione • Per alzare/abbassare il volume •... - Page 84 4. Vista dal basso Attacco per cavalletto 5. Telecomando...
- Page 85 Regolazione della messa a fuoco Navigazione Parte posteriore Accensione/spegnimento modalità mouse Conferma del contenuto selezionato Base di ricarica Impostazioni di sistema Aumento/Diminuzione del volume...
- Page 86 Per iniziare 1. Posizionamento Posizionare il Mars II Pro su un tavolo stabile e piano davanti alla superficie di proiezione. Per ottenere i migliori risultati, la superficie di proiezione deve essere bianca e piana. La distanza tra il proiettore e la superficie di proiezione deve essere minimo 1 metro e massimo 3 metri.
-
Page 87: Preparazione Del Telecomando
2. Preparazione del telecomando ① Per il primo utilizzo, rimuovere la linguetta protettiva in plastica per attivare le batteria del telecomando. ② Per sostituire le batterie, estrarre la piastra del vano batterie per aprire il coperchio del vano batterie, inserire le nuove batterie (facendo corrispondere la polarità... - Page 88 App Nebula Per controllare facilmente il proiettore, consigliamo di scaricare l’app Nebula dedicata, Nebula Connect. Utilizzando questa app, è possibile utilizzare la tastiera dello smartphone per inserire il testo e lo schermo dello smartphone come mouse. ① Scaricare l’app Nebula Connect dall’App Store (dispositivi iOS) o da Google Play (dispositivi Android).
- Page 89 Modalità proiettore È possibile collegare delle cuffie Bluetooth o un altoparlante al Mars II Pro mentre si trova in modalità proiettore. ① Nel menu Home, selezionare [Impostazioni] > [Bluetooth] e premere ② Seguire le istruzioni visualizzate sullo schermo per completare la connessione Bluetooth.
-
Page 90: Altre Impostazioni
4. Gestione app ① Nel menu Home, selezionare [Impostazioni] > [Gestione app] e premere ② È possibile selezionare un’app e verificare la sua versione corrente, aprire l’app o forzarne l’arresto, controllare la quantità di memoria utilizzata o cancellarne i dati oppure disinstallare l’app. Se sono installate più... - Page 91 Tutti i dati della memoria incorporata verranno [Ripristino] cancellati. Uso di Nebula Mars II Pro 1. Collegamento ai dispositivi di riproduzione HDMI Questo proiettore supporta i collegamenti a vari dispositivi di riproduzione HDMI, ad esempio TV box, TV stick, lettori DVD, decoder, console per videogiochi o altri dispositivi.
- Page 92 In questo caso, è possibile riprodurre il contenuto utilizzando direttamente la stessa app installata su Nebula Mars II Pro. 3. Selezione di un’app Una volta connessi a una rete wireless, è possibile accedere ai servizi online, godersi film, musica e foto e navigare in Internet.
- Page 93 4. Collegamento a un dispositivo di archiviazione USB Con questo proiettore, è possibile godere di musica, video e foto o installare app memorizzate su un dispositivo di archiviazione USB 2.0 utilizzando il cavo OTG (non in dotazione). ① Nel menu Home, selezionare [Gestione file] e premere ②...
-
Page 94: Risoluzione Dei Problemi
Tipo batteria incorporata: Polimeri di litio Capacità: 3350 mAh 14,52V Durata riproduzione video: 3 ore Durata riproduzione audio: 30 ore Batterie telecomando: CR2032 × 2 Temperatura di esercizio: Da 0°C a 35°C Umidità operativa: 15% ~ 85% (senza condensa) Temperatura e umidità di conservazione: < 65 °C, < 90% di umidità Dimensioni (L ×... -
Page 95: Garanzia
Garanzia 30 giorni di garanzia “soddisfatti o rimborsati” per qualsiasi motivo È possibile restituire il prodotto integro e la sua confezione entro 30 giorni dalla data di acquisto per ricevere un RIMBORSO COMPLETO per qualsiasi motivo. Se il motivo della restituzione non è relativo alla qualità, il cliente dovrà... - Page 96 Instruções Relativas à Segurança Leia e procure entender todas as instruções antes de usar o seu projetor. Nãofaça quaisquer alterações ou configurações que não estejam descritas neste manual. A garantia deixa de ser aplicável caso lesões físicas, perda de dados ou danos sejam causados pela não observância às instruções abaixo.
- Page 97 dispositivo em um saco plástico antes de movê-lo para outra e espere de uma a duas horas antes de tirá-lo do saco plástico. Fonte de Alimentação • Use apenas o adaptador de tomada fornecido. • Desligue o projetor antes de retirar a fonte de alimentação do tomada. •...
- Page 98 Limpeza • Use um pano macio e livre de fiapos. Jamais utilize produtos de limpeza gasosos ou de fácil combustão (sprays, abrasivos, polidores, álcool) para limpar o projetor. • Não utilize agentes líquidos de limpeza para limpar a lente a fim de evitar danos à...
-
Page 99: Conteúdo Da Embalagem
Conteúdo da Embalagem Projetor Controle remoto com pilhas Main unit Remote control with batteries Owner’s Manual Adaptador de Cabo de Manual Power Adapter Power cord Manual tomada alimentação Visão Geral 1. Vista Frontal Lente Alça Protetor da lente • Desloque para baixo para ligar e ajustar automaticamente o foco •... -
Page 100: Vista Traseira
2. Vista Traseira Tomada DC IN • Conecte-a ao cabo de alimentação. Tomada HDMI • Conecte-a um aparelho de vídeo com saída HDMI. Tomada USB • Conecte-a a um dispositivo de memória USB. • Serve também para carregar o dispositivo. Tomada AUDIO OUT •... - Page 101 3. Vista do Topo LEDs indicadores • Nível de potência Teclas de navegação • Para navegar pelos menus ou ajustar os conteúdos selecionados. • Pressione para confirmar uma seleção ou item. • Pausa / voltar à reprodução. • VPressione para aumentar ou reduzir o volume. •...
-
Page 102: Controle Remoto
4. Vista da Base Rosca de fixação para tripé. 5. Controle Remoto... - Page 103 Scherpstelling aanpassen Navigatie Terug In-/uitschakelen muismodus Geselecteerde inhoud bevestigen Start Systeeminstellingen Volume omhoog / omlaag...
-
Page 104: Preparativos Iniciais
Preparativos Iniciais 1. Posicionamento Coloque o projetor sobre uma mesa ou outro suporte estável de frente para a superfície de projeção. Para obter melhores resultados, a superfície de projeção deverá ser branca e totalmente plana. A distância entre o projetor e a superfície de projeção deverá ser de no mínimo 1 metro e no máximo de 3 metros. -
Page 105: Preparação Do Controle Remoto
2. Preparação do Controle Remoto ① Para utilizar o projetor pela primeira vez, retire a aba de proteção e ative a bateria do controle remoto. ② Para substituir a bateria, destrave e abra o seu compartimento, coloque uma nova bateria obedecendo as polaridades (+/-) coforrme as indicações e, em seguida, feche e trave a tampa do compartimento. - Page 106 Aplicativo Nebula Para controlar facilmente seu projetor, recomendamos que você baixe o aplicativo Nebula Connect. Através desse aplicativo você poderá usar o teclado do seu smartphone para inserir texto e usar a tela como um mouse. ① Faça o download do aplicativo Nebula Connect na App Store (dispositivos iOS) ou Google Play (dispositivos Android).
- Page 107 Modo Projetor Você poderá conectar um fone de ouvido ou uma caixa acústica com Bluetooth ao Mars II Pro no modo projetor. ① Aperte a tecla para acessar o menu inicial, selecione [Ajustes] > [Bluetooth] e aperte ② Siga as instruções na tela para concluir a conexão Bluetooth. 3.
- Page 108 ② Selecione um aplicativo e verifique a versão atual, abra-o ou force a parada, verifique a memória utilizada ou limpe os dados ou o cache ou desinstale-o. Quando mais de três aplicativos estão instalados, você poderá selecionar [Todos] na linha inferior da página inicial para entrar na página [Aplicativos].
- Page 109 Como Utilizar o Nebula Mars II Pro 1. Conexão com Aparelhos com Saída HDMI Este projetor permite sua conexão com vários aparelhos com saída HDMI, como receptor de TV a cabo ou via satélite, DVD ou Blu-ray player, console de videogame e outros aparelhos.
- Page 110 Para dispositivos Android: Alguns conteúdos poderão não estar disponíveis para transmissão devido a restrições de copyright. Neste caso, você poderá transmiti-los através do mesmo aplicativo instalado no seu projetor Mars II Pro. 3. Selecione um Aplicativo Uma vez conectado a uma rede sem fio, você poderá acessar serviços on-line, desfrutar de filmes, músicas e imagens e navegar na Internet.
-
Page 111: Especificações Técnicas
Especificações Técnicas As especificações e o projeto estão sujeitos a alterações sem aviso prévio. Alimentação: 9V Consumo: < 57W Consumo em standby: < 0.5W Tecnologia de projeção: DLP de 0,3” – 1280 × 720 pixels Fonte de luz: LED RGB Tamanho da imagem projetada: 30 a 150 polegadas Resolução: 1280 ×... - Page 112 Identificação e Solução de Problemas ① O projetor não é ligado através do controle remoto? • Verifique se o projetor está conectado à tomada de energia. • Desloque para cima o protetor da lente, aguarde por 10 segundos e tente novamente. ②...
-
Page 113: Marcas Registradas
Este produto foi projetado e fabricado com materiais e peças de alta qualidade que podem ser reciclados e reutilizados. Este símbolo indica que o produto não deve ser descartado como lixo doméstico, e deve ser encaminado a um posto de coleta apropriado para reciclagem. -
Page 114: Güvenlik Talimatları
Güvenlik Talimatları Bu cihazı kullanmadan önce tüm talimatları okuyun ve anlayın. Bu kılavuzda açıklanmayan bir değişiklik veya ayar yapmayın. Talimatların izlenmemesinden kaynaklanan fiziksel yaralanmalar, veri kayıpları veya hasarlar garanti kapsamında değildir. Kurulum • Yangın ve/veya elektrik çarpması riskini azaltmak için cihazı yağmura veya nemli ortamlara maruz bırakmayın ve cihazın üzerine vazo gibi içinde sıvı... - Page 115 b) soğuk bir oda ısıtıldığında; c) cihaz rutubetli bir odaya yerleştirildiğinde. Nem kapmasını önlemek için cihazı farklı bir odaya taşırken naylon bir koruyucu ile kaplayın ve naylonu kaldırmadan önce bir iki saat bekleyin. Güç Kaynağı • Yalnızca ürünle birlikte verilen güç adaptörünü kullanın. •...
- Page 116 gerekir. • Cihazı düzenli olarak şarj edin. Cihazı pili tamamen bitik şekilde saklamayın. Temizlik • Yüzeyini temizlemeden önce cihazı kapatın ve güç kaynağından çıkarın. • Yumuşak ve tüy bırakmayan bir bez kullanın. Hiçbir zaman sıvı, gazlı veya kolay yanabilen temizleyiciler (sprey, aşındırıcı, parlatıcı ve alkol gibi) kullanmayın.
-
Page 117: Genel Bakış
İçindekiler Main unit Remote control with batteries Owner’s Manual Power Adapter Power cord Manual Genel Bakış 1. Önden Görünüm Mercek Tutamaç Mercek kapağı • Cihazı açmak ve otomatik odak ayarı yapılması için aşağı kaydırın • Cihazı kapatmak için yukarı kaydırın Hoparlör... -
Page 118: Arkadan Görünüm
2. Arkadan Görünüm DC IN • Güç kaynağı bağlayın HDMI • HDMI çıkışı olan ve içerik oynatabilen veya çalabilen bir cihaz bağlayın • USB Depolama Cihazlarına Bağlama • USB cihazlarını şarj etmek için taşınabilir şarj cihazı olarak kullanın SES ÇIKIŞI •... -
Page 119: Üstten Görünüm
3. Üstten Görünüm LED göstergeler • Güç seviyesi Gezinti düğmeleri • Menüler arasında dolaşın veya seçilen içerikleri ayarlayın • Bir seçimi veya girişi onaylamak için basın • Oynatmayı duraklatın/sürdürün • Ses artırma/azaltma • Önceki menüye dönün • Bluetooth moduna girmek/çıkmak için basın •... -
Page 120: Alttan Görünüm
4. Alttan Görünüm Tripod soketi 5. Uzaktan Kumanda... - Page 121 • Cihazı açın/kapatın/bekleme moduna geçirin • Fare tuşu moduna girmek/bu moddan çıkmak için basın. • Bir seçimi veya girişi onaylamak için basın • Oynatmayı duraklatın/sürdürün • Ana ekran menüsüne erişmek için basın • Oynatma sırasında diğer seçeneklere erişin (seçeneklerin kullanılabilirliği kaynak girişine bağlıdır) •...
- Page 122 Başlarken 1. Yerleştirme Mars II Pro projektörü projeksiyon yüzeyinin ön tarafına düz ve sabit bir şekilde yerleştirin. En iyi sonuç için projeksiyon yüzeyi beyaz ve düz olmalıdır. Projektör ile projeksiyon yüzeyi arasındaki mesafe en az 1 metre (39,4 inç), en çok 3 metre (118 inç) olmalıdır. •...
- Page 123 2. Uzaktan Kumandayı Kullanıma Hazırlama ① İlk kullanımdan önce uzaktan kumanda pillerinin aktive olması için plastik pil korumasını çıkarın. ② Pilleri değiştirmek için arkadaki pil bölmesi kapağını kaydırarak pil bölmesini açın, yeni pilleri (+/- kutuplarına uygun şekilde) yerleştirin ve pil bölmesini kapatın. 3.
- Page 124 Nebula Uygulaması Projektörü kolayca kumanda etmek için Nebula Uygulaması olarak kullanılan Nebula Connect. Bu uygulamayı kullanarak metin girmek için akıllı telefonunuzun klavyesini, projektör ekranını kumanda etmek için ise bir fare kullanabilirsiniz. ① App Store'dan (iOS cihazlar) veya Google Play'den (Android cihazlar) Nebula Connect uygulamasını...
- Page 125 hoparlör bağlayabilirsiniz. ① Ana ekran menüsünden [Ayarlar] > [Bluetooth] bölümüne gidin ve ② Bluetooth bağlantısını tamamlamak için ekrandaki talimatları uygulayın. 3. Projektör Ana ekran menüsünden [Ayarlar] > [Projektör] bölümüne gidin ve [Görüntü Modu] [Otomatik]/[Standart Mod]/[Pil Modu] [Renk Sıcaklığı] [Normal]/[Soğuk]/[Sıcak] Otomatik eğrilik düzeltmeyi etkinleştirin/ [Otomatik Eğrilik Düzeltme] devre dışı...
- Page 126 gidin ve ② Bir uygulamayı seçin ve mevcut sürümünü kontrol edin, açın veya zorla durdurun, kullanılan depolama alanını kontrol edin, verileri veya önbelleği silin ya da uygulamayı kaldırın. 3'ten fazla uygulama yüklüyse [Uygulamalar] sayfasına girmek için ana sayfanın alt satırında [Tümü] seçimini yapabilirsiniz. Bir uygulama seçin ve uzaktan kumandada düğmesine basın, ardından [Ana Sayfaya Taşı] veya [Kaldır] seçimini...
- Page 127 [Hakkında] Yerleşik depolama alanındaki tüm veriler [Kurtarma] silinecektir. Nebula Mars II Pro'yu Kullanma 1. HDMI Bağlantısıyla İçerik Oynatabilen Cihazlara Bağlama Bu projektör TV çubuğu, TV kutusu, DVD oynatıcı, set üstü kutu (STB), oyun konsolu veya diğer cihazlar gibi HDMI bağlantısı üzerinden içerik oynatabilen çeşitli cihazlarla bağlantı...
- Page 128 Android cihazlar için: Bazı içerikler telif hakkı kısıtlamaları nedeniyle yansıtma için uygun olmayabilir. Bu durumda içeriği Nebula Mars II Pro'nuzda yüklü olan aynı uygulama aracılığıyla oynatabilirsiniz. 3. Uygulama Seçme Kablosuz bir ağa bağlanıldıktan sonra çevrimiçi hizmetlere erişebilir, keyifle film izleyebilir, müzik dinleyebilir, fotoğraflarınıza bakabilir ve internette gezinebilirsiniz.
-
Page 129: Teknik Özellikler
① Ana ekran menüsünden [Dosya Yöneticisi] bölümüne gidin ve ② Dosya seçin ve Teknik Özellikler Specifications are subject to change without notice. Güç kaynağı: DC 19V Güç tüketimi: < 57W Beklemedeyken güç tüketimi: < 0,5W Ekran teknolojisi: 0,3 inç 1280 × 720p DLP Işık kaynağı: RGB LED Projeksiyon görüntüsü... -
Page 130: Sorun Giderme
Uzaktan kumanda pilleri: CR2032 × 2 Çalışma sıcaklığı: 0°C - 35°C/32°F - 95°F Çalışma nem aralığı: %15 ~ %85 (yoğunlaşmamış) Depolama sıcaklığı ve nem oranı: < 65°C/149°F, < %90 nem Boyut (G × Y × D): 122 × 138 × 178 mm/4,8 × 5,4 × 7 inç Ağırlık: 1483 gr/52,3 ons Sorun giderme ①... - Page 131 Декларация о соответствии Bu ürün, Avrupa Topluluğunun radyo girişimi gerekliliklerine uygundur. Hereby, Anker Innovations Limited. declares that this device is in compliance with the essential requirements and other relevant provisions of Directive 2014/53/EU. For the Declaration of Conformity, visit the Web site www.seenebula.com.
-
Page 132: Ticari Markalar
Warning: Changes or modifications not expressly approved by the partly responsible for compliance could void the user’s authority to operate the equipment. Not: Bu ekipman test edilmiş ve FCC Kuralları Bölüm 15'e göre B Sınıfı dijital cihazlarla ilgili kısıtlamalara uygun olduğu görülmüştür. Bu kısıtlamalar, yerleşim alanlarındaki kurulumlarda, zararlı... - Page 133 ülkelerde ticari markaları veya tescilli ticari markalarıdır. ® Bluetooth kelimesi ve logoları, Bluetooth SIG, Inc. Şirketine ait tescilli ticari markalardır ve Anker Innovations Limited tarafından her türlü kullanımı lisans kapsamındadır. Diğer ticari markalar ve ticari adlar ilgili sahiplerinin mülkiyetindedir. Garanti Her Koşulda 30 Gün Para İadesi Garantisi...
- Page 134 安全须知 简 在您使用该设备之前,请通读全部使用说明以充分理解。本手册中未说 体 明的内容,请勿更改或设置。如果由于未遵守使用说明而导致的人身伤 中 害、数据损失或损坏,不属于保修范围。 文 设置 • 为了减少火灾和电击的风险,该设备应避免接触雨水或潮湿空气;设 备上也不应放置装有液体的物品,如花瓶。 • 不要将该设备放置于柔软表面,如桌布或地毯上,因为这样做可能有 火灾危险。 • 不要将设备放置在容易有过多尘土的地方,或靠近任何产生强磁场的 家用电器。 • 为了防止过热,请勿阻挡或堵塞通风口。 • 不要将设备放在密闭空间内。设备周围应当始终留有足够的空间以利 通风。 • 设备应避开阳光直射、高温、剧烈温度变化和潮湿空气。 • 当该设备运行较长时间后,表面会发烫,应将它关闭,并断开电源线。 仅在设备冷却后恢复运行。 • 操作设备时应始终保持小心。避免接触镜头。 • 不要在该设备或电源线上放置重物或尖锐物品。 • 为避免电击,请勿拆开设备。 • 仅使用制造商指定的附件。 • 避免过度振动。可能会损害内部部件。 • 请勿让儿童在没有监管的情况下操作该设备。 •...
- Page 135 温暖的区域;b) 冷房间变热后;c) 设备放置在潮湿的房间。为避免任 何湿气,应将设备密封在塑料袋中,然后再移到另一个房间,等待一 到两小时后再从塑料袋中取出。 简 体 中 电源 文 • 仅使用提供的电源适配器。 • 关闭设备电源,然后从插座上断开电源线。 • 防止电源线被踩踏或挤压,尤其是在插头、插座或设备上接线出口处。 • 在雷雨天气或者长期不使用时,应拔掉此设备的插头。 • 当电源插头或电器耦合器用作断路装置时,断路装置应该容易操作。 • 在您进行连接或更改任何连接时,确保所有设备都从电源插座断开。 • 切勿使用湿手触摸电源线或电源接头。 听力安全 • 请勿长时间使用高音量收听,以免损伤听力。将音量设置在安全水平。 电池 • 请勿自行更换内置电池。更换请联系授权服务中心。 • 遥控器中含有纽扣型电池,可能会被吞下。请将电池放在儿童无法接 触到的地方。 • 爆炸风险!电池应避开高温、阳光直射或明火。切勿将电池丢入火中。 • 当遥控器长时间不用时,请取出电池。 • 如果电池更换错误,将存在爆炸危险。仅更换类型相同或相近的电池。 • 电池中含有化学物质,应妥善丢弃。 •...
- Page 136 清洁 • 关闭设备电源,将它从电源中取出,然后清理表面。 简 • 使用柔软的无绒布。切勿使用液体、气体或易燃的清洁剂(如喷雾、 体 研磨剂、擦亮剂和酒精)。 中 文 • 请勿使用任何液体清洁剂清洁镜头,因为它可能损坏镜头保护涂层。 • 轻轻擦拭表面。小心不要刮伤表面。 • 使用镜头清洁纸清洁投影仪镜头。 维修 • 请勿自行对该设备进行任何维修。您的设备如需维修,应仅由授权服 务中心进行。 • 不当维护可能导致受伤或损坏该设备。 • 所有保养应当交由具备资质的人员进行。 小心: • 该设备可发出光波辐射,可能有害。 • 请勿直视工作光束。强光可能伤害您的眼睛。...
- Page 137 内含物品 简 体 中 文 主机 遥控器(含电池) Main unit Remote control with batteries Owner’s Manual 电源线 说明书 电源适配器 Power Adapter Power cord Manual 概述 1. 前视图 镜头 提手 镜头盖 • 下滑可开机且自动调焦 • 上滑可关闭电源 扬声器...
- Page 138 2. 后视图 简 体 中 文 DC IN • 连接电源 HDMI • 通过 HDMI 输出连接播放设备 • 连接到 USB 存储设备 • 将 USB 设备作为移动电源充电 音频输出 • 连接到耳机或外接扬声器 红外接收器 通风口(出风) 通风口(进风) 重置 • 按住 3 秒钟可重置...
- Page 139 3. 顶视图 简 体 中 文 LED 指示灯 • 电量 导航按钮 • 导航菜单或调整所选择的内容 • 按下以确认选择或进入 • 暂停 / 恢复播放 • 音量升高 / 降低 • 返回之前的菜单 • 按下可进入 / 退出蓝牙模式 • 在待机模式下,按下可唤醒投影仪...
- Page 140 4. 底视图 简 体 中 文 三脚架接口 5. 遥控器...
- Page 141 Adjust Focus Navigation 简 体 Back 中 文 Power On / Off Mouse mode Confirm the selected content Home System Settings Volume Up / Down...
- Page 142 准备开始 1. 放置 简 体 中 将 Mars II Pro 放在投影面前面的平稳表面上。为了达到最佳效果,投 文 影面应当是白色且平滑。投影仪到投影面之间的距离必须是 1 米(39.4 英寸 ) 到 3 米(118 英寸)之间。 • 无需将投影仪倾向于投影面。该设备内置梯形失真校正功 能,可用于修正投影图像。 • 投影仪到投影面之间的距离决定了图像的大小。...
- Page 143 2. 准备遥控器 ① 首次使用时,应除去塑料电池绝缘标签以启用遥控器电池。 简 体 ② 要更换电池,请滑出电池仓背板,打开电池仓,插入新电池(与所 中 指示的极性 (+/-) 匹配),然后关上电池仓。 文 准备开始 ① 首次使用前,将内置电池充满电(不含充电器)。 ② 使用提供的电源适配器和电源线将投影仪连接到插座,内置的电池 将被充电,LED 指示灯将亮起。 DC IN ③ 向下滑镜头盖,投影仪将自动开启。您也可按遥控器上的 将投影 仪打开。 ④ 调整投影仪的角度,使其朝向合适的投影面或墙壁。 ⑤ 要聚焦图像 ,可轻轻移动投影仪进行自动调焦,或长按遥控器上的 以手动调焦。 首次使用时,按照屏幕指示完成基本设置。...
- Page 144 Nebula 应用 为了方便控制此投影仪,我们建议您下载专用的 Nebula 应用 Nebula 简 Connect。使用该应用时,您可以使用智能手机的键盘输入文字,并且 体 可以使用屏幕来控制鼠标。 中 文 ① 从 App Store(iOS 设备)或 Google Play(Android 设备)下载 Nebula Connect 应用。 ② 在您的智能手机上启用蓝牙, 然后选择 [ Nebula ] 作为要连接的设备。 ③ 打开 Nebula Connect 应用,按照屏幕上的说明完成连接设置。 设置 首次打开投影仪时,完成设置过程。 1. 网络 该投影仪可无线 (Wi-Fi) 连接至互联网。 ①...
- Page 145 投影仪模式 当 Mars II Pro 处于投影仪模式时,您可以将蓝牙耳机或扬声器连接到 简 投影仪上。 体 ① 在主菜单上,选择 [ 设置 ] > [ 蓝牙 ],并按下 。 中 文 ② 按照屏幕指示完成蓝牙连接。 3. 投影仪 在主菜单上,选择 [ 设置 ] > [ 投影仪 ],然后按 。 [ 图像模式 ] [ 自动 ] / [ 标准模式 ] / [ 电池模式 ] [ 色温...
- Page 146 4. 应用管理器 ① 在主菜单上,选择 [ 设置 ] > [ 应用管理器 ],然后按 。 简 ② 选择一个应用并检查当前版本,打开或强制停止,检查已使用的存 体 储空间或清除数据或缓存,或卸载。 中 文 当安装的应用超过 3 个时, 您可以选择主页底部的 [ 全部 ], 进入 [ 应用 ] 页面。选择一个应用并按下遥控器上的 ,然后您 可以选择 [ 移动至主页 ] 或 [ 卸载 ]。 5.
- Page 147 使用 Nebula Mars II Pro 1. 连接 HDMI 播放设备 简 体 中 该投影仪支持连接多种 HDMI 播放设备,如 TV 盒、TV 棒、DVD 播放器、 文 机顶盒 (STB)、游戏机或其它设备。 ① 使用 HDMI 电缆(未提供),将该投影仪连接至 HDMI 播放设备。 ② 在主菜单上,选择 [HDMI],然后按 。(* 当首次连接至 HDMI 播 放设备时,将会自动开始 HDMI 播放。) HDMI 2. 屏幕映射...
- Page 148 对于 Android 设备: 简 体 中 文 由于版权限制,某些内容可能无法投射到屏幕上。在此情况下, 您可以使用在您的 Nebula Mars II Pro 上安装的相同应用程序 直接播放。 3. 选择应用程序 连接无线网络后,您可以访问在线服务,观赏电影、音乐和图片,以及 浏览网络。除了默认已安装的应用之外,您还可以从 Nebula Store 或 USB 闪存驱动器安装任何其它应用。 • 在主菜单上,从“应用”或“Nebula Store”中选择互联网服务。 • 按 确认。 4. 连接到 USB 存储设备 您可以使用 OTG 电缆 (未提供) , 将 USB 2.0 存储设备连接至该投影仪,...
- Page 149 规格 简 规格和设计如有变更,恕不另行通知。 体 中 文 电源:DC 19V 功耗:< 57 W 待机功耗:< 0.5W 显示技术:0.3 英寸 1280 × 720p DLP 光源:RGB LED 投影图像大小:30 - 150 英寸 分辨率:1280 × 720 像素 亮度:500 ANSI 流明 对比度:1000:1 投射比:1.2 扬声器单元:10 w × 2 蓝牙 V4.2 内置电池类型:锂聚合物...
- Page 150 故障诊断 简 ① 无法使用遥控器打开电源? 体 • 确保投影仪连接到电源。 中 文 • 向下滑镜头盖。 ② 通过下滑镜头盖未能开机? • 确保投影仪连接到电源。 • 向上滑镜头盖,等待 10 秒,然后重试。 ③ 遥控器不工作? • 除去电池绝缘标签以启用遥控器电池。 • 更换新电池。 ④ 图像不清晰? • 您可以轻轻移动投影仪,或按下方向键以聚焦图像。 ⑤ 投影图像反了? • 在主菜单上,选择 [ 设置 ] > [ 投影仪模式 ] 并切换到正确状态。...
- Page 151 保修 简 30 天无理由退款 体 在购买之日起 30 天内,您无需任何理由即可将没有损坏的产品和包装 中 退回,并可以收到全额退款。如果退货原因与质量无关,则客户必须支 文 付退货运费。 12 个月质量问题保修 Nebula 产品提供自购买之日起 12 个月的材料和制造缺陷保修。产品在 此期间内如无法正常使用,Nebula 将免费为您更换并承担任何相关运 送费用。 请注意:任何 Nebula 技术支持提供的运送标签必须在提供之日起 20 天内使用。...
- Page 152 إرشادات السالمة اقرأ كل اإلرشادات وافهمها جي د ً ا قبل استخدام هذا الجهاز. ال تجر ِ أي تغييرات أو إعدادات غير موضحة في هذا الدليل. في حالة وقوع إصابة جسدية أو فقدان بيانات أو حدوث ضرر بسبب عدم .اتباع اإلرشادات، لن ينطبق الضمان اإلعداد...
- Page 153 مصدر اإلمداد بالطاقة .ال تستخدم إال مهايئ الطاقة المرفق .أوقف تشغيل الجهاز قبل إزالة مصدر اإلمداد بالطاقة من المقبس احم ِ سلك الطاقة من أن تطأه األقدام أو يتم ال ق َ رص عليه، ال سيما عند القوابس ومقابس المالءمة .والنقطة...
- Page 154 التنظيف .أوقف تشغيل الجهاز وأزله من مصدر اإلمداد بالطاقة قبل تنظيف السطح استخدم قطعة قماش ناعمة وخالية من الوبر. ال تعمد مطل ق ً ا إلى استخدام المنظفات السائلة أو .)الغازية أو القابلة لالشتعال بسهولة (مثل مواد الرش والكشط والتلميع والكحول ال...
- Page 155 اللوازم المرفقة جهاز التح ك ّ م عن ب ُعد مع بطاريات الوحدة الرئيسية Main unit Remote control with batteries Owner’s Manual سلك الطاقة الدليل Power Adapter محوّ ل الطاقة Power cord Manual نظرة عامة 1. المنظر األمامي العدسة المقبض غطاء...
- Page 156 2. المنظر الخلفي DC IN للتوصيل بمصدر اإلمداد بالطاقة HDMI HDMI للتوصيل بجهاز تشغيل مزوّ د بمخرج USB للتوصيل بجهاز تخزين كبنك طاقةUSB لشحن جهاز AUDIO OUT للتوصيل بسماعة الرأس أو مك ب ّر صوت خارجي مستقبل األشعة تحت الحمراء )التهوية...
- Page 157 3. المنظر العلوي LED مؤشرات مستوى الطاقة أزرار التنقل للتنقل بين القوائم أو ضبط المحتويات المحددة اضغط لتأكيد التحديد أو اإلدخال لإليقاف المؤقت / استئناف التشغيل لرفع / خفض مستوى الصوت للعودة إلى القائمة السابقة أو الخروج منهBluetooth اضغط للدخول في وضع في...
- Page 158 4. المنظر السفلي مقبس الحامل ثالثي القوائم 5. جهاز التحكم عن ب ُ عد...
- Page 159 ضبط التركيز التنقل الجهة الخلفية للتشغيل / إيقاف التشغيل وضع الماوس تأكيد المحتوى المحدد الرئيسية إعدادات النظام رفع مستوى الصوت / خفضه...
- Page 160 بدء االستخدام 1. مكان وضع الجهاز ، على أساس ثابت ومسط ّ ح أمام سطح اإلسقاط. للحصول على أفضل النتائجMars II Pro ضع يجب أن يكون سطح اإلسقاط أبيض اللون ومسط ّ حً ا. يجب أن تبلغ المسافة بين جهاز اإلسقاط وسطح .اإلسقاط...
- Page 161 2. تحضير جهاز التح ك ّ م عن ب ُ عد ① عند االستخدام للمرة األولى، أزل عروة عزل البطارية البالستيكية لتنشيط بطاريات جهاز .التح ك ّ م عن ب ُعد ② الستبدال البطاريات، أزل اللوحة الخلفية لحجرة البطارية لفتح الحجرة وأدخل بطاريات جديدة .(مع...
- Page 162 Nebula تطبيق Nebula ، المخصصNebula للتحكم في جهاز اإلسقاط هذا بسهولة، نوصي بتنزيل تطبيق . فباستخدام هذا التطبيق، يمكنك استخدام لوحة مفاتيح هاتفك الذكي إلدخال النصConnect .واستخدام الشاشة كماوس )iOS (لألجهزة التي تعمل بنظامApp Store منNebula Connect ① قم بتنزيل التطبيق .)Android ...
- Page 163 وضع جهاز اإلسقاط Mars II أو مك ب ّر صوت بجهازBluetooth يمكنك توصيل سماعات الرأس التي تعمل بتقنية أثناء تشغيله في وضع جهازPro ] واضغط علىBluetooth[ > ]① من القائمة الرئيسية، حدد [اإلعدادات .Bluetooth ② اتبع اإلرشادات التي تظهر على الشاشة إلكمال اتصال 3.
- Page 164 4. إدارة التطبيق ① من القائمة الرئيسية، حدد [اإلعدادات] > [إدارة التطبيق] واضغط على ② حدد أحد التطبيقات وتحقق من اإلصدار الحالي ثم افتحه أو أوقفه إجبار ي ًا وتحقق من التخزين .المستخدم أو امسح البيانات أو ذاكرة التخزين المؤقت أو ألغ ِ تثبيته عند...
- Page 165 Nebula Mars II Pro استخدام HDMI 1. االتصال بأجهزة التشغيل المزو ّ دة بـ ،TV box مثلHDMI يدعم جهاز اإلسقاط هذا عمليات التوصيل بأجهزة تشغيل مختلفة مزوّ دة بـ )، أو وحدة التح ك ّ م باأللعابSTB( ، أو جهاز فك التشفيرDVD ، أو مش غ ّ ل أقراصTV stick أو...
- Page 166 .قد ال تتوفر بعض المحتويات لعرض الشاشة من جرّ اء القيود المتعلقة بحقوق النشر في هذه الحالة، يمكنك تشغيل المحتوى مباشر ة ً باستخدام نفس التطبيق المثبت على .Nebula Mars II Pro 3. تحديد تطبيق بمجرد االتصال بشبكة السلكية، يمكنك الوصول إلى الخدمات عبر اإلنترنت واالستمتاع باألفالم...
- Page 167 المواصفات .إن المواصفات والتصميم عرضة للتغيير من دون إشعار 3 أمبير اإلمداد بالطاقة: التيار المستمر 91 فولت استهالك الطاقة: < 75 واط استهالك الطاقة في وضع االستعداد: <5.0 واط تقنية الشاشة: تقنية المعالجة الرقمية للضوء مقاس 3.0 بوصات بدقة 0821*027 بكسل )...
- Page 168 استكشاف األخطاء وإصالحها ① هل يفشل تشغيل الجهاز بواسطة جهاز التح ك ّ م عن ب ُعد؟ .تأكد من توصيل جهاز اإلسقاط بمصدر اإلمداد بالطاقة .حرّ ك غطاء العدسة ألسفل ② هل يفشل تشغيل الجهاز عن طريق تحريك غطاء العدسة ألسفل؟ .تأكد...
- Page 169 הוראות בטיחות יש לקרוא ולהבין את כל ההוראות לפני השימוש במכשיר זה. אין לבצע אף שינויים או להגדיר הגדרות שאינם מתוארים במדריך זה. האחריות אינה חלה במקרה של פציעה גופנית, אובדן נתונים .או נזק הנגרמים כתוצאה משימוש שאינו תואם את ההוראות התקנה...
- Page 170 אספקת חשמל .יש להשתמש במתאם החשמל שסופק בלבד .יש לכבות את המכשיר לפני הוצאת ספק הכוח מהשקע ,יש להגן על כבל החשמל מפני דריכה או צביטה, במיוחד בתקעים .בשקעים ובנקודות שבהן הם יוצאים מהמכשיר יש לנתק מכשיר זה בזמן סופות ברקים או כאשר אינו בשימוש .במשך...
- Page 171 ניקוי המכילים נוזל, גז או דליקים בקלות (כגון תרסיסים, מסירי .)שומנים, מבריקים ואלכוהול אין להשתמש בחומרי ניקוי המכילים נוזל כדי לנקות את העדשה .מכיוון שהם עלולים להזיק לציפוי המגן שעל העדשה יש לנגב את פני השטח בעדינות. יש להיזהר שלא לשרוט את פני .השטח...
- Page 172 תכולת האריזה Main unit Remote control with batteries Owner’s Manual Power Adapter Power cord Manual סקירה תצוגה קדמית עדשה ידית מכסה העדשה החלק מטה להפעלה ולכוונון אוטומטי של המיקוד החלק מעלה לכיבוי רמקול תצוגה אחורית...
- Page 173 DC IN חבר אל ספק כוח HDMI HDMI חיבור אל התקן הפעלה עם יציאת USB חיבור אל התקן אחסון כמטען ניידUSB טעינת התקן יציאת שמע חיבור לאוזניות או לרמקול חיצוני מקלט אינפרה-אדום )אוורור (יציאה )אוורור (כניסה איפוס לחץ והחזק למשך 3 שניות כדי לאפס...
- Page 174 תצוגה מלמעלה LED מחווני רמת מתח לחצני ניווט נווט בין התפריטים או כוונן את התוכן הנבחר לחץ כדי לאשר בחירה או הזנה השהייה / המשך הפעלה הגבר/הנמך את עוצמת הקול חזרה לתפריט הקודם Bluetooth לחץ כדי להיכנס/לצאת ממצב במצב המתנה, לחץ כדי להעיר את המקרן...
- Page 175 תצוגה מלמטה חיבור לחצובה שלט רחוק...
- Page 176 הפעלה / כיבוי / מעבר למצב המתנה .לחץ כדי להיכנס / לצאת ממצב עכבר לחץ כדי לאשר בחירה או הזנה השהייה / המשך הפעלה לחץ כדי לגשת אל תפריט הבית גישה אל אפשרויות נוספות במהלך ההפעלה (זמינות .)האפשרויות תלויה בקלט המקור לחץ...
- Page 177 אין צורך להטות את המקרן לכיוון משטח ההקרנה. ניתן לתקן את תמונת ההקרנה באמצעות תיקון אבן המפתח .המובנה המרחק בין המקרן לבין משטח ההקרנה קובע את גודל .התמונה הכנת השלט-רחוק ① בעת השימוש בפעם הראשונה, הסר את לשונית הבידוד מתא .הסוללות...
- Page 178 ① טען את הסוללה המובנית במלואה לפני השימוש בפעם .הראשונה ② חבר את המקרן אל שקע החשמל באמצעות כבל החשמל LED-והמתאם שסופקו, הסוללה המובנית תיטען ומחווני ה .יידלקו DC IN .③ החלק מטה את מכסה העדשה, והמקרן יופעל באופן אוטומטי -בשלט...
- Page 179 .) Android (במכשיריGoogle Play-) או מiOS (במכשירי בטלפון החכם שלך ובחר באפשרותBluetooth ② הפעל את .] כדי לחבר את המכשירNebula[ ופעל על-פי ההנחיותNebula Connect ③ פתח את האפליקציה .במסך כדי להשלים את הגדרת החיבור הגדרות .פעל על-פי תהליך ההתקנה בעת הפעלת המקרן בפעם הראשונה רשת...
- Page 180 בתפריט הבית, בחר [הגדרות] > [מקרן], ולחץ על []מצב תמונה []מצב אוטומטי] / [מצב רגיל] / [מצב סוללה ][טמפרטורת צבע ][רגילה] / [קרה] / [חמה ][תיקון אבן מפתח אוטומטי .הפעל / השבת תיקון אבן מפתח אוטומטי בצע תיקון אבן מפתח ידני. ערך ברירת המחדל הוא ][תיקון...
- Page 181 כאשר מותקנות יותר מ-3 אפליקציות, ניתן לבחור באפשרות [הכל] בתחתית דף הבית כדי להיכנס אל הדף ,בשלט-רחוק [אפליקציות]. בחר אפליקציה ולחץ על ולאחר מכן ניתן לבחור באפשרות [מעבר לדף הבית] או .][הסרת התקנה אפשרויות נוספות בתפריט הבית, בחר [הגדרות] כדי להציג אפשרויות הגדרה .נוספות...
- Page 182 Nebula Mars II Pro שימוש במכשיר HDMI חיבור אל התקני הפעלה עם יציאת HDMI ניתן לחבר אל מקרן זה מגוון התקני הפעלה עם יציאת , ממירDVD כגון סטרימר לטלוויזיה, ממיר טלוויזיה, נגן .), קונסולת משחקים או התקנים נוספיםSTB( אינטראקטיבי באמצעותHDMI ① חבר מקרן זה אל התקן הפעלה עם יציאת...
- Page 183 ייתכן שלא יהיה ניתן לשקף חלק מהתוכן עקב הגבלות זכויות יוצרים. במקרה כזה, ניתן להזרים את התוכן באמצעות אותה אפליקציה המותקנת במכשיר . שלךNebula Mars II Pro בחר אפליקציה לאחר החיבור אל רשת אלחוטית, ניתן לגשת אל שירותים .מקוונים, ליהנות מסרטים, מוזיקה ותמונות ולדפדף באופן מקוון...
- Page 184 מפרט טכני Specifications are subject to change without notice. DC 19V 3A :ספק כוח > 57W :צריכת חשמל > 0.5W :צריכת חשמל במצב המתנה 1280 × 720p DLP 'טכנולוגיית תצוגה: 3.0 אינץ RGB LED :מקור אור 'גודל תמונת הקרנה: 051 - 03 אינץ רזולוציה: 027 ×...
- Page 185 משך הפעלת מוזיקה: 03 שעות CR2032 × 2 :סוללות השלט רחוק 95°F °23 עדF / 35°C °0 עדC :טמפרטורה בעת הפעלה )לחות בעת הפעלה: %58 ~ %51 (ללא עיבוי °56 > לחותC / 149°F, > 90% :טמפרטורה ולחות בעת אחסון 4.8 ×...
- Page 186 הצהרת תאימות מוצר זה מציית לדרישות של הנציבות האירופית בנוגע .להפרעות רדיו מצהירה בזאת. שמכשירAnker Innovations Limited זה עומד בדרישות ההכרחיות ובתנאים רלוונטיים נוספים . לעיון בהצהרת התאימות, יש לבקרEU/2014/53 של תקן .www.seenebula.com באתר האינטרנט BT: , רצועת תדרים שלBT: 8 dBm הספק מוצא מרבי של...
- Page 187 EU היבואן להלן הוא הגוף האחראי (ניתן ליצור קשר בענייני .)בלבד Anker Technology )UK( Ltd :יבואן Suite B, Fairgate House, 205 Kings Road, :כתובת היבואן Tyseley, Birmingham, B11 2AA, United Kingdom FCC הודעת ,) (רשות התקשורת הפדרליתFCC-מכשיר זה עומד בכללי ה...
- Page 188 וסמלי הלוגו הינם סימנים מסחריים רשומיםBluetooth הסימן ® -. וכל שימוש בסימנים אלה עלBluetooth SIG, Inc בבעלות נעשה תחת רישיון. סימניםAnker Innovations Limited ידי .מסחריים ושמות מסחריים נוספים שייכים לבעליהם בהתאמה אחריות אחריות להחזר כספי תוך 03 יום מכל סיבה שהיא...
- Page 189 .עלות משלוח ההחזרה חלה על הלקוח אחריות של 21 חודשים עבור בעיות הקשורות לאיכות המוצר חלה אחריות בת 21 חודשים ממועד הרכישהNebula על מוצרי Nebula ,בגין פגמים בחומר או בעבודה. במהלך תקופה זאת...
Need help?
Do you have a question about the Nebula Mars II Pro and is the answer not in the manual?
Questions and answers