
Summary of Contents for FATEK SD3 Series
- Page 1 Instruction Manual AC SERVO MOTOR and SERVO AMPLIFIER SD3 Series FATEK AUTOMATION CORP.
- Page 2 ■ Before using the product, be sure to carefully read the Safety Instructions. ■ After reading this manual, please keep it for future reference. ■ Product specifications are subject to change without notice in the course of product improvement. Apr. 2019 SD3 Series Instruction Manual...
- Page 3 Overview of the SD3 Series Instruction Manual 1. Introduction Safety Precautions, Safety Standards, Maintenance and Inspection, and Warranty 2. Specifications Model Codes, Component Identifications, Specifications, and Dimensions 3. Preparation Installation, System Wiring, and Timing Diagrams 4. Connections CN1 User I/O Connector Pinout Options and Control Modes 5.
- Page 4 5. Parameters ............28 SD3 Series Instruction Manual...
-
Page 5: Table Of Contents
4. Status Display ............17 5. How to set Pulse train command: Input filter (No.33.0) ..... . 32 SD3 Series Instruction Manual... - Page 6 MEMO SD3 Series Instruction Manual...
- Page 7 Introduction 1. Important Safety Instructions ......2 1. Safety Precautions .........2 2.
-
Page 8: Important Safety Instructions
Cautions and Dangers Causes unexpected, unstable, or uncontrolled motions. Compromises the performance or reliability of the product. Shortens the service life of the product. Electric shock hazard Burn hazard Fire hazard Injury hazard Failure and damage hazard SD3 Series Instruction Manual... -
Page 9: Operations
Do not touch the keyway if you are using a motor with a shaft-end keyway. Do not touch the motor or amplifier heat sink. It becomes very hot. Do not use external power to run the motor. SD3 Series Instruction Manual... - Page 10 Never attempt to disassemble the product. There are hazardous voltage sections in the amplifier. Before performing any wiring or inspection, be sure to allow more than 5 minutes after the power shuts off for the internal voltage to completely discharge. SD3 Series Instruction Manual...
- Page 11 Upon occurrence of an alarm, remove the cause and ensure the safe condition of the equipment before resetting the alarm and restarting the machine. Connect the brake control relay and the emergency stop relay in series. SD3 Series Instruction Manual...
- Page 12 If the amplifier or motor fails, shut down both the control power supply and the main circuit power supply. When not using the product for an extended period, be sure to turn the power off. SD3 Series Instruction Manual...
-
Page 13: Other Considerations And Precautions
Practice a fail-safe design and take adequate measures to ensure safety within the range of machine motion. Use of the product in a manner not rated by the manufacture Such use shall void the manufacture warranty. Be mindful before you attempt to do so. SD3 Series Instruction Manual... -
Page 14: Safety Standards
• Pollution Degree 2 (Circuitry) *2) The test conditions for the machinery and equipment with this product installed may be different from our test conditions. Such machinery or equipment must meet the safety standards for their final configurations. SD3 Series Instruction Manual... -
Page 15: Maintenance And Inspection
• No loose clamp screw problems in the amplifier and motor. • No deformation or discoloration in the amplifier, motor, cables, and terminal blocks due to overheating. • No looseness in wiring fixings and terminal block screws. SD3 Series Instruction Manual... -
Page 16: Warranty
This warranty does not apply to any parts or accessories that have been used longer than their rated service life. The warranty applies to delivered products only. FATEK shall not be liable for any indirect, incidental or consequential damage caused by the product failure or damage. -
Page 17: Overview
■ For a copy of the latest version of the instruction manual, please contact us. ■ Reproducing or copying this document, in whole or in part, without prior approval of FATEK, is strictly prohibited. Check Items Upon Unpacking ■... -
Page 18: Product Label
(Produced year and month + Control No. + Serial No.) A product number is indicated by 12 digits. : * * * * * * * * * * * * Serial No. Control No. onth SD3 Series Instruction Manual... - Page 19 *) About indication of "the year". " I " = 2018., " J " = 2019., … About indication of "the month". 1" = Jan., … "9" = Sep., "X" = Oct., "Y" = Nov., and "Z" = Dec. " SD3 Series Instruction Manual...
-
Page 20: Danger Signs
Incorrect use of the amplifier may cause injury or damage. Avoid misuse or improper handling of the amplifier, or injury will result. SYMBOL (FRAME GROUND/PROTECTIVE GROUNDING) Be sure to perform grounding with the screw located at this sign. SD3 Series Instruction Manual... - Page 21 Specifications 1. Motor ..........2 1.
-
Page 22: Motor
Low Inertia 2,000 / 3,000 r/min 40 mm x 40 mm IP65 Middle Inertia 3,000 / 6,000 r/min 60 mm x 60 mm IP67 High Inertia 80 mm x 80 mm 130 mm x 130 mm SD3 Series Instruction Manual... -
Page 23: Names Of Parts
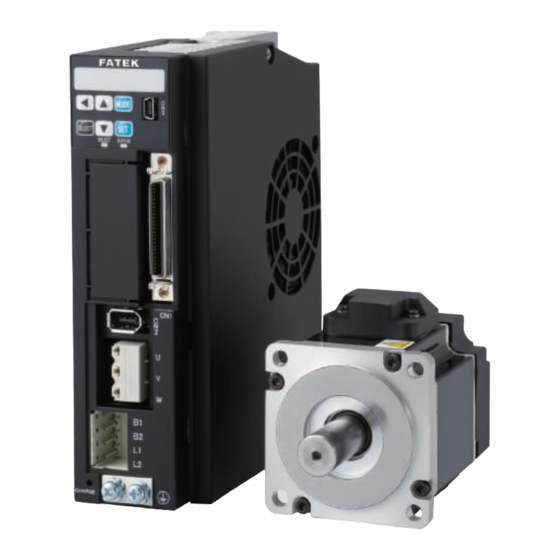
Motor Power Connector Oilseal Radial direction Flange Shaft Oilseal Thrust direction Encoder Cover Frame Mounting hole Motor: Oilseal Brake Connector Motor Power Connector Encoder Connector Radial direction Flange Shaft Thrust direction Encoder Cover Oilseal Frame Mounting hole SD3 Series Instruction Manual... -
Page 24: Specifications
Ⅱ Overvoltage category Pollution degree 2 Installation environment The brake has polarity. Lead wire color: Connection Yellow (BRK+): +24 V Blue (BRK−): GND Incorrect wiring may result in motor failure or suboptimal performance of the motor. SD3 Series Instruction Manual... - Page 25 1000 2000 3000 4000 5000 6000 7000 Speed [r/min] Ambient Temperature [℃] (mm) Brake Without With Oil Seal Without With Without With 66.4 72.0 106.8 112.4 15.5 3 h9 φ46 Depth 8 21.5 2 - φ4.5 M4 (L≥12 mm) SD3 Series Instruction Manual...
- Page 26 1000 2000 3000 4000 5000 6000 7000 Speed [r/min] Ambient Temperature [℃] (mm) Brake Without With Oil Seal Without With Without With 57.1 64.7 89.5 97.1 15.5 3 h9 φ46 Depth 8 21.5 2 - φ4.5 M4 (L≥12 mm) SD3 Series Instruction Manual...
- Page 27 Continuous operation range 1000 2000 3000 4000 5000 6000 7000 Speed [r/min] Ambient Temperature [℃] (mm) Brake Without With Oil Seal Without With Without With 82.4 88.0 122.8 128.4 15.5 3 h9 φ46 Depth 8 21.5 2 - φ4.5 M4 (L≥12 mm) SD3 Series Instruction Manual...
- Page 28 1000 2000 3000 4000 5000 6000 7000 Speed [r/min] Ambient Temperature [℃] (mm) Brake Without With Oil Seal Without With Without With 70.7 78.3 103.1 110.7 15.5 3 h9 φ46 Depth 8 21.5 2 - φ4.5 M4 (L≥12 mm) SD3 Series Instruction Manual...
- Page 29 ・ m inertia With brake 0.17 Rotational Speed vs. Torque Derating Curve At Single-phase AC 200 V Without oil seal Instantaneous operation range With oil seal Continuous operation range 1000 2000 3000 4000 5000 6000 7000 Speed [r/min] Ambient Temperature [℃] (mm) Brake Without With 76.5 113.0 22.5 5 h9 Depth10 4-φ 5.5 M5 (L≥12 mm) SD3 Series Instruction Manual...
- Page 30 ・ m inertia With brake 0.47 Rotational Speed vs. Torque Derating Curve At Single-phase AC 200 V Without oil seal Instantaneous operation range With oil seal Continuous operation range 1000 2000 3000 4000 5000 6000 7000 Speed [r/min] Ambient Temperature [℃] (mm) Brake Without With 93.5 130.0 22.5 5 h9 Depth10 4-φ 5.5 M5 (L≥12 mm) SD3 Series Instruction Manual...
- Page 31 ・ m inertia With brake 0.26 Rotational Speed vs. Torque Derating Curve At Single-phase AC 200 V Without oil seal Instantaneous operation range With oil seal Continuous operation range 1000 2000 3000 4000 5000 6000 7000 Speed [r/min] Ambient Temperature [℃] (mm) Brake Without With 93.5 130.0 22.5 5 h9 Depth10 4-φ 5.5 M5 (L≥12 mm) SD3 Series Instruction Manual...
- Page 32 ・ m inertia With brake 0.73 Rotational Speed vs. Torque Derating Curve At Single-phase AC 200 V Without oil seal Instantaneous operation range With oil seal Continuous operation range 1000 2000 3000 4000 5000 6000 7000 Speed [r/min] Ambient Temperature [℃] (mm) Brake Without With 110.5 147.0 22.5 5 h9 Depth10 4-φ 5.5 M5 (L≥12 mm) SD3 Series Instruction Manual...
- Page 33 With brake 0.94 Rotational Speed vs. Torque Derating Curve At Single-phase AC 200 V 10.0 Without oil seal Instantaneous operation range With oil seal Continuous operation range 1000 2000 3000 4000 5000 6000 7000 Speed [r/min] Ambient Temperature [℃] (mm) Brake Without With 107.3 144.3 φ90 6 h9 Depth10 4-φ 6.6 M6 (L≥14 mm) SD3 Series Instruction Manual...
- Page 34 With brake 1.81 Rotational Speed vs. Torque Derating Curve At Single-phase AC 200 V 10.0 Without oil seal Instantaneous operation range With oil seal Continuous operation range 1000 2000 3000 4000 5000 6000 7000 Speed [r/min] Ambient Temperature [℃] (mm) Brake Without With 122.3 159.3 φ90 6 h9 Depth10 4-φ 6.6 M6 (L≥14 mm) SD3 Series Instruction Manual...
- Page 35 12.0 Single-phase Instantaneous operation range With oil seal Continuous operation range 1000 2000 3000 4000 Speed [r/min] Ambient Temperature [℃] (mm) Brake Without With 128.0 153.0 97.0 122.0 55.0 57.5 116.0 141.0 φ145 – 102.8 8 h9 Depth20 4-φ 9 φ165 M8(L≥18 mm) (mm) SD3 Series Instruction Manual...
- Page 36 12.0 Single-phase Instantaneous operation range With oil seal Continuous operation range 1000 2000 3000 4000 Speed [r/min] Ambient Temperature [℃] (mm) Brake Without With 163.0 188.0 132.0 157.0 70.0 92.5 151.0 176.0 φ145 – 137.8 8 h9 Depth20 4-φ 9 φ165 M8(L≥18 mm) (mm) SD3 Series Instruction Manual...
- Page 37 20.0 15.0 Instantaneous operation range 10.0 With oil seal Continuous operation range 1000 2000 3000 4000 Speed [r/min] Ambient Temperature [℃] (mm) Brake Without With 145.5 170.5 114.5 139.5 55.0 75.0 133.5 158.5 φ145 – 120.3 8 h9 Depth20 4-φ 9 φ165 M8(L≥18 mm) (mm) SD3 Series Instruction Manual...
- Page 38 12.0 Single-phase Instantaneous operation range With oil seal Continuous operation range 1000 2000 3000 4000 Speed [r/min] Ambient Temperature [℃] (mm) Brake Without With 180.5 205.5 149.5 174.5 70.0 110.0 168.5 193.5 φ145 – 155.3 8 h9 Depth20 4-φ 9 φ165 M8(L≥18 mm) (mm) SD3 Series Instruction Manual...
- Page 39 range With oil seal 10.0 Continuous operation range 1000 2000 3000 4000 Speed [r/min] Ambient Temperature [℃] (mm) Brake Without With 163.0 188.0 132.0 157.0 55.0 92.5 151.0 176.0 φ145 – 137.8 8 h9 Depth20 4-φ 9 φ165 M8(L≥18 mm) (mm) SD3 Series Instruction Manual...
-
Page 40: Encoder
Using the motor with rotations of 180 degrees or less will reduce the encoder's rotational accuracy. For a motor equipped with a brake, follow the brake voltage and polarity specifications. If the brake voltage is less than 12 V or the polarity is reversed, the encoder's rotational accuracy will be reduced. SD3 Series Instruction Manual... -
Page 41: Amplifier
M7A 100 C □□□□ 1 kW SD3 150 C612 M5A 150 C □□□□ M7A 150 C □□□□ 1.5 kW SD3 200 C812 M5A 200 C □□□□ 2 kW Use a motor and the amplifier in a correct combination. SD3 Series Instruction Manual... -
Page 42: Names Of Parts
This will be lit while there is residual Mounting notch hazardous voltage inside the amplifier ⌀ 5.5 (one location) FG(Protective earth) terminal The recommended screw: M5x12 mm with spring washer Two terminals: M4x8 mm screw with spring washer SD3 Series Instruction Manual... - Page 43 This will be lit while there is residual Mounting notch hazardous voltage inside the amplifier ⌀ 5.5 (one location) FG(Protective earth) terminal The recommended screw: M5x12 mm with spring washer Two terminals: M4x8 mm screw with spring washer SD3 Series Instruction Manual...
- Page 44 Green light when Power ON Normal, Red light when Power ON Error, Dim when Power OFF (*3) Regeneration function A regenerative resistor may be installed externally (*4) None Dynamic brake Preparation Control mode Position Control, Velocity Control, Torque Control SD3 Series Instruction Manual...
- Page 45 10 to 60 Hz (no continuous operation allowed at frequency of resonance) Dielectric strength AC 1,500 V for one minute across the primary and FG Electric shock protection Class Ⅰ (mandatory grounding) Overvoltage category Ⅱ Installation environment Pollution degree 2 SD3 Series Instruction Manual...
- Page 46 Servo ON, alarm reset, start 1 (CCW), start 2 (CW), 8-stage speed command Control input 2-stage torque limit Control output Alarm status, servo status, servo ready, under torque limit, brake release Smoothing filter IIR Filter, FIR Filter SD3 Series Instruction Manual...
- Page 47 Auto-tuning Available Encoder output Division Available /Multiplication Available through the SD3 series setup software "Servo Studio" Tuning & Function Setup Tuning with the setup panel on the amplifier front side Overvoltage, low voltage, Overcurrent, Abnormal temperature, Overload, By hardware Encoder error...
- Page 48 Preparation Setting Parameters SD3 series amplifiers are equipped with a software-based dynamic braking function to stop the equipment. This dynamic braking function does not necessarily work in case of disconnection from control power such as amplifier failure and power outage.
- Page 49 2. Specifications 3. Amplifier Overload Detection Feature SD3 series amplifiers features overload protection-overload alarm output and emergency stop upon alarm output - in case of motor operation with load level above the overload detection curve shown below. 1000 1000 Detection Time [s]...
- Page 50 2. Specifications 3. Amplifier 4. Dimensions Figure 1 φ5.5 16 10 φ5.5 2-M5 Mounting Dimension Figure 2 φ5.5 16 10 φ5.5 2-M5 Mounting Dimension (mm) SD3 Series Instruction Manual...
- Page 51 2. Specifications 3. Amplifier Figure 3 φ5.5 φ5.5 2-M5 Mounting Dimension (mm) Figure 4 φ5.5 φ5.5 61.7 61.7 φ5.5 3-M5 Mounting Dimension (mm) SD3 Series Instruction Manual...
- Page 52 2. Specifications MEMO SD3 Series Instruction Manual...
- Page 53 Preparation 1. Installation ........2 1.
-
Page 54: Installation
Do not touch or block the air vent of the amplifier. Do not place objects which would block the air vent. Dust-proof and Waterproof SD3 Series Amplifiers are not waterproof. The protective enclosure rating of motors depends on the rated output. -
Page 55: Motor Installation
When attaching a coupling to the motor shaft end or removing it, avoid direct impact by a tool such as hammer. To remove the pulley, coupling, or any other parts from the shaft, use a puller. SD3 Series Instruction Manual... - Page 56 Types of Mounting and OilSeal SD3 series motors can be mounted in two different ways, horizontally and vertically. Observe the following precautions for motor installation. Horizontal Installation To protect the motor from oil or water, have the cable-pull side downward.
-
Page 57: Amplifier Installation
■ The service life of each amplifier depends on the ambient temperatures of the internal electrolytic capacitor. Electrolytic capacitors last approximately 5 to 6 years under the conditions of 30° C annual average temperature, 80% load factor, and 20 hours or less average daily operation. SD3 Series Instruction Manual... - Page 58 Hook the U-shaped installation notch of the amplifier to the bolt that has been screwed in advance. Tighten the mounting screws on the amplifier top. Loosely screw all amplifier to the chassis first, and then securely tighten them all together. (Tightening torque: 1.4 N・m to 1.6 N・m) SD3 Series Instruction Manual...
-
Page 59: System Wiring
For a CN1 connector cable, use a shielded twisted-pair cable of 2 m or less. The encoder cable length must be 20 meters or less. For stranded wire, use insulation coating, rod or ring crimp terminals. SD3 Series Instruction Manual... - Page 60 High Voltage Non-dangerous voltage cable Circuit breaker Ground resistance : 100 Ω max. Surge absorber Control power DC24 V Servo-Studio Servo-Studio Noise filter Host control equipment Control power DC24 V Electromagnetic contactor Regenerative resistor Control signal I/O cable Encoder cable Motor power cable Motor power cable To connect to the Dynamic braking unit Encoder connector Motor power connector Incremental Brake control circuit Brake connector To connect to Absolute the Dedicated power supply unit ■Installation, Using Pollution degree 2 (IEC 60664-1) Overvoltage Category Ⅱ (IEC 60664) Power supply for holding brake DC24 V SD3 Series Instruction Manual...
- Page 61 High Voltage Non-dangerous voltage cable Circuit breaker Ground resistance : 100 Ω max. Surge absorber Control power DC24 V Servo-Studio Servo-Studio Noise filter Host control equipment Control power DC24 V Electromagnetic contactor Regenerative resistor Control signal I/O cable Encoder cable Motor power cable Motor power cable To connect to the Dynamic braking unit Encoder connector Motor power connector Incremental Brake control circuit Brake connector To connect to Absolute the Dedicated power supply unit ■Installation, Using Pollution degree 2 (IEC 60664-1) Overvoltage Category Ⅱ (IEC 60664) Power supply for holding brake DC24 V SD3 Series Instruction Manual...
- Page 62 Only three phase power supply is available to a 1.5 kW amplifier and a 2 kW amplifier. Motor power cable Motor power connector To connect to the Dynamic braking unit Only “SD3100C412” = 1kW Encoder connector Brake control circuit To connect to the Dedicated power supply unit ■Installation, Using Pollution degree 2 (IEC 60664-1) Overvoltage Category Ⅱ (IEC 60664) Power supply for holding brake DC24 V SD3 Series Instruction Manual...
-
Page 63: Connecting Equipments And Recommended Peripherals
Fuji Electric Co Ltd Product Three-phase: EW32AAG-3P020B 20 A for single-phase (three-phase) 200 V Leakage current of 30 mA. An equivalent product is acceptable Select the capacity and other characteristics according to your entire system configuration. SD3 Series Instruction Manual... - Page 64 OKAYA Electric Industries Co Ltd Product Three-phase: 3SUPF-BE □□ -ER-6- □ Included in SD3 series amplifier's EMC testing. Select the capacity and other characteristics according to your entire system configuration. Electromagnetic contactor This is an on/off switch for the main power supply. Use a surge absorber on the input side of the primary circuit power supply.
- Page 65 Since this product is Class Ⅰ device, protective grounding is mandatory. (Type D grounding: grounding resistance of up to 100 Ω ) Properly ground the product using protective grounding terminals through EMC-compatible casing and control panel. SD3 Series Instruction Manual...
-
Page 66: Wiring To The Connectors
Serial communication data: −Data (Absolute) (No Connect) Encoder power supply: +5 V Signal ground (No Connect) *1) Only for a motor equipped with a brake *2) Connect the negative pole of the battery to SG (Signal Ground). SD3 Series Instruction Manual... - Page 67 Serial communication data: +Data (Absolute) −D Serial communication data: −Data 7, 8 (No Connect) Signal ground SHIELD Shield *1) Only for a motor equipped with a brake *2) Connect the negative pole of the battery to SG (Signal Ground). SD3 Series Instruction Manual...
-
Page 68: Amplifier Connectors And Pinouts
SHIELD wired to the connector casing VBUS USB power supply +5 V D− USB data − PC Communication USB data + (No Connect) USB signal ground Route power and signal wiring suitable for your operation mode. User I/O Connections SD3 Series Instruction Manual... - Page 69 SHIELD wired to the connector casing VBUS USB power supply: +5 V D− USB data: − PC Communication USB data: + (No Connect) USB signal ground Route power and signal wiring suitable for your operation mode. User I/O Connections SD3 Series Instruction Manual...
- Page 70 Route power and signal wiring suitable for your operation mode. User I/O Connections *1)When having single-phase power wired to 1kW amplifiers (SD3100C412), connect the primary circuit power to L1 and L3. *2)Do not connect when using with single-phase power. SD3 Series Instruction Manual...
-
Page 71: Accessory Connector
Image Insulated ferrule with sleeve WAGO JAPAN 216-203, red sleeve (for AGW18) 216-206, blue sleeve (for AGW14) Ferrule Non-insulated ferrule (no sleeve) WAGO JAPAN 216-143 (for AWG18) 216-106 (for AWG14) Ferrule crimping tool WAGO JAPAN 206-204 SD3 Series Instruction Manual... - Page 72 The connector is fixed with the locking latch. Push in the orange-colored connector release. Pull out the connector. Motor power connector Keep pressing the top lever to the arrow direction and pull out the connector. SD3 Series Instruction Manual...
- Page 73 Pull the wire slightly to verify that the wire connection is not loose. (the image to the right) Primary circuit power Pushbutton connector Motor power connector Pushbutton Wire disconnection While pushing in the pushbutton, pull out the cable. Primary circuit power Pushbutton connector Motor power connector Pushbutton SD3 Series Instruction Manual...
-
Page 74: Cables
Shielded twisted pair cables of length no User I/O 1007 80° C 300 V exceeding 2 m Regenerative resistor 1015 105° C 600 V Dynamic brake 1015 105° C 600 V Brake 2517 105° C 300 V 1 pair (2 cores) SD3 Series Instruction Manual... - Page 75 NA6CT-14-4 (for fixed wiring) CABLE MISUMI Group Ink NA6CTR-14-4 (for movable wiring) RING TONGUE TERMINAL R2-4 J.S.T. Mfg. Co., Ltd. FERRULE 216-106 WAGO JAPAN PLUG JL04V-6A18-10SE-EB-R CABLE CLAMP JL04V-18CK13-CR-R SUMITUBE F(Z) 14x0.3 Sumitomo Electric Industries (MARKER TUBE) (arbitrary) (arbitrary) SD3 Series Instruction Manual...
- Page 76 NA20276TSB-C (for fixed wiring) CABLE MISUMI Group Ink NA20276RRSB-C (for movable wiring) HOUSING 3E206-0100KV COVER 3E306-3200-008 HOUSING CM10-SP10S-M TERMINAL CM10-#22SC(C1)(D8) TERMINAL CM10-#22SC(C2)(D8) SUMITUBE F(Z) 7x0.25 Sumitomo Electric Industries SUMITUBE F(Z) 3/64 or 1.5x0.2 Sumitomo Electric Industries SD3 Series Instruction Manual...
- Page 77 170366-1 Tyco Electronics JAPAN SUMITUBE F(Z) 7x0.25 Sumitomo Electric Industries SUMITUBE F(Z) 3/64 or 1.5x0.2 Sumitomo Electric Industries HOUSING DF3-2EP-2C Hirose Electric TERMINAL DF3-EP2428PCFA Hirose Electric CABLE NAUL1007-24-BK MISUMI Group Ink CABLE NAUL1007-24-R MISUMI Group Ink SD3 Series Instruction Manual...
- Page 78 TERMINAL CM10-#22SC(C1)(D8) TERMINAL CM10-#22SC(C2)(D8) SUMITUBE F(Z) 7x0.25 Sumitomo Electric Industries SUMITUBE F(Z) 3/64 or 1.5x0.2 Sumitomo Electric Industries HOUSING DF3-2EP-2C Hirose Electric TERMINAL DF3-EP2428PCFA Hirose Electric CABLE NAUL1007-24-BK MISUMI Group Ink CABLE NAUL1007-24-R MISUMI Group Ink SD3 Series Instruction Manual...
- Page 79 Brake Cable 2 PLUG Pin No. Signal Color BRK+ BRACK BRK− BRACK Item Model Supplier MAST-UL2517-19-2 (for fixed wiring) CABLE MISUMI Group Ink NA3UCR-18-2 (for movable wiring) PLUG CM10-SP2S-M-D CONTACT CM10-#22SC(S2)(D8)-100 SUMITUBE F(Z) 8x0.25 Sumitomo Electric Industries SD3 Series Instruction Manual...
-
Page 80: Timing Diagrams
Output Transistor I/O Output Status Contacts of Input Circuit I/O Input Status Open Open Close Close (The contact paired with COM- is closed) (Close the contact paired with GND) : Internal Status of the Amplifier Internal SD3 Series Instruction Manual... - Page 81 Alarm Status ( = NO ALARM ) *1) After Clear Parameter execution, T1 needs approximately 5 seconds for parameter initialization. *2) SRDY turns ON when Primary Circuit Power and PRDY turns ON consecutively while Internal Error Status remains No Errors. SD3 Series Instruction Manual...
- Page 82 (*2) Brake Release MBRK Alarm Status ( = NO ALARM ) Motor Rotational Speed 30 r/min *1) Motor Excitation Status remains OFF until Motor Rotational Speed drops to 30 r/min or below. *2) T1 is specified by Bake-Release Delay Time (No.238.0). SD3 Series Instruction Manual...
- Page 83 SVON Internal Error Status Internal NO ERROR Motor Excitation Status Internal T1 Deceleration Stop Status Internal 20 ms(typ.) Servo Status SERVO 20 ms(typ.) Brake Release MBRK Alarm Status ( = NO ALARM ) *) T1 is specified by Servo OFF Delay time (No.237.0). SD3 Series Instruction Manual...
- Page 84 The rotational speed drops to the value specified by Deceleration stop Rotational speed to cancel (No.227.0) or below. Deceleration Stop Method (No.224.0) = 0 (free run) MBRK turns OFF when Motor Excitation Status becomes OFF. SD3 Series Instruction Manual...
- Page 85 Errors related to Inverter output part: Free-run *5) In case of the following alarms, Servo Status will remain ON until Deceleration Stop Status turns OFF. a) Encoder related errors b) Control power voltage drop error SD3 Series Instruction Manual...
- Page 86 Alarm Status 20 ms(typ.) ( = NO ALARM ) ( = ALARM ) Motor Rotational Speed 30 r/min 0 r/min *1) Motor Excitation Status remains OFF until motor rotational speed drops to 30 r/min or below. *2) T1 is specified by Bake release Delay time (No.238.0). SD3 Series Instruction Manual...
- Page 87 Servo Ready 2 ms(typ.) SRDY Servo On SVON 25 ms(min) Reset RESET 20 ms(typ.) Internal Error Status ERROR Internal NO ERROR Motor Excitation Status Internal Deceleration Stop Status Internal Servo Status SERVO Brake Release MBRK 20 ms(typ.) Alarm Status ( = NO ALARM ) ( = ALARM ) SD3 Series Instruction Manual...
- Page 88 *1) MBRK turns OFF is when one of the following becomes true, a) Deceleration Stop completes, or b) Motor rotational speed, after the time specified by Parameter No.234.0 elapses, drops to the value specified by Parameter No.235.0 or below. *2) If the deceleration stop method is quick stop, the motor will remain excited during deceleration stop. SD3 Series Instruction Manual...
- Page 89 (Output Transistor Status, I/O Input Status, and Internal Status) 25 ms(min.) Reset RESET 20 ms(typ.) Internal Error Status Internal ERROR NO ERROR 20 ms(typ.) Dynamic Brake Release The value of the Parameter The value of the Parameter No.233.3 DBRK No.224.3 Alarm Status ( = ALARM ) ( = NO ALARM ) SD3 Series Instruction Manual...
- Page 90 Deceleration Stop Status turns OFF. b) Motor Rotational Speed drops to the value of Deceleration stop - Rotational speed to cancel (No.227.0) or below. *2) Deceleration Stop Status turns OFF when deceleration stop conditions (No.224.1, 226.0, or 227.0) are met. SD3 Series Instruction Manual...
- Page 91 *1) Deceleration Stop Status turns OFF after the deceleration stop conditions set by the Parameters (No.224.1, 226.0, and 227.0) are met and the time amount set to Quick Brake Delay Time (No.236.0) elapses. *2) When DBRK output (No.224.3) = 1 (dynamic brake) after Deceleration Stop (at Servo OFF) ends. SD3 Series Instruction Manual...
- Page 92 3. Preparation MEMO SD3 Series Instruction Manual...
- Page 93 Connections 1. Introduction ........2 2.
-
Page 94: Introduction
4. Connection 1. Overview 1. Introduction This SD3 series feature seven operation modes for motor, which are combinations of Control Mode and Command Mode options. Work on CN1 connector wiring according to the mode that you are using. Control Mode... - Page 95 For actual wiring, check the pin numbers etched on the connector body as well. For further details, refer to Descriptions of CN1 Connector Signals and Interface Circuit of CN1 Connector. Page 24 Descriptions of CN1 Connector Signals Page 45 I/F Circuit of CN1 Connector SD3 Series Instruction Manual...
-
Page 96: Position Control Mode
Command input prohibited Encoder Z-phase (open collector) PCLR SRDY+ Deviation counter clear Servo ready + CCWL SRDY- CCW drive restriction Servo ready - ALM+ CW drive restriction Alarm status + TLSEL1 ALM- Torque Limit Alarm status - SD3 Series Instruction Manual... - Page 97 *6) If Z-phase pulse width is too small to be measured accurately by the host controller, decrease pulse division rate by using pulse output ratio (parameters No.276.0 and No.278,0) or decrease rotational speed to increase the pulse width. Pulse width [ms] = 2 / rotational speed [r/min] / (division ratio × 2 ) × 60 × 1,000. SD3 Series Instruction Manual...
-
Page 98: Differential, I/O Setting Option 1
Servo ready + CCWL SRDY- CCW drive restriction Servo ready-Servo ready - ALM + CW drive restriction Alarm status + TLSEL1 ALM- Torque Limit Alarm status - *) For these pins function, change I/O setting with "Servo Studio". SD3 Series Instruction Manual... - Page 99 *6) If Z-phase pulse width is too small to be measured accurately by the host controller, decrease pulse division rate by using pulse output ratio (parameters No.276.0 and No.278,0) or decrease rotational speed to increase the pulse width. Pulse width [ms] = 2 / rotational speed [r/min] / (division ratio × 2 ) × 60 × 1,000. SD3 Series Instruction Manual...
-
Page 100: Differential, I/O Setting Option 2
Dynamic brake release + CCWL DBRK- CCW drive restriction Dynamic brake release - ALM+ CW drive restriction Alarm status + TLSEL1 ALM- Torque Limit Alarm status - *) For these pins function, change I/O setting with "Servo Studio". SD3 Series Instruction Manual... - Page 101 *6) If Z-phase pulse width is too small to be measured accurately by the host controller, decrease pulse division rate by using pulse output ratio (parameters No.276.0 and No.278,0) or decrease rotational speed to increase the pulse width. Pulse width [ms] = 2 / rotational speed [r/min] / (division ratio × 2 ) × 60 × 1,000. SD3 Series Instruction Manual...
-
Page 102: Open Collector, Standard I/O Configuration
Torque limiting HOLD Command input prohibited Encoder Z-phase (open collector) PCLR SRDY + Deviation counter clear Servo ready+ CCWL SRDY- CCW drive restriction Servo ready- ALM+ CW drive restriction Alarm status+ TLSEL1 ALM- Torque Limit Alarm status- SD3 Series Instruction Manual... - Page 103 *6) If Z-phase pulse width is too small to be measured accurately by the host controller, decrease pulse division rate by using pulse output ratio (parameters No.276.0 and No.278,0) or decrease rotational speed to increase the pulse width. Pulse width [ms] = 2 / rotational speed [r/min] / (division ratio × 2 ) × 60 × 1,000. SD3 Series Instruction Manual...
- Page 104 Torque limiting HOLD Command input prohibited Encoder Z-phase (open collector) PCLR SRDY+ Deviation counter clear Servo ready+ CCWL SRDY- CCW drive restriction Servo ready- ALM+ CW drive restriction Alarm status+ TLSEL1 ALM- Torque Limit Alarm status- SD3 Series Instruction Manual...
- Page 105 *6) If Z-phase pulse width is too small to be measured accurately by the host controller, decrease pulse division rate by using pulse output ratio (parameters No.276.0 and No.278,0) or decrease rotational speed to increase the pulse width. Pulse width [ms] = 2 / rotational speed [r/min] / (division ratio × 2 ) × 60 × 1,000. SD3 Series Instruction Manual...
-
Page 106: Internal Position Command
Encoder Z-phase (open collector) PCSEL2 SRDY+ Point No. Select 2 Servo ready + PCSEL3 SRDY- Point No. Select 3 Servo ready - PCSEL4 ALM+ Point No. Select 4 Alarm status + ALM- Home position sensor Alarm status - SD3 Series Instruction Manual... - Page 107 *6) If Z-phase pulse width is too small to be measured accurately by the host controller, decrease pulse division rate by using pulse output ratio (parameters No.276.0 and No.278,0) or decrease rotational speed to increase the pulse width. Pulse width [ms] = 2 / rotational speed [r/min] / (division ratio × 2 ) × 60 × 1,000. SD3 Series Instruction Manual...
-
Page 108: Optional I/O Configuration
Servo Status + PCSEL3 SERVO- Point No. Select 3 Servo Status - HOME ALM+ Homing start Alarm status + TLSEL1 ALM- Torque limit Alarm status - *) For these pins function, change I/O setting with "Servo Studio". SD3 Series Instruction Manual... - Page 109 *6) If Z-phase pulse width is too small to be measured accurately by the host controller, decrease pulse division rate by using pulse output ratio (parameters No.276.0 and No.278,0) or decrease rotational speed to increase the pulse width. Pulse width [ms] = 2 / rotational speed [r/min] / (division ratio × 2 ) × 60 × 1,000. SD3 Series Instruction Manual...
-
Page 110: Velocity Control Mode
Alarm reset Encoder Z-phase (open collector) HOLD SRDY+ Command input prohibited Servo ready + CCWL SRDY- CCW drive restriction Servo ready - ALM+ CW drive restriction Alarm status + TLSEL1 ALM- Torque Limit Alarm status - SD3 Series Instruction Manual... - Page 111 24 V control power supply, connect A_GND to signal ground of the host controller, not to GND of control power, If the analog velocity command circuit is not isolated, connect A_GND to GND of control power. SD3 Series Instruction Manual...
-
Page 112: Internal Velocity Command
Start 1 (CCW rotation) Servo ready + VCRUN2 SRDY- Start 2 (CW rotation) Servo ready - VCSEL1 ALM+ Speed Select 1 Alarm status + VCSEL2 ALM- Speed Select 2 Alarm status - VCSEL3 Speed Select 3 TLSEL1 Torque Limit SD3 Series Instruction Manual... - Page 113 *6) If Z-phase pulse width is too small to be measured accurately by the host controller, decrease pulse division rate by using pulse output ratio (parameters No.276.0 and No.278,0) or decrease rotational speed to increase the pulse width. Pulse width [ms] = 2 / rotational speed [r/min] / (division ratio × 2 ) × 60 × 1,000. SD3 Series Instruction Manual...
-
Page 114: Torque Control Mode
Encoder Z-phase (open collector) HOLD SRDY + Command input prohibited Servo ready + CCWL SRDY- CCW drive restriction Servo ready - ALM + CW drive restriction Alarm status + TLSEL1 ALM- Torque Limit Alarm status - SD3 Series Instruction Manual... - Page 115 24 V control power supply, connect A_GND to signal ground of the host controller, not to GND of control power, If the analog velocity command circuit is not isolated, connect A_GND to GND of control power. SD3 Series Instruction Manual...
-
Page 116: Descriptions Of Cn1 Connector Signals
Differential Analog Velocity Command Position Control Mode Velocity Control Mode 24 V open collector Internal Velocity Command Position Control Mode Torque Control Mode 5 V open collector Analog Torque Command Position Control Mode Internal Position Command SD3 Series Instruction Manual... - Page 117 Use SELV power supply with reinforced insulation that is isolated from hazardous voltages. G24V G24V: Control power GND Amplifier control power. dif. Differential 24 V Internal Analog Internal Analog Position Velocity Velocity Torque open collector open collector SD3 Series Instruction Manual...
-
Page 118: Descriptions Of Cn1 Connector Signals
Troubleshooting Alarms and Remedies Close Clears Alarm and Deviation counter. RESET/PCLR Troubleshooting Alarms and Remedies Alarm Clear /Deviation Counter Clear dif. Differential 24 V Internal Analog Internal Analog Position Velocity Velocity Torque open collector open collector SD3 Series Instruction Manual... -
Page 119: Position Control Mode
・No.390.0, No.391.0 These are used to set acceleration/deceleration time for Homing. ・No.392.0…No.399.0 These parameters are used to set 8 speeds. You can switch between the target speeds with combinations of signals, VCSEL1, VCSEL2 , and VCSEL3 SD3 Series Instruction Manual... - Page 120 : No contact with COM- ■ Related Parameters ・No.646.3 This parameter enables you to select motion per Point No.0 from either Homing or Point Table Motion. Close Motor rotates in CW direction VCRUN2 Internal Velocity Start 2 VCRUN1(Pin No.6) SD3 Series Instruction Manual...
- Page 121 Servo OFF and the motor stops its motion. No alarm (*2) E-STOP occurs. A warning is output by parameter setting. Emergency Stop Appendices Functions *1) In I/O configuration Option 1 *2) In I/O configuration Option 2 SD3 Series Instruction Manual...
- Page 122 Open Close You can select the target speed setting with a combination of VCSEL2 VCSEL1…VCSEL3. Speed Select 2 VCSEL1(Pin No.8) dif. Differential 24 V Internal Analog Internal Analog Position Velocity Velocity Torque open collector open collector SD3 Series Instruction Manual...
- Page 123 Be sure to turn off this signal after homing is completed. Open Close You can select the target speed setting with a combination of VCSEL3 VCSEL1…VCSEL3. Speed Select 3 VCRUN1(Pin No.6) *1) In Standard I/O configuration *2) In Optional I/O configuration. SD3 Series Instruction Manual...
- Page 124 Enables you to change the polarity of home sensor detection. *1) In Standard I/O configuration *2) In Optional I/O configuration. dif. Differential 24 V Internal Analog Internal Analog Position Velocity Velocity Torque open collector open collector SD3 Series Instruction Manual...
-
Page 125: General-Purpose Output
: Contact with COM- Close : No contact with COM- Open ■ Related Parameters ・No.644.0 Enables you to select timing of Point No. output and its content. *1) In Standard I/O configuration *2) In Optional I/O configuration. SD3 Series Instruction Manual... - Page 126 Testing motion complete. ・In Servo-Off state Open Close Outputs the started or completed Point No. with a combination of PM1… PM3. (*2) Point No.3 PM1(Pin No.13) *1) In Standard I/O configuration *2) In Optional I/O configuration. SD3 Series Instruction Manual...
- Page 127 Outputting a warning Warning (*2) Troubleshooting Warnings and Remedies (*2) *1) In I/O configuration Option 1 *2) In I/O configuration Option 2 dif. Differential 24 V Internal Analog Internal Analog Position Velocity Velocity Torque open collector open collector SD3 Series Instruction Manual...
- Page 128 TLSEL1 (Torque Limit) OFF. (*3) *1) In Standard I/O configuration *2) In Optional I/O configuration *3) In I/O configuration Option 1 dif. Differential 24 V Internal Analog Internal Analog Position Velocity Velocity Torque open collector open collector SD3 Series Instruction Manual...
- Page 129 If Z-phase pulse width is too small to be measured accurately by the host controller, decrease frequency division ratio or rotational speed to increase the pulse width. Pulse width [ms] = 2 / rotational speed [r/min] / (division ratio × 2 ) × 60 × 1,000. SD3 Series Instruction Manual...
- Page 130 *1) In Standard I/O configuration *2) In Standard I/O configuration *3) In Optional I/O configuration *4) In I/O configuration Option 2 dif. Differential 24 V Internal Analog Internal Analog Position Velocity Velocity Torque open collector open collector SD3 Series Instruction Manual...
- Page 131 No alarm is occurring. (Pin No.22) Control power is supplied to the amplifier. ■ TIP Alarm The emitter side of the output transistor is independent . Cascade connection to multiple amplifiers is possible. COM- Troubleshooting Alarms and Remedies SD3 Series Instruction Manual...
-
Page 132: Command Input
(Pin No.29) Use this in combination with /CMD_PLS. 24 V open collector CC-D: power Use this in combination with /CMD_DIR. dif. Differential 24 V Internal Analog Internal Analog Position Velocity Velocity Torque open collector open collector SD3 Series Instruction Manual... - Page 133 Command signal input from the host controller to the amplifier. A power input terminal of 5 V open collector. CC_P-5V (Pin No.49) CC-P-5V: CC_D-5V (Pin No.50) Use this in combination with /CMD_PLS 5 V Open collector CC-D-5V: power Use this in combination with /CMD_DIR. SD3 Series Instruction Manual...
- Page 134 GND of control power, If the analog velocity command circuit is not isolated, connect A_GND to GND of control power. dif. Differential 24 V Internal Analog Internal Analog Position Velocity Velocity Torque open collector open collector SD3 Series Instruction Manual...
-
Page 135: Encoder Output
(Pin No.42) Pulse width [ms] = 2 / rotational speed [r/min] / (division ratio × 2 ) × 60 × 1,000. Signal ground SD3 Series Instruction Manual... -
Page 136: Communication
(G24 V, COM- Connect signal ground of the communication IC of the host (Pin No.45) controller. Signal ground dif. Differential 24 V Internal Analog Internal Analog Position Velocity Velocity Torque open collector open collector SD3 Series Instruction Manual... -
Page 137: I/F Circuit Of Cn1 Connector
Connect to input devices such as switch, open-collector output transistor, and relay contact. When the input device contact is closed and the contact pair of general-purpose pin and power supply GND becomes closed, the amplifier turns on. Amplifier 4.7 kΩ I/O power supply 3 (COM+) 24 V±10 % General-purpose input 4 to 11 (SVON etc.) Input device SD3 Series Instruction Manual... - Page 138 This is cut off by a prompt stop. Relay (MBRK etc.) Surge absorber MAX 50 mA (COM−) Motor 19 & 21 (SRDY+, ALM+) 24 V MAX 50 mA 20 & 22 Fuse (10 A) (SRDY−, ALM−) Power supply for motor brake dif. Differential 24 V Internal Analog Internal Analog Position Velocity Velocity Torque open collector open collector SD3 Series Instruction Manual...
- Page 139 Max command pulse frequency: 200 kpps 49 (CC̲P-5V) Be sure to set [Pulse train command 330 Ω Input filter (No.33.0)] to at least 7. 390 Ω Pulse 27 (/CMD̲PLS) 50 (CC̲D-5V) 330 Ω 390 Ω Direction 31 (/CMD̲DIR) Twisted-pair cable Shield SD3 Series Instruction Manual...
- Page 140 If not isolated Connect A_GND with GND of control power. Amplifier 32 (A̲SPEED, A̲TRQ) 33 (A̲GND) A_GND Twisted-pair cable Shield dif. Differential 24 V Internal Analog Internal Analog Position Velocity Velocity Torque open collector open collector SD3 Series Instruction Manual...
- Page 141 Amplifier (OUT̲A) Output A-phase 220 Ω Encoder signal output (/OUT̲A) (RS-422) (OUT̲B) Output B-phase 220 Ω (/OUT̲B) (OUT̲B) Output Z-phase 220 Ω (/OUT̲B) (SG) Twisted-pair cable Shield Encoder Z-phase is synchronized with A-phase and output. SD3 Series Instruction Manual...
- Page 142 Be sure to use shielded twisted-pair cable as a noise countermeasure. Host Controller Amplifier 43 (485) 44 (/485) 45 (SG) Twisted-pair cable Shield dif. Differential 24 V Internal Analog Internal Analog Position Velocity Velocity Torque open collector open collector SD3 Series Instruction Manual...
- Page 143 Setting Parameters 1. Overview ......... . 2 2.
-
Page 144: Overview
Parameter Tuning Method Tuning with the Setup Panel at front the amplifier. Tuning with the setup software "Servo Studio". Install it on the user-supplied PC. SD3 Series Instruction Manual... -
Page 145: Setup Panel
Use this button to move to higher order digits when changing the data. LEFT Button Do not press more than one button simultaneously on the Setup Panel. Otherwise, the information displayed on the DISPLAY LED will be incomplete. SD3 Series Instruction Manual... -
Page 146: Displaying A Number With 6 Or More Digits
3: Model Code and Serial Number 0002020400 Selecting the digit to edit button to move the blinking position to the digit place that you want to edit. button to change the value of the blinking digit. SD3 Series Instruction Manual... - Page 147 - JOG Operation to execute testing with no command input from the host. - Clear Parameter to reset all parameters to the factory default. Auxiliary Function Mode - Clear Encoder to initialize multi-turn data of absolute encoder. Character table for 7-segement LED display + - SD3 Series Instruction Manual...
-
Page 148: Using The Setup Panel
Alarm Display Mode P. 17 Parameter Setting Mode P. 19 Quick Tuning Mode P. 20 Auto Tuning Mode P. 21 Normal End Parameter Saving Mode Approximately P. 23 Abnormal End 5 seconds Auxiliary Function Mode P. 24 SD3 Series Instruction Manual... -
Page 149: Status Display Mode
Encoder Serial Number (P. 12) Speed Deviation I/O Status (P. 12) (P. 8) Torque Command Value ⋮ (P. 12) Load Factor (P. 13) Press for the direction of the flow( ). Press for the reverse direction. SD3 Series Instruction Manual... - Page 150 The assignments of I/O pins depend on each control mode. Check each corresponding pin. Connections :ON :OFF I/O Item Number : Input Signal : Output Signal Output Signal Pin No. Input Signal Pin No. ⋮ Reserved ⋮ Reserved *) NOTE: The display of is fixed at (OFF). SD3 Series Instruction Manual...
- Page 151 [ pulse/200 µs ]: 1 kW to 2 kW Speed derived from Pulse Train Command Input (Position) : positive : negative 5 Analog Velocity Command Status No.49 [ r/min ] Analog Velocity Command input from the host controller : positive : negative SD3 Series Instruction Manual...
- Page 152 Status No.78 [ command pulse ] Indicates the difference between the position command value and position feedback value. Current display signs (Press to change the display.) : +/- sign : first 5 digits : last 5 digits SD3 Series Instruction Manual...
- Page 153 [ encoder pulse ] Indicates the difference between the position control value and the position feedback value Current display signs (Press to change the display.) : +/- sign : first 5 digits : last 5 digits SD3 Series Instruction Manual...
- Page 154 Indicates the difference between the speed command value and the speed feedback value : positive : negative 17 Torque Command Value Status No.113 [ 0.1% ] Indicates the value of motor output torque : positive : negative SD3 Series Instruction Manual...
- Page 155 21 Encoder Rotor Mechanical Angle (Multiple-turns) Status No.195 [ encoder pulse ] Indicates the cumulative value of the motor's multiple-turns Current display signs (Press to change the display.) : +/- sign : first 5 digits : last 5 digits SD3 Series Instruction Manual...
- Page 156 [ count ] Indicates how many times encoder communication has been retried (Indicates zero times in this example.) 25 Encoder Data Error Counter Status No.218 [ count ] Encoder Data Error Count (Indicates zero times in this example.) SD3 Series Instruction Manual...
- Page 157 : you do not need install a regenerative resistor. : install a regenerative resistor. Preparation Regenerative Resistor CAUTION appears while the motor is decelerating, you may need a regenerative resistor. Determine if a regenerative resistor is necessary or not as described above. SD3 Series Instruction Manual...
- Page 158 29 Serial Number(Amplifier, Motor, Encoder) Amplifier [ encoder pulse ] Indicates the single-turn absolute value of the motor. Motor Current display signs (Press to change the display.) Encoder : +/- sign : first 5 digits : last 5 digits SD3 Series Instruction Manual...
-
Page 159: Alarm Display Mode
The alarm occurrence hours are as same as the cumulative operating hours displayed under the Alarm tab in "Servo Studio". History No.9 Alarm that is occurring now SD3 Series Instruction Manual... - Page 160 Overvoltage error (inside the amplifier) Power supply error (primary circuit power) List of Warnings Display 警告 Warning Display Warning Encoder overheat detection Encoder communication warning Encoder battery voltage drop Excessive position deviation error detection Emergency stop SD3 Series Instruction Manual...
-
Page 161: Parameter Setting Mode
When you finish with the change, the blink turns solid. Save the parameter settings in Parameter Saving mode to the amplifier. If you shut down the amplifier without saving them, the changes will not take effect. SD3 Series Instruction Manual... -
Page 162: Quick Tuning Mode(Position Control Mode Only)
Tuning Items Parameter Saving Mode. Parameter Saving Mode Save the parameter settings in Parameter Saving mode to the amplifier. If you shut down the amplifier without saving them, the changes will not take effect. SD3 Series Instruction Manual... -
Page 163: Auto Tuning Mode(Position Control Mode)
Gain FF compensation 1 Position Control Mode Gain FF compensation 2 Damping ratio Save the parameter settings in Parameter Saving mode to the amplifier. If you shut down the amplifier without saving them, the changes will not take effect. SD3 Series Instruction Manual... -
Page 164: Auto Tuning Mode(Velocity Control Mode)
Velocity Control Mode Parameter Saving Mode Gain FF compensation 1 Damping ratio Save the parameter settings in Parameter Saving mode to the amplifier. If you shut down the amplifier without saving them, the changes will not take effect. SD3 Series Instruction Manual... -
Page 165: Parameter Saving Mode
Save the parameter settings in Parameter Saving mode to the amplifier. If you shut down the amplifier without saving them, the changes will not take effect. If you changed parameters for which control-power cycle is needed, cycle power after the new parameter settings are saved. SD3 Series Instruction Manual... -
Page 166: Auxiliary Function Mode
Parameter Clear. Clear Encoder P. 26 ・This function initializes the multi-turn data of absolute encoder. ・Control-power cycle is required. ・Perform this operation in a Servo-OFF state. If operated in a Servo-ON state, an alarm will occur. SD3 Series Instruction Manual... - Page 167 0 to 60,000 387.0 Target Speed 300 r/min 0 to Maximum rotational speed of motor *) The larger the setting, is the longer it takes for the motor to stop after releasing any of the buttons. SD3 Series Instruction Manual...
- Page 168 Parameters Clear execution Press and then go back to to repeat the process. Cycle control-power to complete the Clear Encoder execution. Use this in a Servo-OFF state. If used in a Servo-ON state, an alarm will occur. SD3 Series Instruction Manual...
-
Page 169: Overview Of "Servo Studio" (Setup Software)
4. Overview of "Servo Studio" (Setup Software) Product Overview "Servo Studio" is a dedicated setup software to be installed on a user-supplied PC connecting to a SD3 Series servo amplifier with a USB cable. It enables you to perform the following operations easily. Features: ・setting, saving, and writing amplifier parameters... - Page 170 Indicates the control mode. Group 2 (Blue) Indicates the usage type. Group 3 (Yellow) Indicates the type of the settings. Group 4 (Green) Indicates that control-power cycle is required. Group 5 (Dark Blue) Indicates the data size. SD3 Series Instruction Manual...
-
Page 171: Parameters
Those parameters need power cycling for their setting Control Power Cycle (Green) changes to take effect. 2-byte data 2-Byte Data Communications Manual: RS-485 Communications (Dark 4-byte data Blue) 4-Byte Data Communications Manual: RS-485 Communications SD3 Series Instruction Manual... - Page 172 Voltage Sag Detection Delay time 305.0 RS-485 Communications Drive Restriction Input Name Name Switch Setup 67.0 Address Deceleration method 67.1 Communication speed Idling status 67.2 Stop bit Retaining position deviation counter 67.3 Parity Minimum response time 11.0 SD3 Series Instruction Manual...
- Page 173 229.0 Low-pass filter Auto setting 160.2 Extension Time 236.0 Time constant 162.0 Deceleration time 239.0 Switch 160.1 Frequency 168.0 Notch filter Width 169.0 Depth 170.0 Switch 160.3 Frequency 171.0 Notch filter 2 Width 172.0 Depth 173.0 SD3 Series Instruction Manual...
- Page 174 Control gain 2 116.0 Acceleration time 726.0 ~ Gain FF compensation 1 117.0 Deceleration time 727.0 ~ Gain FF compensation 2 118.0 Dwell time 728.0 ~ Integral gain 119.0 Positioning completion 729.0 ~ Current control gain 193.0 SD3 Series Instruction Manual...
- Page 175 Input filter Numerator 288.0 Gain FF compensation 1 132.0 Denominator 289.0 Integral gain 133.0 Numerator 290.0 Current control gain 193.0 Input gain Denominator 291.0 Numerator 292.0 Denominator 293.0 Torque limit Numerator 294.0 Denominator 295.0 Speed Limit 152.0 SD3 Series Instruction Manual...
- Page 176 Characteristics RS-485 communication: No. 6.0 Communication speed 0 to 5 Specify the communications speed for the RS-485 communication. Settings Communications Speed [bps] 2,400 Function 4,800 9,600 19,200 38,400 57,600 Related To No.4.0, No.6.1, No.6.2, No.8.0, No.11.0 SD3 Series Instruction Manual...
-
Page 177: Parameters
RS-485 communication: No. 11.0 Minimum response time 0 to 255 [ms] Use this item to adjust the response time from the amplifier to meet the communication Function specifications of the host control device. Related To No.4.0, No.8.0 SD3 Series Instruction Manual... - Page 178 Function Pulse and Direction ( PLS + DIR ) Quadrature phase difference pulse (A-Phase + B-Phase) Positive pulse and Negative pulse (CCW + CW) Prerequisite Position Control Mode Related To No.2.0, No.3.0, No.32.1, No.32.3, No.33.0, No.642.0 SD3 Series Instruction Manual...
- Page 179 Pass-Through Pulse Width [ns] Settings Pass-Through Pulse Width [ns] Function No filter 600 (500 kHz) 50 (4 MHz) 1,000 1,200 150 (2 MHz) 1,600 (250 kHz) 2,000 300 (1 MHz) 2,300 3,100 Related To No.3.0, No.32.0 Appendices SD3 Series Instruction Manual...
- Page 180 Analog Velocity: Input filter switch (No.62.1) = 1 (Enable) The ratio of No.288.0 (Numerator) to No.289.0 (Denominator) must not be higher than 1. Remark If the ratio = 1, filtering will not take effect. Related To No. 62.1 SD3 Series Instruction Manual...
- Page 181 CW Speed Limit = Maximum rotational speed of motor × 55.0 Maximum Rotational Speed of Motor Motor Capacity Maximum rotational speed of motor [r/min] 50 W to 750 W 6,000 1 kW to 2 kW 3,000 SD3 Series Instruction Manual...
- Page 182 0 r/min with the input voltage at the time of servo on. Manual: Select this to manually adjust the offset value, such that the speed command becomes 0 r/min with 0 V input voltage. Related To No.60.0 SD3 Series Instruction Manual...
- Page 183 Switch 0, 1 Enable/Disable Speed Deviation Error Detection. Settings Speed deviation error detection Function Disable Enable When using Torque command limit, select "Disable" so that an alarm will not occur during limiting. Related To No.90.0, No.91.0 SD3 Series Instruction Manual...
- Page 184 Velocity Control Internal Command Torque Control Analog Command Communication Operation Mode Operation Control Alarm Detection Tuning Homing Torque Limit Deceleration Stop and so on Vibration Control Switch Selection Numeric Value Control Power Cycle 2-Byte Data 4-Byte Data SD3 Series Instruction Manual...
- Page 185 Motor's stopping upon drive restriction input results in position deviation from the input pulse. Use this parameter to select either keep or clear that position deviation. Function Settings Position Deviation Counter Keep Clear Related To No.67.0, No.67.1, No.67.2 SD3 Series Instruction Manual...
- Page 186 Velocity Control Internal Command Torque Control Analog Command Communication Operation Mode Operation Control Alarm Detection Tuning Homing Torque Limit Deceleration Stop and so on Vibration Control Switch Selection Numeric Value Control Power Cycle 2-Byte Data 4-Byte Data SD3 Series Instruction Manual...
- Page 187 Motor Capacity Default Units Conversion to Time 50 W to 750 W 160 µs 3.2 ms 1 kW to 2 kW 200 µs 3.2 ms Position Deviation Function Positioning Complete Positioning Complete Range Time Detection delay time Related To No.64.0, No.68.0, No.69.0, No.70.0 SD3 Series Instruction Manual...
- Page 188 Velocity Control Internal Command Torque Control Analog Command Communication Operation Mode Operation Control Alarm Detection Tuning Homing Torque Limit Deceleration Stop and so on Vibration Control Switch Selection Numeric Value Control Power Cycle 2-Byte Data 4-Byte Data SD3 Series Instruction Manual...
- Page 189 Complete shutoff of notch frequency input 100% pass-through Smaller setting value gives deeper filter. Larger setting value gives shallower filter. Prerequisite Position command filter 1: Type (No.66.0) = 2 (Notch filter) or 3 (γ-Notch filter) Related To No.66.0, No.74.0, No.75.0, No.76.0 SD3 Series Instruction Manual...
- Page 190 Remark Setting this parameter during pulse input or presence of residual pulse could cause positioning failure. The larger the setting is, the longer the delay time from command input becomes. Related To No.66.0, No.66.1 Tuning SD3 Series Instruction Manual...
- Page 191 Velocity Control Internal Command Torque Control Analog Command Communication Operation Mode Operation Control Alarm Detection Tuning Homing Torque Limit Deceleration Stop and so on Vibration Control Switch Selection Numeric Value Control Power Cycle 2-Byte Data 4-Byte Data SD3 Series Instruction Manual...
- Page 192 Velocity Control Internal Command Torque Control Analog Command Communication Operation Mode Operation Control Alarm Detection Tuning Homing Torque Limit Deceleration Stop and so on Vibration Control Switch Selection Numeric Value Control Power Cycle 2-Byte Data 4-Byte Data SD3 Series Instruction Manual...
- Page 193 Converted to Time 50 W to 750 W 250 [160 µs] 40 ms 1 kW to 2 kW 200 [200 µs] Prerequisite Speed deviation error detection - Switch (No.65.1) = 1 (Enable) Related To No.65.1, No.90.0 SD3 Series Instruction Manual...
- Page 194 Inertia ratio upper bound 100 to 10,000 Function Set the upper bound of the inertia ratio automatically adjusted in Quick Tuning. Prerequisite Tuning: Control gain set - Automatic switch (No.120.0): 1 (Enable) Related To No.110.1, No.120.0 SD3 Series Instruction Manual...
- Page 195 Velocity Control Internal Command Torque Control Analog Command Communication Operation Mode Operation Control Alarm Detection Tuning Homing Torque Limit Deceleration Stop and so on Vibration Control Switch Selection Numeric Value Control Power Cycle 2-Byte Data 4-Byte Data SD3 Series Instruction Manual...
- Page 196 ・If Torque command filter: Low-pass filter - Auto setting (No.160.2) = 1 (auto setting ON), then Torque command filter: Low-pass filter - Time constant (No.162.0) will be included in the gain set. Related To No.113.1, No.114.0, No.115.0, No.116.0, No.117.0, No.118.0, No.119.0, No.162.0 Tuning SD3 Series Instruction Manual...
- Page 197 Velocity Control Internal Command Torque Control Analog Command Communication Operation Mode Operation Control Alarm Detection Tuning Homing Torque Limit Deceleration Stop and so on Vibration Control Switch Selection Numeric Value Control Power Cycle 2-Byte Data 4-Byte Data SD3 Series Instruction Manual...
- Page 198 Velocity Control Internal Command Torque Control Analog Command Communication Operation Mode Operation Control Alarm Detection Tuning Homing Torque Limit Deceleration Stop and so on Vibration Control Switch Selection Numeric Value Control Power Cycle 2-Byte Data 4-Byte Data SD3 Series Instruction Manual...
- Page 199 - Control Gain Set (No.113.0) Remark - Inertia conditions (No.113.1) - Control Level (No.114.0) ・To reduce position deviations after the command becomes zero, increase the value of Control Gain 1 (No.115.0). Related To No.113.0, No.113.1, No.114.0, No.115.0, No.118.0 Tuning SD3 Series Instruction Manual...
- Page 200 Velocity Control Internal Command Torque Control Analog Command Communication Operation Mode Operation Control Alarm Detection Tuning Homing Torque Limit Deceleration Stop and so on Vibration Control Switch Selection Numeric Value Control Power Cycle 2-Byte Data 4-Byte Data SD3 Series Instruction Manual...
- Page 201 Control gain set - Upper bound 5 to 45 [ - ] Function Set the upper bound of Control Gain Set in Auto Tuning of Control Gain Set. Prerequisite Position Control Mode Related To No.106.0, No.120.0 SD3 Series Instruction Manual...
- Page 202 ・If Torque command filter: Low-pass filter constant (No.162.0) is set to 1 (auto setting ON), Torque command filter: Low-pass filter auto setting (No.160.2) will be included in the gain set. Related To No.131.0, No.132.0, No.133.0, No.162.0 Tuning SD3 Series Instruction Manual...
- Page 203 Making a change to any of the following will also change other tuning parameters (such as Gain FF Compensation 1) to the prearranged parameter set all at once. Remark ・Control gain set (No.129.0) ・Control level (No.130.0) Related To No.129.0, No.130.0, No.132.0 Tuning SD3 Series Instruction Manual...
- Page 204 If you are to select 1 for this parameter, configure the above settings so that Position deviation error (Alarm No.6) and Speed deviation error (Alarm No.5) will be avoided. Related To No.65.0, No.65.1, No.87.0, No.89.0, No.90.0, No.91.0 SD3 Series Instruction Manual...
- Page 205 Velocity Control Internal Command Torque Control Analog Command Communication Operation Mode Operation Control Alarm Detection Tuning Homing Torque Limit Deceleration Stop and so on Vibration Control Switch Selection Numeric Value Control Power Cycle 2-Byte Data 4-Byte Data SD3 Series Instruction Manual...
- Page 206 Enable Related To No.113.0, No.160.2, No.162.0 Tuning Settings Default Characteristics Torque command filter: No. 160.1 Notch filter - Switch 0, 1 Enable/Disable Notch filter. Function Settings Notch filter Disable Enable Related To No.168.0, No.169.0, No.170.0 Tuning SD3 Series Instruction Manual...
- Page 207 Torque command filter: Low-pass filter switch (No.160.0) = 1 (Enable) Example: Calculating in time unit and converting to frequency Remark 20 [0.01 ms/rad] → 5,000 rad/s (equivalent to 796 Hz) Related To No.113.0, No.160.0, No.160.2 Tuning SD3 Series Instruction Manual...
- Page 208 ・If the noise cannot be eliminated by setting a notch filter, increase the setting gradually (e.g., 50, 100, 150 and so on), which decreases the notch depth. Prerequisite Torque command filter: Notch filter switch (No.160.1) = 1 (Enable) Related To No.160.1, No.168.0, No.169.0 Tuning SD3 Series Instruction Manual...
- Page 209 ・If the noise cannot be eliminated by setting a notch filter, increase the setting gradually (e.g., 50, 100, 150 and so on), which decreases the notch depth. Prerequisite Torque command filter: Notch filter switch (No.160.1) = 1 (Enable) Related To No.160.3, No.171.0, No.172.0 Tuning SD3 Series Instruction Manual...
- Page 210 Deceleration stop Operating time Deceleration stop Rotational speed to cancel Settings (No.226.0) (No.227.0) ○ ○ ○ Prerequisite Deceleration stop Method (upon servo off) (No.224.0) = 1 (Short brake) or 2 (Quick stop) Related To No.224.0, No.226.0, No.227.0 SD3 Series Instruction Manual...
- Page 211 Smoothing filter - Switch 0, 1 Enable/Disable the Velocity Command smoothing filter at the time of a quick stop. This filter suppresses vibration caused by drastic velocity change. Function Settings Velocity Command smoothing filter Disable Enable Prerequisite No.229.0 SD3 Series Instruction Manual...
- Page 212 Velocity Control Internal Command Torque Control Analog Command Communication Operation Mode Operation Control Alarm Detection Tuning Homing Torque Limit Deceleration Stop and so on Vibration Control Switch Selection Numeric Value Control Power Cycle 2-Byte Data 4-Byte Data SD3 Series Instruction Manual...
- Page 213 With the configuration of No.224.3 (upon servo off) and No.233.3 (upon alarm on), the dynamic brake release (DBRK) will remain ON and the dynamic braking will remain disengaged until the deceleration stop status becomes OFF. Preparation Timing Diagrams SD3 Series Instruction Manual...
- Page 214 Velocity Control Internal Command Torque Control Analog Command Communication Operation Mode Operation Control Alarm Detection Tuning Homing Torque Limit Deceleration Stop and so on Vibration Control Switch Selection Numeric Value Control Power Cycle 2-Byte Data 4-Byte Data SD3 Series Instruction Manual...
- Page 215 (multi-turn counter overflow) ⑤ ① Overheat error Current sensor error ① ⑤ Overvoltage error Encoder error (overheat) Power supply error ⑤ ① Voltage drop (inside the amplifier) (primary circuit power) Free run Quick stop Short brake Dynamic brake SD3 Series Instruction Manual...
- Page 216 Velocity Control Internal Command Torque Control Analog Command Communication Operation Mode Operation Control Alarm Detection Tuning Homing Torque Limit Deceleration Stop and so on Vibration Control Switch Selection Numeric Value Control Power Cycle 2-Byte Data 4-Byte Data SD3 Series Instruction Manual...
- Page 217 No. 239.0 Deceleration time 0 to 100 [ms] This item indicates decelerating time after a quick stop. Function Set the time-length for speed command to change from 1,000 r/min to 0 r/min. Related To No.224.0, No.232.2, No.236.0 SD3 Series Instruction Manual...
- Page 218 No output Warning output Alarm output Settings Default Characteristics Encoder: No. 259.1 Battery voltage drop detection switch 0, 1 Select what to output when encoder battery voltage drop is detected. Function Settings Output No output Warning output SD3 Series Instruction Manual...
- Page 219 Velocity Control Internal Command Torque Control Analog Command Communication Operation Mode Operation Control Alarm Detection Tuning Homing Torque Limit Deceleration Stop and so on Vibration Control Switch Selection Numeric Value Control Power Cycle 2-Byte Data 4-Byte Data SD3 Series Instruction Manual...
- Page 220 ・Use these parameters within the max output frequency of 4 Mpps. Remark ・Note that [Encoder output resolution] × [ Numerator / Denominator ] has to be a multiple of 4. Related To No.34.0, No.36.0, No.272.1, No.276.0, No.278.0 SD3 Series Instruction Manual...
- Page 221 Velocity Control Internal Command Torque Control Analog Command Communication Operation Mode Operation Control Alarm Detection Tuning Homing Torque Limit Deceleration Stop and so on Vibration Control Switch Selection Numeric Value Control Power Cycle 2-Byte Data 4-Byte Data SD3 Series Instruction Manual...
- Page 222 The figures in the table below are applicable for both Numerator and Denominator. Motor Motor Default Default Capacity Capacity 50 W 3,500 750 W 2,900 100 W 3,400 1 kW 3,300 200 W 3,100 1.5 kW 3,200 400 W 3,100 2 kW 3,100 SD3 Series Instruction Manual...
- Page 223 Velocity Control Internal Command Torque Control Analog Command Communication Operation Mode Operation Control Alarm Detection Tuning Homing Torque Limit Deceleration Stop and so on Vibration Control Switch Selection Numeric Value Control Power Cycle 2-Byte Data 4-Byte Data SD3 Series Instruction Manual...
- Page 224 CCW Rotation Settings Default Characteristics Analog torque: No. 302.1 Input filter switch 0, 1 Enable/Disable Analog torque command input filter. Enable if noise is significant in the analog command. Function Settings Input filter switch Disable Enable SD3 Series Instruction Manual...
- Page 225 Velocity Control Internal Command Torque Control Analog Command Communication Operation Mode Operation Control Alarm Detection Tuning Homing Torque Limit Deceleration Stop and so on Vibration Control Switch Selection Numeric Value Control Power Cycle 2-Byte Data 4-Byte Data SD3 Series Instruction Manual...
- Page 226 100% pass-through Smaller setting value gives deeper filter. Larger setting value gives shallower filter. Prerequisite Position command filter 3: Type (No.82.1) = 2 (Notch filter) or 3 (γ-Notch Filter) Related To No.82.1, No.357.0, No.358.0, No.359.0 Tuning SD3 Series Instruction Manual...
- Page 227 Motor Capacity Maximum rotational speed of motor [r/min] 50 W to 750 W 6,000 1 kW to 2 kW 3,000 Remark JOG operation requires control power supply and the Servo ON signal input from the I/O connector. SD3 Series Instruction Manual...
- Page 228 Velocity Control Internal Command Torque Control Analog Command Communication Operation Mode Operation Control Alarm Detection Tuning Homing Torque Limit Deceleration Stop and so on Vibration Control Switch Selection Numeric Value Control Power Cycle 2-Byte Data 4-Byte Data SD3 Series Instruction Manual...
- Page 229 The following three settings are necessary. ・Control Mode (No.2.0) = 1 (Velocity control mode) Prerequisite ・Command Mode (No.3.0) = 3 (Internal command mode) ・Internal Velocity: Command Method (No.388.0) = 1 (Trapezoid speed command) Related To No.388.0, No.390.0, No.391.0 SD3 Series Instruction Manual...
- Page 230 Velocity Control Internal Command Torque Control Analog Command Communication Operation Mode Operation Control Alarm Detection Tuning Homing Torque Limit Deceleration Stop and so on Vibration Control Switch Selection Numeric Value Control Power Cycle 2-Byte Data 4-Byte Data SD3 Series Instruction Manual...
- Page 231 Characteristics Homing: No. 645.1 Encoder Z-phase selection 0, 1 To add encoder Z-phase as the reference position after the Home Reference Signal is detected, set this parameter to 1. Settings Encoder Z-phase Signal Function Disable Enable SD3 Series Instruction Manual...
- Page 232 Velocity Control Internal Command Torque Control Analog Command Communication Operation Mode Operation Control Alarm Detection Tuning Homing Torque Limit Deceleration Stop and so on Vibration Control Switch Selection Numeric Value Control Power Cycle 2-Byte Data 4-Byte Data SD3 Series Instruction Manual...
- Page 233 Offset from home position *) If the starting point is on the dog, the motion is automatically in the reverse direction of homing, and then the dog-front-end is detected upon machine's leaving the dog. Related To No.645.0, No.645.1, No.645.3 SD3 Series Instruction Manual...
- Page 234 Specify the motion upon PCSTART1 input by selecting Point No.0 with User I/O. Settings Motion of Point No.0 Homing Function Motion per Point Table Use this parameter for homing when the I/O assignments don't include homing input HOME. SD3 Series Instruction Manual...
- Page 235 After home reference signal is detected and then the motor decelerates to stop, motion to carefully approach to the home position follows according to the parameter setting. Home Reference Home Position Speed Home Shift amount to Home HOMING : Careful Approach Position Origin HEND becomes closed. MEND becomes closed. SD3 Series Instruction Manual...
- Page 236 Otherwise, vibration may occur. Range Default Characteristics Homing: No. 651.0 Amount of home position shift 0 to 1,000,000,000 [command pulse] Function Use this parameter to set shift amount from home signal or encoder Z-phase to home. Related To No.646.0 SD3 Series Instruction Manual...
- Page 237 60,000 Timeout time 0 to 60,000 [10 ms] Set the timeout time for homing. Function This is a safety measure in case of fault during homing. Prerequisite Timeout Switch (No.646.2) = 1 (Disable) Related To No.646.2 SD3 Series Instruction Manual...
- Page 238 Velocity Control Internal Command Torque Control Analog Command Communication Operation Mode Operation Control Alarm Detection Tuning Homing Torque Limit Deceleration Stop and so on Vibration Control Switch Selection Numeric Value Control Power Cycle 2-Byte Data 4-Byte Data SD3 Series Instruction Manual...
- Page 239 Input PCSTART1 Start Input Motor Point − Rotational Command No.2 Point Point Speed No.1 No.3 0 r/min *) See the Point Table Parameter List to look up a point number and its corresponding parameter numbers. Page 102 SD3 Series Instruction Manual...
- Page 240 Turn the servo off or input Clear Deviation Counter. "Servo Studio" operation Turn the servo off or click the STOP button. *) See the Point Table Parameter List to look up a point number and its corresponding parameter numbers. Page 102 SD3 Series Instruction Manual...
- Page 241 In the default setting, it takes 90 ms for the rotational speed to change from 3,000 r/min to 0 r/min. *) See the Point Table Parameter List to look up a point number and its corresponding parameter numbers. Page 102 SD3 Series Instruction Manual...
- Page 242 Velocity Control Internal Command Torque Control Analog Command Communication Operation Mode Operation Control Alarm Detection Tuning Homing Torque Limit Deceleration Stop and so on Vibration Control Switch Selection Numeric Value Control Power Cycle 2-Byte Data 4-Byte Data SD3 Series Instruction Manual...
- Page 243 Command − Motor Rotational Speed 0 r/min Positioning Complete − Position Deviation 0 pulse Dwell Time Motion MEND Complete (Output) *) See the Point Table Parameter List to look up a point number and its corresponding parameter numbers. Page 102 SD3 Series Instruction Manual...
- Page 244 No. 1002.0 No. 1004.0 No. 1006.0 No. 1007.0 No. 1000.0 No. 1008.0 No. 1000.1 No. 1009.0 No. 1000.3 No. 1022.0 No. 1024.0 No. 1026.0 No. 1027.0 No. 1020.0 No. 1028.0 No. 1020.1 No. 1029.0 No. 1020.3 SD3 Series Instruction Manual...
- Page 245 Operations 1. Configuring Operation Mode......2 1. Common Parameters ........3 2.
-
Page 246: Configuring Operation Mode
Before performing wiring to each amplifier or motor, verify that all power sources are shut off. All wiring work must be performed by certified electricians. Before powering to each amplifier or motor, be sure that wiring has been performed correctly. SD3 Series Instruction Manual... -
Page 247: Common Parameters
For each operation mode, its supporting parameters must be configured. For details, refer to the subsequent sections describing each operation mode. Parameter Tuning Methods Use the Setup Panel at the front of the amplifier for tuning. Use the setup software "Servo Studio" for tuning. Install it on the user-supplied computer. SD3 Series Instruction Manual... -
Page 248: Configuring Parameters
Approx. 5 sec Abnormal End Check in Alarm Display Mode. Save the parameter settings in Parameter Saving mode to the amplifier. If you shut down the amplifier without saving them, the changes will not take effect. SD3 Series Instruction Manual... - Page 249 Step1 Start Double-click 1. Select the Communication Setup tab (initial display) 2. List of the compatible amplifiers →Select the amplifier that you are connecting → If you don't see your amplifier, Click Get to display new versions and select your amplifier version. 3. Click Connection Status: Online Offline Step2 Set parameters 1. Select the Parameter Tab. 2. In the row of the parameter to edit, click on the cell in the Value column to edit. → When you make a change in a value cell, *(asterisk) will appear in the Change settings column. 3. Click Set to write to RAM. →The *(asterisk) in the Change settings column will disappear. 4. Click Write to save to the amplifier EEPROM. Step3 Finish Method 1 Click Disconnect under the quick tool bar. Method 2 1. Select the Communication Setttings tab. 2. Click Disconnect Method 1, 2 Cycle control-power to finish so that the change that you just made will take effect. SD3 Series Instruction Manual...
-
Page 250: Position Control Mode
The amount of time needed for rising or falling edge of the command pulse input signal must be 0.1 μs or below. The number of pulses is counted at the rising edge (from low level to high level). The input logic can be changed with Parameter No. 32.3. SD3 Series Instruction Manual... -
Page 251: Pulse Train Command
Setting Parameters Detection Criteria (Command input) 70.0 Detection Time Delay 71.0 Configuration of Parameter No. 32.1 and Rotational Direction of the Motor Command pulse from the controller Parameter No. 32.1 Positive direction command Negative direction command (Default) SD3 Series Instruction Manual... - Page 252 A-phase rises first. B-phase rises first. ・ No direction signal logic change by Parameter No. 32.3. Positive or Negative pulse(CCW + CW)(No. 32.0 = 2) Command input waveform Parameter Parameter No. 32.1 No. 32.3 (Default) (Default) (Default) SD3 Series Instruction Manual...
- Page 253 Verify that stopping the command pulse does stop the motor. After ensuring safety of actual motions, increase the frequency of position command pulse Step 6 gradually and check motor motions. If vibration occurs, increase the inertia ratio. Troubleshooting SD3 Series Instruction Manual...
-
Page 254: Velocity Control Mode
53.0 (*3) Speed limit Numerator 54.0 Set the speed limit for CW rotations. Denominator 55.0 Switch 77.0 Smoothing Apply this filter to reduce the variance of Filter the motor speed. Moving Average Time 78.0 Setting Parameters SD3 Series Instruction Manual... - Page 255 Numerator desired max rotational speed 3,000 r/min 52.0 Denominator max rotational speed of the motor 5,000 r/min 53.0 Numerator desired max rotational speed 3,000 r/min 54.0 Denominator max rotational speed of the motor 5,000 r/min 55.0 SD3 Series Instruction Manual...
- Page 256 Verify that the motor speed changes depending on the input voltage. After ensuring safety of actual motions, increase the command voltage gradually and check motor motions. Step 6 Verify that the rotational speed has reached the specified speed. If vibration occurs, increase the inertia ratio. SD3 Series Instruction Manual...
-
Page 257: Internal Velocity Command
No. 78.0 = 100 ms Default [r/min] Speed Parameter No. Setting 50 W to 750 W 1 kW to 2 kW 392.0 1,000 393.0 1,500 394.0 2,000 395.0 2,500 396.0 3,000 397.0 4,000 3,000 398.0 6,000 3,000 399.0 SD3 Series Instruction Manual... - Page 258 Closed Open Open Stop Open Open Open Closed Open Stop Closed Closed Closed Closed Open Open Open Closed Closed Open Closed Closed :Contact with COM- Open Closed Closed Open :No contact with COM- Closed Closed Closed SD3 Series Instruction Manual...
-
Page 259: Torque Control Mode
Denominator 291.0 Numerator 292.0 Set the torque limit during CCW rotation. Denominator 293.0 (*3) Torque Limit Numerator 294.0 Set the torque limit during CW rotation. Denominator 295.0 Speed Limit Set the speed limit. 152.0 Setting Parameters SD3 Series Instruction Manual... - Page 260 Rotation Numerator desired torque limit 1,000 [0.1%] 292.0 Denominator max torque limit of the motor 3,000 [0.1%] 293.0 Numerator desired torque limit 1,000 [0.1%] 294.0 Denominator max torque limit of the motor 3,000 [0.1%] 295.0 SD3 Series Instruction Manual...
- Page 261 Be sure that the actual rotational direction of the motor agrees with the direction setting. Verify that the motor speed changes according to the input voltage. After ensuring safety for actual motions, increase the command voltage gradually and check motor Step 8 motions. SD3 Series Instruction Manual...
-
Page 262: Internal Position Command(Point Table)
2. The motor moves according to the point table settings at the start time of Positioner operation. The current motion is not be affected by any changes made to the point table in the middle of the motion. SD3 Series Instruction Manual... - Page 263 (any value) Description Signal Name Chart Select PCSEL1…4 Point No. Input PCSTART1 Start Input Point − Motor Command No.2 Point Rotational Point 0 r/min No.1 No.3 Speed Motion MEND Complete (Output) Parameter No. 644.0=0 Parameter No. 644.0=1 Point PM1…3 (Output) Parameter No. 644.0=2 SD3 Series Instruction Manual...
- Page 264 A positive value indicates CCW rotation, a negative CW. If Absolute is selected as Command method, Description The position data will determine the target position. This value corresponds to ABS Position Command value (Status No. 74). Related to: Internal position: Overflow detection(No. 643.0) SD3 Series Instruction Manual...
- Page 265 Command method Item Relative, Absolute [ - ] Absolute: the setting of Position will be the shift amount from the current position to the target position. Description Relative: the setting of Position will be the target position. SD3 Series Instruction Manual...
- Page 266 Example If Running Motion = continuous and Dwell Time = 0, the motor will not stop and the rotational speed will change continuously. 内容 信号名 チャート Description Signal Name Chart Select PCSEL1…4 Point No. Input PCSTART1 Start Input Motor Point − Rotational Command No.2 Point Point Speed No.3 No.1 0 r/min SD3 Series Instruction Manual...
- Page 267 ON. Timing Diagram (Positioning complete and Dwell time) Description Signal Name Chart Select PCSEL1…4 Point No. Input PCSTART1 Start Input Actual motion Description Command − Motor Rotational Speed 0 r/min Positioning Complete − Position Deviation 0 pulse Dwell Time Motion MEND Complete (Output) SD3 Series Instruction Manual...
- Page 268 (MEND) off and the next motion instruction will be not be executed. If this happened, do one of the following. With User I/O Turn the servo off or input Clear Deviation Counter. With "Servo Studio" Turn the servo off or click the STOP button. SD3 Series Instruction Manual...
- Page 269 4. Enter a Point No. to start with. 5. Start a motion :Start :Pause :Stop 2. Select ◉ "Servo Studio" as Command Type. 1. Save the Point Table data to the amplifier. Click "Servo Studio" User's guide SD3 Series Instruction Manual...
-
Page 270: Operation By User I/O
Step 5 Check Operation Complete MEND turning from open to closed indicates that the operation is complete. *) For more information about user I/O operation, refer to the timing diagrams shown in the operation examples. SD3 Series Instruction Manual... - Page 271 The Point No. output method depends on the [Point No. Output Method (No644.0)] setting at the time of PCSTART1 input. *5) Any changes made to the point table setting during a motion will not be applied to the motion. *6) The startup timing depends on other conditions. SD3 Series Instruction Manual...
- Page 272 No.1 No.2 0 r/min Time No.2 Rotational Speed Acceleration Time No.2 Acceleration Time No.1 Positioning Positioning Complete No.1 Complete No.2 − Position 0 pulse Deviation (Waiting for Positioning (Waiting for Positioning Complete) Complete) Dwell Time Dwell Time No.1 No.2 MEND Motion (Output) Complete Parameter No. 644.0=0 Parameter No. 644.0=1 PM1…3 Point No. (Output) Parameter No. 644.0=2 SD3 Series Instruction Manual...
- Page 273 0 r/min No.1 Speed Point Acceleration Rotational No.2 Time No.1 Acceleration Speed No.2 Time No.2 (Waiting for Positioning Complete) Position − Positioning Complete No.1 0 pulse Deviation Positioning Complete (Waiting for Positioning No.2 Complete) Dwell Time No.1 Dwell Time MEND Motion No.2 Complete (Output) Parameter No. 644.0=0 Parameter No. 644.0=1 Point No. PM1…3 (Output) Parameter No. 644.0=2 SD3 Series Instruction Manual...
- Page 274 Deceleration Rotational Speed No.1 Time No.1 − Command Rotational Speed No.3 Motor Rotational Point Point Point No.1 No.2 No.3 0 r/min Speed Positioning Complete − Position No.3 Deviation 0 pulse (Waiting for Positioning Complete) Dwell Time No.3 Motion MEND Complete (Output) Parameter No. 644.0=0 Parameter No. 644.0=1 Point No. PM1…3 (Output) Parameter No. 644.0=2 SD3 Series Instruction Manual...
- Page 275 Deceleration Time No.1 Rotational Speed No.2 Command Point − Motor Point No.1 Rotational 0 r/min No.2 Speed Point Acceleration Time No.1 No.3 Rotational Speed No.3 (Waiting for Positioning Position − Complete) Deviation 0 pulse Positioning Complete No.3 Dwell Time Motion MEND No.3 Complete (Output) Parameter No. 644.0=0 Parameter No. 644.0=1 Point No. PM1…3 (Output) Parameter No. 644.0=2 SD3 Series Instruction Manual...
- Page 276 Speed 91.0 deviation error detection: Value (No. 90.0) setting. Point Table Set to 2: output the point number at its motion start. 644.0 Point Number Output Method Setting Parameters SD3 Series Instruction Manual...
- Page 277 Input − Torque Limit value 1 Torque Limit value 2 Torque Limit value 1 Torque Limit value Motor − Rotational 0 r/min Speed Workpiece Torque Limit value 2 Torque 0 % (Internal) Command Value Motion (MEND) Complete (Internal) Limiting (T-LIMIT) the torque (Internal) Motion Complete/ MEND/ Limiting Torque T-LIMIT Output Parameter No. 644.0=2 Point No. PM1…3 (Output) SD3 Series Instruction Manual...
- Page 278 Wait until the MEND/T-LIMIT becomes open. If it's open, change PCSTART1 back to open. Check Operation Complete Step 12 Verify with MEND/ T-LIMIT that the motion command execution is complete. MEND/T-LIMIT turning from open back to closed indicates that the motion is complete. SD3 Series Instruction Manual...
-
Page 279: Homing
Homing Incomplete state. ・Servo turns off. ・Clear Deviation Counter is executed. When Clear Deviation Counter is executed, the motor will make a quick stop. ・Drive Restriction is input and Clear Deviation Counter is executed. SD3 Series Instruction Manual... - Page 280 MEND turning from open to close indicates that the motion is complete. Check Homing Complete Step 7 After the motion is complete, use HEND to see if Homing is complete. HEND turning from open to closed indicates that the homing procedure is complete. SD3 Series Instruction Manual...
- Page 281 *)Operation Mode (No. 9.0) = 0 (I/O) upon amplifier power on. The Setup Panel does not support display or setup of Operation Mode. Start Stop 1. Parameter Tab Setting homing parameters 2. Point Table Tab Click Servo ON (Have the motor in a Servo-ON state) 3. Click Start to start homing ・Click Pause to pause homing. ・When homing is completed, the indicator to the left of the Start button will turn green and the Current position cell will show the current position resulting from homing. SD3 Series Instruction Manual...
- Page 282 Complete *1) If you want to check the operation end signal (MEND) with the User I/O output "MEND/T-LIMIT", turn T-LIMIT output OFF, by parameter configuration and TLSEL1 OFF. *2) The startup timing depends on other conditions. SD3 Series Instruction Manual...
-
Page 283: Types Of Homing Motions
Home reference position Motion to re-detect the dog, Speed Motion to detect the stopper or dog Motion after re-detecting the dog travel z-phase disabled distance Shift-to-home motion Position Origin Z-phase Motion to re-detect Stop position disabled distance the dog (No.657.0) Home SD3 Series Instruction Manual Encoder Z-phase Home reference position... - Page 284 Refer to the patterns from 1 to 6 below to set the parameters. Pattern 1 Parameters Settings Home reference signal selection Speed No. 645.0 Encoder Z-phase selection No. 645.1 Careful Approach switch Origin No. 647.1 Shift-to-home amount Position No. 651.0 Z-phase disabled distance No. 657.0 Reference position Home SD3 Series Instruction Manual...
- Page 285 Home reference signal selection Speed No. 645.0 Careful Approach Encoder Z-phase selection No. 645.1 Careful Approach switch Origin No. 647.1 Shift-to-home amount Position (any) No. 651.0 Stop position Z-phase disabled distance Shift-to-home (any) Z-phase disabled distance No. 657.0 amount = (No.657.0) Home (No.651.0) SD3 Series Instruction Manual...
- Page 286 Refer to the patterns 7 to 12 to configure the parameters. Pattern 7 Parameters Settings Stopper Home reference position Home reference signal selection Speed No. 645.0 Encoder Z-phase selection No. 645.1 Careful Approach switch No. 647.1 Shift-to-home amount Position Origin No. 651.0 Z-phase disabled distance No. 657.0 Home SD3 Series Instruction Manual...
- Page 287 Home reference signal selection Speed No. 645.0 Encoder Z-phase selection No. 645.1 Careful Approach switch No. 647.1 Shift-to-home amount Position (any) Origin No. 651.0 Z-phase disabled distance Shift-to-home Stop position (any) No. 657.0 Z-phase disabled distance amount = Home (No.657.0) (No.651.0) SD3 Series Instruction Manual...
- Page 288 Home reference signal selection Home reference position Speed No. 645.0 Re-detection of Home position dog No. 645.3 Encoder Z-phase selection No. 645.1 Careful Approach switch Position Origin No. 647.1 Shift-to-home amount Home No. 651.0 Z-phase disabled distance No. 657.0 SD3 Series Instruction Manual...
- Page 289 Re-detection of Home position dog Approach = Home No. 645.3 Encoder Z-phase selection No. 645.1 Position Careful Approach switch Origin No. 647.1 Shift-to-home Z-phase disabled distance Shift-to-home amount amount (any) No. 651.0 (No.657.0) (No.651.0) Z-phase disabled distance (any) No. 657.0 SD3 Series Instruction Manual...
- Page 290 Home reference position Speed No. 645.0 Re-detection of Home position dog No. 645.3 Encoder Z-phase selection No. 645.1 Careful Approach switch Origin Position No. 647.1 Shift-to-home amount Motion to re-detect 原点 No. 651.0 Home the dog Z-phase disabled distance No. 657.0 SD3 Series Instruction Manual...
- Page 291 No. 645.3 Encoder Z-phase selection No. 645.1 Position Careful Approach switch Origin No. 647.1 Shift-to-home Shift-to-home amount amount Z-phase (any) Motion to re-detect No. 651.0 (No.651.0) disabled distance the dog Z-phase disabled distance (No.657.0) (any) Home Stop position = Home No. 657.0 SD3 Series Instruction Manual...
- Page 292 6. Operation MEMO SD3 Series Instruction Manual...
-
Page 293: Tuning
Tuning 1. Introduction ........2 1. -
Page 294: Introduction
SD3 Series is a servo system that does not let overshooting and undershooting happen when the equipment inertia ratio is set appropriately� SD3 Series features response models with two cutoff frequencies: ω 1 (Control Gain 1) and ω 2 (Control Gain 2) Control Gain 1... - Page 295 Inertia Condition SD3 Series features three response models to support a variety of equipment� Three models are different in ratios of Control Gain 1 ( ω 1) and Control Gain 2 ( ω 2) and you can select the one suitable to the stability and convergence of your equipment�...
-
Page 296: Control Block Diagram
7. Tuning 1. Introduction 2� Control Block Diagram SD3 Series Instruction Manual... - Page 297 7. Tuning 1. Introduction SD3 Series Instruction Manual...
- Page 298 7. Tuning 1. Introduction SD3 Series Instruction Manual...
-
Page 299: Tuning Procedure
*1)When a too big load inertia is connected, the estimated inertia ratio value will be restricted by the upper limit value settled by the upper limit value of the inertia ratio (No�106�0)� *2)Proper tuning may not be possible in the case of 300 r/min or below� SD3 Series Instruction Manual... -
Page 300: Overview
After Auto Tuning was performed, you might need further adjustments for some of the parameters individually� Final Tuning will improve responsiveness, settling time, and degree of freedom to achieve optimal performance of equipment� Page 20 Final Tuning: Velocity control mode SD3 Series Instruction Manual... -
Page 301: Quick Tuning On "Servo Studio
Manually enter Inertia ratio the inertia ratio. Quick tuning. Quick tuning Quick tuning Manually Input Quick tuning ・Automatic estimation of the inertia ratio ① Enter an inertia ratio value ・Automatic setting of the control gain set ① Select the inertia condition Wait for the inertia ratio estimate to converge. If position deviation error occurs If abnormal vibration with loud noise occurs Handle the error by, for example, decreasing ・Decrease the inertia ratio the rotational speed to about 1,000 r/min. Let the system move. ・Check the motor motion by test operation or external command input. ・Repeat the system entire motion several times. Confirm Is the motor quiet? Visually check the actual motion. The following is desired: Acceptable motion? ・Shorter settling time ・Better responsiveness ・Less vibration Operation 2 Stage 2 Final Tuning Quick tuning Write to the amplifier Tuning complete SD3 Series Instruction Manual... - Page 302 Select the Tuning tab. Click the Quick Tuning in the Tuning tub. Enter an inertia ratio value Click Let the system move. Change the inertia ratio. ・Check the motor motion by test operation or external command input. ・Repeat the system entire motion several times. Confirm Confirm Is the motor quiet? And/or Visually check the actual motion. The following is desired: Acceptable motion? Stage 2 Final tuning ・ Shorter settling time ・ Better responsiveness ・ Less vibration Operation 2 Write to the amplifier Click Tuning complete SD3 Series Instruction Manual...
- Page 303 *)Extremely large load may cause vibration� In such a case, decrease the parameter setting of Tuning: Control gain set - Tuning constant (No�121�0)� Make sure to click on to finish Quick Tuning. Stop Starting Final Tuning Mode while Quick Tuning is still in process will make the tuning difficult because of inertia ratio changes. SD3 Series Instruction Manual...
-
Page 304: Final Tuning: Position Control Mode
Pages 36- Operation 4 Suppressing vibration at the motion end Gain FF compensation 1 ・Tuning of Control Gain FF compensation Page 33 Confirm Acceptable motion? And/or Visually check the actual motion. Operation 5 Suppressing disturbance Integral gain ・Tuning of Integral gain Page 35 Confirm Suppressing vibration and noise Torque command filter Is the motor quiet? Notch filter And/or Low-pass filter Visually check the actual motion. Pages 41- Suppression of residual vibration at the equipment tip. Position command filter Acceptable motion? Notch filter No vibration? γ-Notch filter Pages 36- Acceptable motion? Operation 6 Write to the amplifier Tuning complete SD3 Series Instruction Manual... - Page 305 2. Tuning Procedure Final Tuning Start Final Tuning Operation 3, 4, and 5 Change Control Gain Set Click Let the equipment system move. Change Gain FF Compensation Click Let the equipment system move. Change Integral Gain Click Let the equipment system move. *) ・ Check the motor motion by test operation or external command input. ・ Repeat the system entire motion several times. Confirm Confirm Torque command filter Acceptable motion? And/or Position command filter Visually check Pages 41- the actual motion. Pages 36- Operation 6 Write to the amplifier Click Tuning complete SD3 Series Instruction Manual...
-
Page 306: Quick Tuning On Setup Panel
Visually check the actual motion. ・Shorter settling time Acceptable motion? ・Better responsiveness ・Less/no vibration Operation 2 Saving parameters Stage 2 Final Tuning Write to the amplifier Tuning complete Performed by Servo Studio . *) Starting tuning with a low setting of the controller gain set will enable successful tuning with no vibrations accompanied by noise� SD3 Series Instruction Manual... - Page 307 x1 (press once) ② Inertia Ratio Enter the inertia ratio Change (This is a sample image: the inertia ratio is 250 .) Let the equipment system move. Change the inertia ratio. ・Check the motor motion by test operation or external command input. ・Repeat the system entire motion several times. Confirm Confirm Visually check Is the motor quiet? the actual motion If you need to improve the response further, gradually increase ・No noise? the control gain set within the range where the motor will not make noise and perform tuning each time. The following is desired: Acceptable motion? Stage 2 Final tuning ・Shorter settling time ・Better responsiveness ・Less/no vibration Operation 2 Parameter Saving Mode ・In the parameter saving mode, save the parameters Saving complete to EEPROM in the amplifier. ・If you shut down the amplifier without saving the parameters, the setting changes will not take effect. Tuning complete SD3 Series Instruction Manual...
- Page 308 Change x1 ③ Tuning Items Set to 2 then starting a tuning Change *)After you change the value to 2 and then press the SET button, Tuning will start. ・Check the motor motion by test operation or external command input. ・Repeat the system entire motion several times. ・Stop tuning once you verify that the motion has become stable. You can change the value when this starts blinking. Set to 0 then stop a tuning. Change *)After you change the value to 0 and then Let the equipment system move. press the SET button, Tuning will stop. Confirm Confirm Visually check The following is desired: the actual motion Acceptable motion? Final tuning Stage 2 ・Shorter settling time ・Better responsiveness ・Less/no vibration Operation 2 Parameter Saving Mode ・In the parameter saving mode, save the parameters Saving complete to EEPROM in the amplifier. ・If you shut down the amplifier without saving the parameters, the setting changes will not take effect. Tuning complete SD3 Series Instruction Manual...
-
Page 309: Velocity Control Mode
・Check the motor motion by test operation or external command input. ・Repeat the system entire motion several times. Confirm Is the motor quiet? Visually check the actual motion Acceptable motion? ・Shorter settling time ・Better responsiveness Operation 2 Stage 2 Final Tuning Write to the amplifier Tuning complete *) Starting tuning with a low setting of the controller gain set will enable successful tuning with no vibrations accompanied by noise� SD3 Series Instruction Manual... - Page 310 Auto Tuning on "Servo Studio": Operation 1A Manually enter the inertia ratio. Operation 1A Select the Tuning tab. Set Control Gain Set to "5" Starting tuning with a low setting of the controller gain set will enable successful tuning with no vibrations accompanied by noise. Click Enter the inertia ratio Click Let the equipment system move. Change the inertia ratio. ・Check the motor motion by test operation or external command input. ・Repeat the system entire motion several times. Confirm Confirm Is the motor quiet? And/or Visually check the actual motion. Acceptable motion? Stage 2 Final tuning Operation 2 Write to the amplifier Click Tuning complete SD3 Series Instruction Manual...
- Page 311 ・Better responsiveness Operation 2 Write to the amplifier Click Tuning complete Make sure to click on to finish Auto Tuning. Stop Starting Final Tuning Mode while Auto Tuning is still in process will make the tuning difficult because of inertia ratio changes. SD3 Series Instruction Manual...
-
Page 312: Final Tuning: Velocity Control Mode
Start Final Tuning Operation 3 Tuning of command Responsiveness ・Tuning of Control Gain Set Control Gain Set Page 27 Suppressing vibration and noise Confirm N N N Torque command filter Is the motor quiet? Notch filter Low-pass filter And/or Pages 41- Visually check the actual motion. Operation 4 Suppressing disturbance ・Tuning of Integral gain Integral gain Page 35 Confirm Suppressing vibration and noise Torque command filter Is the motor quiet? Notch filter And/or Low-pass filter Visually check the actual motion. Pages 41- Acceptable motion? Operation 5 Write to the amplifier Tuning complete SD3 Series Instruction Manual... - Page 313 7. Tuning 2. Tuning Procedure Final Tuning Start Final Tuning Operation 3 and 4 Change Control Gain Set Click Let the equipment system move. Change Integral Gain Click Let the equipment system move. *) ・ Check the motor motion by test operation or external command input. ・ Repeat the system entire motion several times. Confirm Confirm Torque command filter Acceptable motion? Notch filter And/or Low-pass filter Visually check Pages 41- the actual motion. Operation 5 Write to the amplifier Click Tuning complete SD3 Series Instruction Manual...
-
Page 314: Auto Tuning On Setup Panel
Visually check the motion etc. Is the motor quiet? Acceptable motion? ・Shorter settling time ・Better responsiveness Operation 2 Stage 2 Final Tuning Saving parameters Write to the amplifier Performed by Servo Studio . Tuning complete *) Starting tuning with the lowest setting of the controller gain set will provide successful tuning with no vibrations accompanied by noise� SD3 Series Instruction Manual... - Page 315 Change (This is a sample image: the inertia ratio is 250 .) Let the equipment system move. Change the inertia ratio. ・ Check the motor motion by test operation or external command input. ・ Repeat the system entire motion several times. Confirm Confirm Visually check Is the motor quiet? the actual motion. If you need to improve the response further, gradually increase ・No noise? the control gain set within the range where the motor will not make noise and perform tuning each time. Acceptable motion? Stage 2 Final tuning The following is desired: ・Shorter settling time ・Better responsiveness Operation 2 Parameter Saving Mode ・In the parameter saving mode, save the parameters Saving complete to EEPROM in the amplifier. ・If you shut down the amplifier without saving the parameters, the setting changes will not take effect. Tuning complete SD3 Series Instruction Manual...
- Page 316 Set to 2 Change x1 ③ Tuning Items Set to 2 then starting a tuning Change *)After you change the value to 2 and then press the SET button, Tuning will start. ・Check the motor motion by test operation or external command input. ・Repeat the system entire motion several times. ・Stop tuning once you verify that the motion has become stable. You can change the value when this starts blinking. Set to 0 then stop a tuning. Change *)After you change the value to 0 and then Let the equipment system move. press the SET button, Tuning will stop. Confirm Confirm Visually check the actual motion. The following is desired: Acceptable motion? Final tuning Stage 2 ・Shorter settling time ・Better responsiveness ・Less/no vibration Operation 2 Parameter Saving Mode ・In the parameter saving mode, save the parameters Saving complete to EEPROM in the amplifier. ・If you shut down the amplifier without saving the parameters, the setting changes will not take effect. Tuning complete SD3 Series Instruction Manual...
- Page 317 7. Tuning 2. Tuning Procedure Confirm Check the machine motion Check the motor motions in test operation or by external command input� Repeat the previous steps from the beginning� Confirm Select the Tuning tab Select items to measure. Select measurement conditions. Start Measuring Capture waveform Click SD3 Series Instruction Manual...
-
Page 318: Tuning Parameters
(moderate setting) general transport machines (Default) light-load equipment Better Convergence equipment that demands high-speed operation or settling-required Position deviation Speed command value t Difference in convergence characteristics depending on the inertia condition settings SD3 Series Instruction Manual... -
Page 319: Control Gain Set
Noise Responsiveness Slow Long Unlikely ↑ ↑ ↑ ↑ ↓ ↓ ↓ ↓ (Default) Quick High Short Likely Under the Auto Tuning tab, tick the detail setup box, and then select from 1-46 one by one� SD3 Series Instruction Manual... -
Page 320: Mode Switch
Setting the item(s) to be estimated during tuning� Estimate items Settings(Tuning) Inertia ratio Damping ratio (Tuning Stop) Do not estimate Parameter (Default) Do not estimate No.110.1 (Tuning Start) Estimate 2(Tuning Start) Estimate Prerequisite Position Control Mode, Velocity Control Mode SD3 Series Instruction Manual... -
Page 321: Final Tuning
This item represents the ratio of the motor axis moment of inertia to the load moment of inertia� The inertia ratio used in SD3 Series motor includes the motor rotor inertia (=100%)� Function Example: inertia ratio 200% = motor rotor inertia 100% + output axis load 100%... -
Page 322: Position Control Mode: Control Gain 1
Tuning Tip deviation, or noise is too much that the control gain set or control level should not be increased� High Position deviation Velocity command value t Differences in Position Deviation Convergence SD3 Series Instruction Manual... -
Page 323: Position Control Mode: Control Gain 2
③ Lower Integral gain (No�119�0)� When no improvement have been seen if these ① , ② , and ③ method had been performed, please decrease the 116�0 value� Position deviation Velocity command value High t Differences in Position Deviation Convergence SD3 Series Instruction Manual... -
Page 324: Velocity Control Mode: Control Gain 1
③ Lower Integral gain (No�133�0) When no improvement have been seen if these ① , ② , and ③ method had been performed, please decrease the No�131�0 value� Velocity deviation Velocity command High t Differences in Velocity Deviation Convergence SD3 Series Instruction Manual... - Page 325 ・Too high a value of this parameter will result in overshooting, and too low in undershooting� Set relatively a moderate value� Inertia condition Coarse tuning amount increment by 10 increment by 100 High Position deviation Velocity command value Differences in Position Deviation Convergence SD3 Series Instruction Manual...
-
Page 326: Position Control Mode: Gain Ff Compensation 1
With a right inertia ratio setting, setting this parameter to 10,000 minimizes the position deviation� Tuning Tip Noise Solutions Adjusting Filter 4: Smoothing 2- Moving average counter (No�81�0) may reduce the noise� Position deviation Velocity command value High Differences in Position Deviation Convergence SD3 Series Instruction Manual... -
Page 327: Integral Gain
If noise occurs, decrease the setting of this parameter or apply a torque command notch filter� Page 42 Torque Command Notch Filter High Position deviation Overshooting Case Velocity command value High Position deviation Undershooting Case Velocity command value Differences in Position Deviation Convergence SD3 Series Instruction Manual... -
Page 328: Position Command Filter
Depth Depth No.79.0 No.86.0 No.360.0 γ-Notch 1 γ-Notch 2 γ-Notch 3 Frequency Frequency Frequency No.74.0 No.83.0 No.357.0 Gain Gain Gain Depth No.76.0 No.85.0 No.359.0 Depth Depth No.79.0 No.86.0 No.360.0 Block Diagram of Position Command Filter (Details) SD3 Series Instruction Manual... - Page 329 Increase Notch Width while checking the effect of the filer. Notch filter Width: Increase (from the initial value of 512) up to approximately 800 -given as a guideline. Page 39 Use of the notch filer will increase the position deviation. Adjust the width within the acceptable range of the position deviation. Check for vibration again Was the vibration Write to Amplifier suppression successful? Setup Complete Further adjust within the acceptable range of position deviation Setting Position command filter Method 1 Method 2 larger notch width setting. Set the second level filter. Notch filter about: 1,000 Page 39 Setting more than one notch filters may affect the filter of lower level. Check the frequency and width again. When setting the second level filter, change the notch depth accordingly. Decreasing the notch depth may reduce vibration. 【application】 Setting Position command filter In case setting the notch filter alone is not enough to suppress vibration γ-Notch filter Set γ-Notch Filter (*2) Page 40 *2) Set the high-frequency gain to a lower value. Note that decreasing the gain will tend to cause a position deviation error. SD3 Series Instruction Manual...
-
Page 330: Position Command: Smoothing Filters 1 And 2
In the example below, when the vibration frequency is 39 ms, the average count = 6,250 x 0�039 = 242; the delay time will be 39 ms� Setting Parameters List of Parameters Example: 50 W to 750 W Before After Position Position deviation deviation 39 ms Effect of Smoothing Filter SD3 Series Instruction Manual... - Page 331 Vibration frequency F = N/T [Hz] T [s] No.74.0 Torque Command Value No.83.0 [times] No.357.0 ABS Position Deviation Vibration frequency F [Hz] No.74.0 No.83.0 Gain [dB] No.357.0 0 dB -3 dB Depth No.79.0 No.86.0 No.360.0 Gain [dB] 0 dB -3 dB [Hz] Width No.75.0 No.84.0 No.358.0 SD3 Series Instruction Manual...
-
Page 332: Position Command: Notch Filter
Torque Command Value No.357.0 [times] ABS Position Deviation Vibration frequency F [Hz] Position Deviation is low No.74.0 Gain [dB] No.83.0 No.357.0 0 dB very effective in suppressing vibration High Frequency Gain [dB] No.76.0 Depth No.85.0 No.79.0 No.359.0 No.86.0 No.360.0 SD3 Series Instruction Manual... -
Page 333: Torque Command Filter
No.160.3 Torque command limit Current Control Low-pass Notch Notch 2 Auto setting No.160.2 Frequency No.168.0 Frequency No.171.0 No.162.0 No.169.0 No.172.0 Time constant Width Width No.170.0 No.173.0 Depth Depth Block Diagram of Torque Command Filter with Details SD3 Series Instruction Manual... -
Page 334: Torque Command Filter: Notch Filter
Setting Parameters List of Parameters Vibration frequency F = N/T [Hz] T [s] No.168.0 No.171.0 [times] Torque Command Value Vibration frequency F [Hz] No.168.0 No.171.0 Gain [dB] Frequency 0 dB -3 dB Width [Hz] No.169.0 No.172.0 Frequency 0 dB -3 dB Gain [dB] Depth [-] No.170.0 No.173.0 SD3 Series Instruction Manual... -
Page 335: Torque Command: Low-Pass Filter
Position Control Mode Velocity Control Mode ω 1 Control Gain 1 No�115�0 Control Gain 1 No�131�0 ω 2 Control Gain 2 No�116�0 ‐ ‐ ω q Integral Gain No�119�0 Integral Gain No�133�0 Setting Parameters List of Parameters SD3 Series Instruction Manual... -
Page 336: Using "Servo Studio" To Measure Vibration Frequency (Fft)
Read the peak value by using the cursor� Position Command Filter Torque Command Filter Click on Adjustment Adjustment This will take you to the filter setup window under the tuning tab where a filter can bet set� SD3 Series Instruction Manual... - Page 337 After setting the notch filer, start the equipment, verify the filter effect, and lower the notch frequency gradually� Measure the waveforms to find the best filter conditions such as frequency, width, and depth� The notch frequency varies depending on the equipment� SD3 Series Instruction Manual...
- Page 338 7. Tuning MEMO SD3 Series Instruction Manual...
-
Page 339: Troubleshooting
Troubleshooting 1. Checking Warnings and Alarms ..... . . 2 1. Using the Setup Panel ........2 2. -
Page 340: Checking Warnings And Alarms
The amplifier is not ON. Or the amplifier has not been started. Solid Green Normal Amplifier is operating normally. no warnings/alarms Blinking Green Abnormal Warning is occurring warning occurring Solid Red Abnormal Alarm is occurring alarm occurring SD3 Series Instruction Manual... - Page 341 The alarm occurrence hours are as same as the cumulative operating hours displayed under the Alarm tab in "Servo Studio". History No.9 Alarm that is occurring now SD3 Series Instruction Manual...
-
Page 342: Using "Servo Studio
Select the Alarm tab in "Servo Studio". Step2 See [Current alarm] and [Cause for the alarm] and [What to do] windows for details. Checking the Alarm History in "Servo Studio" The alarm history area shows a list of the alarms. SD3 Series Instruction Manual... -
Page 343: Warnings And Remedies
3. RS-485 Communication Warning status output with the RS-485 communication. Appendices Status Display 4. "Servo Studio" Select the Alarm tab in "Servo Studio". See [Current alarm] and [Alarm history] windows for details. "Servo Studio" User's Guide SD3 Series Instruction Manual... -
Page 344: Warning Details
E-STOP by I/O is open. Possible Cause Close E-STOP of the I/O. Remedy Check for proper I/O connections. After eliminating the cause, then input RESET signal to the RESET terminal on the connector Reset Method CN1. Related To Appendices Functions SD3 Series Instruction Manual... - Page 345 Check the settings of Position deviation warning detection: Value (No.363.0) and Position deviation warning detection: Delay time (No.365.0). Reset Method After eliminating the cause, then input RESET signal to the RESET terminal on the connector CN1. SD3 Series Instruction Manual...
-
Page 346: Alarms And Remedies
Switch circuit error Page 15 Overcurrent error Page 15 Inverter error 1 Page 16 Inverter error 2 Page 16 Current sensor error Page 16 Encoder error (overheat) Page 16 Voltage drop (inside the amplifier) Page 16 SD3 Series Instruction Manual... -
Page 347: Alarms And Remedies
The command from the host controller was not appropriate. Possible Cause There were residual pulses due to drive restriction or other reasons. Adjust the Tuning parameters. Remedy Check the command. Verify that the location of the limit sensor hasn't shifted. Reset Method SD3 Series Instruction Manual... - Page 348 ① Eliminate the cause. ① Eliminate the cause. ① Eliminate the cause. ② input RESET signal to the RESET terminal ② Cycle control-power. ② Execute CLEAR Encoder on the connector CN1. ③ Cycle control-power. After power cycle, perform Homing. SD3 Series Instruction Manual...
- Page 349 The position control input exceeded the max rotational speed. Possible Cause The command from the host controller was not appropriate. Check the Pulse train command: Ratio (No.34.0 and No.36.0). Remedy Check the commands from the host controller. Reset Method SD3 Series Instruction Manual...
- Page 350 Reset Method Overheat error Alarm No. Symptom The control circuit temperature has exceeded the upper limit. Possible Cause Check the amplifier's installation method and environment. Remedy Lower the ambient temperature to below the rating. Reset Method SD3 Series Instruction Manual...
- Page 351 ① Eliminate the cause. ① Eliminate the cause. ① Eliminate the cause. ② input RESET signal to the RESET terminal ② Cycle control-power. ② Execute CLEAR Encoder on the connector CN1. ③ Cycle control-power. After power cycle, perform Homing. SD3 Series Instruction Manual...
- Page 352 Replace the battery, connect it, and initialize the encoder. Remedy If you are not using an absolute system Check whether the encoder temperature is within specification. If any of the above didn't resolve the issue, please contact our distributor. Reset Method SD3 Series Instruction Manual...
- Page 353 Allow motor motion by disengaging the brake or removing from the stopper. Check the encoder cable. → Connection (bad connection) → Use a twist-pair cable If any of the above didn't resolve the issue, please contact our distributor. Reset Method SD3 Series Instruction Manual...
- Page 354 The control power voltage (5 VDC) inside of the amplifier has dropped. Possible Cause Verify that there is no short-circuit in encoder cable connections. Remedy If any of the above didn't resolve the issue, please contact our distributor. Reset Method SD3 Series Instruction Manual...
-
Page 355: Troubleshooting
The motor motions are unstable. Page.21 Unstable motor motions Problem Symptom Refer to Problem 5 Positional aberration occurs. Page.22 Positional aberration Problem Symptom Refer to Problem 6 Vibration and The motor causes vibration or abnormal noise. Page.23 abnormal noise SD3 Series Instruction Manual... -
Page 356: Problem 1. No Display On The Setup Panel
Connect the 24 VDC to Pin 1 and Pin 3 and GND to Pin 2 and Pin 12 connector. respectively. Loose user I/O connector Connect the user I/O connector firmly. The control power voltage is low. Check the control power voltage capacity. The amplifier is faulty. Please contact our distributor. SD3 Series Instruction Manual... -
Page 357: Problem 2. Servomotor Not Turning On
If it is off, verify that the primary circuit power is not loose, and the primary (Alarm No.15 is displayed) circuit power is output. The motor power connector Connect the user I/O connector firmly. is loose. The amplifier is faulty. Please contact our distributor. SD3 Series Instruction Manual... -
Page 358: Problem 3. No Motor Rotation
If CCW/CW drive restriction input is disabled, set Drive restriction input: Setup (No.67.0) to 0 (disable). CCW/CW drive restriction is enabled. If it is enabled, connect both CCWL and CWL pins of the user I/O connector with either "COM-" or "closed" each. SD3 Series Instruction Manual... -
Page 359: Problem 4. Unstable Motor Motions
Set Pulse train command: Input filter (No.33.0) to an appropriate value. The motor rotates with no host In Velocity Control Mode command input. Adjust Analog velocity: Offset value (No.60.0). In Torque Control Mode Adjust Analog torque: Offset value (No.300.0) SD3 Series Instruction Manual... -
Page 360: Problem 5. Positional Aberration
A resistor is installed in the pulse output circuit of the host controller The output resistor of the host controller and the input resistor of servo (PLC). amplifier being connected in series prevents correct command signal from being input to the amplifier. SD3 Series Instruction Manual... -
Page 361: Problem 6. Vibration And Abnormal Noise
In case of wrong pairing, clear the parameters saved in EEPROM and change and motor is not right. the motor model code. *) This problem may occur in a low-rigidity case such as belt drive whose load inertia ratio is over 30 times. SD3 Series Instruction Manual... - Page 362 8. Troubleshooting MEMO SD3 Series Instruction Manual...
-
Page 363: Appendices
Appendices 1. Absolute System........2 1. -
Page 364: Absolute System
Page 6 Absolute Encoder Cable Checking the model code Use the modes that supports absolute systems. Motor Product Code: M 5 G 005 C S N N ** Encoder Code Specifications 17 bit (Incremental) 17 bit (Absolute) SD3 Series Instruction Manual... -
Page 365: System Configuration
3. After connecting the battery, secure the battery to the absolute encoder cable by using a cable tie. Page 5 Securing the Battery 4. Initialize the absolute encoder. Page 7 Initializing Absolute Encoder Cable and Battery Connections Battery for backup Battery for backup SD3 Series Instruction Manual... -
Page 366: Backup Battery
*) This is a primary lithium battery. Do not try to charge it, or it may explode. Dimensions (mm) 18 (MAX) 47 ±5 (MAX) Lead wire of − Terminal − Terminal UL1007 AWG26 Black Lead wire of +Terminal UL1007 AWG26 Red 37 (MAX) The battery is protected by the insulation tube. +Terminal 20 (MAX) SD3 Series Instruction Manual... - Page 367 ・Be careful not to connect the battery in the wrong way. ・Do not attempt to disassemble the battery. ・Do not short circuit the battery. ・Never attempt to charge the recommended battery. Disposal of Batteries Dispose of used batteries according to local government regulations. SD3 Series Instruction Manual...
-
Page 368: Absolute Encoder Cable
Select a battery that meets the specifications of the recommended one. Replace the battery at a reasonable interval, taking the batter life into consideration. The connectors and cables needed to make your own cable are user-supplied. Preparation SD3 Series Instruction Manual... -
Page 369: Initializing Absolute Encoder
Use the Encoder Clear function by using the Setup Panel or "Servo Studio" to initialize the encoder. And then restart your amplifier. Only multi-turn data will be initialized and single-turn absolute data will not. Initialize the absolute encoder before performing homing. SD3 Series Instruction Manual... - Page 370 Turn the control power on (*) verify that Alarm No.18 is displayed. and verify that S-off is displayed. *) At the same time, Alarms 20 and 21 occur. ① Execute Encoder Clear by using the axillary function. Execute Encoder Clear while the Servo is OFF. Operation with the Servo being ON will cause an alarm. Press and hold for approximately 5 seconds until the display changes to . ② Turn on the control power to the amplifier. Confirm If an alarm occurs Turn on the control power, ① Check the following. and then verify that S-off ・ Is the battery connected correctly ? is displayed. ・ Is the battery voltage normal ? ・ Is the encoder cable connected correctly ? ・ Are the wiring and connections all correct ? ② Repeat Step 3. SD3 Series Instruction Manual...
- Page 371 ① Set Parameter No.257.0 to 1 or 2. Multi-turn counter overflow detection 1 : Disable 2 : Enable If you shut down the control power without saving, ② Save the parameters and cycle power. the setting changes will not take effect. After shutting off the control power, wait for at least Turn on the control power and start communicating 5 seconds before turning the power back on. with the amplifier by using Servo Studio . Did you disconnect Step 3B any cable or battery before reboot? Step 3A 1. Under the Auxiliary function tab, click Encoder 2. Click on Get Encoder Status. 3. Check one of the boxes. Clear encoder 4. Click . Until checking the boxes, the Clear encoder U til h th b button does not work. 5. Click . k . 6. Cycle the control power. Confirm SD3 Series Instruction Manual...
- Page 372 3. Click on Get Encoder Status. 4. Check one of the boxes. Clear encoder 5. Click . . Until checking the boxes, the encoder clear button til h th b does not work. 6. Click . . 7. Cycle the control power. Confirm Turn on the control power and start communicating with the amplifier by using "Servo Studio". 1. Under the Auxiliary functions tab, select Encoder. 2. Click on Show Encoder Status. 3. Verify that this value is 0. If an alarm occurs ① Check the following. ・ Is the battery connected correctly ? ・ Is the battery voltage normal ? ・ Is the encoder cable connected correctly ? ・ Are the wiring and connections all correct ? ② Repeat Step 3. SD3 Series Instruction Manual...
-
Page 373: Obtaining Absolute Data
If the command is sent to another amplifier at an address other than Address 1, the error detection segment in the command is different from this example. Communications Manual: RS-485 Page 26 Encoder/Rotor mechanical angle (integrated value) in List of Status Variables SD3 Series Instruction Manual... - Page 374 Below is the formula to derive absolute data (Encoder mechanical angle (integrated value) ). × 2 : Encoder mechanical angle (integrated value) ( =Absolute data ) : Encoder mechanical angle (1 rotation) : Encoder Multi-turn data SD3 Series Instruction Manual...
-
Page 375: Alarm
・Take noise countermeasures. For example, separate the motor power cable from the encoder cable. ・Multi-turn data being reset due to low battery voltage. Encoder error ・Check for low battery voltage and loose connection of the battery cable. (voltage drop) ・Initialize the encoder. SD3 Series Instruction Manual... - Page 376 The Setup panel displays a warning when the battery voltage falls below the parameter No.268.0 setting value. This warning isn't show to 【Auxiliary functions】tab but is shown to【Alarm】tab of "Servo Studio". The battery voltage is checked at the time of power turning on and every hour afterwards. SD3 Series Instruction Manual...
-
Page 377: Function
Related to Servo OFF to stop the motor motion. No.224.0 Deceleration stop: Method (upon Servo Off) 0:free run Opened SVON. Related to No.232.1 Status during free-run No.224.3 DBRK output after stopping Deceleration Stop 1:short brake (No related parameters) Opened E-STOP. 2:quick stop Related to Warning Output Smoothing filter No.225.2 Switch Related to No.229.0 Moving average counter No.225.0 switch Motion control No.225.1 timing No.236.0 Extension Time No. 12.0 latch time No.239.0 Deceleration time No.232.2 Short brake operation after a stop 3:dynamic Brake Related to No.224.3 DBRK output after stopping Brake operation (brake-equipped motor) Related to No.232.3 Timing No.234.0 Delay time No.235.0 Rotational speed SD3 Series Instruction Manual... -
Page 378: Technical Data
Relay Fuse Voltage Inrush current + detection Voltage protection Input DC/DC detection filter Relay Fuse Inrush current Over current protection detection Gate drive Voltage detection Insulation Setting panel Input filter Insulation Internal power supply Control power DC 24 V DC/DC I/O power supply 24 V Pulse train command input Interface circuit Analog command input Encoder output Interface circuit RS-485 Interface circuit SD3 Series Instruction Manual... -
Page 379: Status Display
17-bit. It is a pulse value resulting from division/ multiplication in the amplifier. Unit of Command pulse This unit is based on pulse count corresponding to single turn of the motor in the host controller's perspective. This is a pre-division/multiplication value. SD3 Series Instruction Manual... -
Page 380: List Of Status Variables
Logical I/O Input Page 29 (*2) Logical I/O Output Page 30 Inertia Ratio Estimate Page 31 *1) "Servo Studio" only *2) RS-485 communication only Note: The amplifier version can be checked in "Servo Studio". "Servo Studio" Operation Manual SD3 Series Instruction Manual... -
Page 381: Details Of Each Status Variable
Internal Position Command overflow error Homing failure Current sensor error Encoder error (multi-turn counter overflow) Encoder error (overheat) Overheat error Voltage drop (inside the amplifier) (Reserved) (Reserved) Overvoltage error (Reserved) Power supply error (primary circuit power) Troubleshooting SD3 Series Instruction Manual... - Page 382 SRDY SRDY DBRK SRDY SERVO SVON RESET RESET/PCLR RESET HOLD RCSTART1 HOLD VCRUN1 HOLD PCLR PCSEL1 VCRUN2 (Reserved) (Reserved) HOME E-STOP PCSEL2 VCSEL1 (Reserved) (Reserved) (Reserved) CCWL PCSEL3 CCWL VCSEL2 CCWL PCSEL4 HOME VCSEL3 TLSEL1 TLSEL1 SD3 Series Instruction Manual...
- Page 383 (1 kW to 2 kW) The speed value derived from using differentials of Pulse train command (position) at each Description 160 or 200 μs is returned. 24 01 00 10 00 23 C0 8A Command example SD3 Series Instruction Manual...
- Page 384 Units Bytes Signed Status No. 67 (43) encoder pulse (Hexadecimal number) Description Indicates the position data of the motor returned from the encoder to the amplifier. 24 01 00 11 00 43 9B 1C Command example SD3 Series Instruction Manual...
- Page 385 ABS Position Command Status Units Bytes Signed Status No. 74 (4A) command pulse (Hexadecimal number) Description This indicates a position command value based on the home-position offset. 24 01 00 11 00 4A 0A 35 Command example SD3 Series Instruction Manual...
- Page 386 If a command's acceleration/deceleration time is too short, the motor will be unable to keep up and vibration will easily occur. If you want to set a short acceleration/deceleration time, use a position command smoothing filter. 24 01 00 10 00 61 A8 0C Command example SD3 Series Instruction Manual...
- Page 387 ③ Install a speed reducer to decrease the inertia ratio. ④ Select a new motor to increase the rotor inertia or increase the capacity to decrease the inertia ratio. 24 01 00 10 00 71 BA 3D Command example SD3 Series Instruction Manual...
- Page 388 24 01 00 11 00 C3 0A 94 Command example Encoder temperature Status Units Bytes Signed Status No. 205 (CD) ° C (Hexadecimal number) Description Indicates the encoder internal temperature. (for reference only) 24 01 00 10 00 CD DC 6A Command example SD3 Series Instruction Manual...
- Page 389 Encoder Data Error Counter Status Units Bytes Signed Status No. 218 (DA) times (Hexadecimal number) Description Indicates the cumulative count of errors in receiving encoder data. 24 01 00 10 00 DA BE BC Command example SD3 Series Instruction Manual...
- Page 390 Primary Circuit Power Voltage Status Units Bytes Signed Status No. 232 (E8) 0.1 V (Hexadecimal number) Description Indicates the primary circuit power voltage (for reference only). 24 01 00 10 00 E8 A8 AD Command example SD3 Series Instruction Manual...
- Page 391 PCSTART1 Start Forward Rotation (Reserved) Point No. Select 1 PCSEL1 PCSEL2 Point No. Select 2 PCSEL3 Point No. Select 3 PCSEL4 Point No. Select 4 Torque Limit TLSEL1 (Reserved) (Reserved) Alarm Reset/ RESET/PCLR Deviation Counter Clear SD3 Series Instruction Manual...
- Page 392 Torque Limiting (Reserved) (Reserved) Point No. Select 1 MBRK Brake release Point No. Select 2 (Reserved) Point No. Select 3 Point No. Select 4 SERVO Servo status Alarm OUTPUT (Reserved) (Reserved) Motion complete/ MEND/T-LIMIT Torque limiting (Reserved) SD3 Series Instruction Manual...
- Page 393 4. Status Display Inertia Ratio Estimate Status Units Bytes Signed Status No. 371 (173) (Hexadecimal number) Description This item indicates the inertia ratio value estimated in auto turning. 24 01 00 10 01 73 A9 4E Command example SD3 Series Instruction Manual...
-
Page 394: How To Set Pulse Train Command: Input Filter (No.33.0)
(The default is 4) 2 MHz (500 ns) Input pulse 125 ns(=250 ns/2) Passing pulse width (250 ns) Input pulse width Duty50 % Selecting the best filter value using the pulse frequency by pulse duty cycle matrix Duty [%] Pulse Frequency 100 kHz 200 kHz SD3 Series Instruction Manual... - Page 395 MEMO SD3 Series Instruction Manual...