Smith Corona MEMORY CORRECT - Electronic Typewriter Manual
- User manual (2 pages) ,
- User manual (2 pages)
Advertisement
- 1 My Most Popular Features
- 2 Hardware Basics
- 3 Keyboard
- 4 Format
- 5 Correcting Text
- 6 Enhanced Text
- 7 Care and Maintenance
- 8 Safe Operating Recommendations
- 9 Quick Reference Guide
- 10 Documents / Resources
My Most Popular Features
Correcting Cassette
Easy to change and snap into place.
Automatic Memory Correction
Instant correction.
WordEraser
Erases an entire word.
Auto Center
Quickly and accurately centers text.
Bold
Highlights text.
Decimal Tab
Automatically aligns numbers by decimal points.
Self Demonstration
Activate this Self Demonstration Program and discover my most popular features.
This built-in Demo is easy to use. Follow the instructions below.
- Insert Paper.
- Press and hold Code while pressing Z.
- Release both.
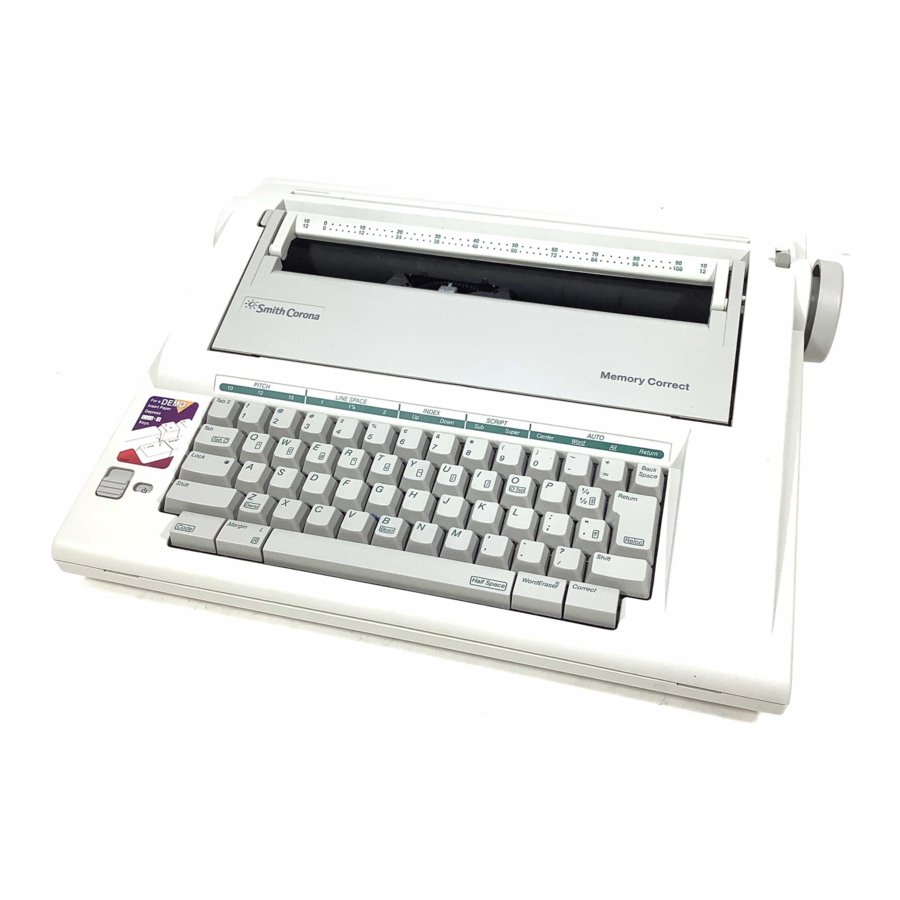
Hardware Basics
Device Diagram


Save all packing materials. If you ship or move the typewriter, it should be repacked in the original carton. See "Shipping Instructions."
This diagram depicts only basic features. For information on coded features, see specific chapters or the Quick Reference Guide at the end of these instructions. Product appearance and/or specifications are subject to change without notice.
Setting Up
Before you can use your typewriter, you must remove the packing materials from the print mechanism. This is essential to the proper functioning of your typewriter. Do not turn the unit on until you have prepared the typewriter for use. Follow the steps listed below using the typewriter diagram for reference. The numbers on the diagram correspond to those in the instructions.
- Tilt the protective cover (1) toward you.

- Release the rubber band (left side first) from the tabs.
![]()
- Remove the print hammer restraint card.
- Remove the ribbon cassette. If the typewriter ribbon is slack, advance it by turning the gear wheel on the bottom of the cassette in the direction indicated (see illustration).
![]()
- Place the cassette back on the carrier, and return the protective cover to its original position. You will hear it snap into place.


Turning the Device On
The electrical cord is stored on the back of the unit. Remove the plug from the protection slot and unwind the cord for use.
- Plug the typewriter into a proper electrical outlet. (Use the correct electrical current.)
![]()
- The
![]() symbol indicates the unit is in Standby mode. This means your keyboard is inactive until you select ON ( | ). Move the power switch (5) to ON ( | ). The carrier (2) moves to the preset left margin.
symbol indicates the unit is in Standby mode. This means your keyboard is inactive until you select ON ( | ). Move the power switch (5) to ON ( | ). The carrier (2) moves to the preset left margin.
![]()

 symbol indicates the unit is in Standby mode. This means your keyboard is inactive until you select ON ( | ). Move the power switch (5) to ON ( | ). The carrier (2) moves to the preset left margin.
Inserting Paper
Note: Your typewriter handles 12'' wide paper and a 9" typing line. Standard bond paper stock is recommended for best quality. Copier paper, erasable bonds and very heavily textured bond papers do not print well with Correctable Film ribbon. For these paper types, we recommend High Density Correctable Film or Multi-Strike ribbons. If typing stencils, use those specifically designed for daisywheel printers.
- Insert paper securely in the slot behind the platen (3) against the paper alignment mark. (For 12" wide paper, center on the platen area.)
- Advance paper by using the platen knob (6), Index Up/Down feature, or Return key.

- Push the paper release lever (4) back, and straighten the paper if necessary. Return lever to original position.

- Make sure the protective cover is in its original position.


Platen Knob / Variable Line Spacer

Rotate the platen knob to position the paper up or down at variable line positions.
Removing Paper
To remove paper, push the paper release lever back and gently pull the paper out of the machine.
Turning the Device Off
When typing is completed, move the power switch to Standby. We suggest you unplug the typewriter if it will not be used for an extended period of time.
Keyboard
Code Key

The Code key is used in combination with other keys to activate features. Code key combinations are activated by pressing and holding the Code key while pressing the second key.
Shift Key

Press Shift while typing an alpha key to type upper case letters or to type the characters located on the top of certain keys, such as $, %.
Lock Key and Indicator Light

Press Lock to type continuously in upper case characters and access the characters located on top of certain keys. The shift lock light will light when Lock is pressed. To deactivate shift lock, press Lock or a Shift key. The light goes out.
When the shift lock light flashes, the typewriter has received an incorrect command. Press Code to stop the flashing light.
Repeat Action
All keys will automatically repeat when held down except the following Keyboard II characters: ^ ' ~.

Format
Each time you turn on your typewriter, a preset format is activated. It is set for general typing purposes. These settings remain active until you change them.
Margins
Margins are preset depending on your pitch setting. They are:
| 10 Pitch (Pica) | 12 Pitch (Elite) | 15 Pitch (Micro) | |
| Left Margin | 12 | 14 | 18 |
| Right Margi | 72 | 86 | 108 |
Changing Margins
When you need to change the margins, follow the instructions below:
- Press Back Space or Spacebar to desired left margin.
- Press Margin. Unit beeps.
- Press Spacebar to desired right margin.
- Press Code + Margin. Unit beeps.
Note: To signal that you are near the right margin, your typewriter will beep once 5 spaces before the right margin.
Tabs
You can set up to six tabs, either regular or decimal. Tabs may be set outside of margins.
| Regular Tab | Decimal Tab |
| This is | 123.56 |
| a Regular | 12.47 |
| Tab | 2.09 |
Regular Tabs
Regular tabs justify text at the tab stop. To set a regular tab:
- Position print hammer at desired location.
- Press Tab S. Unit beeps.
Decimal Tabs
Decimal tabs are used to align numbers with the decimal point. To set a decimal tab:
- Position the print hammer at desired location.
- Press Code + D. Tab (O). Unit beeps.
- Repeat steps 1 and 2 to set more decimal tabs if desired.
- Press Return when all tabs are set.
Using Tabs
Once tabs are set, they can be used as you are typing your text.
- Press Tab to move to tab location.
- Type text. If using a decimal tab, type the numbers preceding the decimal point. The carrier moves to the left for each number you type. If you make a mistake, press Tab to start again.
- Type the decimal point. The numbers print to this point.
- Type the numbers following the decimal point.
Clearing a Tab
Both types of tabs are cleared the same way.
- Position print hammer to tab setting.
- Press Code + Tab (Tab C). Release immediately. Unit beeps.
Clearing All Tabs Quickly
Press and hold Code + Tab (Tab C) until 2 beeps are heard. If you are positioned at a tab stop, you will hear 3 beeps.
Pitch
Your typewriter has been designed with triple pitch capabilities. To set the Pitch:
Press Code + Tab S for 10 Pitch.
Press Code + 1 for 12 Pitch.
Press Code + 2 for 15 Pitch.
Unit beeps when selecting pitch.
Note: Your typewriter is set at 10 pitch. Change the printwheel if you select another pitch. Changing pitch in the middle of a line erases Correction Memory. However, after the new pitch is selected, Correction Memory begins again.
Line Spacing
Each time you turn the typewriter on, it is set for single line spacing. You can change line spacing to 11⁄2 line spacing or double line spacing. To change line spacing:
Press Code + 3 for single line spacing.
Press Code + 4 for 11⁄2 line spacing.
Press Code + 5 for double line spacing.
Unit beeps when selecting line spacing.
Impression Control
Impression control is the force used by the print mechanism to strike the paper. When you turn the typewriter on, it is set at medium. You can change to light or heavy impression. It is recommended that you select heavy impression when typing on carbons. For normal typing, use medium impression.
To set impression control:
Press Code + L for light impression.
Press Code + M for medium impression.
Press Code + H for heavy impression.
The unit beeps when Impression control is changed.
Note: Standard bond paper stock is recommended for best quality. Copier paper, erasable bonds and very heavily textured bond papers do not print well with Correctable Film ribbon. For these paper types, we recommend High Density Correctable Film or Multi-Strike ribbons. If typing stencils, use those specifically designed for daisywheel printers.
Correcting Text
There are two ways to correct typing errors: off-line and on-line. The half-space feature can be used for both.
On-Line Correction
The typewriter can automatically correct all characters in a one-line memory buffer called the Correction Memory. You can easily correct characters no longer in Correction Memory using Off-Line correction. After correcting an error you can quickly return to your previous typing position.
Bold and auto underscore must be activated before correcting characters having these enhancements.
Correct Key
Use Correct for erasing character(s) in Correction Memory.
- Position the print hammer on the incorrect character and then press Correct. Hold down Correct to continue correcting, or press Back Space and then Correct again until all characters are removed.
- Type correct text.
- Press Code + Reloc (Return) if necessary to relocate. The unit beeps.
Note: You erase Correction Memory when you turn off the typewriter, press Return, change pitch, or use the Half Space feature.
WordEraser Key
Use WordEraser for erasing word(s) in Correction Memory.
- Position the print hammer on any character in the right most word to be corrected, and then press WordEraser once for each word to be erased. If you press WordEraser while between words, the word to the left of the space will be deleted.
- Type correct text.
- Press Code + Reloc (Return) if necessary to relocate. The unit beeps.
Off-Line Correction
To correct an error not in the current line Correction Memory:
- Press Code + Up (6), Down (7), or Return to position the print hammer on the line containing the incorrect character.
- Press Back Space or Spacebar to move to incorrect character.
- Press Code + Correct. The unit beeps.
- With correction cassette installed, retype the incorrect character to remove it.
- Type the correct character.
Bold and auto underscore must be activated before correcting characters having these enhancements.
Half Space
The Half Space feature is used when making corrections when you omit a character or type one too many. When the Half Space feature is activated, the typing position moves a half space to the right. Regular spacing returns when the Half Space feature is deactivated.
Note: When you activate the Half Space feature, the Correction Memory is erased. The typewriter remembers the half spaced characters until the Half Space feature is deactivated. Then, the typewriter begins to remember normal spaced characters again.
Adding a Character
- Press Correct or WordEraser to erase error.
- Press Back Space to position the carrier one space before the first character of the erased word.
- Press Code + Half Space (Spacebar). Print hammer advances a half space.
- Type correct word.
- Press Code + Half Space (Spacebar).
Removing a Character
- Press Correct or WordEraser to erase error.
- Press Code + Half Space (Spacebar). Print hammer advances a half space.
- Type the correct word.
- Press Code + Half Space (Spacebar).
Note: Before activating the Half Space feature on another line, you have to remove the error using off-line correction procedures. (See "Off-Line Correction.")
Enhanced Text
You can enhance your text by using Bold, Auto Center, Underscore, Superscript and Subscript.
Bold Print
This feature is used for highlighting text. To use Bold:
- Press Code + Bold (B). Unit beeps.
- Type text.
- Press Code + Bold (B) to deactivate bold.
Bold and auto underscore must be activated before correcting characters having these enhancements.
Auto Underscore
You can automatically underscore just the words or the words and spaces using the Auto Underscore feature.
Activating Word Underscore
- Press Code + Word (_/ - ). Unit beeps.
- Type text.
- Press Code + Word (_/ - ) to deactivate Underscore.
Activating Underscore All
- Press Code + All (+/ =). Unit beeps.
- Type text.
- Press Code + All (+/ =) to deactivate Underscore.
Manual Underscore
You can manually go back and underscore text.
- Position print hammer under the first character of the text to be underscored.
- Press Shift + —.
Auto Center
This feature automatically centers text between current margins. To use Auto Center:
- Press Code + Center (0). Unit beeps. The carrier moves to the center of the margins.
- Type the text. The carrier will backspace in half space increments for each character typed.
- Press Return. Text prints and centers automatically.
Note: If you make a mistake, press Code + Center to restart centering. If you decide not to center text, press Return prior to entering text.
Superscript / Subscript
Your typewriter can easily create superscript and subscript characters.
Typing Superscripts
- Press Code + Super (9). Typing position moves up 1⁄2 line.
- Type the superscript. Carrier returns to the original line.
Typing Subscripts
- Press Code + Sub (8). Typing position moves down 1⁄2 line.
- Type the subscript. The carrier returns to the original line.
Note: If you superscript or subscript more than one character, you must repeat steps 1 and 2 above. If you decide not to type a superscript or subscript after activating the feature, press Correct to return to the original line.
Correcting Superscript and Subscript Errors
To correct errors made while using Superscript or Subscript:
- Press Back Space to error.
- Activate superscript or subscript.
- Press Code + Correct.
- Type the incorrect character. It is erased and carrier returns to original line.
Keyboard II: International Characters and Special Symbols
The Keyboard II feature allows you to access the international characters and special symbols (for example: ç é ¿ ) that appear on the bottom right of certain keys.
Accessing Keyboard II Characters
Press Code then the desired Keyboard II character key or symbol.
For those characters ( ^ ~ ' ) printed above the letters, type the KB II character first. The print hammer remains in place so you can type a letter below the symbol.
Other Features
Your typewriter also has Index Up/Down and Auto Return.
Index Up/Index Down
This feature moves the paper up or down in increments equal to the current line space setting.
To use Index Up/Down:
- Press Code + Up (6) to move the typing position up (paper down).
- Press Code + Down (7) to move the typing position down (paper up).
Note: These are repeating keys. If they are held down, the paper will continue to move up or down.
Auto Return
You can program your typewriter to automatically return at the end of each line. When a space or hyphen is typed in the "warning zone," which begins five spaces before the right margin, the carrier automatically returns to the next line. For lengthy words falling at the end of the line, simply type a hyphen as you normally would and the carrier returns automatically. To activate Auto Return:
- Press Code + Return (Back Space). Unit beeps.
- Type text. Do not press Return at the end of a line.
Deactivating Auto Return
Press Code + Return (Back Space).
Care and Maintenance
Ribbon Cassettes and Correcting Cassette

Use Smith Corona brand "H" Series supplies. Use of non-Smith Corona (brand or manufactured) supplies or accessories will not (except as noted below) void this warranty.
THE WARRANTY WILL BE VOID IF the typewriter is damaged or rendered wholly or partially inoperable as a result of using a non-Smith Corona supply or accessory item(s).
Your Smith Corona typewriter uses Ribbon and Correcting Cassettes with the Right Ribbon System ® feature. Smith Corona's patented Right Ribbon System feature assures that the right combination of ribbon and correcting cassette is inserted in the typewriter.
- Assures use of Correctable film with Lift-Off correction.
- Assures use of Multi-Strike film with Cover-Up correction.
For example: Correctable film ribbon with Cover-Up correcting cassette. If a mismatched set is inserted, the ribbon cassette cannot be fully or properly inserted into your typewriter.
The exclusive Right Ribbon System feature using the patented Smith Corona Ribbon and Correcting Cassettes is designed to make changing ribbons and correcting tapes quick, easy, and error-free.
Because of Smith Corona's patented correcting tape feed mechanism, the lift-off correcting cassette has approximately two times the yield of spooled tapes found in other machines.
Replace the ribbon cassette when a different colored portion begins to unwind from the Cassette. Be sure to use the Right Ribbon System combination.
Correctable Film with Lift-Off Correction
When using Correctable film ribbon cassettes, use Smith Corona Lift-Off correcting cassettes. Lift-Off tape removes your errors quickly and cleanly. It will not remove the print of a Multi-Strike ribbon. Lift-Off correcting cassettes have a yellow cut-out on the lower right.
Multi-Strike Film with Cover-Up Correction
When using Multi-Strike film ribbon cassettes, use Smith Corona Cover-Up correcting cassettes.
Cover-Up tape covers your errors neatly and quickly. Cover-Up correcting cassettes have a pink cut-out on the lower right.
Removing the Ribbon Cassette
Replace the ribbon cassette when a different colored portion begins to unwind from it.
- Tilt protective cover forward.
- Grasp cassette on both sides.
- Lift cassette STRAIGHT up and out.
Inserting the Ribbon Cassette
- Turn the gear wheel on the bottom of the cassette in the direction indicated to tightly wind the cassette.
- Turn the cassette over with the name face up and the ribbon toward the print hammer.
- Set the cassette in the carrier while guiding the ribbon between the printwheel and the typing guide. Press down. Ribbon snaps into place.

- Return protective cover to its original position. Be sure it snaps into place.

Note: Stencils designed specifically for daisywheel typewriters perform best when the print ribbon is inserted. To determine which brand best fits your individual requirements, check with your office supplies retailer.
Correcting Cassettes
Replace the correcting cassette when a different colored portion unwinds from the right spool.
Removing the Correcting Cassette
- Tilt protective cover forward, and remove the print ribbon cassette.
- Grasp correcting cassette on sides as shown. Lift correcting cassette up and out.


Inserting a New Correcting Cassette
- Turn appropriate gear wheel on bottom of the correcting cassette in direction indicated by arrows to wind tightly.

- Hold correcting cassette (using both hands as shown) with the Smith Corona name facing up.
- Guide correcting tape between the printwheel and typing guide and position left gear wheel on left mount and right gear wheel on right mount.

- Snap correcting cassette securely in place.
![]()
After the cassette is mounted, tighten slack in tape by moving red plastic lever toward platen. The lever is located under left side of cassette towards the platen. Repeat as many times as necessary. - Replace ribbon cassette. Be sure printwheel and print hammer are secure.
- Return protective cover to its original position. Be sure it is closed securely.


Printwheels
Removing the Printwheel
- Move switch to Standby
![]() .
. - Tilt the protective cover forward.
- Remove the print ribbon cassette and correcting cassette.
- Locate the print hammer release/engage lever (left of print hammer). Press the lever toward you until the print hammer mechanism springs away from the printwheel.

- Lift the printwheel up and out.
 .
.
Inserting a Printwheel
- Drop printwheel between print hammer and typing guide with type style name facing you.
- Push the print hammer release lever back to secure the printwheel.
- Replace the correcting cassette and ribbon cassette.
- Return the protective cover to its original position.
- Return the switch to the operating position.
If incorrect characters are printed, after changing the printwheel, turn the typewriter off, then on.
Cleaning
Do not attempt to disassemble the typewriter to clean it.
Always unplug the machine before using cleaning solutions on its surfaces.
Printwheel
To remove residue, dip the characters into a small container of ethyl or isopropyl alcohol (rubbing alcohol) and wipe with a clean dry cloth. Do not soak the printwheel.
Platen
Wipe surface with a clean cloth dampened with ethyl or isopropyl alcohol (rubbing alcohol).
Keyboard
To clean the keyboard, dampen a sponge with a mild ammonia or soap solution. DO NOT use household cleaners containing chlorinated compounds. DO NOT spray anything directly on the product.
Keep all solvents and petroleum distillates (gasoline, kerosene, lighter fluids, etc.) away from plastic parts. Keep all cleaning solutions away from electrical components and moving parts.
Check Points
If your typewriter does not function properly, check the following:
✔ Is the typewriter plugged into a live socket?
✔ Is the typewriter switched on?
✔ Is the protective cover completely closed?
✔ Are the printwheel, ribbon cassette and the correcting cassette properly installed?
✔ Have the ribbon or correcting cassette been used up?
✔ Is the carrier lock completely disengaged?
✔ Are compatible ribbon and correcting cassettes installed?
✔ Is the print hammer in a locked position?
✔ Has a foreign object fallen into the typewriter?
If the typewriter still does not work properly after checking the above, contact your nearest Smith Corona Service Center.
Obtaining Service
If you are experiencing difficulty, before returning the unit for service, call Consumer Affairs, toll-free at 1-800-448-1018, for assistance. Customer Service
Representatives are available to assist you Monday through Friday, from 8:00 AM to 6:00 PM, EST.
Note: If you need to send your unit for service, to qualify for Warranty, proof of purchase must accompany the unit. Your sales receipt is your proof of purchase.
Shipping Instructions
When the machine is to be shipped for any reason, the printwheel carrier inside the typewriter must be stabilized to prevent movement. The typewriter as a whole must be properly protected from shipping and handling hazards. Use original packing material to pack the unit.
Stabilizing the Printwheel Carrier
- Tilt the protective cover forward.
![]()
- Select a rubber band to use to secure the carrier mechanism.
- Place the rubber band around the foot retainer on the right side of the machine. Position the carrier mechanism near the rubber band.

- Stretch the rubber band over the top of the mechanism and around the tab on the left side.

- Return the protective cover to its original position and tape shut.
- Wrap the cord around the cord wrap panel as many times as possible. Some excess cord will remain loose. Secure the plug in the protection slot. Tuck the excess cord up under the lip. Your typewriter is ready for transport.


Note: If the original packing materials are not available or the carrier cannot be put into the correct position, ball up single sheets of newspaper and insert them on each side of the carrier until all open spaces are filled to capacity.
Packing the Device
Pack the typewriter in the original materials. If you do not have the original packing materials:
- Use box slightly larger than the typewriter.
- Place the typewriter in a large plastic bag.

- Place at least 2" of packing material in the bottom of the box for cushioning.
- Place the typewriter inside the box and fill the sides and top with more packing material (2" of material on all sides).
- Seal carton using either filament tape or wide plastic tape.
- Address the package for shipment to the nearest service location. Remember to include your return address and retain your shipping receipt.

Safe Operating Recommendations
To avoid unnecessary operator injury or damage to the machine, please review the following recommendations.
![shock hazard]() USE THE CORRECT VOLTAGE to avoid electrical short circuiting, overheating or shocks.
USE THE CORRECT VOLTAGE to avoid electrical short circuiting, overheating or shocks.- If in doubt, check the electrical rating label affixed to the unit. Smith Corona does not recommend attaching your unit to any power source other than that which is indicated on the original electric rating label of the machine. Smith Corona does not recommend the use of a voltage converter.
- THE UNIT SHOULD BE PLUGGED into an outlet which is nearby and easily accessible.
- ALWAYS HAVE THE UNIT SERVICED by a qualified service technician. There are no user-serviceable parts inside.
![shock hazard]() TO AVOID ELECTRICAL SHOCK, never insert metal objects such as screwdrivers, paper clips, nail files, etc. inside the unit. For safety's sake, never place any object inside the unit.
TO AVOID ELECTRICAL SHOCK, never insert metal objects such as screwdrivers, paper clips, nail files, etc. inside the unit. For safety's sake, never place any object inside the unit.- BEFORE REACHING INTO THE CARRIER PATH AREA, always switch to standby or off, depending on the model.
- KEEP FINGERS, HAIR, JEWELRY, etc. away from the carrier area when in operation.
- IF THE UNIT IS DROPPED, the insulation system may be disturbed. Have the unit checked by a qualified service technician before using it again.
- DO NOT remove the housing from the unit.
- AVOID PLACING THE UNIT near an excessively warm or humid location.
- IF LIQUIDS ARE SPILLED OR SPLASHED on the unit, immediately unplug it. Have the unit checked by a qualified service technician.
- BEFORE CLEANING any part of your unit, make sure it is unplugged.
- WHEN FINISHED TYPING, switch to Standby or Off. Unplug unit if it is not to be used for an extended period. Unplug unit for a complete cut from the main electrical circuit.
 USE THE CORRECT VOLTAGE to avoid electrical short circuiting, overheating or shocks.

To reduce the risk of fire or electric shock, do NOT expose unit to rain or moisture.
Quick Reference Guide


Documents / ResourcesDownload manual
Here you can download full pdf version of manual, it may contain additional safety instructions, warranty information, FCC rules, etc.
Download Smith Corona MEMORY CORRECT - Electronic Typewriter Manual
Advertisement


Need help?
Do you have a question about the MEMORY CORRECT and is the answer not in the manual?
Questions and answers