Advertisement
INTRODUCTION
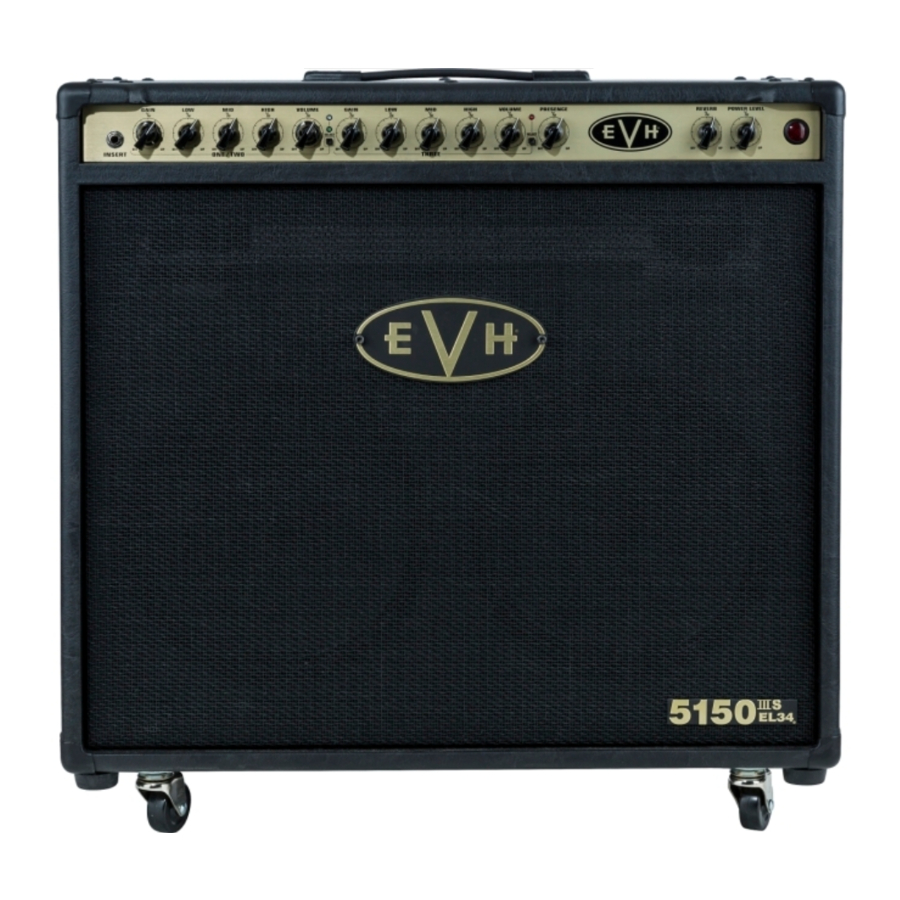
This professional all-tube amplifier meets the exacting specifications of Edward Van Halen, one of the true living legends of rock guitar. The 5150III EL34 2x12 Combo Amplifier is an addition to the 6L6 2x12 version, with new features that will inspire unlimited artistic expression, including a "cleaner" channel one and more compressed tone and saturation from the matched JJ EL34 tubes. With such fierce tone and uncompromising construction, the result is phenomenal EVH performance for years to come. Other distinctive features of this ferocious amp include an ultra-high-gain preamp design custom voiced for maximum harmonic content, a black-andgold EVH motif and much more.
FRONT PANEL

- INPUT: Plug in an instrument here. Use only a high-quality shielded instrument cable.
- CHANNEL ONE/TWO GAIN: Dual concentric gain controls. Inner round knob controls channel one (clean); outer "chicken-head" knob controls channel two (medium gain).
- CHANNEL ONE/TWO LOW/MID/HIGH: Low-, middle- and high-frequency tone controls for channel one (clean) and channel two (medium gain).
- CHANNEL ONE/TWO VOLUME: Dual concentric volume controls. Inner round knob controls channel one (clean) volume; outer "chicken-head" knob controls channel two (medium gain) volume. Note: For a cleaner sound from channels one and two, set these volume controls to their maximum, then bring the gain controls (B) up from their minimum settings to the desired level.
- CHANNEL ONE/TWO SELECT: Momentary pushbutton alternately selects channel one (clean, green LED) and channel two (medium gain, blue LED).
- 2 CHANNEL THREE GAIN: Preamp gain control for highgain channel three. Higher settings of this knob will increase preamp distortion.
- CHANNEL THREE LOW/MID/HIGH: Low-, middle- and high-frequency tone controls for high-gain channel three.
- CHANNEL THREE VOLUME: Post-preamp gain control for high-gain channel three.
- CHANNEL THREE SELECT: Momentary pushbutton selects channel three (high gain, red LED). State of channel one or channel two is remembered when returning from channel three to channel one/two select (E).
- PRESENCE: Ultra-high frequency tone control for all three channels.
- REVERB: Adjusts reverb level for all three channels. Reverb can be switched on/off from footswitch (T).
- POWER LEVEL: Adjusts amplifier output from 1 to 50 watts while maintaining same tonal characteristics.
- POWER LAMP: Illuminates when amplifier is on.
REAR PANEL

- POWER INPUT: Connect the included power cord to the amplifier here, in accordance with the voltage and frequency ratings listed on the rear panel of the amplifier. O. FUSE: Replace only with a fuse of the same rating.
- POWER: Turns the amp on and off. After turning this switch to ON, wait 30 seconds for the tubes to warm up, then turn the STANDBY switch (O) to ON to take the amp out of STANDBY mode. When turning the amplifier off, place the amp in STANDBY mode by turning the STANDBY switch to OFF for 10 seconds before turning the POWER switch to OFF.
- STANDBY: Place this switch in the OFF position to put the amp in STANDBY mode. This should be done when taking a break from playing or before turning the amplifier off (as described above in item "N"). Using STANDBY mode prolongs tube life.
- HEADPHONES: Connect headphones here (automatically mutes speaker output).
- MIDI IN: Connect a MIDI controller here to enable MIDIcommanded channel selection and effects loop bypass (see "MIDI Setup and Use" section on following page).
- FOOTSWITCH: Connect the included footswitch (see illustration below) here. The footswitch enables easy selection of each of the three channels and reverb. The green, blue and red footswitch LEDs correspond to the channel LEDs on the amp front panel. Purple LED at far right illuminates when reverb is active.

- EFFECTS LOOP: Connect SEND to an external effect input; connect RETURN to external effect output.
- PREAMP OUT: Connect to another amp's effects return or power amp input for simultaneous multiple amp use. This output can also be used to send the preamp signal directly to a mixer.
- RESONANCE: Adjusts power amp low-frequency response.
- LOAD IMPEDANCE: Selects amp output impedance of (4, 8 or 16 ohms) to match speaker load.
- NOTE: The 5150III 212ST speaker enclosure (recommended) has an impedance of 16 ohms. When using the 5150III 212ST speaker enclosure, set LOAD IMPEDANCE switch to "16Ω."
- SPEAKER OUTPUTS: For connection to speaker cabinet(s). Either jack can be used when using only one speaker cabinet. Five different speaker configurations are listed below.
Use only high-quality unshielded speaker cables.

 NOTE: A speaker must always be plugged into one of the speaker jacks when the amplifier is on, or damage may occur. Turn the amplifier off or put it in standby modewhen changing speaker connections or impedance settings.
SPEAKER CONFIGURATIONS
| SPEAKER JACK | SPEAKER JACK | IMPEDANCE SETTING |
| 16Ω + | NONE = | 16Ω |
| 16Ω + | 16Ω = | 8Ω |
| 8Ω + | NONE = | 8Ω |
| 8Ω + | 8Ω = | 4Ω |
| 4Ω + | NONE = | 4Ω |
MIDI SETUP AND USE
MIDI CHANNEL SELECTION
- Press both channel SELECT buttons (E and I) simultaneously to initiate MIDI "learning mode." The current amp channel LED will start to flash.
- Send any desired program change message on any desired channel from a MIDI controller to the amp. The channel one LED (green) will start to flash unless the program change message has previously been assigned to a different amp channel (in which case the LED for the previously assigned channel will start to flash).
- Select the target amp channel (one, two or three) using the channel SELECT buttons (E and I). All three amp channel LEDs will briefly illuminate to indicate if the amp channel assignment has been changed for the program change message sent (if the amp channel assignment has not changed— which would be the case when assigning amp channel one to a program change message for the very first time—the three amp channel LEDs will not all illuminate briefly, because the amp channel assignment has not changed from the default amp channel one assignment).
If the program change message is currently assigned to amp channel one (default), the channel one/two select button (E) must be pressed twice to select amp channel two. If the program change message is currently assigned to amp channel two, the channel one/two select button (E) must be pressed twice to select amp channel one. - Repeat steps two and three for each channel on the amp, if desired. For greater flexibility, multiple program change messages can also be assigned to the same amp channel.
![warning]() Note that the footswitch can be used to temporarily change channels at any time during MIDI setup; this will have no effect on saving amp channel assignments. All channel assignment changes must be made using the front panel channel select buttons (E and I).
Note that the footswitch can be used to temporarily change channels at any time during MIDI setup; this will have no effect on saving amp channel assignments. All channel assignment changes must be made using the front panel channel select buttons (E and I). - When MIDI program change setup is complete, exit "learning mode" by pressing both front panel channel select buttons (E and I) simultaneously. The amp is now set up to switch to the target channels whenever the selected program change messages are sent on the selected MIDI channel.
![warning]() Note that the default MIDI channel for the amp is channel one. The amp MIDI channel can be changed by sending a program change message from any other desired MIDI channel while in "learning mode." The amp will then respond only to program change messages and control change messages on that new MIDI channel.
Note that the default MIDI channel for the amp is channel one. The amp MIDI channel can be changed by sending a program change message from any other desired MIDI channel while in "learning mode." The amp will then respond only to program change messages and control change messages on that new MIDI channel.
MIDI USE FOR REVERB ON/OFF
No setup is required. From MIDI channel one (default) or the channel used to send program change messages in the section above (if different from MIDI channel one), simply send a control change #85 message with a value of 63 or less to switch reverb off, or a value of 64 or greater to switch reverb on.
CLEARING MIDI PROGRAMMED SETUPS
To clear MIDI programming and return amp to factory defaults, hold down one of the CHANNEL SELECT buttons (E or I) while powering up amplifier.
FURTHER INFORMATION
For a more in-depth guide to MIDI programming for EVH 5150III series amplifiers, visit the online "Support" section of the EVH website (evhgear.com), and click on "MIDI Programming EVH® 5150III 50W Series Amps" under the "Schematics and Wiring Diagrams" heading.
SPECIFICATIONS
| TYPE | PR 5557 |
| POWER REQUIREMENT | 400 watts |
| OUTPUT | 1 to 50 watts RMS into 4, 8 or 16 ohms |
| INPUT IMPEDANCE | >1MΩ |
| OUTPUT IMPEDANCE | 4, 8 or 16 ohms (selectable) |
| SPEAKERS | Two 12" 8Ω Celestion® 30W connected in series (total impedance 16Ω) |
| FUSES | F4A L 250V (100V and 120V units) F2A L 250V (220-240V units) |
| FOOTSWITCH | Four-button (included, PN 0096467000) |
| TUBES | Two EL34 power amp tubes, seven ECC83S preamp tubes |
| DIMENSIONS AND WEIGHT | Height: 28" (71.1 cm) Width: 27.6" (70.1 cm) Depth: 12.1" (30.7 cm) Weight: 84 lbs. (38.1 kg) |
Product specifications subject to change without notice.

Documents / ResourcesDownload manual
Here you can download full pdf version of manual, it may contain additional safety instructions, warranty information, FCC rules, etc.
Advertisement


Need help?
Do you have a question about the 5150III EL34 and is the answer not in the manual?
Questions and answers