Table of Contents
Advertisement
Quick Links
..................................................................................................................................................................
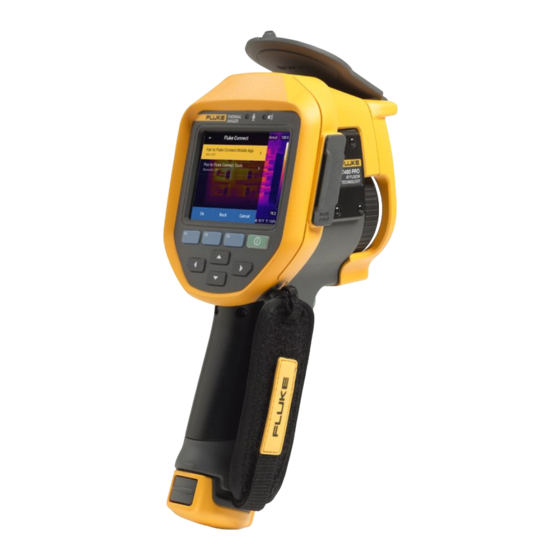
Memory Card Slot,
HDMI
F1, F2, F3
Buttons
Directional Arrow Keys
1. MEMORY:
Insert SD memory card into the slot under the rubber cover on the side of the camera.
2. POWER:
Insert a fully charged battery into the base of the hand grip. The battery life is indicated in the lower left corner of the LCD
display. You can also press and hold the battery symbol on the side of the battery.
3. START:
Press the Power button until you hear an audible tone signaling camera startup.
• Swing the attached lens cover up and lock in the open position on the top of the camera.
• The LCD display will turn on and you will see the default start up screen (as above) showing a live infrared image.
• To turn the camera off, press the Power button until an audible tone signals it is powering down.
4. FOCUS:
Focus is either manual or automatic, and is user selectable.
• To manually focus, adjust the focusing ring either clockwise or counter clockwise to optimize image focus
• Automatic focus is laser enhanced. To utilize the laser assisted auto focus, depress the laser assisted focus trigger while aiming the
laser pointer at the object of interest. While holding the camera steady, release the trigger. If there is too much movement of the
laser during the auto focusing operation, an Excessive Laser Movement warning may appear on the screen
5. AUTO ADJUST (Level and Span):
button and the imager will change to Auto mode.
• Auto mode is additionally accessible through the menu screens. Depress the F2 button to open the Menu, and either with the
directional buttons or by using the touch screen, select Measurement. Then select Set Level/Span. To select auto, either press the
Auto button on the screen, or highlight it with the directional buttons and then depress Select or Done.
6. MANUAL ADJUST (Level and Span):
the F1 button and the imager will change to Manual mode.
• Manual mode is additionally accessible through the menu screens. Depress the F2 button to open the Menu, and either with the direc
tional buttons or by using the touch screen select Measurement. Then select Set Level/Span. To select Manual, either depress the Manual
button on the screen, or highlight it with the directional buttons and then depress Select.
• While in Manual mode, a one-time auto adjust of level and span can be made by depressing the F3 button.
© 2023 The Snell Group / 20 Godfrey Dr / Unit 2 / Orono, ME 04473 / 800.636.9820 / www.thesnellgroup.com
Mic
Speaker
Auto/Manual
Indicator
Power
Auto Level and Span can be selected two ways. If operating in Manual Mode, depress and hold the F1
Manual Level and Span can be selected two ways. If operating in Auto Mode, depress and hold
QuickStart FLUKE
Ti480/450/401/400/300/200
AC Power, USB,
Mini USB
Range/Span/Level
Indicator
Battery
Focus Ring
Laser Assisted
Focus Trigger
Trigger
(Pause Image)
Advertisement
Table of Contents

Subscribe to Our Youtube Channel
Related Manuals for Fluke Ti480


Summary of Contents for Fluke Ti480
- Page 1 QuickStart FLUKE ……………………………………………………………………………………………………………………………………………… Ti480/450/401/400/300/200 Speaker Memory Card Slot, Auto/Manual HDMI Indicator AC Power, USB, Mini USB Range/Span/Level Indicator Focus Ring Power Battery Laser Assisted F1, F2, F3 Focus Trigger Buttons Directional Arrow Keys Trigger (Pause Image) 1. MEMORY: Insert SD memory card into the slot under the rubber cover on the side of the camera.
- Page 2 ……………………………………………………………………………………………………………………………………………… QuickStart FLUKE Ti480/450/401/400/300/200 7. PAUSE IMAGE (Freeze): Live images are paused by depressing the green trigger once. Once an image has been paused, the options are given to Save, Edit or Cancel. Selecting cancel returns the imager to live operation 8.
Need help?
Do you have a question about the Ti480 and is the answer not in the manual?
Questions and answers