Advertisement
WHAT SETS THE A20 APART
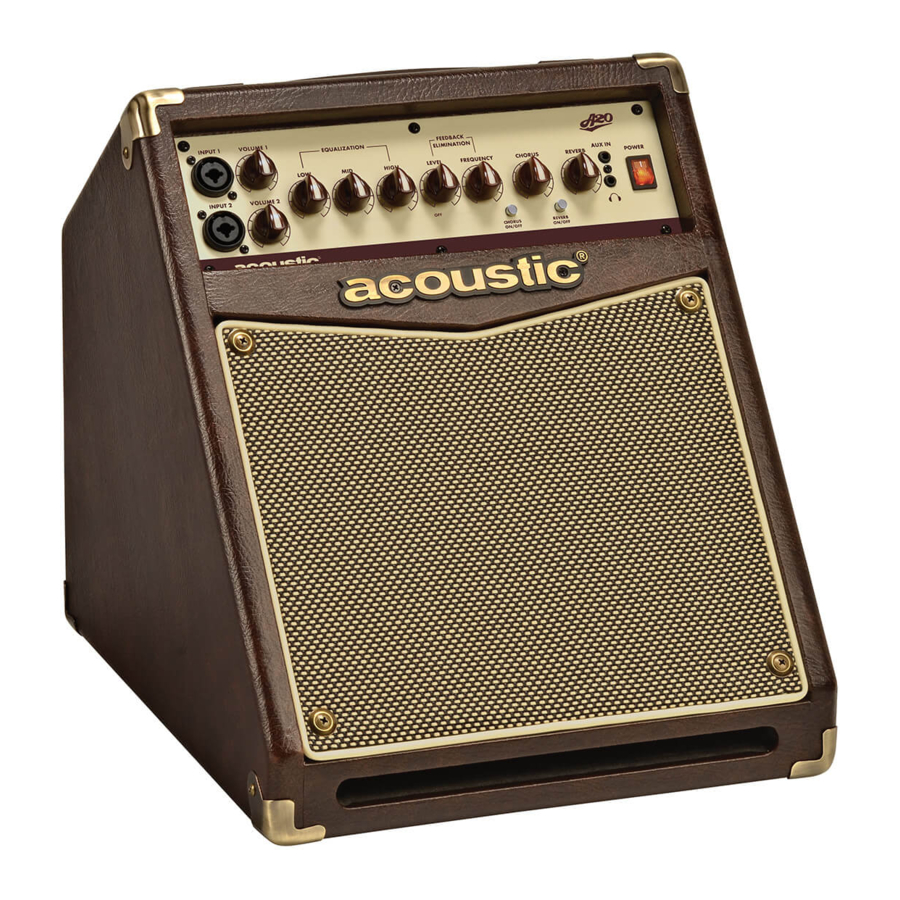
Your new Acoustic A20 amplifier is designed to sound great with any acoustic instrument or vocals.
We put a lot of thought and effort into selecting exactly the right components and designing a product that will be easy to adjust so you can quickly find the voice of your instrument and project it beyond your personal performance space.
Here a few of the features that we put into the A20 to make you sound your best
- 20 watt output, perfect for solo performance, rehearsal, and more
- Two inputs, each with combo XLR-1/4" jacks for use with instruments or vocal microphones
- 1 x 8" co-ax speaker featuring a polypropylene cone with a rubber surround for extended frequency response, combined with a tweeter for chime-like high end clarity
- Shelf-ported cabinet design for extended bass response
- 3-Band EQ for great tonal control
- Digital chorus with adjustable rate
- Digital reverb with adjustable level
- Vari-control feedback elimination
- Full-feature direct output with ground lift, pre-post EQ and level
No matter what your style of playing or choice of acoustic instrument, you will find that your new amp will capture and project the very best of your musical voice.
SPECIFICATIONS
Power: 20W RMS
Equalizer:
Low ±15dB@100Hz
Med ±15dB@800Hz
High ±15dB@7kHz
Channels: 1
Inputs: 2
Digital Reverb
Digital Chorus
Feedback Elimination Filter
Speaker: 8" Co-ax Studio Monitor Style
Dimensions: 14.4"H x 13.0"W x 15.8"D
Weight: 21.5 lbs.
TAKING CARE OF YOUR NEW AMPLIFIER
LOCATION
- To avoid deformation, discoloration, or more serious damage, do not expose the unit to direct sunlight, high temperature sources, or excessive humidity.
POWER SUPPLY
- Turn the power switch off when the A20 is not in use.
- The AC cable should be unplugged from the AC outlet if the A20 will not be used for an extended period of time.
- Avoid plugging the AC cable into an AC outlet that is also powering high consumption appliances such as electric heaters or televisions.
- Avoid using multi-plug adapters since these can reduce sound quality, cause operation errors, and result in possible damage.
- To avoid damage, turn off the A20 power switch and all related devices prior to connecting or disconnecting cables.
HANDLING AND TRANSPORT
- Never apply excessive force to any parts.
- Unplug cables by gripping plugs firmly. Do not pull on cables.
- Physical shocks caused by dropping or bumping can result in serious damage.
CLEANING
- Clean with a dry, soft cloth.
- A slightly damp cloth may be used to remove stubborn grime and dirt.
- Never use cleaners such as alcohol or thinner.
ELECTRICAL INTERFERENCE
- The A20 contains electronic circuitry that may cause interference if placed too close to radio or television receivers. If this occurs, move the A20 further away from the affected equipment.
SERVICE AND MODIFICATION
- There are no user serviceable parts in the A20.
- Do not attempt to open the A20 or make any change to circuits or parts. This will void the warranty.
FRONT PANEL

- INPUTS – combination ¼" (2 conductor instrument cable) or XLR (3-4 conductor microphone)
- VOLUME CONTROLS - these adjust the overall loudness of the corresponding input. If your acoustic instrument has a preamp, you should set the Volume control on your instrument at about half volume. You can then adjust the amplifier volume to your normal playing level and still have room to increase or decrease your volume as needed from the instrument.
- EQUALIZATION
- LOW FREQUENCY - set to boost (15 dB) or cut (-15 dB) frequencies at 100Hz. Controls the lowest fundamental frequencies to enhance the warmth and deep, full tones of your acoustic instrument or vocals.
- MIDRANGE FREQUENCY - set to boost (15 dB) or cut (-15 dB) frequencies at 800Hz. Allows you to control the definition and voice of your acoustic instrument or vocals.
- HIGH FREQUENCY - set to boost (15 dB) or cut (-15 dB) frequencies at 7kHz. Increasing this will enhance the clarity and brightness of your acoustic instrument or vocals.
- FEEDBACK ELIMINATION
- FEEDBACK ELIMINATION LEVEL – this adjusts the amount of feedback filtering. Be sure to set this control to "off" if you are not experiencing any feedback issues.
- FEEDBACK ELIMINATION FREQUENCY – this adjusts the frequency of the feedback filtering.
To control Feedback, do the following:
- Set the Level control to "12 o'clock" setting or higher
- Turn the Frequency knob, moving from left-to-right, to search for the frequency at which the feedback is to be suppressed.
- If in the lower register, start at "0" position
- Sweep to the right if the frequency is in the higher register
- When the feedback is eliminated, reduce the Level control until the feedback returns, then adjust slightly upward until it is gone
- CHORUS
- Chorus On / Off switch – this creates a shimmering, musical tonal effect.
- Chorus Rate control - this will speed up the rate of the Chorus effect.
- REVERB
- Reverb On /Off switch – this simulates the natural ambience of reflective soundwaves.
- Reverb Level control – increasing the level control will intensify the amount of reverb present in your signal.
- AUX IN – this 1/8" 3-conductor Aux input jack will allow you to plug in a CD, MP3 player or any other stereo source so you can play along. To control the volume of this input, adjust the output volume of the device.
- HEADPHONE - this 1/8" 3-conductor jack is for plugging in headphones. When used, it will disconnect the internal speaker.
- POWER – this rocker switch will illuminate with a soft amber color when the amp is turned on and ready to play.

REAR PANEL

- POWER
- AC LINE IN – this plug accept a standard CLASS 1 IEC grounded cable (included) to provide AC power to the amplifier.
- VOLTAGE SELECTOR – used to select the input voltage level to 110/115V or 220/230V. Voltage standards vary by country.
This switch is preset at the factory. Setting the power supply voltage switch to the incorrect input voltage could damage the power supply and possibly other parts of your equipment.
- DIRECT OUTPUT
- PRE/POST EQ Switch – this switch determines if your direct output signal will be effected by the front panel equalization settings. In the PRE setting, the direct signal is not effected by the front panel settings; in POST setting, the direct signal is effected by the EQ settings.
- DIRECT OUTPUT LEVEL – this adjusts the overall level of the direct output.
- DIRECT OUTPUT – connect a standard XLR balanced cable from this jack to provide a line-level signal to your PA system, powered speaker, or other powered output device.
- GROUND LIFT – this switch disconnects pin 1 on the XLR jack, which is connected to the shield in the cable and acts as the ground point of the circuit, reducing ground-related noise.
- EFFECTS LOOP
these ¼" unbalanced send and returns allow you to run external effects between the preamp and the power amp, resulting in clearer effects signal, and cleaner levels (line level vs. instrument level). Connect the Send to your effect devices input, and the output from your device to the Return.


Documents / Resources
References
Download manual
Here you can download full pdf version of manual, it may contain additional safety instructions, warranty information, FCC rules, etc.
Advertisement


Need help?
Do you have a question about the A20 and is the answer not in the manual?
Questions and answers