Table of Contents
Advertisement
Quick Links
Advertisement
Table of Contents

Related Manuals for U.S. Solid USS-HMA03


Summary of Contents for U.S. Solid USS-HMA03
- Page 1 Instruction Manual USS-HMA03 Moisture Analyzer...
-
Page 2: Table Of Contents
Table of Contents 1. Introduction........................2 1.1 About Halogen Moisture Analyzer..............2 2. Safety Precautions...................... 3 2.1 Definition of Warning Symbols................3 2.2 Warnings......................3 2.3 Cautions......................5 3. Design and Function....................6 3.1 Components...................... 6 3.2 Display Panel......................8 4. Installation and Adjustment..................10 4.1 Scope of Delivery.....................10 4.2 Selecting the location.................. -
Page 3: Introduction
To make full use of the functions and performance of the U.S. Solid USS-HMA03 moisture analyzer, please read the manual completely and follow the usage instructions before installation and operation. -
Page 4: Safety Precautions
2. Safety Precautions U.S. Solid Moisture Analyzer qualifies as state-of-the-art technology and complies with all recognized safety rules. Improper use or handling, however, can result in damage and/or injury. Follow the precautions below to ensure safe and trouble-free operation of your moisture analyzer. - Page 5 • Avoid allowing the analyzer to get wet. It is not a water-resistant structure. Any leakage of liquid into the analyzer may cause damage to the analyzer or an electric shock to the user. • Use a power source (voltage, frequency, outlet type) adapted to the specification of the analyzer.
-
Page 6: Cautions
• For substances that produce corrosive vapors when heated (e.g. acids), work with small amounts of samples as the vapor may condense on cooler housing parts and cause corrosion. 2.3 Cautions • Operate the Analyzer on a stable, rigid and flat table. •... -
Page 7: Design And Function
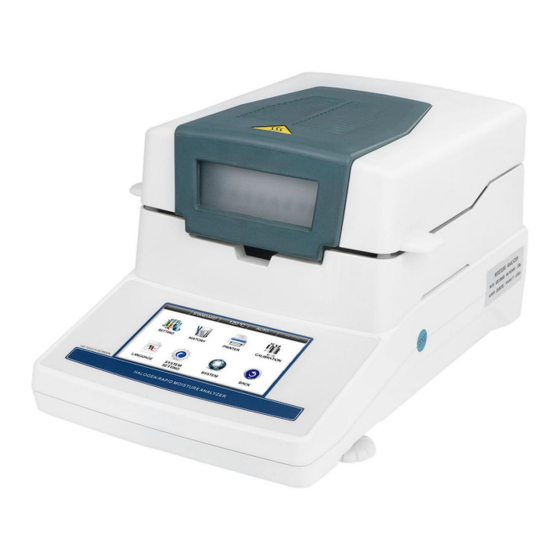
3. Design and Function 3.1 Components 1: Observation window 6: Sample pan holder 2: Heater cover 7: Sample pan handle 3: Heater 8: Draft shield 4: Temperature sensor 9: Display panel 5: Sample pan 10: Leveling foot... - Page 8 1: Fan 2: Power inlet 3: Level bubble 4: RS-232 connector 5: Switch button...
-
Page 9: Display Panel
3.2 Display Panel No. Display Name Description Set the test parameters including drying Setting mode, temperature, ending mode and drying time History View previous test report Printer Printer Settings Weight calibration, including single point Calibration calibration and multipoint calibration Language Language selection... - Page 10 System time date, touch screen Setting calibration and factory reset View the basic parameters of the moisture System analyzer Back Return to the home page...
-
Page 11: Installation And Adjustment
· 1 Quality Certification Unpacking and checking the instrument for transport damage. Immediately inform U.S. Solid customer service if you have any complaints or parts are missing. Note: Keep all all of the packaging. This packaging guarantees the best possible... -
Page 12: Selecting The Location
4.2 Selecting the location Measurement performance of your moisture analyzer depends largely on the surrounding environments. Follow these guidelines to make sure the proper environmental conditions are met: • Operate the instrument only indoors. • Make sure that all parts of the instrument reach room temperature (5°C-30°C) before switching it on. -
Page 13: Installing Parts
4.3 Installing parts Procedure: 1. Lift the cover straight up 2. Install the draft shield Place the draft shield into the sample chamber. Align it with the hole. 3. Install the sample pan holder Place the pan holder on the axis of the moisture analyzer main unit. Align the pan holder with the draft shield, and insert them onto the bottom. - Page 14 Adjust the leveling feet of the Moisture Analyzer until the air bubble in the indicator is centered. The level indicator is located under the cover towards the rear of the Moisture Analyzer. Position of air bubble Adjustment method Turn both feet clockwise down Turn both feet counterclockwise Turn left foot counterclockwise, right foot...
-
Page 15: Connect To Power
4.5 Connect to power Warning: • To prevent electric shock, be sure to use the 3-pin power cord with equipment grounding connector. • Check to make sure the voltage indicated on the moisture analyzer data label matches the local line voltage. If it is does not match, do not connect the moisture analyzer to the power source. -
Page 16: Settings And Calibration
5. Settings and calibration 5.1 Drying Mode setting 1. Standard drying mode This mode is the default setting and is suitable for most samples. The heating temperature can be set, the sample is heated to the set temperature during the test, and the temperature is maintained until the test ends automatically. -
Page 17: Ending Mode Setting
5.2 Ending Mode setting 1. Automatic ending mode The test will automatically stop at a certain point in time (when the moisture content does not change within 45 seconds) in the automatic stop mode. This mode takes effect after 15 seconds of heating. After the test is completed, the display shows the sample moisture content, heating time and current temperature. -
Page 18: Calibration
5.3 Calibration Weight calibration is the correction of the difference between the measured value displayed and the true weight (mass) of a sample, or the reduction of the difference to a level within specified permissible error limits. Procedure: 1. Click “MENU” on the homepage, then click “CALIBRATION” to perform the weight calibration operation. -
Page 19: First Measurement
First Measurement Steps to carry out your first measurement: 1. Turn on the switch button on the back of the moisture analyzer, the home page will be displayed. 2. Click the “MENU” icon to enter the page of settings and functions. - Page 20 3. Click the “SETTING” icon to start the mode selection and parameter settings. 4. Click the “DRYING MODE” icon to select the required drying mode and confirm by clicking “CONFIRM”.
- Page 21 5. Click the “TEMPERATURE SETTING” icon, then use “˄” or “˅” to select a drying temperature and confirm by clicking “CONFIRM”. 6. Click the “ENDING MODE” icon to select the required ending mode and confirm by clicking “CONFIRM”.
- Page 22 7. If timing ending mode is selected, then it is needed to click “TIME SETTING” icon to set a drying time. Use “˄” or “˅” to select required drying time and confirm by clicking “CONFIRM”. 8. After all settings are completed, click “BACK” to return to the home page.
- Page 23 9. Place an empty sample pan on the sample pan holder and ensure it is laid flat. 10. Close the heater cover and tare by clicking the “TARE” icon. 11. Open the heater cover and place the sample evenly on the sample pan.
- Page 24 * During the drying process, the current temperature, time and temporary results will be continuously updated and displayed. 13. When the drying is completed, an audible signal will sound and the result will be displayed.
- Page 25 14. Click the “CONVERSION” icon to switch to different displays of results. 15. Open the heater cover and use the sample pan handle to remove the sample pan.
-
Page 26: Maintenance
7. Maintenance • Turn off the power switch and remove power cord during maintenance. • Cool down all parts of the analyzer before maintenance. 7.1 Cleaning Make sure that no dust or liquid enters the moisture analyzer housing. Do not use any aggressive cleaning agents (solvents, abrasive cleaning agents, etc.) or organic solvents to clean the analyzer. -
Page 27: Cleaning The Heating Unit
7.1.2 Cleaning the heating unit Disconnect the power by unplugging power cord from the outlet. Carefully remove any residue from • the temperature sensor. Use a damp, lint-free cloth to clean • the tubular heating element. 7.1.3 Cleaning the display panel and keyboard Wipe the panel with a damp cloth. -
Page 28: Troubleshooting
8. Troubleshooting Problem: Display remains off after switching on. Possible causes: Power cord is not connected • Power line fuse blown • Power supply interrupted • Instrument faulty • Problem: Display does not change when loading samples. Possible causes: • The sample pan/pan holder is not installed correctly. Problem: Weight display is constantly changing or unstable. - Page 29 • Heating chamber open • Power cord is not connected • Power line fuse blown Problem:Measurement takes too long. Possible causes: • Incorrect ending mode selected Problem: Measurements are not repeatable. Possible causes: • The samples are not homogeneous. • Drying time is too short. •...
-
Page 30: Technical Data
9. Technical Data Model USS-HMA03 Capacity 110g Readability 0.001g / 0.01% Heating Element Halogen lamp Temperature range 104℉- 390.2℉(40℃ - 199℃) Time setting range 1 - 99 min Drying mode Standard, Fast, Soft Ending mode Auto, Timing, Manual [%m] moisture content...
Need help?
Do you have a question about the USS-HMA03 and is the answer not in the manual?
Questions and answers