Table of Contents
Advertisement
Available languages
Available languages
Quick Links
Advertisement
Chapters
Table of Contents

Related Manuals for ETNA FGV561WIT


Summary of Contents for ETNA FGV561WIT
- Page 1 GEBRUIKSAANWIJZING INSTRUCTIONS FOR USE FORNUIS COOKER FGV561WIT FGV561RVS...
- Page 2 Handleiding NL 3 - NL 35 Manual EN 3 - EN 35 Gebruikte pictogrammen - Pictograms used Belangrijk om te weten - Important information...
-
Page 3: Table Of Contents
INHOUD Uw fornuis Inleiding Beschrijving Bedieningspaneel Vóór het eerste gebruik Gebruik van de oven Gebruik van de gaskookplaat Bediening van de oven Instellen van de klok Handbediening van de oven Ovenfuncties Bediening van de oven met elektronische schakelklok Kookwekker Het geluidssignaal instellen Bediening gaskookplaat Ontsteken en instellen Comfortabel koken... -
Page 4: Uw Fornuis
UW FORNUIS Inleiding Gefeliciteerd met de aanschaf van dit Etna fornuis. In het ontwerp van dit product heeft optimale gebruikersvriendelijkheid centraal gestaan. Het fornuis biedt een uitgebreide reeks instellingen, zodat u altijd de juiste bereidingswijze kunt kiezen. In deze handleiding leest u hoe u dit fornuis het best kunt gebruiken. -
Page 5: Beschrijving
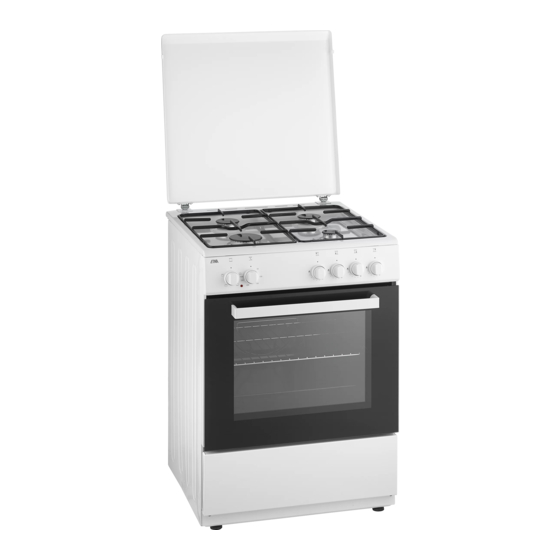
UW FORNUIS Beschrijving 1. Normaalbrander linksachter 2. Normaalbrander rechtsachter 3. Sterkbrander 4. Sudderbrander 5. Pandrager 6. Vangschaal A. Sierdeksel B. Bedieningspaneel C. Oven D. Opbergvak E. Stelvoeten NL 5... -
Page 6: Bedieningspaneel
UW FORNUIS Bedieningspaneel 1. Functieknop oven 5. Bedieningsknop normaalbrander linksachter 2. Thermostaatlampje oven 6. Bedieningsknop sterkbrander linksvoor 3. Thermostaatknop oven 7. Bedieningsknop sudderbrander rechtsvoor 4. Elektronische schakelklok 8. Bedieningsknop normaalbrander rechtsachter 4a. - toets 4b. ‘mode’ toets 4c. + toets NL 6... -
Page 7: Vóór Het Eerste Gebruik
VÓÓR HET EERSTE GEBRUIK Gebruik van de oven • Verwijder alle delen van het toebehoren uit de oven en reinig ze met een warm sopje. Gebruik geen schurende schoonmaakmiddelen. • Schakel de oven één uur lang in op de hoogste temperatuur met boven- en onderwarmte (zie ‘Bediening van de oven’). - Page 8 VÓÓR HET EERSTE GEBRUIK • Haal alles wat u niet nodig heeft voor de bereiding uit de oven. • Schakel de oven uit voordat u het gare gerecht eruit haalt. Ovenservies • In principe kunt u elk soort hittebestendig servies gebruiken. •...
-
Page 9: Gebruik Van De Gaskookplaat
VÓÓR HET EERSTE GEBRUIK Vlees braden • Het meest geschikt is ‘groot vlees’ vanaf 1 kg. Het vlees krijgt een regelmatig gevormde, krokante korst, waarbij vrijwel geen gewichtsverlies optreedt. • Wrijf het vlees een kwartier van tevoren in met zout en kruiden. Gebruik voor het braden 80 tot 100 g boter of vet (of een mengsel hiervan) per 500 g vlees. -
Page 10: Bediening Van De Oven
BEDIENING VAN DE OVEN Instellen van de klok Als u het toestel voor de eerste keer aansluit, knippert de tijds- aanduiding ‘0 00’. De juiste dagtijd moet nog worden ingesteld. 1. Druk tegelijkertijd op de + en de - toets. Er verschijnt een kooksymbool in de display. -
Page 11: Bediening Van De Oven Met Elektronische Schakelklok
BEDIENING VAN DE OVEN Boven- en onderwarmte (conventioneel) Het gerecht wordt verwarmd door de stralingswarmte van de onder- en bovenelementen. Plaats het gerecht altijd in het midden van de oven. Deze stand is geschikt voor het op traditionele manier bereiden van gerechten. De gerechten rijzen goed uit en krijgen een mooie bruine kleur. - Page 12 BEDIENING VAN DE OVEN De duur van de baktijd programmeren 1. Selecteer een temperatuur met de thermostaatknop en een ovenfunctie met de functieknop. Het thermostaatlampje van de oven gaat branden en de oven is ingeschakeld. 2. Druk op de ‘mode’ toets totdat ‘dur’ in de display verschijnt. Afwisselend worden nu ‘dur’...
- Page 13 BEDIENING VAN DE OVEN 6. Zet na afloop van de bereidings tijd eerst de thermostaatknop en de functieknop op ‘0’. 7. Schakel vervolgens het geluidssignaal uit door op een willekeurige toets te drukken. Programmering van het automatische bakproces U kunt de oven automatisch laten in- en uitschakelen door een tijdsduur en een eindtijd in te stellen.
-
Page 14: Kookwekker
BEDIENING VAN DE OVEN 7. De oven geeft een geluidssignaal als de eindtijd is bereikt. De ‘A’ gaat knipperen en de oven schakelt automatisch uit. 8. Zet na afloop van de bereidings tijd eerst de thermostaatknop en de functieknop op ‘0’. 9. -
Page 15: Het Geluidssignaal Instellen
BEDIENING VAN DE OVEN Het geluidssignaal instellen U kunt kiezen uit drie verschillende geluidssignalen. Zorg ervoor dat de actuele tijd in de display te zien is. 1. Houd de - toets ingedrukt totdat u een geluidssignaal hoort. 2. Hierna hoort u telkens een ander geluidssignaal als u weer op de - toets drukt. -
Page 16: Bediening Gaskookplaat
BEDIENING GASKOOKPLAAT Ontsteken en instellen Een symbool bij de bedieningsknop geeft aan welke brander wordt bediend. Elke brander kan traploos worden geregeld tussen vol- en kleinstand. Aansteken met vonkontsteking Druk de bedieningsknop in en draai deze linksom naar de volstand. De brander ontsteekt. -
Page 17: Comfortabel Koken
COMFORTABEL KOKEN De kookplaat optimaal gebruiken Zorg er altijd voor dat de vlammen onder de pan blijven. Als vlammen om de pan heen spelen gaat veel energie verloren. Bovendien kunnen de handgrepen dan te heet worden. Gebruik geen pannen met een kleinere bodemdiameter dan 12 cm. - Page 18 COMFORTABEL KOKEN Zo stelt u vast of de taart gaar is Prik 10 minuten voor het einde van de baktijd met een prikker in de taart op de plaats waar deze het hoogst is. Als de prikker droog blijft en er geen deeg aan vastplakt, kunt u de oven uitschakelen en de nawarmte benutten om de taart te laten doorbakken.
-
Page 19: Grilltijdentabel
COMFORTABEL KOKEN De cake gaat bij het omkeren niet uit de vorm Maak de rand met een scherp mes voorzichtig los. Keer de vorm opnieuw om en bedek het geheel een paar keer met een natte, koude doek. De volgende keer de vorm goed invetten en met paneermeel bestrooien. -
Page 20: Baktijdentabel Conventioneel
COMFORTABEL KOKEN Baktijdentabel conventioneel Gerecht Temp. °C Richelhoogte Tijd in min. van onderen Roerdeeg Cake 160 - 180 65 - 70 Kruidkoek 160 - 180 70 - 80 Notentaart 160 - 180 60 - 70 Vruchtentaart 170 - 180 2, 3 35 - 45 bakblik Vruchtentaart... -
Page 21: Onderhoud
ONDERHOUD Let op! Maak het toestel spanningsloos voordat met reparatie of schoonmaken wordt gestart. Bij voorkeur door de stekker uit het stopcontact te halen of de schakelaar in de meterkast op nul te zetten. Draai de gaskraan in de toevoerleiding dicht. Gebruik geen stoomreiniger of hogedruk-stoomreiniger om het toestel te reinigen. - Page 22 ONDERHOUD Geëmailleerde delen De binnenkant van de ovendeur, de gehele binnenzijde van de oven en de bak- en braad plaat zijn geheel geëmailleerd. U kunt ze het beste reinigen met een warm sopje. Buitenkant Reinig de buitenkant van het fornuis met een warm sopje of vloeibare zeep.
- Page 23 ONDERHOUD • Open de deur daarna volledig en draai de pallen weer in de beginpositie. Sluit de deur langzaam en controleer of hij goed sluit. Als de deur niet goed open of dicht gaat, controleer dan of de inkepingen van de scharnieren goed in de scharnierhouders geplaatst zijn.
-
Page 24: Vervangen Van Het Ovenlampje
ONDERHOUD Vervangen van het ovenlampje De fitting van het ovenlampje staat onder spanning. Er bestaat gevaar van een elektrische schok! Let op! De lamp in dit huishoudelijke apparaat is uitsluitend bedoeld voor verlichting van dit apparaat. De lamp is niet geschikt voor de verlichting van een huishoudelijke ruimte. - Page 25 ONDERHOUD Reinigen pandragers Reinig de pandragers niet in de vaatwasser. Het emaille op de pandragers is geschikt voor reiniging in de vaatwasser, maar de verbinding met de rubber voetjes echter niet. Bovendien kan bij reiniging in de vaatwasser lichte verkleuring van de pandragers optreden.
-
Page 26: Storingen
Wanneer u twijfelt over de goede werking van uw toestel, betekent dit niet automatisch dat er een defect is. Controleer in elk geval de volgende punten in onderstaande tabel of kijk voor meer informatie op de website ‘www.etna.nl’. Storing bij de kookplaat Mogelijke oorzaak... - Page 27 STORINGEN Storing bij de kookplaat Mogelijke oorzaak Oplossing De brander brandt niet egaal. Branderdelen niet juist Zet de branderdelen via de geplaatst. centreernokken in elkaar. Branderdelen vervuild/ Reinig/droog de brander- vochtig. delen. Let er hierbij op dat de uitstroomgaten open zijn. Verkeerde soort gas gebruikt.
-
Page 28: Installatie
• de stekker uit het stopcontact is getrokken. Defecte onderdelen mogen alleen vervangen worden door originele ETNA onder delen. Alleen van die onderdelen kan ETNA garanderen dat zij aan de veiligheidseisen voldoen. Indien de aansluitkabel beschadigd is mag deze alleen worden vervangen door de fabrikant, zijn service-organisatie of gelijkwaardig gekwalificeerde personen, teneinde gevaarlijke situaties te voorkomen. -
Page 29: Gasaansluiting
INSTALLATIE Gasaansluiting • Wij adviseren de kookplaat aan te sluiten met een vaste leiding. Aansluiting door middel van een speciaal daarvoor bestemde veiligheidsslang is ook toegestaan. • Achter een oven moet een volledig metalen slang worden gebruikt. Let op! • Een veiligheidsslang mag niet worden geknikt en niet in aanraking komen met bewegende delen van het keukenmeubel. -
Page 30: Plaatsing
INSTALLATIE Plaatsing • Wanneer het fornuis wordt geplaatst naast een hoge kast of een andere wand van brandbaar materiaal, houd dan minimaal 50 mm afstand tussen het fornuis en deze wanden. • Houd ook een afstand van minimaal 650 mm aan tussen de kookplaat en een eventueel boven de kookplaat geplaatste afzuigkap. -
Page 31: Technische Gegevens
INSTALLATIE Technische gegevens Op het gegevensplaatje aan de onderzijde van het toestel worden de totale aansluitwaarde, de vereiste spanning en de frequentie aangegeven. Dit toestel voldoet aan alle relevante CE richtlijnen. Aansluiting 230-240 V~ - 50/60 Hz Vermogen 2,76 kW Buitenmaten (mm) Breedte 600 mm... - Page 32 INSTALLATIE Merk Model FGV561RVS FGV561WIT Type oven Elektrisch Massa Energie-efficiëntie-index - 105,7 conventioneel Energie-efficiëntie-index - hete lucht 94,8 Energieklasse Energieverbruik (elektriciteit) - kWh/cyclus 0,87 conventioneel Energieverbruik (elektriciteit) - hete lucht kWh/cyclus 0,78 Aantal ovenruimten Warmtebron Elektrisch Volume Deze oven voldoet aan EN 60350-1 Tips voor energiebesparing voor de oven •...
- Page 33 INSTALLATIE Merk FGV561RVS Model FGV561WIT Type kookplaat Aantal kookzones Verwarmingstechnologie-1 Maat-1 Hulp Energie-efficiëntie-1 N.v.t. Verwarmingstechnologie-2 Maat-2 Normaal Energie-efficiëntie-2 59,0 Verwarmingstechnologie-3 Maat-3 Normaal Energie-efficiëntie-3 59,0 Verwarmingstechnologie-4 Maat-4 Sterk Energie-efficiëntie-4 57,0 Energie-efficiëntie kookplaat 58,3 Deze oven voldoet aan EN 30-2-1 Tips voor energiebesparing voor de kookplaat •...
- Page 34 INSTALLATIE G30 28-30mbar 7,5 kW 545 g/h NG/G25 NG/G20/G25.3 LPG/G30 II2L3B/P- II2EK3B/P NL Klasse: 1 25 mbar 20/25 mbar 28-30 mbar STERKBRANDER Inspuiter diameter (1/100 mm) Nominaal vermogen (kw) Verbruik in 1 uur 332,2 l/h 325,0 l/h 285,6 l/h 218,1 g/h NORMAALBRANDER Inspuiter diameter (1/100 mm) Nominaal vermogen (kw)
-
Page 35: Milieuaspecten
MILIEUASPECTEN Verpakking en toestel afvoeren Bij de vervaardiging van dit toestel is gebruik gemaakt van duurzame materialen. Dit toestel moet aan het eind van zijn levenscyclus op verantwoorde wijze worden afgevoerd. De overheid kan u hieromtrent informatie verschaffen. De verpakking van het toestel is recyclebaar. Gebruikt kunnen zijn: •... - Page 36 NL 36...
- Page 37 CONTENTS Your cooker Introduction Description Control panel Before first use Using the oven Using the gas hob Operating the oven Setting the clock Operating the oven manually Oven functions Operating the oven with electronic timer Kitchen timer Setting the audible signal Operating the gas hob Ignition and adjustment Easy cooking...
-
Page 38: Your Cooker
YOUR COOKER Introduction Congratulations on the purchase of this Etna cooker. This product is designed to offer optimum user-friendliness. The cooker has a wide range of settings, so you can always select the correct cooking method. Read this manual to learn how to get the most out of your cooker. In addition to information about operating the oven, you will also find background information that may be useful when using the appliance. -
Page 39: Description
YOUR COOKER Description 1. Left rear standard burner 2. Right rear standard burner 3. Rapid burner 4. Simmer burner 5. Pan support 6. Drip tray A. Decorative cover B. Control panel C. Oven D. Storage compartment E. Levellers EN 5... -
Page 40: Control Panel
YOUR COOKER Control panel 1. Oven function knob 5. Left rear standard burner control knob 2. Oven thermostat light 6. Left front rapid burner control knob 3. Oven temperature knob 7. Right front simmer burner control knob 4. Electronic timer 8. -
Page 41: Using The Oven
PRIOR TO FIRST USE Using the oven • Remove all accessories from inside the oven and clean them with warm soapy water. Do not use any abrasive cleaning materials. • Set the oven at its highest setting for one hour with top and bottom heat (see ‘Operating the oven’). - Page 42 PRIOR TO FIRST USE • Remove everything you don’t need for the dish from the oven. • Turn the oven off before taking out the cooked dish. Ovenware • In principle, you can use any type of heat-resistant ovenware. • Do not rinse glass ovenware with cold water immediately after use. The sudden temperature difference can cause the glass to crack.
-
Page 43: Using The Gas Hob
PRIOR TO FIRST USE Roasting meat • Large pieces of meat, from 1 kg, are the most suitable. The meat will get a regularly shaped, crispy crust, with virtually no weight loss. • Rub the meat with salt and spices fifteen minutes beforehand. Use 80 to 100 g of butter or fat (or a mixture of the two) per 500 g of meat for roasting. -
Page 44: Operating The Oven
OPERATING THE OVEN Setting the clock When the unit is connected for the first time, the time will flash ‘0·00’. The correct time of day has yet to be set. 1. Press the + and - keys at the same time. A cooking symbol will appear in the display. -
Page 45: Operating The Oven With Electronic Timer
OPERATING THE OVEN Top and bottom heat (conventional) The dish is heated by radiant heat from the bottom and top elements. Always place the dish in the middle of the oven. This mode is suitable for preparing dishes in a traditional way. Baked goods rise well and are beautifully browned. Conventional + fan The air in the oven is heated by the top and bottom elements. - Page 46 OPERATING THE OVEN Programming the baking time 1. Select a temperature with the temperature knob and an oven function with the function knob. The thermostat light for the oven lights up and the oven is switched on. 2. Press the ‘mode’ key until ‘dur’ appears in the display. The display will now alternate between ‘dur’...
- Page 47 OPERATING THE OVEN 6. After the cooking time has elapsed, first turn the temperature knob and the function knob to ‘0’. 7. Then press any key to switch off the alarm signal. Programming the automatic baking process You can program the oven to turn on and off automatically by setting a duration and end time.
-
Page 48: Kitchen Timer
OPERATING THE OVEN 7. The oven sounds a signal when the end time has been reached. The ‘A’ starts flashing and the oven switches off automatically. 8. After the cooking time has elapsed, first turn the temperature knob and the function knob to ‘0’. 9. -
Page 49: Setting The Audible Signal
OPERATING THE OVEN Setting the audible signal You can select one of three different audible signals. Ensure that the current time is shown in the display. 1. Hold the - key until you hear an audible signal. 2. You will then hear a different audible signal when you press the - key again. -
Page 50: Operating The Gas Hob
OPERATING THE GAS HOB Ignition and adjustment A symbol next to the control knob indicates which burner is being operated. Each burner is fully adjustable between high and low settings. Spark ignition Push in the control knob and turn it to the left to the high setting. The burner will ignite. -
Page 51: Easy Cooking
EASY COOKING Optimal use of the hob Always ensure that the flames remain under the pan. A lot of energy is lost when flames burn around the outside of the pan. The handles will also become too hot. Do not use pans with a base diameter smaller than 12 cm. - Page 52 EASY COOKING How to know if the cake is cooked Prick the cake with a toothpick 10 minutes before the end of the baking time in the place where it is the highest. If the toothpick remains dry and no dough sticks to it, you can switch off the oven and use the residual heat to let the cake finish baking.
-
Page 53: Grill Times Table
EASY COOKING The cake does not come out of the mold when inverted Loosen the edge carefully using a sharp knife. Invert the mold again and cover the whole thing with a wet, cold cloth a few times. Next time, grease the form well and sprinkle with breadcrumbs. -
Page 54: Conventional Baking Times Table
EASY COOKING Conventional baking time table Dish Temp °C Rack position Time in height from minutes the bottom Pastry dough Cake 160 - 180 65 - 70 Spice cake 160 - 180 70 - 80 Nut pie 160 - 180 60 - 70 Fruit tart baking tray 170 - 180... -
Page 55: Maintenance
MAINTENANCE Warning! Disconnect the appliance from the power supply before carrying out any repairs or cleaning. Preferably unplug the appliance, switch off the fuses, or set the switch in the meter cupboard to zero. Turn off the gas tap on the supply line. Do not use steam cleaners or high-pressure steam cleaners to clean the appliance. - Page 56 MAINTENANCE Enamelled parts The inside of the oven door, the entire interior of the oven and the baking and roasting tray are fully enamelled. They are best cleaned with warm soapy water. Exterior Clean the oven exterior with warm soapy water or liquid soap. Rinse with clean water.
- Page 57 MAINTENANCE • Then open the door fully and turn the pawls back to their initial position. Close the door slowly and check that it closes properly. If the door does not open or close properly, make sure the hinge notches are positioned correctly in the hinge holders. In the event of stubborn stains, the following should be observed: The oven should be cooled down before cleaning.
-
Page 58: Replacing The Oven Lamp
MAINTENANCE Replacing the oven lamp The oven lamp fitting is live. There is a danger of electric shock! Attention! The lamp in this household appliance is only suitable for illumination of this appliance. The lamp is not suitable for household room illumination. •... - Page 59 MAINTENANCE Cleaning the pan supports Do not clean the pan supports in the dishwasher. The enamel on the pan supports is suitable for cleaning in the dishwasher, but the connection with the rubber feet is not. The pan supports might also show some discolouration if washed in the dishwasher.
-
Page 60: Faults
Try to deal with the problem yourself first by checking the points mentioned below in the table or visit our website ‘www.etna.nl’ for more information. Problems with the hob Possible cause... - Page 61 FAULTS Problems with the hob Possible cause Solution The burner does not burn Burner parts not placed Assemble the burner parts evenly. correctly. using the centring ridges. Burner parts dirty/damp. Clean/dry the burner components. Make sure that the outflow holes are open. Wrong type of gas used.
-
Page 62: Installation
• the plug has been pulled out of the socket. Faulty parts may only be replaced with original ETNA parts. Only these parts are guaranteed by ETNA to meet the safety requirements. If the connecting cable is damaged, it may only be replaced by the manufacturer, the manufacturer’s service organisation or equivalently... -
Page 63: Gas Connection
INSTALLATION Gas connection • We recommend that the hob be connected by means of a fixed pipe. Connection using a specially-designed safety hose is also permitted. • The pipe behind the oven must be made entirely out of metal. Note! •... -
Page 64: Installation
INSTALLATION Installation • When placing the cooker next to a tall cupboard or another wall made of flammable material, keep at least 50 mm distance between the cooker and the walls. • Also keep a minimum distance of 650 mm between the hob and any cooker hood placed above the cooker. -
Page 65: Technical Data
INSTALLATION Technical data The data plate on the underside of the appliance indicates the total nominal load, the required voltage and the frequency. This appliance meets all relevant CE guidelines. Connection 230–240 V~ - 50/60Hz Power output 2.76 kW External dimensions (mm) Width 600 mm Height... - Page 66 INSTALLATION Brand Model FGV561RVS FGV561WIT Type of Oven Electric Mass Energy Efficiency Index - conventional 105,7 Energy Efficiency Index - fan forced 94,8 Energy Class Energy consumption (electricity) - kWh/cycle 0,87 conventional Energy consumption (electricity) - fan kWh/cycle 0,78 forced...
- Page 67 INSTALLATION Brand FGV561RVS Model FGV561WIT Type of hob Number of Cooking Zones Heating Technology-1 Size-1 Auxiliary Energy Efficiency-1 N.v.t. Heating Technology-2 Size-2 Semi rapid Energy Efficiency-2 59,0 Heating Technology-3 Size-3 Semi rapid Energy Efficiency-3 59,0 Heating Technology-4 Size-4 Rapid Energy Efficiency-4...
- Page 68 INSTALLATION G30 28-30mbar 7.5 kW 545 g/h NG/G25 NG/G20/G25.3 LPG/G30 II2L3B/P- II2EK3B/P NL Class: 1 25 mbar 20/25 mbar 28-30 mbar RAPID BURNER Injector diam (1/100 mm) Nominal Rating (kw) Consumption in 1h 332.2 l/h 325.0 l/h 285.6 l/h 218.1 g/h STANDARD BURNER Injector diam (1/100 mm) Nominal Rating (kw)
-
Page 69: Environmental Aspects
ENVIRONMENTAL ASPECTS Disposal of packaging and appliance Sustainable materials have been used during manufacture of this appliance. This appliance must be disposed of responsibly at the end of its service life. Ask your local authorities for more information about how to do this. The appliance packaging is recyclable. - Page 72 *788563* 788563 52276456...
Need help?
Do you have a question about the FGV561WIT and is the answer not in the manual?
Questions and answers