Advertisement
Quick Links
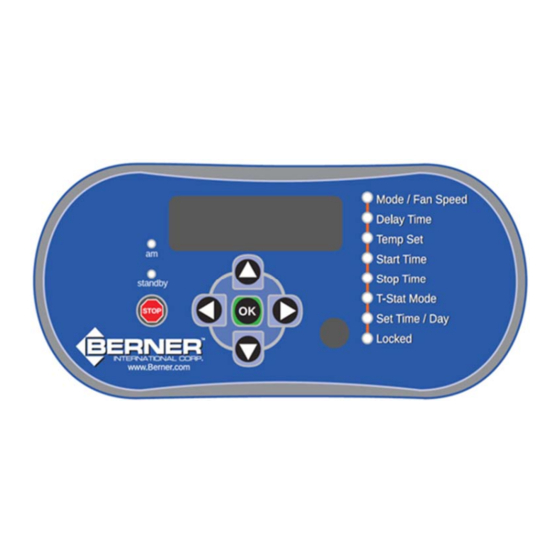
Intelliswitch Gen3C Navigation – V4.15 (AC Motor)
Display: Gen3
To reduce the risk of injury and ensure proper operation ALL Notes and Instructions shall be read!
Note: The STOP button
and will immediately stop the unit in an emergency.
The Intelliswitch® will display STOP and hold. STOP
must be pressed a second time to display the OFF
mode. Press "OK" or wait for the display to return to
the clock.
Note: When USER changing options, if there is no
activity for 15 seconds, the control will save changes
and default back to the User Menu display clock.
Note: The "OK" button
saves the current entered value, and returns to the
User Menu display clock.
Section 1: Quick Start Reference
Section 2: Display Controls and Functions
Section 3: Menu Structure
Section 4: User Menu
Section 5: Program Menu
Section 6: Diagnostic Menu
Section 7: Factory Menu
Section 8: External Connections
1. Quick Start Reference
1.1. Press the Menu button (down Arrow) to Mode.
1.2. Using the left and right arrows, select the
operating Mode: Off, On, Auto, Deluxe, Comfort
Plus or Program Number 1, 2 or 3.
1.3. Press "OK".
Confidential
is available at any time
, unless otherwise noted,
2. Display Controls and Functions
2.1. Arrow Navigation
The up and down arrows
options unless otherwise noted. If a value of an
option is changed with the left/right arrow, moving up
or down to another option saves that setting.
The left and right arrows
single-level menu options or select multi-level menu
options to be changed unless otherwise noted.
Button sequence, menu level type and available
settings are illustrated under each option.
Note: The Gen3 Intelliswitch is designed to work with
Gen3 or Gen4 displays. If the up/down and left/right
arrow functions operate in reverse, check or set the
display type by holding the STOP button and
pressing the "OK" button 3 times. On the third press
the current setting will display; "dsp3" = Gen3
(shown above) or "dsp4" = Gen4. Continue to press
"OK" to cycle between each version, release STOP
to set.
2.1.1.
Single Level Options
Single level options can change values directly with
the left and right arrows. No additional actions are
necessary to access these option settings.
2.1.2.
Multi-level Options
Multi-level options require additional actions to
access the option's settings. To select an option,
use the arrows opposite the arrows being used for
Page 1 of 11
Draft V4.15-A
cycle through
change values for
9/29/2022
Advertisement

Related Manuals for Berner Intelliswitch Gen3C


Summary of Contents for Berner Intelliswitch Gen3C
- Page 1 Intelliswitch Gen3C Navigation – V4.15 (AC Motor) Display: Gen3 To reduce the risk of injury and ensure proper operation ALL Notes and Instructions shall be read! 2. Display Controls and Functions Note: The STOP button is available at any time 2.1.
- Page 2 (provided by others). Download the or BACnet connection using the Berner AIR™ app Berner AIR™ app and pair the air curtain to the app. which is available via Google Play or the Apple App In the settings menu select the BACnet option.
- Page 3 Intelliswitch Gen3C Navigation – V4.15 (AC Motor) Display: Gen3 The Factory Menu (FACT) is only to be used when Note: AutoLock, Comfort Plus Low Speed and directed to reset or change factory default settings. PASSCode are global options, these settings are the same for any Mode.
- Page 4 Intelliswitch Gen3C Navigation – V4.15 (AC Motor) Display: Gen3 Select option with right arrow (seconds will flash), 4.11. Locked (enable/disable) use up and down arrows to set seconds. Use left and right arrows to switch between minutes and The Intelliswitch® Gen2 can be locked to prevent seconds.
- Page 5 Intelliswitch Gen3C Navigation – V4.15 (AC Motor) Display: Gen3 When day is displayed, press right arrow to edit the 5.1. User Program: multi-level day parameters or the down arrow to skip. To select the Custom Program menus, press the Once in the day parameters, each day is identified down arrow at the PRO display.
- Page 6 Intelliswitch Gen3C Navigation – V4.15 (AC Motor) Display: Gen3 5.1.8. Stop Time: multi-level 5.4. Serial Network Stop: multi-level ind – ALL Set stop time for the Zone program to deactivate including am/pm. Use down arrow to select Network Stop option at the STOP display.
- Page 7 6.2. Fan Speed Range – rn XX (see Section 7.1) This is for cases where the Berner Air™ option was once connected to an access point but is no longer 6.3. Thermostat Probe – Pr XX (see Section 7.2) connected and Er81 is displayed.
- Page 8 Intelliswitch Gen3C Navigation – V4.15 (AC Motor) Display: Gen3 6.15.1. Error Code 1 – Speed Sensor 6.15.5. Error Code 5 – Corrupted Memory Setting Er 10 – Prox Sensor or Speed feedback exists Er 51 – Status of this error is not available. It only Er 11 –...
- Page 9 6.15.7. Error Code 7 – Pairing Status 7. Factory Menu – Service Personnel Only Er 70 – Berner Air™ paired or ready to pair The Factory Menu must be entered from the DIAG Er 71 – Berner Air™ network pairing error header.
- Page 10 Intelliswitch Gen3C Navigation – V4.15 (AC Motor) Display: Gen3 Product Series: St – Standard mode, locks out below 34ºF (1ºC) AC08 (1/5 hp): Amb-1, Heat-2 Cd – Cold mode, works below 34ºF (1ºC) AC10 (1/2 hp): Amb-13; Heat-14 ALC08 (1/5 hp): Amb-1; Heat-2 Press the OK button to accept the selection or use AHD10 (1/2 hp): Amb-13;...
-
Page 11: External Connections
Intelliswitch Gen3C Navigation – V4.15 (AC Motor) Display: Gen3 thermostat to activate the heat. If the internal Use the left or right arrows to select the frequency of thermostat is turned “OFF” the external thermostat the power supply. The controller can be set to will still independently activate the heat.
Need help?
Do you have a question about the Intelliswitch Gen3C and is the answer not in the manual?
Questions and answers