
Related Manuals for Philips VoiceTracer DVT1120


Summary of Contents for Philips VoiceTracer DVT1120
- Page 1 VoiceTracer DVT1120 EN User manual Register your product and get support at www.voicetracer.com...
- Page 2 Table of contents...
- Page 3 5 Record Table of contents 5.1 Recording settings 5.1.1 Displaying the remaining recording time 5.1.2 Recording using an external microphone 1 Important safety information 6 Playback 1.1 Safety instructions 6.1 Selecting a recording 2 About this user manual 6.2 Playing a recording back 2.1 Symbols used 6.3 Quick search 6.4 Repeating playback...
- Page 4 9.1 Service functions 9.1.1 Memory formatting 9.1.2 Device reset 9.1.3 Displaying the remaining memory space 9.2 Replacing batteries or rechargeable batteries 9.3 Updating the firmware 9.3.1 Displaying the firmware version 9.4 Troubleshooting 10 Appendix 10.1 Technical data Table of contents...
-
Page 5: Important Safety Information
1 Important safety information 1.1.1 Batteries and rechargeable batteries • Only use AAA batteries with the device. • Never try to recharge alkaline or non-rechargeable batteries. Do not make any adjustments and modifications that are not described • Remove batteries or rechargeable batteries from the device if it in this manual. -
Page 6: Hearing Protection
If you need to replace these headphones, we recommend contacting your dealer to order the respective original Philips model. Table of contents... -
Page 7: Symbols Used
Warning 2 About this user manual • This symbol warns of danger to persons. Bodily injury or damage could be caused by improper handling. You can find a quick overview of your device in the following pages. For detailed description, see the following chapters of this user manual. -
Page 8: Product Highlights
3 VoiceTracer We are delighted that you have chosen a Philips device. Visit our website for comprehensive support such as user manuals, software downloads, warranty information and much more: www.voicetracer.com. 3.1 Product highlights • Super-fast USB transfer of recordings and data •... -
Page 9: What's In The Box
3.2 What's in the box Device Two AAA batteries Quick-start guide USB cable to connect to a computer Note • If any item is missing or damaged, please contact your distributor. Quick Guide VoiceTracer Table of contents... -
Page 10: Product Overview
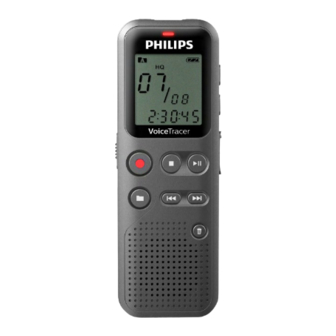
3.3 Product overview 3.3.1 Front and rear sides ON/OFF switch / HOLD (keypad lock) Micro USB port for computer connection Status LED: Red – device is recording Green – device is playing back Yellow – data is being transferred to/from the computer Display Operating panel with keys Speaker Operating panel with keys External microphone socket, (stereo jack, 3.5 mm) - Page 11 3.3.2 Keys a Stop mode: Change folder Start recording (record key), confirm selection Stop playback (stop key), close menu e Play recording back (playback key), Pause playback (pause playback), Menu navigation: call next menu tab, Long press: h Short press: jump to the previous recording Long press: fast seek rewind mode Menu navigation: Select setting b Short press: jump to the next recording...
-
Page 12: Startup Screen
3.4 Start-up screen Playback/recording time / Remaining recording time / Menu v w x entry Indicator for the remaining recording time (in stop mode press stop key j) HQ H Playback/recording: current number k S – Playback, { – Pause, k – Record Set recording quality: Ï... - Page 13 3.4.1 Menu overview Note • In stop mode (start-up screen), press MENU, for at least two seconds to call the menu. • Repeatedly press e, to select one of the following menus. Setting recording quality Enabling/disabling the record indicator Setting microphone sensitivity Monitoring during recording Enabling/disabling key and signal tones Auto-off...
-
Page 14: First Steps
Fold the cover out. 4 First steps Use the installation guide on the following pages to start using your device quickly and easily. Caution • Follow the instructions on handling the device, especially the batteries and rechargeable batteries (see also chapter 1.1.1 Insert the batteries or rechargeable batteries into the device as Batteries and rechargeable batteries, page shown. -
Page 15: Power On/Off
4.2 Power on/off 4.3 Initial installation process Slide the on/off switch on the side of the device downwards for When using for the first time, you must set the date and time of the approximately two seconds. device. The device turns on and the start-up screen is displayed. 4.3.1 Setting date &... -
Page 16: Enabling/Disabling The Keypad Lock
4.4 Enabling/disabling the keypad lock 4.5 Accessories The keypad lock deactivates all keys on the device. The timer function 4.5.1 Connecting the headphones of the device continues to function. Slide the HOLD switch up into the HOLD position to lock the Warning keypad of the device. -
Page 17: Connecting To A Computer
Turn up the volume until you reach a comfortable listening level. The speaker is switched off when headphones are connected. 4.5.2 Connecting an external microphone 4.6 Connecting to a computer Note You can select one of the following options once you have connected •... - Page 18 Plug the USB connector into a USB port on your computer. 4.6.1 Transferring files from or to the device Insert the micro USB plug into the USB port on the side of the You can use the File Explorer to access the device data without device.
-
Page 19: Recording Settings
Press the g key to resume recording. 5 Record Press the j key to stop recording. The device returns to stop mode. The device offers many features that you can use during recording or to improve the quality of a recording. Note •... - Page 20 5.1.1 Displaying the remaining recording time In stop mode press the stop key j. The remaining recording time in the memory is shown in hours and minutes. 5.1.2 Recording using an external microphone If you connect an external microphone to the device, the recording source will switch automatically and the device's microphone will be turned off.
-
Page 21: Selecting A Recording
Press e to continue playback from the previous position. 6 Playback Press the j key to stop playback.. 6.1 Selecting a recording 6.3 Quick search In stop mode (start-up screen), press a to select the desired folder for the recording. You can scan backward or forward in the current file at a fast speed. -
Page 22: Protecting A Recording / Lock File
The symbol of the selected repeat mode is displayed on the 6.5 Protecting a recording / lock file display: n – no repeat Í – repeat folder playback You can protect recordings against unintentional deletion. Ì – repeat file playback Select the required file as described. Press the record key, g, to confirm. -
Page 23: Deleting All Recordings In The Folder
7 Delete 7.2 Deleting all recordings in the folder You can delete all recordings in the selected folder. Connect the device You can delete an individual recording on the device or all the to a computer if you want to rename an entire folder. recordings in the folder In stop mode (start screen), select the folder in which you wish to delete all recordings by pressing a. - Page 24 8 Settings – (Short play) above-average recording time, Format: WAV, 384 kbit/s Press and hold the MENU key for at least two seconds while the Press the record key, g, to confirm. device is stopped (start-up screen) to enter the Settings menu. Press the j key to exit the menu.
-
Page 25: Setting Microphone Sensitivity
• Press the j key to cancel the operation without saving and return • Press the j key to cancel the operation without saving and return to the stop mode. to the stop mode. 8.1.3 Setting microphone sensitivity 8.1.4 Monitoring during recording You can customize the microphone settings to suit the recording Using this feature you can listen to the current recording using the conditions. -
Page 26: Device Settings
8.1.5 Setting auto divide 8.2 Device settings You can automatically divide large recordings, such as a multi-hour meeting recording. Once the set time has been reached, the device 8.2.1 Enabling/disabling key and signal tones stops the current recording and automatically starts a new one. In stop mode (start-up screen), press MENU for at least two In stop mode (start-up screen), press MENU for at least two seconds. - Page 27 Press b. Press h / b, to automatically turn the device off after 5, 15, 30 or 60 minutes' inactivity. Press + / – to set the day. Press the record key, g, to confirm. Press b. Press + / – to set the hours. Press the j key to exit the menu.
-
Page 28: Service Functions
9 Service • Press the j key to cancel the operation without saving and return Do not perform any maintenance operations that are not described in to the stop mode. this user manual. Do not disassemble the device into its component parts to carry out repairs. -
Page 29: Updating The Firmware
• Do not remove batteries or rechargeable batteries from the device You can find more information under www.philips.com/dictation. while it is recording. If you do this, data may be damaged or lost. -
Page 30: Troubleshooting
9.4 Troubleshooting Problem Possible cause/solution The recording session does • Keypad lock (HOLD) is switched on. Problem Possible cause/solution not start Slide the HOLD switch to the The device does not turn on • The batteries or rechargeable batteries "Off" position. are not inserted correctly. -
Page 31: Technical Data
Technical data 10 Appendix Internal memory TF card, 8 GB Recording format HQ – WAV, 512 kbit/s The information in this user manual has been produced to the best of our knowledge. It (particularly the technical data) may be modified or SP –... - Page 32 We accept no liability for changes, mistakes or printing errors. — Ÿ Philips and the Philips Shield Emblem are registered trademarks of Koninklijke Philips Electronics NV and are used by Speech Processing Solutions under license from Koninklijke Philips Electronics NV.
- Page 33 Table of contents...
- Page 34 © 2021 Speech Processing Solutions GmbH. All rights reserved. Documents Version 1.0, 2021/06/30...
Need help?
Do you have a question about the VoiceTracer DVT1120 and is the answer not in the manual?
Questions and answers
In setting date and time, I don't know where the +/- is. Philips Voice Tracer DVT1120
The user manual does not provide a specific diagram or description of the location of the +/- buttons. However, it mentions using the +/- buttons to set the date and time. You can refer to the "Product overview" or "Keys" section in the manual to identify their exact placement on the device.
This answer is automatically generated