
Related Manuals for Philips DVT6010


Summary of Contents for Philips DVT6010
- Page 1 Register your product and get support at www.philips.com/dictation DVT4010 DVT6010 DVT8010 EN User manual...
- Page 2 4.4 Show recording and device information 6.4 Quick search 4.5 Enable/disable the keypad lock 6.5 Repeat a file / repeat a sequence 4.6 Insert microSD card 4.7 Pull out the stand (DVT6010 – DVT8010) 4.8 Using the remote control (DVT8010) Table of contents Table of contents...
- Page 3 Follow all safety instructions to ensure proper • Only use CR2025 type batteries for the remote control (DVT8010). 8 Radio (DVT6010 – DVT8010) 9.3.1 Set date & time operation of the device. The manufacturer assumes no liability for •...
- Page 4 If you need to replace these headphones, we recommend contacting • This symbol identifies information that helps you to use your your dealer to order the respective original Philips model. device more efficiently and simply. Note •...
- Page 5 3 Your recorder 3.2 Package contents DVT4010: Device We are delighted that you have chosen a Philips device. Visit our DVT6010 – DVT8010: Device website for comprehensive support such as user manuals, software USB cable to connect to a computer...
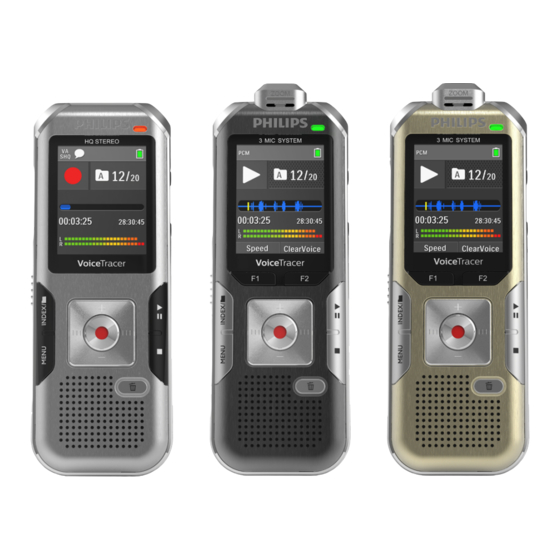
- Page 6 Stop mode: change folder; recording: set index mark ON/OFF switch / HOLD (keypad lock) (INDEX/a key) Slot for memory card (microSD card) DVT6010 – DVT8010: Soft function key F1 Microphone DVT6010 – DVT8010: Soft function key F2 DVT6010 – DVT8010: Zoom microphone...
- Page 7 • The position and appearance of the symbols may vary, depending Playback/recording level of the right and left channels on the model, the mode and the selected functions. DVT6010 – DVT8010: Function of the soft function keys Your recorder Your recorder...
- Page 8 Ô Display settings: 3.4.1 Menu overview 4 First steps Select language Note Adjusting the display contrast Adjusting the backlight • The symbol of the selected menu tab is Setting Demonstration mode Use the installation guide on the following pages to start using your highlighted in blue.
- Page 9 Note Press + / – to set the month. 4.4 Show recording and device information • The device switches itself off automatically if no key is pressed Press b within a pre-set period of time (see also chapter 9.3.4 AUTO- Press the stop key in the stop mode (start-up screen) j.
- Page 10 4.7 Pull out the stand (DVT6010 – DVT8010) 4.8 Using the remote control (DVT8010) 4.9 How to use the remote control (DVT8010) Use the stand on the rear side of the device when you stand it on a The battery is already inserted in the remote control. It is protected Note table, for example to record a meeting.
- Page 11 Scope of delivery: DVT6010 – DVT8010 4.10.3 How to use the phone pick-up microphone Warning Available as an optional accessory: Philips phone pick-up microphone Stop the recording currently in progress. Turn up the volume until you reach a comfortable listening level.
- Page 12 Further microphones (for cascading) are available as optional the device. You can select one of the following options once you have connected accessories. Philips Meeting Microphone LFH9173. the device to a computer • A USB mass storage device: You can use the File Explorer to The meeting microphone can be used during a meeting or a multi- access the device data without installing additional software.
- Page 13 The device will be displayed as a mass storage device named you press the record key. and the remaining recording time are displayed in the selected PHILIPS. Use the Voice folder for recordings and the Music folder on the display. 4.11.2 Disconnecting from a computer folder for music files.
- Page 14 • To prevent files getting to big during a long recording, a meeting that lasts several hours for example, you can automatically split • DVT6010 – DVT8010: Press the F1/F2 keys to call up settings Press the g key. recordings (see also chapter 9.1.12 Setting auto divide, page...
- Page 15 Customize the voice-activated recording settings in the Settings Press h while the device is stopped. 6 Playback 5.2 Start recording automatically menu and turn on the feature (see also chapter 9.1.11 Enabling/ disabling voice-activated recording, page 43). The position indicator jumps to the start of a file. You have two options to start automatic recording: Timer function If this feature is on, the ‚...
- Page 16 You can scan backward or forward in the current file at a fast speed. • DVT6010 – DVT8010: Press F1/F2 to call up the playback This allows to find a specific part of the recording.
- Page 17 Press + / – to repeat a certain file, folder or sequence automatically. Caution 7 Edit & delete The symbol of the selected repeat mode is displayed on the display: • You can use the Overwrite mode to delete the existing recording  – repeat a file from its current position! Á – repeat all files in a folder...
- Page 18 7.1.2 Split a recording 8 Radio (DVT6010 – DVT8010) 7.2 Deleting recordings on the device Split a large recording into two separate recordings so that it can be • You can also use Menu to enter/exit the radio mode. more easily archived or transferred via e-mail, or to delete a section of You can delete individual recordings from the device.
- Page 19 Press h / b to select the radio station that you wish to delete. Press and hold the z key for at least 2 seconds. Press g to confirm the deletion. Radio (DVT6010 – DVT8010) Radio (DVT6010 – DVT8010) Table of contents...
- Page 20 (bit rate). The higher the recording • DVT6010 – DVT8010: Press the F1/F2 keys to call up settings operation without saving and return to the stop mode. quality the bigger the file and the less recordings you can create.
- Page 21 Press the h / b key to select the record settings menu Ó. ² – (DVT6010 – DVT8010) – automatic adjustment of Press the h / b key to select the record settings menu Ó. Auto Zoom the zoom function for a sound source at a larger distance.
- Page 22 If this feature is on, the À icon is displayed. The device will 9.1.8 Switching silent recording on and off 9.1.9 Enabling/disabling the pre-recording function 9.1.10 Setting the timer start recording at a specified time. Use this function to turn off display indication, LED status, and the The pre-recording function allows to record the last five seconds You can use this function to start a recording at a specified date and signal tones during a recording.
- Page 23 In stop mode (start-up screen), press MENU. 9.1.12 Setting auto divide 9.1.13 Enabling/disabling the record indicator 9.1.14 Selecting an external sound source Press the h / b key to select the record settings menu Ó. You can automatically divide large recordings, such as a multi-hour This function allows you to switch off the status LED.
- Page 24 Press the h / b key to select the display settings menu Ô. Press + / – to select the function. • DVT6010 – DVT8010: The device has an integral brightness Press + / – to select the Note function.
- Page 25 Press + / – to set the hours. Press + / – to enable/disable the function. Press the record key, g, to confirm. 9.3 Device settings If the feature is on, the Ç icon is displayed. Press b Press the j key to exit the menu. Press the record key, g, to confirm.
- Page 26 Press the record key, g, to confirm. 10 Service 10.1.2 Memory formatting If this feature is on, the ¿ icon will be displayed. • Press the j key to cancel the operation without saving and return Caution to the stop mode. Press + / –...
- Page 27 Download the firmware update for your model from the website Note www.philips.com/dictation onto your computer. • Follow the instructions on handling the device, especially the Copy the new firmware file to the root directory of the device.
- Page 28 DVT4010: 45 × 120 × 18 mm SP – MP3, 64 kbits/s respond. I cannot hear anything from • The headphones are incorrectly DVT6010 – DVT8010: 45 × 125 × 18 mm LP – MP3, 8 kbits/s the headphones. connected. microSD card can not be •...
- Page 29 Battery life Recording in LP mode (built-in memory / The conformity with the relevant EU directives is confirmed by the CE Philips and the Philips’ Shield Emblem are registered trademarks of microSD memory card) mark. Product: The crossed dustbin symbol on your product indicates that Koninklijke Philips N.V.
- Page 30 © 2014 Speech Processing Solutions GmbH. All rights reserved. Document Version 1.0, 2014/06/18...
Need help?
Do you have a question about the DVT6010 and is the answer not in the manual?
Questions and answers