
Related Manuals for REDGUM Brand IKON MOBILITY PRESTO IK8PRS

Summary of Contents for REDGUM Brand IKON MOBILITY PRESTO IK8PRS
- Page 1 In partnership with M O B I L I T Y REDGUM Brand M O B I L I T Y S C O O T E R IK8PRS (SILVER) Edition 1 AUSTRALIAN OWNED / OPERATED USER MANUAL Please read and keep these instructions ikonmobility.com.au...
- Page 2 M O B I L I T Y REDGUM Brand IKON Mobility owns the copyright to the PRESTO Mobility Scooter user manual. Any information contained in this user manual shall not be photocopied, reproduced or translated into any other languages without the prior written consent of IKON Mobility.
-
Page 3: Table Of Contents
CONTENTS INTRODUCTION CHARGING BATTERIES (CONTINUED) FEATURES PREPARE TO RIDE THE SCOOTER SPECIFICATIONS TURN ON SCOOTER SAFETY ADVICE SCOOTER CONTROLS SAFETY ADVICE SCOOTER CONTROLS (CONTINUED) (CONTINUED) EMI WARNING SCOOTER CONTROLS (CONTINUED) EMI WARNING DISENGAGE MOTOR (FREEWHEEL) (CONTINUED) UNPACK and INSPECT SUPPLIED PARTS TROUBLESHOOTING GLOSSARY OF SCOOTER INSPECT / MAINTAIN / SERVICE... -
Page 4: Introduction
INTRODUCTION Thank you for purchasing this IKON Mobility product. If you have any issues or questions about the PRESTO Mobility Scooter please contact your supplier or IKON Mobility direct: T: +61 8 9248 4180 E: orders@for-de.com.au A: 1 Business Way, Malaga, Western Australia 6090 INTENDED USE This product has limitations and should be used in accordance to these guidelines. -
Page 5: Features
FEATURES PREMIUM - Large premium mobility scooter SCOOTER - Full adjustable suspension - Comfortable high back contoured rotating seat - Height adjustable seat with depth adjustment away from tiller - Width, height and angle adjustable flip up padded armrests - Height adjustable headrest - Angle adjustable backrest - Padded loop handlebar - Adjustable rear vision mirrors... -
Page 6: Specifications
SPECIFICATIONS Note: All dimensions shown are nominal - Overall: 1340mm (L) x 650mm (W) x 1135mm (H) - Seat: 500 - 700mm (W- int.) x 480mm (D) x 450mm / 475mm / 500mm / 525mm (H) - Backrest: 490mm (W) x 500mm (H) x 0 - 100° range - Headrest: 260mm (W) x 180mm (H) x 705mm / 720mm / 735mm / 750mm (H from seat) - Armrests: 380mm (L) x 60mm (W) x 190mm / 215mm / 240mm (H from seat) 0 - 30°range... -
Page 7: Safety Advice
SAFETY ADVICE For your own safety, please read the user manual before using the PRESTO Mobility Scooter. Failure to follow these guidelines may result in damage to the product and put the user at risk. If in any doubt, contact your supplier directly for advice. - Please make sure that you are physically capable to operate this unit. -
Page 8: Safety Advice
SAFETY ADVICE (CONTINUED) - Make sure the tiller is properly adjusted and in the locked position to suit the user to avoid damage and injury. - It is not allowed to have any person sitting in the scooter when transported by a vehicle, otherwise any injury or damage that might result. -
Page 9: Emi Warning
EMI WARNING Scooters may be susceptible to electromagnetic interference (EMI), which is a kind of interfering electromagnetic energy (EM) emitted from sources such as radio stations, TV stations, amateur radio (HAM) transmitters, two-way radio and mobile phones. The interference (from radio wave sources) can cause the scooter to release its brakes, move by itself, or move in unintended directions. -
Page 10: Emi Warning
EMI WARNING (CONTINUED) WARNINGS 1. Do not operate hand-held transceivers (transmitters-receivers), such as citizens band (CB) radios, or turn ON personal communication devices, such as mobile phones, while the scooter is turned ON. 2. Be aware of nearby transmitters, such as radio or TV stations, and try to avoid coming close to them. -
Page 11: Unpack And Inspect Supplied Parts
UNPACK and INSPECT SUPPLIED PARTS We recommend that you thoroughly inspect all the supplied parts prior to assembling and using the PRESTO Mobility Scooter. KEY (x2) (not to scale) SCOOTER BATTERY CHARGER (not to scale) Please take care when unpacking the product and removing any protective packing materials. -
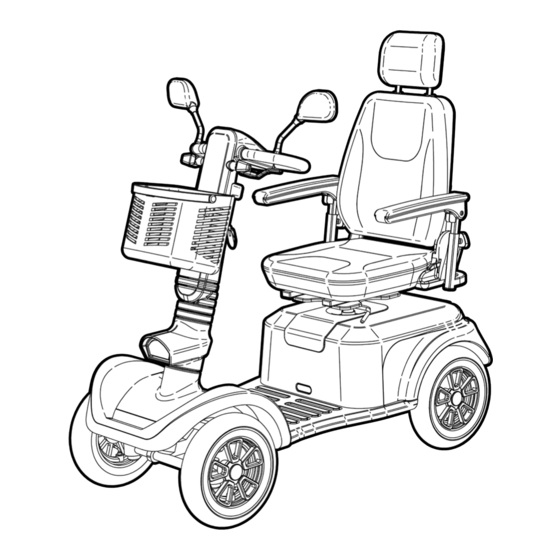
Page 12: Glossary Of Scooter
GLOSSARY OF SCOOTER Please become familiar with the PRESTO Mobility Scooter and the terms used when describing certain parts of the product. REAR VISION MIRROR HEADREST TILLER BACKREST REST BASKET SEAT PNEUMATIC TYRES IMPORTANT NOTE If you are ever unsure about any aspect of the PRESTO Mobility Scooter please do not use and contact your supplier for support. -
Page 13: Preparing The Scooter For Use
PREPARING THE SCOOTER FOR USE It is very important that the PRESTO Mobility Scooter is set up to suit the user so they feel comfortable and have full control when operating the scooter. Refer to the following pages for instruction on how to: - Rotate up armrests (for access) - Rotate seat (for access) -
Page 14: Rotate Up Armrests
ROTATE UP ARMRESTS The armrests on the PRESTO Mobility Scooter can be rotated up to allow for improved access when going to sit on the scooter. Please follow these instructions to rotate the armrest on the scooter: Armrest Step 1: Rotate up the required armrest. -
Page 15: Rotate Seat
ROTATE SEAT The seat on the PRESTO Mobility Scooter can be rotated around to allow for improved access when going to sit on the scooter. Please follow these instructions to rotate the seat on the scooter: We recommend that you sit on the seat to rotate the chair position. -
Page 16: Adjust Seat Height (Continued)
ADJUST SEAT HEIGHT The PRESTO Mobility Scooter has four seat height settings. Please follow these instructions to adjust the seat height as requried: SET UP GUIDELINE To promote the correct sitting posture users thighs should be at 90° to the chest. Step 1: Pull up the seat lever and at the same time rotate the seat away by 45°... -
Page 17: Adjust Seat Height (Continued)
ADJUST SEAT HEIGHT (CONTINUED) Step 4: Press the tab in and lift off the back cover. Carefully set the cover on the ground so it does not scratch. Note: Some parts under cover are not shown for clarity. Seat Heights (Seat to footrest) Hole 1: 450mm IMPORTANT NOTE... - Page 18 ADJUST SEAT HEIGHT (CONTINUED) Step 9: Using the correct lifting technique pull up the seat lever and lift up the seat at the same time. IMPORTANT NOTE Seat Lever We recommend that Seat Pole two people lift the seat Seat Post as it weighs 21kg.
-
Page 19: Adjust Headrest
ADJUST HEADREST The PRESTO Mobility Scooter has a height adjustable headrest . Please follow these instructions to adjust the headrest height as required: Step 1: Whilst pushing in the button slide the headrest to the required position. Step 2: Release the button to set the position. -
Page 20: Adjust Backrest Angle
ADJUST BACKREST ANGLE The PRESTO Mobility Scooter has an angle adjustable backrest. Please follow these instructions to adjust the backrest angle as required: Step 1: Whilst lifting up the backrest lever Rotate the backrest to the required angle. Backrest lever Step 2: Backrest can Release the backrest lever to set... -
Page 21: Adjust Seat Position
ADJUST SEAT POSITION The PRESTO Mobility Scooter has a sliding seat that can move closer or further away from the tiller. Please follow these instructions to position the seat as required: We recommend that you sit on the seat to adjust the seat position. Slide lever Step 1: Whilst lifting up the slide lever... -
Page 22: Adjust Armrest Width
ADJUST ARMREST WIDTH The PRESTO Mobility Scooter has width adjustable armrests. Please follow these instructions to adjust the armrest width as required: Knob Step 1: Undo knobs. Step 2: Slide out armrests to the required width setting. Ensure armrest are evenly spaced away from the seat. -
Page 23: Adjust Armrest Height
ADJUST ARMREST HEIGHT The PRESTO Mobility Scooter has height adjustable armrests. Please follow these instructions to adjust the armrest height as required: Step 1: Whist holding the armrest undo knob. Knob Step 2: Raise or lower the armrest to the required height setting and at the same time tighten the knob... -
Page 24: Adjust Armrest Angle
ADJUST ARMREST ANGLE The PRESTO Mobility Scooter has angle adjustable armrests. Please follow these instructions to adjust the armrest angle as required: Step 1: Rotate armrest up. Armrest Bolt Locking IMPORTANT NOTE We recommend that the scooter supplier or an experienced technician makes any requried adjustments to the armrest angle. -
Page 25: Adjust Tiller Angle
ADJUST TILLER ANGLE The PRESTO Mobility Scooter has an angle adjustable tiller. Please follow these instructions to adjust the tiller to the required angle: SET UP GUIDELINE To promote the correct sitting posture: The tiller should be within easy reach when the users back is leaning on the backrest. -
Page 26: Inspect The Scooter Prior To Use
INSPECT THE SCOOTER PRIOR TO USE Before using the PRESTO Mobility Scooter please perform the following tasks: INSPECT THE SCOOTER Visually and physically look over the scooter for signs of damage or wear prior to use. Pay particular attention to the following areas: - Tyres - Seat - Backrest... -
Page 27: Charging Batteries
CHARGING BATTERIES The PRESTO Mobility Scooter is supplied with rechargeable maintenance free hybrid gel batteries which MUST BE charged using the supplied battery charger. WARNING! FAILURE TO USE CORRECT AND SPECIFIED CHARGER MAY RESULT IN DEATH, DAMAGE OR CANCELLATION OF WARRANTY AND STATUTORY PROTECTIONS. Please follow these instructions to charge the batteries: Identify where the charging socket is... -
Page 28: Charging Batteries
CHARGING BATTERIES (CONTINUED) Step 3: Plug the power cable into a power outlet and turn the power on. Step 4: Battery charging should take approx. 10 hours. The battery is FULLY CHARGED when the light next to Storage Mode is on. Refer to Battery charger user manual for more information on charger settings. -
Page 29: Prepare To Ride The Scooter
PREPARE TO RIDE SCOOTER Sit on the scooter and rest your feet on the footplate. Important note: ALWAYS operate the scooter sitting down. Never stand up and operate the scooter. We recommend that you only rest your feet on the footrest as shown above and not on the front cover of the scooter as it might scratch and cause damage to the plastic covers. -
Page 30: Turn On Scooter
TURN SCOOTER ON Please follow these instructions to fit the key and turn the scooter on: 2 keys supplied. Keep one in a safe place as a spare. Step 1: Locate the ignition. (Right hand side of Ignition the tiller underneath the handle.) Step 2: Insert the key into... -
Page 31: Scooter Controls (Continued)
SCOOTER CONTROLS Please follow these instructions to control the scooter as required: Forward / Reverse Paddles: Pull the RIGHT hand side of lever in towards you to make the scooter move FORWARDS. Pull the LEFT hand side of lever in towards you to make the scooter move BACKWARDS. Speed varies depending on how far the paddle is pulled in. -
Page 32: Scooter Controls (Continued)
SCOOTER CONTROLS (CONTINUED) The LCD screen displays the following: HEADLIGHTS HAZARD Lights (ON when glowing) (ON when flashing) LEFT Indicator RIGHT Indicator (ON when flashing) (ON when flashing) SPEED BATTERY LEVEL SERVICE (Service required when showing) TIME HI / LOW Speed Control Setting ODOMETER... - Page 33 SCOOTER CONTROLS (CONTINUED) When using the scooter keep an eye on the battery levels. FULL BATTERY LOW BATTERY EMPTY BATTERY (Ready to use) (5 - 10km remaining) (Charge required) Charge required soon We recommend that you charge the batteries if 3 bars or less are showing. Please refer to pages 24 and 25 for information on charging the batteries.
-
Page 34: Disengage Motor (Freewheel)
DISENGAGE MOTOR Please follow these instructions to disengage the motor so the scooter can be pushed around without power when required (Freewheel): IMPORTANT NOTE - NEVER disengage the motor on an incline. - Never ride the scooter when the motor is disengaged as the braking system is also disengaged. -
Page 35: Troubleshooting
TROUBLESHOOTING If the PRESTO Mobile Scooter fails to operate please check the following aspects: - Unit is switched on. - Battery has been fitted. - All plugs and cable connections are firmly fitted. - Battery level shows sufficient charge. - Motor has been engaged. (not freewheeling) If the motor has been disengaged and the scooter power has been switched on - the scooter will not operate until it is turned off and then turned on again. -
Page 36: Inspect / Maintain / Service
INSPECT / MAINTAIN / SERVICE INSPECTIONS Visually and physically look over the PRESTO Mobile Scooter for signs of damage or wear prior and during use. Inspect the entire scooter and particular attention to the following areas: Tyres / Seat / Backrest / Armrests / Tiller / Display / Handgrips / Fixings Check to ensure that all parts work and scooter can be controlled as required. -
Page 37: Tyre Care
TYRE CARE The PRESTO Mobility Scooter is fitted with tubeless pneumatic tyres. The tyres should be inspected and maintained on a regular basis. Visually inspect the tread pattern on all four tyres and if excessive or uneven wear exists contact your supplier for advice and replacement tyres. -
Page 38: Cleaning The Scooter
CLEANING THE SCOOTER Clean the PRESTO Mobility Scooter on a regular basis. You must take extreme care when cleaning any electrical aspect of the scooter as water or fluid of any kind can cause severe damage. - Remove the battery pack from the scooter prior to cleaning. - Only use a soft damp cloth and a non-abrasive cleaning solution or mild detergent. -
Page 39: Warranty (Continued)
WARRANTY The IKON Mobility PRESTO Mobility Scooter (IK8PR) is covered by the following warranty from the date of purchase: The Warranty Terms and Conditions noted below provide your IKON Mobility scooter with excellent coverage against possible defective parts or possible faulty workmanship. If at anytime you have a warranty issue YOU MUST contact the selling IKON Mobility dealer as they are required to undertake the diagnosis and labour content of the warranty. - Page 40 WARRANTY (CONTINUED) Exclusions - Normal wear items are not covered under warranty. These items include such items as brushes, tyres, tubes, brake pads, upholstery, seating and armrests. - Damage caused byexcessive, abusive, misuse, negligence, accident or water - Improper maintenance, maintenance carried out by a non approved “Warranty Dealer”.
-
Page 41: Accessories (Continued)
ACCESSORIES The IKON MOBILITY PRESTO Mobility Scooter can be fitted with the following Scooter Xtras range of accessories: BAG CARRIER SEAT WALKER CARRIER SE-BC SE-WWC DELUXE CANOPY SUN CANOPY SE-SD SE-S Please turn the page for more accessory options... ikonmobility.com.au ASK FOR THE BRAND... -
Page 42: Accessories (Continued)
ACCESSORIES (CONTINUED) The IKON MOBILITY PRESTO Mobility Scooter can be fitted with the following Scooter Xtras range of accessories: WALKING STICK CARRIER OXYGEN BOTTLE CARRIER SE-OBC SE-WSH SIDE FOLDING WALKER CARRIER WALKING FRAME CARRIER SE-SFWC SE-WFC Please turn the page for more accessory options... ikonmobility.com.au ASK FOR THE BRAND... - Page 43 ACCESSORIES (CONTINUED) The IKON MOBILITY PRESTO Mobility Scooter can be fitted with the following Scooter Xtras range of accessories: MOVO CANOPY SE-MC SAFETY FLAG HOLDER SE-SFH MOBILE PHONE DRINK BOTTLE HOLDER HOLDER SE-020 SE-022 Please contact your supplier or IKON MOBILITY if you require further information on any the Scooter Xtras accessories that suit the PRESTO Mobility Scooter.
- Page 44 DISTRIBUTOR: AUSTRALIAN OWNED / OPERATED M O B I L I T Y REDGUM Brand ikonmobility.com.au ASK FOR THE BRAND...
Need help?
Do you have a question about the IKON MOBILITY PRESTO IK8PRS and is the answer not in the manual?
Questions and answers