Table of Contents
Advertisement
Quick Links
Warmers: 9101A, 9101A-1
Ranges: 9120A, 9120A-C, 9121A-1, 9122A-1
Drop-In Induction Warmers and Ranges
Remote Control
INSTALLATION AND OPERATING INSTRUCTIONS
IMPORTANT INFORMATION READ BEFORE USE
It is recommended that maintenance and repairs be conducted by authorized service agents using genuine
Nemco replacement parts. Nemco is not responsible for the damages caused by unauthorized service agents
or parts. The information contained in this manual is subject to updates and/or change at the discretion of Nemco
Food Equipment without notice. Please read the Installation and Operating Instructions in its entirety before
attempting to install or operate this unit.
Page | 1
P: 419.542.7751
F: 419.542.6690
800.782.761
nemcofoodequip.com
49234A
Advertisement
Table of Contents

Related Manuals for Nemco 9101A


Summary of Contents for Nemco 9101A
- Page 1 Nemco replacement parts. Nemco is not responsible for the damages caused by unauthorized service agents or parts. The information contained in this manual is subject to updates and/or change at the discretion of Nemco Food Equipment without notice. Please read the Installation and Operating Instructions in its entirety before attempting to install or operate this unit.
-
Page 2: Table Of Contents
Contents Important Safety Instructions ...................... 3 Control Features ........................4 Operating Instructions ........................ 5 Power Settings/Cooking Guide ....................6 Temperature Control Mode ......................6 Timer Mode ..........................7 Setting the Timer ........................7 Cleaning the Induction Range ....................8 Cookware Requirements ......................8 Product Specifications ........................ -
Page 3: Important Safety Instructions
When using electrical appliances, basic safety 10) This appliance should be serviced only by precautions should be followed, including the qualified service personnel. Contact Nemco for the following: authorized service facility for examination, repair or Warning – To reduce the risk of burns, electric shock, adjustment. -
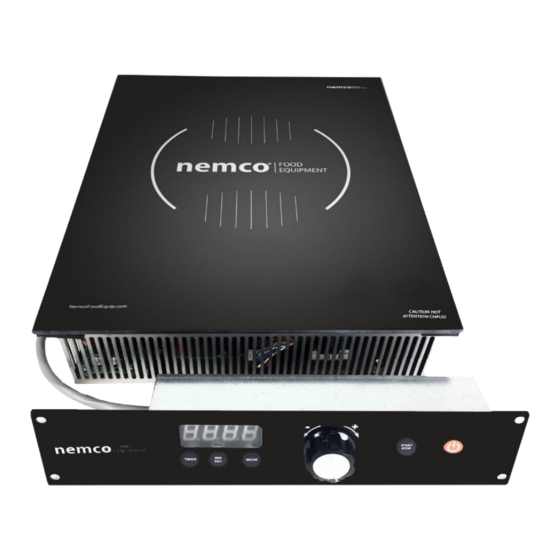
Page 4: Control Features
Control Features Display Mode Min/Sec Start/Stop Power On/OFF Timer Multi-Purpose Knob The range will not operate without an appropriate pan or vessel in place on the cooktop. After a few seconds, the display will flash ‘00’ indicating that no pan is present. -
Page 5: Operating Instructions
5. Rotate the knob to the right to increase the power setting. 6. Rotate the knob to the left to decrease the power level. 7. Warming Units: (9101A-1, 9101A): The power will adjust from H1 to H7. See chart for approximate holding temperatures. Cooking units: (9120A, 9120A-C) the power will adjust from H1 to H7 and 1 to 10. -
Page 6: Power Settings/Cooking Guide
Power Settings/Cooking Guide The ‘Best’ Power Settings will vary depending on the range model number, the type and shape of the pan being used, as well as the type and quantity of food being cooked or held. Until you get a ‘feel’ for the unit, you should start at medium settings of 5 or 6 and adjust up or down from there to get the performance you want. -
Page 7: Timer Mode
Timer Mode The timer function allows you to set a timer from 1 second, up to 719 minutes. The timer resets to 719 minutes every time the power is turned off/on. The timer always runs in the background, so if the unit runs continuously for 12 hours (719 minutes), the timer will run out and the unit will turn off. -
Page 8: Cleaning The Induction Range
If the display flashes ‘00’ the pan is not compatible with induction cooking. Product Specifications Model Frequency Voltage Amps Power Weight Dimensions 9101A 270 W L 14 9/16” 9101A-1 208 or 240 400 W 50/60Hz 14 lbs. W 11 5/8”... -
Page 9: Installation Guide
Installation Guide Always ensure that the glass surface of the range is mounted FLUSH with the counter top. The exposed edge of the glass is fragile and can be easily chipped or broken by side impact. If flush mounting is not feasible, you can purchase the optional Stainless Steel Trim Ring this allows you make a simple cut-out in the counter top, and the Trim Ring supports the unit and protects the glass edge from damage. -
Page 10: Troubleshooting/Error Codes
Troubleshooting/Error Codes Flashing Cause Solution Display Indication No pan or non- induction pan Place an appropriate pan on the cooktop target Over current Check for abnormal conditions like water, moisture or broken parts or cord. Unplug the unit. Plug it back in. - Page 11 Exploded Parts Diagram and Parts List Main Control Filter Ferrite Model Coil Glass Overlay Board Bead 9101A 48856A 48864 48869A 48893 48878 48881 69508 48920 9101A-1 48857A 48865 48869A 48894 48879 48881 69508 48920 9120A 48856A 48864 48871A 48889 48878...
-
Page 12: Warranty
The warranty provided for herein shall be limited to parts and labor. Any determination that a product is defective or covered by this warranty, shall be made by Nemco, in its sole discretion. - Page 13 301 Meuse Argonne Hicksville, OH 43526 www.nemcofoodequip.com Page | 13 P: 419.542.7751 F: 419.542.6690 800.782.761 nemcofoodequip.com 49234A...
Need help?
Do you have a question about the 9101A and is the answer not in the manual?
Questions and answers