Advertisement
Quick Links
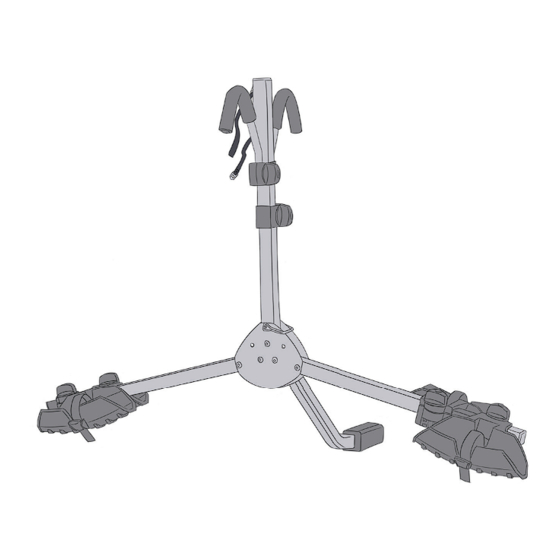
All-Star
2 Bike Tray Rack
Assembly Instructions
Instrucciones de montaje
Instructions d'assemblage
Parts Included | Piezas incluidas | Pièces incluses :
x5
B
A
E
F
I
J
Tools Needed:
Herramientas necesarias:
Outils nécessaires :
x4
C
G
Nut
K
3/4 inch wrench
Llave de 3/4"
Clé 3/4 po
2 bikes
2 bicicletas
2 vélos
D
x2
H
L
1/2 inch wrench
Llave de 1/2"
Clé 1/2 po
178S
Please read instruction manual
before installing your product.
Lea el manual de instrucciones
antes de instalar su producto.
Veuillez lire le manuel
d'instructions avant d'installer
votre produit.
For use with receiver hitches Class II or higher.
Para usar con enganches del receptor Clase II o superior.
À utiliser avec les attelages récepteurs de classe II ou
supérieure.
2-BIKE
1-BIKE
MAX
Max = 45 lbs | 20 kg
Max = 90 lbs | 40 kg
Máx.= 45 lbs | 20 kg
Máx.= 90 lbs | 40 kg
Max = 45 lbs | 20 kg
Max = 90 lbs | 40 kg
Rack = 21 lbs | 9.5 kg
Portabicicletas =
21 lbs | 9.5 kg
Porte-vélos =
21 lbs | 9.5 kg
View our installation video at
Vea nuestro vídeo de instalación en
Consultez notre vidéo d'installation ici
http://www.saris.com/en/instructional-videos-1.html
VIDEO
MAX
Advertisement

Related Manuals for Saris 178S


Summary of Contents for Saris 178S
- Page 1 2 Bike Tray Rack Assembly Instructions 2 bikes Instrucciones de montaje 2 bicicletas Instructions d’assemblage 2 vélos 178S Please read instruction manual before installing your product. Lea el manual de instrucciones antes de instalar su producto. Veuillez lire le manuel d’instructions avant d’installer votre produit.
- Page 2 Pre Installation | Preinstalación | Pré-installation Place hitchtite(K) into the receiver(A). Line up the hitchtite nut with hole in receiver. Coloque el receptor (A) en el enganche y apriete el perno (J) y la arandela al vehículo. Asegure con el pasador de horquilla (L).
- Page 3 Place receiver(A) in hitch and tighten bolt(J) and washer to vehicle. Secure with clevis pin(L). Coloque el receptor (A) en el enganche y apriete el perno (J) y la arandela al vehículo. Asegure con el pasador de horquilla (L). Placez le récepteur(A) dans le mécanisme d’arrimage et serrez le boulon(J) puis la rondelle contre le véhicule.
- Page 4 Place fi rst horizontal bar between the receiver plates, lining up holes. Insert carriage bolts(B) into the square holes and secure with the nut. Repeat with second horizontal bar(H). Coloque la primera barra horizontal entre las placas del receptor, alineando los orifi cios. Inserte los pernos de cabeza redonda (B) en los orifi cios cuadrados y asegúrelos con la tuerca.
- Page 5 Bike Loading | Carga de bicicletas | Chargement des vélos Adjust trays to fi t the placement of bike(s) so that the bike(s) sits completely within the trays. Tighten knobs. Ajuste las bandejas para que se adapten a la colocación de las bicicletas, de modo que se asienten por completo en las bandejas.
- Page 6 Install outer bike in the same manner. Instale la bicicleta exterior del mismo modo. Installez le vélo extérieur de la même manière. Wrap buckle strap around the top tube of the bike(s) and secure the strap in the buckle. Enrolle la brida alrededor del tubo superior de las bicicletas y asegure la correa en la hebilla.
- Page 7 (3) there was no failure to follow instructions or warn- ings in Owner’s Manual; (4) no alterations or modifications were made; and (5) the product or part is delivered, freight prepaid, to Saris Cycling Group or an authorized service center.
- Page 8 • Fíjelo de forma segura y ajuste una distribución de cargas uniforme, cargando primero las bicicletas más grandes o pesadas en la parte más próxima al vehícu- • Sustituya las correas de montaje a la primera señal de desgaste. Las piezas de repuestos están disponibles a través del distribuidor local de Saris o llamando al 1-800-783-7257.
- Page 9 (3) no se hayan seguido incorrectamente las instrucciones o advertencias del Manual de usuario; (4) no se hayan realizado alteraciones o modificaciones; y (5) el producto se haya enviado, con transporte prepagado, a Saris Cycling Group o a un centro de servicio autorizado.
- Page 10 ; (4) le produit n’a subi aucune modification ; et (5) le produit ou ses pièces sont envoyés, en port payé, à Saris Cycling Group inc. ou à un centre de service autorisé. Veuillez appeler le 1-800-783-7257 pour obtenir une autorisation de retour avant de procéder à tout retour. Toute autre récla- mation non incluse dans les déclarations ci-dessus est nulle et ne sera pas honorée.
Need help?
Do you have a question about the 178S and is the answer not in the manual?
Questions and answers