
Related Manuals for Sengoku HeatMate HME-GS10


Summary of Contents for Sengoku HeatMate HME-GS10
- Page 1 Far Infrared Graphite Heater HME-GS10 Operator’ s Manual SENGOKU L.A., LTD. 1- 877- 438 - 4328...
-
Page 2: Important Instructions
IMPORTANT INSTRUCTIONS READ CAREFULLY- The far infrared graphite heater is designed for safe operation. Nevertheless, . Observing the following installation, maintenance and operation of the heater can be dangerous procedures will reduce the risk of fire, electric shock, or injury and keep installation time to a minumum. -
Page 3: Specification
1 8. If the supply cord is damaged in any way, it must be replaced by the manufacturer or its service agent or a similarly qualified person in order to avoid a hazard. 1 9 . Parts of the heater may exceed 200 /392 , contact with the heating tube, reflector, or metal parts near the heating tube, may cause severe BURNS. -
Page 4: Product Features
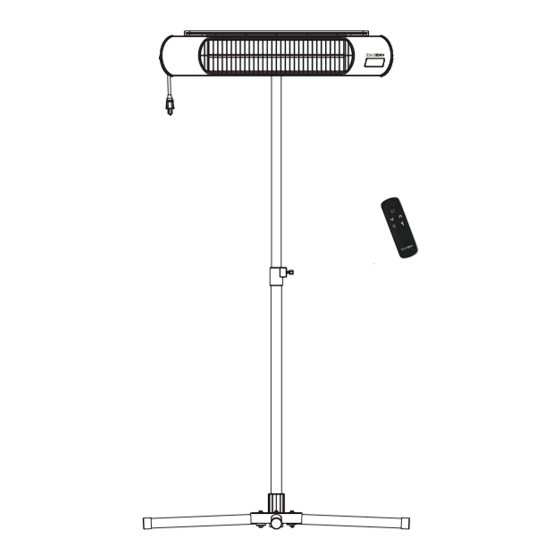
H95CM-150CM /37.40 (in)-59.06 (in) W 85CM D 85CM /33.46 (IN) /33.46 (IN) Product Features INSTANT HEAT WEATHERPROOF TWO HEAT SETTINGS ODORLESS SILENT FREESTANDING A lightweight and sturdy stand allows portable installation. TIP-OVER PROTECTION Tip-over protection to ensure safe operation. The unit will sh ut down immediately if tips over or falls to prevent tip-over-related hazards. - Page 5 A.Stand assembly Stand Accessories List Desc Desc Flat washer Screw Foot,dia=40 Base Holder Fastener Pole,dia=80 Fixed part L shape wrench Screw Spring washer 1. Put foot(H14) into the base(H8) ,and then put the Holder(H15) on top of the Base(H8), finally put Screws(H7) into the hole as shown in Fig-a. Fig-a...
- Page 6 2. Turn to the back side, secure the fixed parts (H10) with Screws(H7) as shown in Fig-b. Fig-b 3. Secure Fastner(H9)& Pole (H16) as show in Fig-c, then turn over to the back side,secure Screw(H11), Spring washer(H12), Flat washer (H13)as shown in Fig-d. Fig-d Fig-c...
- Page 7 B.Heater & Stand installtion Installation hardware contents Desc Screw Wing Nut Screw Bracket Zip tie 1. Tighten the hand knob screw to secure the stand positions as shown in Fig-e. Tighten the hand knob screw to secure the stand position. Fig-e 2.
- Page 8 Fig - g 4. Fasten Screw (H1) with wing nut (H2) as shown in Fig - h Fig - h 5. Assembly the protection bracket on the heater, the top panel on protection bracket could be clipped into the screws as shown in Fig - i. Fig - i...
-
Page 9: Gfci Outlet
6. Fasten the protection bracket with 2 wing nuts (H2), and secure the top 2 screws using the screwdriver as shown in Fig - j. Fig - j 7. Secure the power cord with the zip ties (H6) as shown in Fig - k. Keep the power cord away from the heater H7x3... - Page 10 WARNING THE HEATER MUST BE PLACED ON A FLAT, STABLE SURFACE FOR USE WITH THE STAND. THE HEIGHT OF STAND WITH HEATER IS 60 INCHES. THE POWER CORD MUST BE PLUGGED INTO A GFCI OUTLET FOR OUTDOOR USE. Noted: The heater has a tilt protection function. When the heater exceeds a 60 ° angle, it automatically stops working.
-
Page 11: Grounding Instructions
Grounding instructions CAUTION: This heater is for use on 120 volts. The cord has a plug as shown in below No adapter is available for this blade configuration, and none should be used. The type outlet is a 120 volts grounding outlet. When properly installed, it provides a ground connection through the cord to the heater to protect the operator from electric shock. - Page 12 1 . PLUG the unit into a plug socket, make sure the power supply is the same as rated 2 . PRESS the power button on the left side of the heater TURN ON / OFF the heater by remote control. 4 .
- Page 13 1. Check if the power cord is plugged into an electrical outlet. 2. Error code shows on the display. : When the heater reaches 185 °F(85℃ ) or above, it will shut off. Allow the heater to cool down for 15 minutes, and restart the heater by pressing the Power button on remote control. : Error on Display: The heater has a tilt protection function.
- Page 14 (CAUTION: DO NOT wet the heater.) All maintenance must be performed by certified electrician. store.
- Page 15 Read this "Safety precautions" carefully before using, and use it correctly. The precautions shown here are for safe and correct use of the products, in order to prevent harm, damages or injuries. Also, in order to clarify the magnitude of harm and damage and the extent of urgency, the precautions are categorized as “warming"...
- Page 16 Risk of fire. Please be aware of falling of flammable objects. Be sure to disconnect the power plug and wait until the unit is no longer hot before cleaning. Do not spill water or liquid on the operating unit.
- Page 17 Do not use near the flammable items such as curtains and mattresses / blankets, etc. Risk of fire. Risk of fire. skin burns. Pleaes pay special attention when unit is used around children and people with disabilities, people with sensitive skin.
Need help?
Do you have a question about the HeatMate HME-GS10 and is the answer not in the manual?
Questions and answers