
Related Manuals for Air Black Ridge BR180D

Summary of Contents for Air Black Ridge BR180D
- Page 1 AIR COMPRESSOR MANUAL Portable compressor for medium duty DIY task around the home MODEL NO. BR180D For service, spare parts or product information, please contact Smart Marketing Group Pty. Ltd. AUST. 1300 660 457 N.Z. 0800 474 876 Recyclable Cardboard...
- Page 2 Always check the air requirement of the tool wishing to be Operating Instructions 10 – 16 used to ensure that it is within this air compressors air output. Attaching air tools that draw more than 180 litres per minute, Maintenance free air delivery, to this air compressor, may cause them not to operate to the tools’...
- Page 3 INTRODUCTION What is covered. Dear Customer, • Manufacturing fault or defect. Thank you for purchasing this compressor which has passed through our extensive quality assurance processes. Every How to claim under this warranty. care has been taken to ensure that it reaches you in perfect •...
- Page 4 COMPLETE WARRANTY STATEMENT – COMPRESSOR As soon as you have purchased the compressor, Damage caused to attached equipment or third we recommend that you check to make sure it is party accessories will not be covered under this intact and that you read the operating instructions warranty.
- Page 5 10 for complete details and diagram. Failure to do these Always leave sufficient distance, at least 5 metres between may result in damage to the air compressor and / or injury the air compressor and the work area, especially when using to the user.
- Page 6 AC wall socket. PROTECT FURNISHINGS This air compressor is NOT designed to be run off an extension cord/ lead. If you need extra distance do NOT use an extension cord, USE A If using the air compressor inside your house, protect LONGER AIR HOSE.
- Page 7 Only use compressor when fully assembled Do not attempt to modify the air compressor in any way; this will VOID your warranty. The use of any attachment or accessory other than those recommended in this instruction manual could result in damage to the air compressor and could cause injuries to the operator.
- Page 8 ELECTRICAL DATA IMPORTANT This air compressor is fitted with a sealed electrical connection plug that is compatible with the mains power supply for Australia / New Zealand and meets the requirements of Australian Standards. This air compressor must be connected to a supply voltage that is equal to that stated on the rating label.
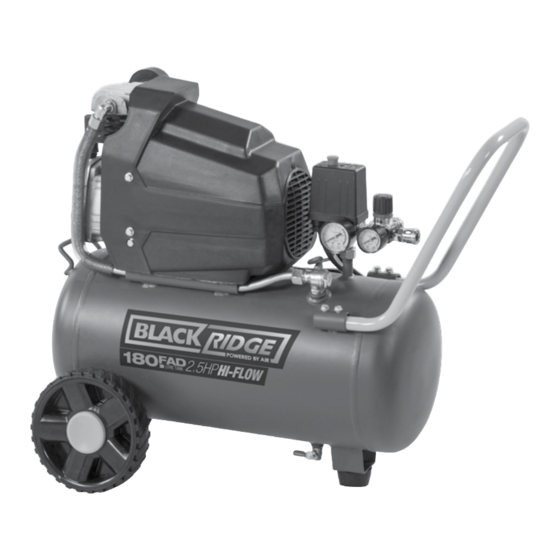
- Page 9 9. Tank pressure gauge - large 10. Outlet pressure gauge - small 11. Front handle (Large and small) 12. Air outlet - nitto style socket 13. Outlet pressure regulator 14. Pressure switch 15. On / Off button – red colour 16.
- Page 10 Warning: PIC. 3 To check the oil level: 1. Always check the oil level when the air compressor is on flat and level ground. 2. To confirm the oil level lift the back, wheel end, up about 20cm, hold for about 1 minute and place back on Oil level should be to ground.
- Page 11 RUBBER STOPPER PIC. 5 To attach the rubber stoppers to the bracket located on the bottom of the tank; 1. Undo the nut and remove the washers. 2. Push through the bracket and replace the washer. 3. Tighten the nut, Pic. 5. WHEELS PIC.
- Page 12 240V AC power point. Never use an extension cord as this can lead to a voltage drop which may cause power loss and over heating. Use a longer air hose if you need to get closer to your work area.
- Page 13 1. Plug the power cord into a standard 240V AC power power point and turn ON. point 8. Lift the air compressor button to turn ON, see page 12, 2. Open the tank drain tap Pic. 9. 3. Start the air compressor using the Allow the air compressor to fill the air tank.
- Page 14 3. Disconnect your air tools and air hose. 4. Clean your air hose and air tools. 5. Store your air hose and air tools in a secure well ventilated cabinet. 6. Slowly open the tank drain tap, see page 16. This allows excess air and moisture, water, to vent.
- Page 15 NOTE: When checking the safety valve ALWAYS wear safety glasses. To check the operation of the safety valve the air tank will need to be full. Gently pull the ring outwards. This should release air under pressure. Release the ring and this should stop the air out flow immediately.
- Page 16 PIC. 14 Pic. 14 Drain Tap Sealed After use open the drain tap to drain excess air and any moisture. The excess air will also help purge the moisture. Leave the drain tap open when air compressor is not in use,...
- Page 17 ON. • Check that you have turned the air compressor ON/ OFF switch ON. • The air tank may be full. Use your air tool and the air compressor should start when the pressure decreases to 85PSI. If your compressor does not build up pressure •...
- Page 18 One Way Valve 95 BRC200OWV Sight Glass Seal 95 BRC95OLSG Handle 95 BRC200TH Sight Glass 95 BRC95OLSG Drain Tap 95 BRC95DT Air Filter 95 BRI60AF Cushion Foot 95 BRC95RS Exhaust Elbow 95 BRC200EE 95 BRC95RS Safety Valve 95 BRC95SPV Washer...
- Page 19 NOTES:...
- Page 20 BR180D Voltage 240V AC ~ 50Hz Motor Electric 2.5 HP Wattage 1950W No Load Speed 2800 RPM FAD (Free Air Delivery) 180L per minute Tank Size Duty Cycle Max Tank Pressure 115PSI (8BAR) Outlet Pressure 1PSI - 115PSI Adjustable Lubrication...
Need help?
Do you have a question about the Black Ridge BR180D and is the answer not in the manual?
Questions and answers