
Related Manuals for Gema OptiGun GA03-E


Summary of Contents for Gema OptiGun GA03-E
- Page 1 Rev. 00 1011 507 Operating instructions and Spare parts list Enamel automatic gun OptiGun GA03-E Translation of the original operating instructions...
- Page 2 To the best of our knowledge and belief, the information contained in this publication was correct and valid on the date of publication. Gema Switzerland GmbH makes no representations or warranties with respect to the contents or use of this publication, and reserves the right to revise this publication and make changes to its content without prior notice.
-
Page 3: Table Of Contents
Connecting the gun ....................17 Start-up Preparation for start-up ..................19 Basic conditions ..................19 Basic conditions ..................19 Initial start-up ......................20 Functional check ....................20 General information ................. 20 Troubleshooting ..................21 Table of contents • 3 OptiGun GA03-E... - Page 4 Requirements on personnel carrying out the work ........39 Disposal regulations ................39 Materials ....................39 Spare parts list Ordering spare parts ..................... 41 OptiGun GA03-E – complete ................42 Powder gun body ....................43 Shaft ........................44 Gun cable ......................45 SuperCorona ......................46 Nozzle combinations ....................
-
Page 5: About These Instructions
General information This operating manual contains all the important information which you require for the working with the OptiGun GA03-E. It will safely guide you through the start-up process and give you references and tips for the optimal use when working with your powder coating system. -
Page 6: Structure Of Safety Notes
Presentation of the contents Figure references in the text Figure references are used as cross references in the descriptive text. Example: "The high voltage (H) created in the gun cascade is guided through the center electrode." 6 • About these instructions OptiGun GA03-E... -
Page 7: Safety
If this product is to be used for other purposes or other substances outside of our guidelines then Gema Switzerland GmbH should be consulted. - Page 8 ► Before working with the device, organize the required documents and read the section "Safety regulations". ► Work should only be carried out in accordance with the instructions of the relevant documents. ► Always work with the complete original document. 8 • Safety OptiGun GA03-E...
-
Page 9: Product Description
European directives and complies with the following standards. The product is suitable for the intended purpose and can be used in the appropriate areas. For further information, also refer to the enclosed Declaration of Conformity. Product description • 9 OptiGun GA03-E... -
Page 10: Reasonably Foreseeable Misuse
Reasonably foreseeable misuse – Coating of non grounded objects – Use of metallic or organic powder – Incorrectly configured values for powder conveyance – Incorrectly configured values for electrode rinsing air – Use of moist powder 10 • Product description OptiGun GA03-E... -
Page 11: Technical Data
Rev. 00 02/23 Technical Data Electrical data OptiGun GA03-E Nominal input voltage 12 V Frequency 18 kHz (average) Nominal output voltage 100 kV negative Polarity (option: positive) Max. output current 100 µA Type A acc. EN 50177 Ignition protection Ex 2 mJ T6 0 °C –... -
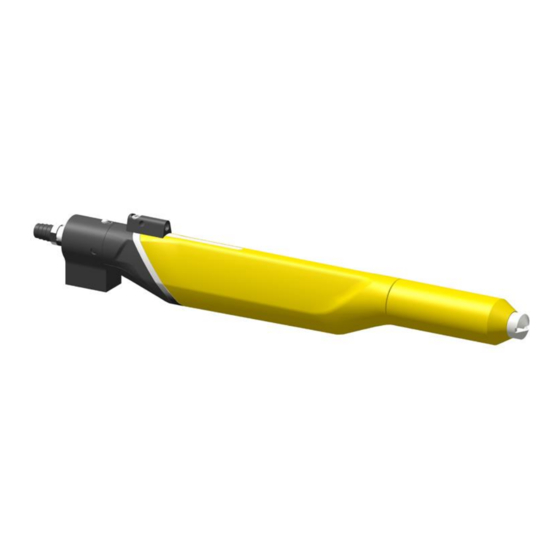
Page 12: Structure
Threaded sleeve SuperCorona connection Spray nozzle Scope of delivery – OptiGun GA03-E Enamel automatic gun with gun cable (20 m)*, negative polarity – Rinsing air hose (20 m)* – Flat jet nozzle NF28-E, complete (incl. electrode holder) or Round jet nozzle NS11-E with deflector Ø... -
Page 13: Supercorona Ring
The OptiGun remains repair-friendly and easy to maintain even after reconfiguration. SuperCorona assembly Before fitting the SuperCorona ring, make sure that the connection and the plug-in connector are free from grease and powder, otherwise the electric contact cannot be guaranteed. CLICK Product description • 13 OptiGun GA03-E... -
Page 14: Principle Of Operation
(see the operating manual of the gun control unit). The functions of the spray nozzles are described in the following sections. 14 • Product description OptiGun GA03-E... -
Page 15: Flat Jet Nozzle With Vented Central Electrode
The electrode rinsing air cleaning ability depends on the powder and its sintering ability. The electrode rinsing air (S) adjustment on the gun control unit is described in the corresponding operating manual. Product description • 15 OptiGun GA03-E... -
Page 16: Typical Properties - Characteristics Of The Functions
Few wearing parts (nozzle and SuperCorona) – Easily removable cascade because free of grease, with integrated current limiting resistors Connection for SuperCorona Ring – Quick and simple connection to and disconnection from the SuperCorona ring 16 • Product description OptiGun GA03-E... -
Page 17: Assembly / Connection
The compressed air must be free of oil and water! 5.5 bar 6.0-10 bar / 6.0 bar 87-145 psi 6.5 bar Fig. 7: Connection instructions – overview Electrode rinsing air hose Conveying air hose Powder hose Supplementary air hose Gun cable Injector Assembly / Connection • 17 OptiGun GA03-E... - Page 18 Rev. 00 02/23 18 • Assembly / Connection OptiGun GA03-E...
-
Page 19: Start-Up
When starting up the Enamel automatic gun, the following general conditions impacting the coating results must be taken into consideration: – Gun correctly connected – Gun control unit correctly connected – Corresponding power and compressed air supply available – Powder preparation and powder quality Start-up • 19 OptiGun GA03-E... -
Page 20: Initial Start-Up
Adjust the desired coating parameters (powder volume, total air and high voltage) on the gun control unit (see also the control unit operating instructions) Adjust the electrode rinsing air on the control unit dependent upon the nozzle used 20 • Start-up OptiGun GA03-E... -
Page 21: Troubleshooting
If all tests have been completed positively, the gun is ready for operation. If malfunctions take place, the cause of the fault can be located by the corresponding troubleshooting guide. Troubleshooting If a malfunction occurs, see section "Troubleshooting". Please consider also the control unit operating instructions. Start-up • 21 OptiGun GA03-E... - Page 22 Rev. 00 02/23 22 • Start-up OptiGun GA03-E...
-
Page 23: Operation
Setting the total air volume Adjust the total air volume on the gun control unit with the T3/T4 keys – Adjust the total air volume according to the corresponding coating requests correct powder cloud too little total air Operation • 23 OptiGun GA03-E... -
Page 24: Setting The Electrode Rinsing Air
Point the gun into the booth, switch the gun on and visually check the powder output Setting the electrode rinsing air Press the key. The second display level will be shown. Adjust the correct electrode rinsing air according to the applied nozzles (deflector plate, flat jet nozzle) 24 • Operation OptiGun GA03-E... - Page 25 ► Always tighten the threaded sleeve well! If round jet nozzles with air rinsed deflectors are used: Exchange the deflector plate (Ø 16, 24 or 32 mm, see also the Spare parts list) Operation • 25 OptiGun GA03-E...
- Page 26 Rev. 00 02/23 26 • Operation OptiGun GA03-E...
-
Page 27: Decommissioning / Storage
If the physical conditions are maintained, the unit can be stored indefinitely. Space requirements The space requirements correspond to the size of the product. There are no special requirements concerning distance to neighboring equipment. Decommissioning / Storage • 27 OptiGun GA03-E... -
Page 28: Physical Requirements
Storage must be inside a dry building at a temperature between +5 and +50 °C. Do not expose to direct sunlight! Maintenance during storage Maintenance schedule No maintenance schedule is necessary. Maintenance works During long-term storage, periodically perform a visual check. 28 • Decommissioning / Storage OptiGun GA03-E... -
Page 29: Maintenance / Repairs
Before cleaning the powder gun, switch off the control unit. The compressed air used for cleaning must be free of oil and water! Daily: Blow off the outside of the gun and wipe, clean etc. Maintenance / Repairs • 29 OptiGun GA03-E... -
Page 30: Cleaning The Spray Nozzle
– the wedge of the electrode holder is worn Nozzles with deflectors: – if the wedge of the electrode holder is worn down, then the electrode holder is to be replaced 30 • Maintenance / Repairs OptiGun GA03-E... -
Page 31: Interval
Except for the replacement of possible defective parts, there are very few repairs to be made. The cascade can be replaced trouble-free. The repair of the gun cable connection, however, may only be made by an authorized Gema Service center. – Contact your Gema representative for details! Dismantling the gun... - Page 32 Rev. 00 02/23 Dismantling procedure Remove the threaded sleeve Remove the nozzle 32 • Maintenance / Repairs OptiGun GA03-E...
- Page 33 Rev. 00 02/23 Maintenance / Repairs • 33 OptiGun GA03-E...
- Page 34 Rev. 00 02/23 34 • Maintenance / Repairs OptiGun GA03-E...
-
Page 35: Assembling The Powder Gun
Rev. 00 02/23 Assembling the powder gun The assembling of the gun is to be carried out in the reverse order to that shown above. Maintenance / Repairs • 35 OptiGun GA03-E... - Page 36 Rev. 00 02/23 36 • Maintenance / Repairs OptiGun GA03-E...
-
Page 37: Fault Clearance
Gun not connected Connect the gun H11 (Help code on control unit) Gun plug or gun cable defective Contact local Gema representative Powder does not adhere to High voltage and current Check the high voltage and object, although the gun... - Page 38 Bend or damage to air lines to Check air lines to injector injector Cartridge/insert sleeve in the Replace or insert it injector worn or not inserted Fluidization not running See above 38 • Fault clearance OptiGun GA03-E...
-
Page 39: Disposal
Requirements on personnel carrying out the work The disposal of the product is to be carried out by the owner or operator. When disposing of components that are not manufactured by Gema, the instructions in the respective manufacturer’s documentation must be observed. - Page 40 Rev. 00 02/23 40 • Disposal OptiGun GA03-E...
-
Page 41: Spare Parts List
When using the spare parts from other manufacturers the explosion protection is no longer guaranteed. If any damage is caused by this use all warrantee claims become invalid! ► Only original Gema spare parts should be used! Spare parts list • 41 OptiGun GA03-E... -
Page 42: Optigun Ga03-E - Complete
– If the powder gun cable is defective, it is to be completely sent in for repair! OptiGun GA03-E Enamel automatic gun – complete with Flat jet nozzle, polarity 1009 422 negative, incl. pos. 1-9 OptiGun GA03-E Enamel automatic gun – complete with Round jet nozzle, 1009 421 polarity negative, incl. -
Page 43: Powder Gun Body
Rev. 00 02/23 Powder gun body OptiGun GA03-E shaft – complete, negative polarity, see spare parts list "Shaft" Powder tube – complete 1009 405# Hollow screw 1009 406 Gun fixture 1008 711 Ground plate 1011 457 SuperCorona connection 1012 089 Cylinder screw –... -
Page 44: Shaft
Rev. 00 02/23 Shaft Shaft OptiGun GA03-E – complete, polarity negative, incl. pos. 1-9 1009 410 Cascade – complete, negative polarity 1007 231 Shaft (without cascade) 1009 400 Sealing piece – complete (incl. pos. 6) 1008 690 Axial gasket 1008 687... -
Page 45: Gun Cable
Cylinder screw – M4x6 mm 1008 639 O-ring – Ø 9.5x1.5 mm 1008 665 O-ring – Ø 8.5x1 mm 1008 666 Fig. 12: Gun cable (complete) Pin allocation white green Bridge brown Shield Spare parts list • 45 OptiGun GA03-E... -
Page 46: Supercorona
PC08-469 (L=469 mm) – for extension 150 mm 1012 099# PC08-619 (L=619 mm) – for extension 300 mm 1012 101# Plug cap for SuperCorona connection – complete (not shown) 1001 037 # Wearing part Fig. 13: OptiGun GA03-E – SuperCorona 46 • Spare parts list OptiGun GA03-E... -
Page 47: Nozzle Combinations
It is not permitted to connect more than two extensions together, in order to prevent the gun from being damaged by arising leverage force. ► The extensions (150 mm/300 mm) may be connected TO ONLY ONE ADDITONAL extension (150 mm/300 mm), if necessary. Spare parts list • 47 OptiGun GA03-E... -
Page 48: Nozzle Combinations
Rev. 00 02/23 Nozzle combinations Fig. 14: OptiGun GA03-E – Nozzle combinations 48 • Spare parts list OptiGun GA03-E... -
Page 49: Flat Jet Nozzle Nf29-E-60
405 728 Flat jet nozzle 1007 462# Electrode holder – complete (ETFE) 404 209# Electrode holder – complete (PTFE) 406 058# Contact ring 318 760# # Wearing part Fig. 15: Flat jet nozzle NF29-E-60° Spare parts list • 49 OptiGun GA03-E... -
Page 50: Angled Nozzles
1010 480# PA03-E-60° knee piece – complete 1010 479# Threaded sleeve 1010 476 Nozzle – see "OptiGun GA03-E – Nozzle combinations" PA03-E-60° knee piece – complete 1013 669# # Wearing part Fig. 16: Angled nozzles 50 • Spare parts list... -
Page 51: Diffuser (Optispray Ap01.1-E Version)
Adaptor piece – complete, incl. pos. 6 1011 625 Tube connection – complete, incl. pos. 9 1011 632 O-ring – Ø 9x1.5 mm 1011 637 * Please indicate length # Wear part Fig. 17: Diffuser (OptiGun GA03-E) Spare parts list • 51 OptiGun GA03-E... - Page 53 Presentation of the contents ......6 Processible powders ........11 Product description ..........9 Decommissioning ..........27 Product specific security regulations ....7 Diffuser (OptiGun GA03-E) ......51 Dimensions ............11 Disposal ............39 Repairs ............29 Disposal regulations ......... 39 Disuse for several days ........
- Page 54 Rev. 00...
Need help?
Do you have a question about the OptiGun GA03-E and is the answer not in the manual?
Questions and answers