Table of Contents
Advertisement
Quick Links
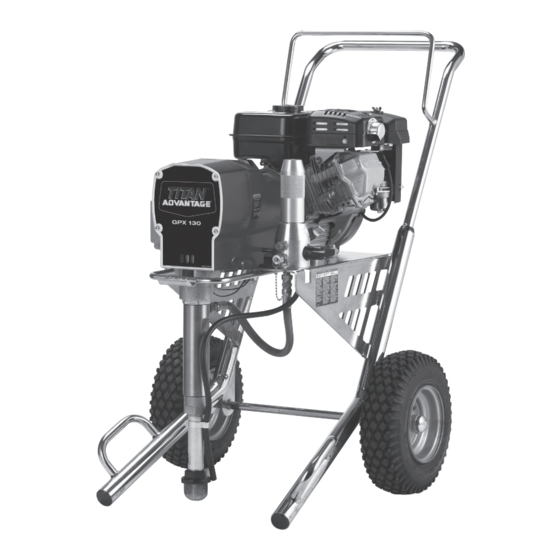
ADVANTAGE GPX 130
Model Numbers:
Bare
Complete
Bare w/5 Gal. Siphon
Complete w/5 Gal. SIphon
Gas Piston Pump
0509008
0509038
0509054
0509058
Owner's Manual
Notice d'utilisation
Manual del Propietario
Do not use this equipment before
reading this manual!
NOTE: This manual contains important
warnings and instructions. Please read
and retain for reference.
© Titan Tool Inc. All Rights Reserved. Form No. 0528901E
1114
•
Advertisement
Table of Contents

Subscribe to Our Youtube Channel
Related Manuals for Titan Tool ADVANTAGE GPX 130


Summary of Contents for Titan Tool ADVANTAGE GPX 130
- Page 1 NOTE: This manual contains important Bare 0509008 warnings and instructions. Please read Complete 0509038 and retain for reference. Bare w/5 Gal. Siphon 0509054 Complete w/5 Gal. SIphon 0509058 © Titan Tool Inc. All Rights Reserved. Form No. 0528901E 1114 •...
-
Page 2: Safety Precautions
A leak can inject material 3. Always use the nozzle tip guard. Do not spray without the into the skin. nozzle tip guard in place. English © Titan Tool Inc. All rights reserved. -
Page 3: Table Of Contents
To avoid severe burns or fire hazards, let the engine cool before transporting it or storing it indoors. 11. Never ship/transport unit with gasoline in the tank. English © Titan Tool Inc. All rights reserved. -
Page 4: General Description
ImPORTANT: Never operate unit for more than ten seconds operating efficiently. without fluid. Operating this unit without fluid will cause unnecessary wear to the packings. English © Titan Tool Inc. All rights reserved. -
Page 5: Preparing To Paint
ImPORTANT: Always keep the trigger lock on the spray gun in the locked position while preparing the system. English © Titan Tool Inc. All rights reserved. -
Page 6: Painting
Try to keep the pressure control knob at the lowest setting that maintains good atomization. NOTE: Turning the pressure up higher than needed to atomize the paint will cause premature tip wear and additional overspray. English © Titan Tool Inc. All rights reserved. -
Page 7: Spraying
Approximately than in a fine spray. Paint tailing pattern 10 to 12 inches Right way Wrong way English © Titan Tool Inc. All rights reserved. -
Page 8: Cleanup
16. Continue to trigger the spray gun into the waste container Fax ..............1-800-528-4826 until the solvent coming out of the gun is clean. NOTE: For long-term or cold weather storage, pump mineral sprits through the entire system. English © Titan Tool Inc. All rights reserved. -
Page 9: Maintaining The Engine
• Make sure to use a spark plug wrench when installing and valve stem to secure the valve handle in position. removing the plug. Gasket Filter Valve Housing Housing Assembly Valve Stem Valve Handle Dowel Pin Cam Base Groove Pin English © Titan Tool Inc. All rights reserved. -
Page 10: Replacing The Potentiometer
EPC housing. Disconnect this wire from the EPC board (it has a phone jack-style connector). 4. Break off the locking tab from the phone jack-style connector at the end of the transducer wire. English © Titan Tool Inc. All rights reserved. -
Page 11: Replacing The Electronic Pressure Control (Epc) Assembly
8. Using a 2 1/4” wrench, loosen the fluid section jam nut. Turn the fluid section counterclockwise by until it disengages from the slider housing. English © Titan Tool Inc. All rights reserved. -
Page 12: Replacing The Gears
When the connecting pin hole on the piston pump housing (refer to the “Replacing the Slider and rod lines up with the hole in the slider assembly, insert the Slider Housing” procedure in this section). connecting pin. English © Titan Tool Inc. All rights reserved. -
Page 13: Servicing The Clutch Assembly
7. Slide the pump and gear housings away from the engine to 16. Make sure the friction surface of the clutch armature is clean disengage them from the clutch housing. and free from oil or grease. English © Titan Tool Inc. All rights reserved. - Page 14 16. Carefully place the EPC assembly over the EPC housing taking care not to pinch any wires. Drive Shaft Assembly 17. Install the four screws that secure the EPC assembly to the EPC housing. Tighten securely. English © Titan Tool Inc. All rights reserved.
-
Page 15: Servicing The Fluid Section
8. Push the connecting pin forward Jam Nut valve retainer to 144 in.-lbs. through the slider assembly and 28. Remove the piston rod from the vise. Cylinder piston. The connecting pin will fall English © Titan Tool Inc. All rights reserved. - Page 16 51. Making sure that the Viton o-ring and PTFE back-up ring are lubricated and in place, reassemble the inlet valve assembly and and thread it into the cylinder. Tighten the inlet valve English © Titan Tool Inc. All rights reserved.
-
Page 17: Troubleshooting
The material being sprayed is too viscous. Add solvent to the material according to the manufacturer’s recommendations. The unit lacks power. The pressure adjustment is too low. Rotate the pressure control knob clockwise to increase the pressure setting. English © Titan Tool Inc. All rights reserved. -
Page 18: Français
Il pourrait s’avérer nécessaire de consulter un plasticien ou un spécialiste en chirurgie reconstructive de la main. Français © Titan Tool Inc. Tous droits réservés. - Page 19 Pour éviter des brûlures graves ou des risques d’incendie, laissez le moteur refroidir avant de le transporter ou de le ranger à l’intérieur. • Ne transportez jamais le moteur si le réservoir est plein. Français © Titan Tool Inc. Tous droits réservés.
-
Page 20: Español
12. Mantenga un extintor de incendios en el área. revestimientos inyectados directamente en la corriente sanguínea. Puede ser aconsejable consultar con un cirujano plástico o un cirujano especialista en reconstrucción de las manos. Español © Titan Tool Inc. Todos los derechos reservados. - Page 21 11. Nunca envíe ni transporte la unidad con gasolina en el tanque. 14. Desenchufe siempre el cable antes de trabajar en el equipo. ImPORTANTE: No cargue el equipo por el asa del carrito durante la carga y descarga. Español © Titan Tool Inc. Todos los derechos reservados.
-
Page 22: Parts Listings
Wire harness 0509520 Connecting pin 0509553 Screw 0509521 Retaining ring 0509928 Grounding cable 0509133 Fluid section assembly 0507785 Return hose (not shown) 0509542 Siphon tube 0507387 Hose, high pressure (not shown) 0507783 Hose clip © Titan Tool Inc. All rights reserved. -
Page 23: Drive Assembly
Lock washer 0509566 Socket screw 0509132 Slider housing 0295694 Lock washer 0509565 Retaining ring 0509568 Clutch rotor 0509567 Drive shaft assembly 0555617 Engine 0555902 Clutch field assembly 0509569 Hex screw 0507748 0507786 Lock washer © Titan Tool Inc. All rights reserved. -
Page 24: Fluid Section Assembly
NOTE: When repacking the fluid section, make sure the raised lip on the bottom of the lower packing is fully outside the packing around the piston rod after insertion of the piston rod. © Titan Tool Inc. All rights reserved. -
Page 25: Cart Assembly
0507737 Transducer 0295608 Screw 0509420 Plug, 3/8” 0555218 Cart (includes item 10) 0088162 Outlet fitting, 3/8” x 1/4” 0509624 Wheel 0295697 Plug, 1/4” 0507793 Fitting, 1/4” 0555625 Filter housing 0507690 PRIME/SPRAY valve assembly © Titan Tool Inc. All rights reserved. -
Page 26: Prime/Spray Assembly
0507662 Valve handle 0507964 Return hose 0509185 Siphon hose 5006536 Inlet screen 0507783 Clamp 0509727 Swivel elbow 0509760 Adapter 0509761 Hose clamp 0509788 Clip 0509789 Spring 55 Gallon Siphon Set (optional, P/N 0507977) © Titan Tool Inc. All rights reserved. -
Page 27: Electrical Schematic
550-110 S-5 Spray Pack with 50’ x 1/4” airless hose 0295841 Warning label, injection 0295805 Shock hazard label 0507958 Electrostatic discharge (ESD) wrist strap 0509819 “No Oil” label 9870307 Grease, 6 lb. can © Titan Tool Inc. All rights reserved. -
Page 28: Limited Warranty
Warranty Titan Tool, Inc., (“Titan”) warrants that at the time of delivery to the original purchaser for use (“End User”), the equipment covered by this warranty is free from defects in material and workmanship. With the exception of any special, limited, or extended warranty published by Titan, Titan’s obligation under this warranty is limited to replacing or repairing without charge those parts which, to Titan’s reasonable satisfaction, are...
Need help?
Do you have a question about the ADVANTAGE GPX 130 and is the answer not in the manual?
Questions and answers