
Related Manuals for Craftsman 944.365871


Summary of Contents for Craftsman 944.365871
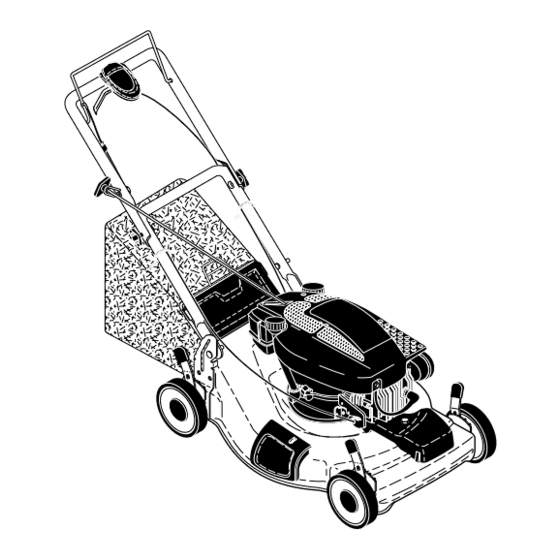
- Page 1 Owner’s Manual ROTARY LAWN MOWER 6.75 Horsepower Power-Propelled 22" Multi-Cut Model No. 944.365871 CAUTION: Read and follow all Safety Rules and In struc tions before operating this equipment Sears Canada, Inc., Toronto, Ontario M5B 2B8...
-
Page 2: Table Of Contents
Warranty service is available by returning the Craftsman Power Mower to the nearest Sears Service Centre/Department in Canada. This warranty applies only while this prod- uct is used in Canada. - Page 3 • Do not pull mower backwards unless • Do not trim excessively steep slopes. absolutely nec es sary. Always look down • Do not mow on wet grass. Reduced and behind before and while moving footing could cause slipping. backwards. •...
-
Page 4: Product Specifications
V. GENERAL SERVICE • Never attempt to make wheel height • Never run machine inside a closed area. adjustments while the engine is running. • Never make adjustments or repairs with • Grass catcher components are sub ject the engine (motor) running. Dis con nect the to wear, dam age, and de te ri o ra tion, spark plug wire, and keep the wire away from the plug to prevent ac ci den tal starting. -
Page 5: Assembly/Pre-Operation
ASSEMBLY / PRE-OPERATION Read these instructions and this manual in Operator MOWING its entirety before you attempt to assemble presence POSITION or operate your new lawn mower. control bar IMPORTANT: This lawn mower is shipped LIFT WITHOUT OIL OR GASOLINE in the engine. -
Page 6: Operation
OPERATION KNOW YOUR LAWN MOWER READ THIS OWNER'S MANUAL AND ALL SAFETY RULES BEFORE OPERATING YOUR LAWN MOWER. Compare the illustrations with your lawn mower to familiarize yourself with the location of various controls and adjustments. Save this manual for future reference. These symbols may appear on your lawn mower or in literature supplied with the product. - Page 7 4. If condition fails to improve after the The operation of any lawn above steps (forward speed remains mower can result in foreign the same), your drive belt is worn and objects thrown into the should be re placed. eyes, which can result in severe eye damage.
- Page 8 TO EMPTY GRASS CATCH ER Discharge defl ector 1. Lift up on grass catcher using the frame han dle. 2. Remove grass catcher with clip pings from under lawn mower han dle. 3. Empty clippings from bag. NOTE: Do not drag the bag when emp- ty ing;...
- Page 9 IMPORTANT: 2. Hold operator presence control bar down • Check oil level before each use. Add oil to the han dle and pull starter handle quick- if needed. Fill to full line on dipstick. ly. Do not allow starter rope to snap back. •...
-
Page 10: Maintenance Schedule
• For best results, adjust the lawn mower cutting height so that the lawn mower MAX 1/3 cuts off only the top one-third of the grass blades. If the lawn is over grown it will be nec es sary to raise the height of •... - Page 11 LUBRICATION CHART BLADE CARE ➀ For best results, blade must be kept sharp. Wheel adjuster Re place a bent or dam aged blade. (on each wheel) CAUTION: Use only a replacement blade approved by the manufacturer of your mower. Using a blade not approved by the manufacturer of your mower is hazardous, could damage your mower and void your warranty.
- Page 12 TO SHARPEN BLADE Change the oil after every 25 hours of opera- NOTE: We do not recommend sharp en ing tion or at least once a year if the lawn mower blade - but if you do, be sure the blade is bal- is not used for 25 hours in one year.
-
Page 13: Service And Adjustments
Collar TURN CLOCKWISE CLEANING IMPORTANT: For best performance, keep REMOVE Clip mower housing free of built-up grass and trash. Clean the underside of your mower after each use. CAUTION: Disconnect spark plug wire from spark plug and place wire where it cannot come in contact with plug. -
Page 14: Storage
TO ADJUST HANDLE The handle can be mounted in a high or low position. The mounting holes in the bottom of lower handle are off center for raising or lowering the handle. 1. Remove upper handle and wire tie(s) securing cable(s) to lower handle. 2. -
Page 15: Troubleshooting
NOTE: Fuel stabilizer is an acceptable SQUEEZE al ter na tive in minimizing the formation TO FOLD of fuel gum deposits during stor age. Lower handle Add stabilizer to gasoline in fuel tank or storage con tain er. Always follow the mix ratio found on stabilizer container. - Page 16 TROUBLESHOOTING - See appropriate section in manual unless directed to a Sears Parts & Repair Centre. PROBLEM CAUSE CORRECTION Does not start 5. Spark plug wire is 5. Connect wire to plug. (continued) disconnected. 6. Bad spark plug. 6. Replace spark plug. 7.
-
Page 17: Repair Parts
REPAIR PARTS TECUMSEH 4-CYCLE ENGINE MODEL NUMBER 143.056702 KEY PART DESCRIPTION 640350 Carburetor (Includes Key Number 184 of Engine Parts List) 631615 Throttle Shaft & Lever Assembly 631767 Throttle Return Spring 631184 * Dust Seal Washer 631183 * Dust Seal (Throttle) 640070 Throttle Shutter 650506... - Page 18 TECUMSEH 4-CYCLE ENGINE MODEL NUMBER 143.056702...
- Page 19 TECUMSEH 4-CYCLE ENGINE MODEL NUMBER 143.056702 KEY PART KEY PART DESCRIPTION DESCRIPTION 37465 Cylinder (Includes Key 31673 Valve Spring Cap Numbers 2, 20 and 150) 151A 40017 Intake Valve Seal 26727 Dowel Pin 37727 Engine Shroud 33734 Breather Element 36783 * Valve Cover Gasket 36557 Breather Assembly (Includes...
- Page 24 197650 02.26.05 BY Printed in U.S.A.
Need help?
Do you have a question about the 944.365871 and is the answer not in the manual?
Questions and answers