Table of Contents
Advertisement
Available languages
Available languages
Quick Links
Benzinrasenmäher
DE
Tondeuse à gazon à essence
FR
Spalinowa kosiarka do trawy
PL
Benzinegrasmaaier
NL
Petrol lawn mower
GB
Tosaerba a benzina
IT
Benzinová travní sekačka
CZ
Benzininė vejapjovė
LT
BRM 4613-20 A E-Start
Originalbetriebsanleitung
Traduction de la notice d'utilisation originale
Tłumaczenie oryginalnej instrukcji obsługi
Vertaling van de originele gebruiksaanwijzing
Translation of the original instructions for use
Traduzione delle istruzioni per l'uso in originale
Překlad originálního návodu k obsluze
Originalios eksploatavimo instrukcijos vertimas
Advertisement
Chapters
Table of Contents

Subscribe to Our Youtube Channel
Related Manuals for Grizzly BRM 4613-20 A E-Start


Summary of Contents for Grizzly BRM 4613-20 A E-Start
- Page 1 Spalinowa kosiarka do trawy Benzinegrasmaaier Petrol lawn mower Tosaerba a benzina Benzinová travní sekačka Benzininė vejapjovė BRM 4613-20 A E-Start Originalbetriebsanleitung Traduction de la notice d’utilisation originale Tłumaczenie oryginalnej instrukcji obsługi Vertaling van de originele gebruiksaanwijzing Translation of the original instructions for use Traduzione delle istruzioni per l’uso in originale...
- Page 4 0,75 mm...
- Page 5 Originalbetriebsanleitung ............6 Traduction de la notice d’utilisation originale ......24 Tłumaczenie oryginalnej instrukcji obsługi ......42 Vertaling van de originele gebruiksaanwijzing ....59 Translation of the original instructions for use ....76 Traduzione delle istruzioni per l’uso in originale ....93 Překlad originálního návodu k obsluze ......111 Originalios eksploatavimo instrukcijos vertimas ....128...
-
Page 6: Table Of Contents
........14 Fehlersuche ......... 23 Benzin einfüllen ......... 14 Schnitthöhe einstellen ....... 15 Original EG-Konformitätserklärung .. 145 Bedienung ..........15 Grizzly Service-Center ...... 155 Motor starten und stoppen ....15 Mähen ..........16 Füllstandsanzeige ......16 Arbeitshinweise ......... 16 Verwendungszweck zer darstellen. -
Page 7: Allgemeine Beschreibung
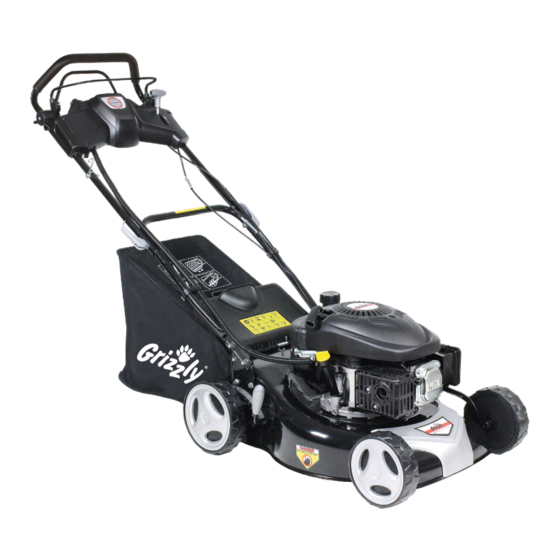
Allgemeine Beschreibung 7 Öltankkappe mit Ölmessstab 8 Tankdeckel Die Abbildungen finden Sie auf den 9 Motorabdeckung Seiten 2 bis 4. 10 Auspuffschutz 11 Zündkerzenstecker Lieferumfang 12 Vorderräder 13 Luftfilter Nehmen Sie das Gerät vorsichtig aus der 14 Luftfilterabdeckung Packung und prüfen Sie, ob die nachfol- 16 Stahlblechgehäuse genden Teile vollständig sind: 17 Hinterräder... -
Page 8: Technische Daten
Technische Daten Vergleich eines Gerätes mit einem ande- ren verwendet werden. Der angegebene Benzinrasenmäher ........Schwingungsemissionswert kann auch zu ......... BRM 4613-20 A E-Start einer einleitenden Einschätzung der Aus- Leistung ..........1,9 kW setzung verwendet werden. Motor ......DAYE DYM1P64FE Motorhubraum ........135 cm... -
Page 9: Bildzeichen/Symbole
Bildzeichen/Symbole Gerät nicht der Feuchtigkeit aus- setzen. Bildzeichen auf dem Gerät Rasenmähermesser läuft nach. Verletzungsgefahr! Warnung! Bedienungsanleitung lesen. Bildzeichen auf der Füll- STOP standsanzeige Verletzungsgefahr durch wegge- am Grasfangkorb schleuderte Teile. Umstehende Personen von dem Gefahr! Gerät fern halten. Hände und Füße fernhalten. Verletzungsgefahr durch scharfe Angabe des Schallleistungspegels Messer! -
Page 10: Sicherheitshinweise
Gebotszeichen (anstelle des Aus- • Erlauben Sie niemals Kindern oder rufungszeichens ist das Gebot er- anderen Personen, die die Betriebs- läutert) mit Angaben zur Verhütung anleitung nicht kennen, das Gerät zu von Schäden. benutzen. Örtliche Bestimmungen kön- nen das Mindestalter des Benutzers Hinweiszeichen mit Informationen festlegen. - Page 11 Tankverschluss nicht geöffnet oder • Achten Sie immer auf einen sicheren Benzin nachgefüllt werden. Stand, besonders an Hängen, Müllhal- - falls Benzin übergelaufen ist, darf den, Gräben und Deichen. Dadurch kein Versuch unternommen werden, können Sie das Gerät in unerwarteten den Motor zu starten.
- Page 12 • Beim Starten oder Anlassen des Mo- • Hinterlassen Sie das Gerät nie unbe- tors darf das Gerät nicht gekippt wer- aufsichtigt am Arbeitsplatz. den, es sei denn, das Gerät muss bei • Arbeiten Sie nicht mit einem beschä- dem Vorgang angehoben werden. In digten, unvollständigen oder ohne die diesem Fall kippen Sie das Gerät nur Zustimmung des Herstellers umge-...
-
Page 13: Inbetriebnahme
ten zu können. Befolgen Sie die War- Halterung am Gerät gezogen tungsvorschriften. werden. Das bildet den unteren • Versuchen Sie nicht, das Gerät selbst Drehpunkt für die Verstellung zu reparieren, es sei denn, Sie besit- des Neigungswinkels. zen hierfür eine Ausbildung. Sämtliche 2. -
Page 14: Mulchkit
Motoröl einfüllen und Ölstand 5. Legen Sie den Prallschutz (6) kontrollieren ab, er hält den Fangkorb in Po- sition. Stellen Sie das Gerät auf ebenen Fangkorb abnehmen/entleeren: Boden. 6. Heben Sie den Prallschutz (6) an und nehmen Sie den Fang- 1. -
Page 15: Schnitthöhe Einstellen
Bedienung - verschüttetes Benzin entfernen. - Benzin von Funken, offenen Flam- men und anderen Zündquellen fern- Beachten Sie den Lärmschutz und halten. örtliche Vorschriften. Motor starten und stoppen - Verwenden Sie kein Benzin/Öl- Gemisch. Warnung! Benzin ist entflammbar. - Verwenden Sie bleifreies Nor- mal- oder Superbenzin. -
Page 16: Mähen
Motor starten (manuell): 3. Radantrieb: 1. Bei einem Kaltstart stellen Sie Ein: Ziehen Sie den Antriebs- den Chokehebel (26) auf Positi- bügel (2) in Richtung Griff- holm, das Gerät bewegt Bei einem Warmstart lassen Sie sich nach vorn. den Chokehebel (26) auf Positi- Aus: Lassen Sie den Antriebsbü- gel (2) los. -
Page 17: Reinigung Und Wartung
Fachwerkstatt Gerät beschädigen. durchführen. Benutzen Sie nur • Ölen Sie von Zeit zu Zeit die Räder. originale Grizzly-Ersatzteile. Es be- • Kontrollieren Sie den Rasenmäher vor steht Unfallgefahr! jedem Gebrauch auf offensichtliche Män- Führen Sie Wartungs- und Reini- gel wie lose, abgenutzte oder beschä-... -
Page 18: Zündkerze Wechseln/Einstellen
1. Lösen Sie die Luftfilterabdeckung (Torch F6RTC; alternativ Cham- (14) und klappen Sie die Abde- pion RN9Y oder NGK BPR 6ES) ckung auf. (empfohlenes Anzugsdrehmoment 2. Nehmen Sie den Luftfilter (13) 20 Nm). heraus. Motoröl wechseln 3. Tauschen Sie den Luftfilter gegen einen neuen Filter aus (siehe „Er- satzteile“). -
Page 19: Messer Schleifen / Austauschen
Messer schleifen / austauschen • Zur platzsparenden Lagerung können Sie den oberen Griffholm nach unten • Ziehen Sie den Zündkerzenstecker klappen (siehe kleines Bild) Lösen ab und prüfen Sie das Messer auf Ab- Sie die Spannhebel und klappen Sie nutzung und Beschädigungen. den Griffholm zusammen, damit das •... -
Page 20: Entsorgung/Umweltschutz
- Geräte, bei denen bereits tech- schütten diese nicht in die Kanalisati- nische Eingriffe vorgenommen wur- on oder in den Abfluss. den. - Fragen Sie hierzu Ihren Grizzly- • Ebenfalls bleiben Motorschäden von Händler. der Garantie ausgeschlossen, die auf- •... - Page 21 Bitte senden Sie keine Geräte ohne vorherige telefonische Abstimmung an unsere Service-Werkstätten, da an- sonsten Kosten infolge Annahmever- weigerung auf Sie zukommen können. • Achtung: Bitte senden Sie defekte Geräte auf keinen Fall mit gefülltem Kraftstoff- oder Öltank ein. Entleeren Sie die Tanks unbedingt.
-
Page 22: Wartungsintervalle
Luftkühlungssystem reinigen bei hohem Staubaufkommen oder starker Verschmutzung öfter reinigen Ersatzteile/Zubehör Ersatzteile und Zubehör erhalten Sie unter www.grizzly-shop.de oder www.grizzly-service.eu Sollten Sie kein Internet haben, so wenden Sie sich bitte telefonisch an das Service- Center (siehe „Grizzly Service-Center“). -
Page 23: Fehlersuche
Fehlersuche Problem Mögliche Ursache Fehlerbehebung Zu wenig Benzin im Tank Benzin einfüllen Anweisungen zum Starten des Mo- Falsche Startreihenfolge tors beachten (siehe „Bedienung“) Zündkerzenstecker (11) nicht Zündkerzenstecker aufstecken Motor startet richtig aufgesteckt Zündkerze reinigen, einstellen nicht oder ersetzen Verrußte Zündkerze ( (siehe „Reinigung und Wartung“) Falsch eingestellte Vergaser- Vergaser durch eine Fachwerkstatt... -
Page 24: Utilisation Conforme
Utilisation ..........33 Traduction de la déclaration de Allumer et arrêter le moteur ....33 conformité CE originale ..... 146 Grizzly-Service-Center......155 Tondre ..........34 Utilisation conforme Cet appareil est conçu pour être utilisé par des adultes. Les enfants ainsi que les Cet appareil n’est destiné... -
Page 25: Description Générale
Description générale 8 bouchon du réservoir 9 couvercle du moteur (protection Vous trouverez en pages 2 - 4 un des doigts) croquis explicatif des organes de 10 protection du pot d’échappement service les plus importants. 11 fiche de bougie 12 2 roues avant Contenu de la livraison 13 filtre à... -
Page 26: Données Techniques
Données techniques d’emploi seront sans effet. Tondeuse à gazon à essence ....La valeur totale de vibrations déclarée a ....... BRM 4613-20 A E-Start été mesurée conformément à une méthode Puissance ........... 1,9 kW d’essai normalisée et peut être utilisée pour Moteur ......DAYE DYM1P64FE... -
Page 27: Symboles / Pictogrammes
Symboles / pictogrammes Ne pas exposer l’appareil à la pluie. Symboles apposés sur l’appareil Après arrêt, la lame continue de tourner pendant quelques instants. Attention! Lire la notice d‘utilisation. Symbol sur l‘affichage STOP Risques de blessure dus à la pro- du niveau de remplis- jection de pièces. -
Page 28: Symboles Utilisés Dans Le Mode D'emploi
Symboles utilisés dans le tention lors de l’utilisation de l’appareil mode d’emploi peut entraîner de graves blessures. • Cet appareil n’est pas destiné à être Symbole de danger et indications utilisé par des personnes ayant des relatives à la prévention de dom- capacités physiques, sensorielles ou mages corporels ou matériels. - Page 29 veuillez éliminer tous les objets (p.ex. • N’utilisez que des pièces de rechange pierres, bâtons, câbles, jouets) suscep- et d’accessoires fournies et recom- tibles de s’accrocher et d’être projetés. mandées par le fabriquant. L’utilisation Mise en garde : L’essence est très •...
- Page 30 • N’utilisez jamais l’appareil si ses ins- parties mobiles sont à l’arrêt complet tallations de sécurité ou ses grilles de et, lorsqu’il existe une clef, que celle-ci protection sont abîmées ou si elles ne est enlevée: sont pas montées dessus, la protection - avant d’éliminer les blocages ou de anti-choc et/ ou les installations de nettoyer les bouchons dans le canal...
-
Page 31: Mise En Service
Mise en service sûr. Beaucoup d’accidents sont dus à un mauvais entretien des appareils. • Ne rangez jamais l’appareil avec de l’es- Attention! Risques de blessure dus aux lames tournantes. N’ef- sence dans son réservoir dans un bâti- fectuez des travaux sur l’appa- ment dans lequel d’éventuelles vapeurs d’essence pourraient entrer en contact reil que lorsque les lames sont... -
Page 32: Monter Le Sac De Récupération
Monter le sac de récupération Kit de paillage Attention: Ne pas utiliser l’appareil Fixer le kit de paillage sans sac de récupération ni sans 1. Enlevez le panier de ramassage protection anti-choc entièrement 19), ) s‘il était monté. montés. Risques de blessures! 2. -
Page 33: Remplir Le Réservoir D'essence
3. Lisez le niveau d’huile sur la 1. Dévissez le couvercle du réservoir jauge après l’avoir ressortie. Le 8) et versez de l’essence jusqu’au niveau d’huile doit se situer entre bord inférieur du bouchon de remplis- les deux marques minimum et sage. -
Page 34: Tondre
Arrêter le moteur : Démarrez l’appareil sur un sol sûr et plane de préférence pas dans les 5. Relâchez l’étrier de sécurité herbes hautes. Assurez-vous que 3). Le moteur s’éteint et la les outils de découpe ne touchent lame est ralentie. ni des objets ni le sol. -
Page 35: Affichage Du Niveau De Remplissage
( 19). La circulation notice par un garage spécialisé. d’air aérodynamique du couvercle permet N’utilisez que des pièces de rechange originales Grizzly. Il y a d’obtenir un remplissage optimal. un risque d’accident! Clapet ouvert : D’une manière générale, effec- tuez les travaux d’entretien et... -
Page 36: Échanger Les Filtres À Air
N’utilisez pas d’objets durs ou pointus, 1. Retirez la fiche de bougie ( vous pourriez abîmer l’appareil. en tirant et en tournant en même • Graissez de temps en temps les roues. temps la bougie. 2. Vissez la bougie (34) dans le •... -
Page 37: Régler Le Câble Bowden
Rangement Régler le câble Bowden Conseils généraux de Si le câble Bowden pour la transmission rangement est désajusté et a trop de jeu, vous pouvez le régler. N’entreposez pas l’appareil avec 1. Desserrez le petit écrou de blo- le sac de récupération rempli. Par temps chaud, l’herbe com- cage (35). -
Page 38: Élimination/ Protection De L'environnement
Élimination/ protection de • Videz le réservoir d’essence dans un l’environnement endroit bien aéré. • Pour vider le carburateur, démarrez le moteur et laissez-le tourner jusqu’à ce • Rapportez l’appareil, ses accessoires qu’il s’arrête en raison du manque de et son emballage pour un recyclage carburant. -
Page 39: Garantie
Garantie • La durée de garantie de cet appareil • Veuillez n’envoyer aucun appareil à est de 2 ans à compter de la date nos ateliers de service après-vente d’achat et n’est valable que pour le sans accord téléphonique préalable premier acheteur. -
Page 40: Intervalles D'entretien
à nettoyer plus souvent lors d'une forte quantité de poussière ou un fort encrassement Pièces de rechange/Accessoires Vous obtiendrez des pièces de rechange et des accessoires à l’adresse www.grizzly-service.eu Si vous ne disposez d’aucun accès Internet, veuillez contacter le centre de SAV (voir «Grizzly Service-Center ») -
Page 41: Détection Des Pannes
Détection des pannes Problème Cause possible Réparation des pannes pas assez d’essence dans le Remplir le réservoir d’essence réservoir démarrage effectué dans le respecter les instructions de démar- mauvais ordre rage du moteur (voir «Utilisation») mettre les fiches de bougie en le moteur ne les fiches de bougies ( place nettoyer, ajuster ou rempla-... -
Page 42: Przeznaczenie
Obsługa ..........51 Odszukiwanie błędów ......58 Uruchamianie i zatrzymywanie Tłumaczenie oryginalnej deklaracji silnika ..........51 zgodności WE ........147 Grizzly-Service-Center ..... 155 Koszenie ........... 52 Wskaźnik poziomu ......52 Przeznaczenie urządzenia i stanowić poważne zagroże- Urządzenie jest przeznaczone wyłącznie nie dla użytkownika. -
Page 43: Opis Ogólny
Opis ogólny 5 2 zaciski kabla 6 Zderzak Rysunki znajdziesz na stronach 7 Klapka zbiornika oleju z prętem 2-4. pomiaru poziomu oleju 8 Pokrywa zbiornika paliwa Zawartość opakowania 9 Osłona silnika 10 Osłona wydechu Ostrożnie wyjmij urządzenie z opakowania 11 Wtyczka świecy zapłonowej i sprawdź, czy w opakowaniu znajdują... -
Page 44: Elementy Ochronne
Spalinowa kosiarka do trawy ....Podana wartość emisji drgań może też ......BRM 4613-20 A E-Start służyć do szacunkowej oceny stopnia eks- Moc ............1,9 kW pozycji użytkownika na drgania.. Silnik ..4-suwowy DAYE DYM1P64FE Ostrzeżenie: Wartość... -
Page 45: Symbole W Instrukcji Obsługi
Niebezpieczeństwo zranienia Okrąg cięcia przez wyrzucone części. Trzymaj stojące obok osoby z da- Poziom ciśnienia akustycznego L leka od urządzenia. w dB. Niebezpieczeństwo zranienia przez ostre noże! Trzymać stopy i nogi z daleka od noży. Symbole wskaźnik pozio- STOP mu napełnienia Ostrożnie - trujące pary! Nie używaj urządzenia w za- Piktogramy na uchwycie:... -
Page 46: Zasady Bezpieczeństwa
Znak informacyjny ze wskazówka- cje w zakresie prawidłowej obsługi mi ułatwiającymi posługiwanie się urządzenia. urządzeniem. • Należy zapewnić, aby dzieci nie bawiły się urządzeniem. Zasady bezpieczeństwa • Nigdy nie zezwalać na używanie urzą- dzenia przez dzieci lub inne osoby, Ten rozdział zawiera podstawowe przepisy które nie zapoznały się... - Page 47 - jeżeli benzyna została rozlana, nie hałdach odpadów, rowach i wałach. wolno podejmować próby urucho- Zapewni to lepszą kontrolę urządze- mienia silnika. Zamiast tego urzą- nia w nieoczekiwanych sytuacjach dzenie odciągnąć z powierzchni . - Zawsze pracuj w poprzek wzniesie- zanieczyszczonej benzyną.
- Page 48 • Nie uruchamiaj silnika, stojąc przed Niebezpieczeństwo porażenia prądem kanałem wyrzutowym. elektrycznym. • Włączaj silnik zgodnie z instrukcją i Konserwacja i przechowywanie: tylko trzymając stopy w bezpiecznej odległości od narzędzi tnących. • Regularnie sprawdzaj, czy wszystkie • Nigdy nie wkładaj rąk ani nóg w po- nakrętki, trzpienie i śruby są...
-
Page 49: Uruchamianie
• Przechowuj urządzenie w suchym, 3. Odchyl górny uchwyt zabezpieczonym przed pyłem i prowadzący (1) i naciśnij niedostępnym dla dzieci miejscu. Mas- dźwignię (20) w kierunku zyny są niebezpieczne, gdy są używane uchwytu. przez osoby niedoświadczone. 4. Zamocuj cięgna przy użyciu obu zacisków kablowych (5) na Uruchamianie uchwycie. -
Page 50: Zestaw Do Mulczowania
Zestaw do mulczowania 3. Wyjmij pręt pomiarowy i odczytaj na nim poziom oleju. Poziom ole- Zakładanie zestawu do mul- ju musi leżeć w zaznaczonym czowania obszarze między znakiem pozio- 1. Zdjąć kosz na trawę ( 19), mu minimalnego i maksymalne- jeśli jest założony. -
Page 51: Regulacja Wysokości Koszenia
1. Odkręć korek wlewu zbiornika ( możliwości nie w wysokiej trawie. i wlej benzynę do poziomu dolnej kra- Upewnij się, że mechanizm tnący wędzi króćca wlewowego. nie dotyka żadnych przedmiotów Nie napełniaj zbiornika do końca, aby ani podłoża. benzyna mogła się rozprężyć. 2. -
Page 52: Koszenie
3. Pociągnij uchwyt rozrusznika Na czas krótkich przerw w pracy 22). i w celu redukcji hałasu ustawiaj dźwignię przepustnicy (26) w po- 4. Gdy silnik zostanie uruchomio- ny, powoli puszczaj uchwyt roz- zycji rusznika, aby linka wciągnęła Zmiana prędkości obrotowej silnika się... -
Page 53: Czyszczenie I Konserwacja
Używaj tylko oryginalnych czę- dzone części. Sprawdzaj, czy wszyst- ści zamiennych Grizzly. kie nakrętki, trzpienie i śruby są dobrze Wszystkie prace konserwacyjne przykręcone. i oczyszczanie przeprowadzaj •... -
Page 54: Wymiana I Regulacja Świecy Zapłonowej
Wymiana i regulacja świecy za- 1. Zdjąć wtyk przewodu zapłonowego płonowej 11). 2. Otworzyć korek zbiornika oleju ( Zużyte świece zapłonowe lub za i za pomocą pompy olejowej wypom- duży odstęp między elektrodami pować olej silnikowy. prowadzą do redukcji mocy silnika. 3. -
Page 55: Przechowywanie
- Zwróć się po poradę do punktu sprze- dzenia gaźnika przez resztki paliwa. daży urządzeń Grizzly. • Usuwaj akumulatory zgodnie z prze- • Opróżnij zbiornik paliwa w dobrze pisami lokalnymi. -
Page 56: Gwarancja
poradę do lokalnego zakładu oczysz- • Proszę nie wysyłać urządzeń do na- czania albo do naszego Centrum szych warsztatów serwisowych bez Serwisowego. wcześniejszego telefonicznego uzgod- • Utylizację przesłanych nam urządzeń nienia, w przeciwnym razie mogą przeprowadzamy bezpłatnie. wystąpić koszty związane z odmową •... -
Page 57: Części Zamienne/Akcesoria
Części zamienne/Akcesoria Części zamienne i akcesoria można zakupić na www.grizzly-service.eu Jeżeli nie masz dostępu do Internetu, skontaktuj się z Centrum Serwisowym (patrz „ Grizzly Service-Center „). Czasokresy konserwacyjne Regularnie wykonuj prace konserwacyjne wymienione w tabeli „Czasokresy konser- wacyjne”. Regularna konserwacja przedłuża żywotność urządzenia. Ponadto pozwala ona na uzyskanie optymalnej wydajności cięcia oraz zapobiega wypadkom. -
Page 58: Odszukiwanie Błędów
Odszukiwanie błędów Problem Możliwa przyczyna Sposób usunięcia Za mało benzyny w zbiorniku Wlej benzynę Zastosuj się do podanych w niniej- Nieprawidłowa kolejność czyn- szej instrukcji obsługi wskazówek ności dotyczących uruchamiania silnika (patrz „Obsługa”). Silnik nie urucha- Wtyczka świecy ( 11) niepra- Podłącz wtyczkę... -
Page 59: Gebruiksdoeleinde
Bediening ..........68 Vertaling van de originele CE- conformiteitsverklaring..... 148 Motor starten en stoppen ....68 Maaien ..........69 Grizzly Service-Center ...... 155 Niveau-indicator ........ 69 Werkinstructies ......... 69 Gebruiksdoeleinde Het apparaat is voor het gebruik door vol- Het apparaat is uitsluitend voor het maaien wassenen bestemd. -
Page 60: Algemene Beschrijving
Algemene beschrijving 4 Onderste hoofdligger van de handgreep De afbeelding van de voornaamste 5 Kabelklem functionele onderdelen vindt u op 6 Stootbescherming de pagina 2 - 4. 7 Olietankdop met oliemeetstaaf 8 Tankdeksel Omvang van de levering 9 Motorafdekking 10 Uitlaatbescherming Pak het apparaat uit en controleer, of de 11 Bougiedop inhoud volledig is:... -
Page 61: Beschermingsinrichtingen
Technische gegevens van het gereedschap van de aange- geven waarde verschillen. Benzinegrasmaaier ...............BRM 4613-20 A E-Start De noodzaak bestaat, veiligheidsmaat- Vermogen ..........1,9 kW regelen ter bescherming van de operator Motor ....4-Takt DAYE DYM1P64FE vast te leggen, die op een inschatting van Motorslagvolume ......135 cm... -
Page 62: Pictogrammen/Symbolen
Pictogrammen/Symbolen Zet de motor uit wanneer u het apparaat verlaat Symbolen op het apparaat Maai nooit terwijl er personen, Opgelet! in het bijzonder kinderen, of Gebruiksaanwijzing lezen. dieren zich in de nabijheid bevinden. Gevaar voor verwondingen door weggeslingerde onderdelen. Om- Symbolen op het ni- STOP ringende Personen op een veilige... -
Page 63: Symbolen In De Gebruiksaanwijzing
Symbolen in de gebruiksaan- • Lees de gebruiksaanwijzing zorgvul- wijzing dig. Maak u met de instelbare onder- delen en met het correcte gebruik van Gevaarsymbool met informatie het apparaat vertrouwd. over de preventie van personen- • Laat nooit toe, kinderen of andere per- of zaakschade. - Page 64 - Benzine dient vóór de start van de • Maai uitsluitend bij daglicht of bij een motor ingegoten te worden. Terwijl goede kunstmatige verlichting. Een de motor draait of bij een heet ap- onverlicht werkterrein kan tot ongeval- paraat mag de tankdop niet ge- len leiden.
- Page 65 • Start of activeer de startschakelaar - indien het apparaat ongewoon sterk met voorzichtigheid en dit in overeen- begint te trillen, is een onmiddellijke stemming met de door de fabrikant controle noodzakelijk. verstrekte instructies. Let op vol- • Zet de motor uit doende afstand van de voeten tot het - wanneer u het apparaat verlaat;...
-
Page 66: Ingebruikname
en netjes om beter en veiliger te kun- greep, een gat, is elk die wordt nen werken. Leef de onderhoudsvoor- getrokken over de overeenkom- schriften na. stige bouten in de beugel op de • Tracht niet, het apparaat zelf te repa- eenheid worden. -
Page 67: Mulchkit
Motorolie ingieten en oliepeil 3. Haak de grasvangmand (19) in controleren de daarvoor voorziene ophan- ging (27) aan de achterzijde van het apparaat vast. Zet het apparaat op een effen vloer 4. Til de stootbescherming (6) op en neem de grasvangmand uit. 1. -
Page 68: Snoeihoogte Instellen
Bediening - Gemorste benzine verwijderen. - Benzine op een veilige afstand tot vonken, open vlammen en Neem de geluidswering en lokale andere ontstekingsbronnen voorschriften in acht. houden. Motor starten en stoppen - Gebruik geen mengsels van Waarschuwing! Benzine is ont- benzine met olie. -
Page 69: Maaien
2. Trek de veiligheidsbeugel ( Zet voor korte werkonderbrekingen in de richting van de hoofdlig- en voor een vermindering van het ger van de handgreep en houd geluid de chokehendel (26) in posi- deze tegen. 3. Trek aan de startergreep ( 4. -
Page 70: Reiniging En Onderhoud
Maak gebruik op zichtbare gebreken zoals uitsluitend gebruik van originele losse, versleten of beschadigde on- Grizzly-wisselstukken. Er be- derdelen. Ga de vaste zitting van alle staat gevaar voor ongevallen! moeren, bouten en schroeven na. Voer onderhouds- en reinigings- •... -
Page 71: Motorolie Verversen
Bowdenkabel instellen 1. Trek de bougiedop ( 11) af door gelijktijdig aan de bougie (34) te trekken en te draaien. Als de bowdenkabel voor de aandrijving 2. Schroef de bougie (34) te gen de versteld werd en teveel speling heeft, kunt richting van de wijzers van de u hem afstellen. -
Page 72: Opslag Tijdens Langere Bedrijfsonderbrekingen
• Ledig de carburateur: - Raadpleeg hiervoor uw Start daarvoor de motor en laat hem Grizzly-dealer. draaien totdat de motor stopt. Laat de • Verwijder de accu’s volgens de lokale motor afkoelen. voorschriften. Geef de accu’s af op •... -
Page 73: Garantie
• Werp gesnoeid gras niet in de vuilnisbak, stof- of olietank toe. Maak de tanks in maar onderwerp het aan compostering ieder geval leeg. Alle materiële schade of verdeel het als mulchlaag onder strui- die hier het gevolg van is (uitlopende ken en bomen. -
Page 74: Onderhoudsintervallen
Geluiddempers en vonkenvangers nakijken Luchtkoelingssysteem reinigen bij aanzienlijke stofproductie of sterke vervuiling vaker reinigen Vervangstukken/Accessoires Reserveonderdelen en accessoires verkrijgt u op www.grizzly-service.eu Indien u geen Internet hebt, neem dan contact op met het Service-Center (zie „Grizzly Service-Center“ ). -
Page 75: Foutopsporing
Foutopsporing Probleem Mogelijke oorzaak Oplossing van de fout Te weinig benzine in de tank Benzine ingieten Aanwijzingen om de motor te star- Verkeerde startvolgorde ten in acht nemen (zie „Bediening“) Bougiedop opsteken Bougiedop niet correct Motor start niet Bougie reinigen, instellen of vervan- opgestoken gen (zie „Reiniging en onderhoud“) Vol roet gekomen bougie... -
Page 76: Intended Use
Starting and Stopping the Translation of the original EC declaration of conformity ....149 Engine ..........85 Grizzly Service-Center ...... 155 Intended Use The equipment is intended only for mowing The equipment is intended for use by lawns and grass in domestic use. -
Page 77: General Description
General Description 6 Impact protection 7 Oil filler cap with dipstick The illustration of the principal 8 Filler cap functioning parts can be found on 9 Engine cover pages 2 - 4. 10 Exhaust guard 11 Spark plug connector Delivery Contents 12 2 front wheels 13 Air filter (not visible) Carefully unpack the appliance and check... -
Page 78: Technical Data
Petrol lawn mower ........(all parts of the operating cycle are to be ......BRM 4613-20 A E-Start considered, including, for example, times Performance ........1.9 kW during which the power tool is turned off Engine 4-stroke .. -
Page 79: Symbols In The Manual
Risk of injury from sharp blades. Keep feet and hands away. Danger! Keep hands and feet away. Caution – toxic fumes! Do not operate the equipment in Information of the acoustic power enclosed areas. level L in dB. Symbols on the handle bar: Caution –... -
Page 80: Safety Instructions
Safety Instructions • Do not mow whilst people – especially children – or animals are nearby. If This section deals with the basic safety distracted, you may lose control of the procedures when working with the equip- equipment. ment. • The operator or user is responsible for accidents or damage to other persons WARNING! Read all of the safety... - Page 81 • Before use, always carry out a visual over a surface other than grass and inspection to check whether the cut- when moving the equipment from and ting tools, mounting bolts and entire to the surface to be mown. cutting unit are worn or damaged. To •...
- Page 82 Maintenance and Storage: - Before checking, cleaning or work- ing on the equipment; • Ensure that all nuts, bolts and screws - If a foreign body is struck. Look for are tightened firmly and the equip- damage to the equipment and carry out ment is in safe working condition.
-
Page 83: Initial Operation
Initial Operation 3. Unfold upper handlebar (1) and push locking lever (20) Caution! Risk of injury from toward bar. rotating blades. Carry out work 4. Fix the Bowden cables to the on the equipment only when the bar using the cable clamp (5) blade is switched off and sta- Install/empty grass catchment tionary. -
Page 84: Mulch Kit
Mulch kit 3. After pulling it out, read off the oil level on the dipstick. The oil Attaching mulch kit level should be in the marked 1. Remove the collection box area between the minimum and 19), if used. maximum marks. 2. -
Page 85: Setting The Cutting Height
Setting the Cutting Height 2. Pull the safety loop (3) towards the grip handle (1) and hold it. The equipment has 10 positions for set- 3. Press the start button (27). ting the cutting heigh (25-75 mm): The motor starts. 1. -
Page 86: Mowing
They cannot be regulated. nance work not described in these instructions carried out by Level gauge a specialist workshop. Use only original Grizzly replacement parts. Risk of accidents! The level gauge ( 19a) is located on the side of the grass catcher ( 19). -
Page 87: Replacing The Air Filter
Change / adjust spark plug • Always keep the equipment clean. To clean, use a toothbrush or cloth but no corrosive cleaning agents or solvents. A worn spark plug or a spark gap Do not use water to clean the engine that is too large will result in a re- as it could contaminate the fuel sys- duction of engine performance. -
Page 88: Adjusting The Bowden Cable
Storage 1. Remove the spark plug connector ( 11). General Storage Instructions 2. Open the oil tank cover ( 7) and pump out the motor oil with an oil Do not store the equipment pump. 3. Refill with engine oil (see “Initial Op- with a full collection box. -
Page 89: Disposal / Environmental Protection
- Take used oil and petrol residues to a disposal point and do not pour them into the sewer system or down the drain. - Please contact your Grizzly dealer. -
Page 90: Guarantee
Guarantee • The guarantee period for this equip- • The repair or replacement of the ment is 2 years from the date of equipment will neither result in exten- purchase and it is applicable only for sion of the guarantee period nor the the initial buyer. -
Page 91: Maintenance Intervals
Clean more often if there is a high level of dust or heavy dirt Replacement parts/Accessories Spare parts and accessories can be obtained at www.grizzly-service.eu If you do not have internet access, please contact the Service Centre (see “Grizzly Service-Center”). -
Page 92: Troubleshooting
Troubleshooting Problem Possible Cause Fault Correction Too little petrol in the tank Fill with petrol Follow the instructions for starting the Incorrect starting sequence engine (see ”operation“) Engine does not Attach the spark plug connector Spark plug connector start Clean, adjust or replace the spark plug not put on correctly (see “cleaning and maintenance“) Sooted spark plug (... -
Page 93: Uso Previsto
Avviamento/arresto del motore ..102 Traduzione della dichiarazione Falciatura ........103 di conformità CE originale ....150 Grizzly Service-Center ..... 155 Uso previsto L‘apparecchio è concepito esclusivamente causare danni all’apparecchio e costituire per la falciatura di prati e aree erbose in un pericolo reale per l’utilizzatore. -
Page 94: Descrizione Generale
Panoramica L’utente che mette in funzione ed in uso l’apparecchio è responsabile di incidenti e danni ad altre persone o ai loro beni 1 Sbarra impugnatura superiore privati. 2 Archetto di regolazione della tra- Il produttore non si assume alcuna re- zione sponsabilità... -
Page 95: Dispositivi Di Protezione
Tosaerba a benzina ........essere sfruttato per confrontare due appa- ......... BRM 4613-20 A E-Start recchi. Il valore sulle vibrazioni emesse in- Potenza ..........1,9 kW dicato può anche essere impiegato per un Motore ......DAYE DYM1P64FE... -
Page 96: Simboli Riportati Nelle Istruzioni
Pericolo di lesioni dovuto alle lame affilate! Pericolo! Tenere lontano piedi e mani. Tenere lontano mani e piedi. Attenzione: vapori tossici! Indicazione del livello di potenza Non utilizzare l‘apparecchio acustica L in dB. in luoghi chiusi. Simboli sulla sbarra impugnatura: Attenzione: la benzina è... -
Page 97: Istruzioni Di Sicurezza
Simboli di divieto (al posto del sizioni di legge locali che stabiliscono punto esclamativo il divieto viene l‘età minima dell‘utilizzatore. delucidato) con indicazioni relative • Non falciare mai in presenza di per- alla prevenzione di danni. sone, in particolare bambini, o animali nelle vicinanze. - Page 98 - in caso di fuoriuscita di benzina non to sicuro dell‘apparecchio, in partico- tentare in alcun modo di avviare il lare in corrispondenza di pendenze, motore. Allontanare l‘apparecchio discariche di rifiuti, fossati e argini. In dalle superfici imbrattate di carbu- questo modo è...
- Page 99 sia presente una distanza sufficiente • Non lavorare se l‘apparecchio è dann- fra il piede e l‘utensile di taglio. Perico- eggiato, non integro o modificato sen- lo di lesioni! za l‘approvazione del produttore. • All‘accensione o all‘avviamento del L‘utilizzo delle macchine per altre ap- motore non inclinare l‘apparecchio, ad plicazioni rispetto a quelle previste può...
-
Page 100: Messa In Funzione
• Non tentare di riparare autonoma- modo si forma il punto di rotazi- mente l‘apparecchio, salvo nei casi in one inferiore per la regolazione cui si possieda una debita formazione. dell‘inclinazione. Tutti gli interventi non indicati nelle 2. Fissare la sbarra impugnatura presenti istruzioni devono essere inferiore (4) con le relative viti di eseguiti esclusivamente dai centri di... -
Page 101: Kit Di Pacciamatura
4. Rilasciare la protezione antiurto 2. Tirare lentamente la corda di (6), che mantiene il raccoglierba avviamento dall‘impugnatura in posizione. di avviamento (22) in direzione della sbarra e agganciarla nella Rimozione/svuotamento del guida (21). raccoglierba: 3. Rilasciare la staffa di sicurezza. 5. -
Page 102: Rabboccare La Benzina
- aprire il tappo del carburante con L‘altezza di taglio corretta per un prato cautela, in modo da poter scaricare ornamentale corrisponde a circa 25 - 45 la sovrappressione; mm, per un prato calpestabile invece circa - non fumare durante il rabbocco del- 40 - 65 mm. -
Page 103: Falciatura
3. Premere il pulsante di avvio Controllare regolarmente il dispo- (27). sitivo di arresto della lama. Rila- Il motore si avvia. sciare la staffa di sicurezza (3). Il motore si spegne e la lama viene La batteria (25) del motorino elettrico frenata. -
Page 104: Avvertenze Per L'utilizzo
Uti- l‘assenza di difetti visibili sul tosaerba, lizzare esclusivamente pezzi di ad es. componenti non fissati, usurati o ricambio Grizzly originali. Peri- danneggiati. Verificare il saldo posizio- colo di incidente! namento di tutti i dadi, i bulloni e le viti. -
Page 105: Sostituzione Del Filtro Aria
• Verificare l’assenza di danni e il 5. Pulire la candela con una spazzola corretto posizionamento delle coper- metallica. ture e dei dispositivi di protezione. 6. Inserire la candela pulita e regolata All’occorrenza sostituire le parti dann- o sostituire la candela eventual- eggiate. -
Page 106: Comando Con Guaina
Il cavo di comando con guaina • Pulire e manutenere l‘apparecchio pri- si accorcia. ma dello stoccaggio. - Ruotare il dado di regolazione • Lasciare raffreddare il motore prima di (36) in senso orario: riporre l‘apparecchio in un ambiente Il cavo di comando con guaina chiuso. -
Page 107: Smaltimento / Rispetto Dell'ambiente
- Consegnare l‘olio usato e i residui di benzina in un centro di smaltimento e non scaricarli nelle tubazioni o nella fognatura. - Chiedere a tal fine al rivenditore Grizzly. -
Page 108: Garanzia
Garanzia • La durata della garanzia per questo Si prega di non inviare l‘apparecchio apparecchio è di 2 anni a partire dalla senza aver preventivamente preso data di acquisto e vale solo per il pri- accordi telefonici con le nostre offici- mo acquirente. -
Page 109: Intervalli Di Manutenzione
Se la presenza di polvere è elevata o in caso di forte imbrattamento effettuare la pulizia più fre- quentemente Pezzi di ricambio/accessori Pezzi di ricambio e accessori sono reperibili al sito www.grizzly-service.eu Se si desidera assistenza telefonica, contattare il centro assistenza (vedere „Centro assistenza Grizzly“). -
Page 110: Ricerca Dei Guasti
Ricerca dei guasti Problema Possibile causa Soluzione Livello di benzina nel serbato- Rabboccare la benzina io insufficiente Attenersi alle indicazioni Sequenza di avvio errata sull‘avviamento del motore (vedere „Utilizzo“) Il motore non Cappuccio della candela Applicare il cappuccio della candela parte Pulire, regolare o sostituire la 11) non applicato corretta-... -
Page 111: Účel Použití
Plnění benzínu ........ 119 Překlad originálního prohlášení o shodě CE ......... 151 Nastavení výšky sekání ....120 Obsluha ..........120 Grizzly Service-Center ...... 155 Spuštění a zastavení motoru ..120 Sekání ..........121 Indikace naplnění ......121 Pracovní pokyny ......121 Účel použití... -
Page 112: Obecný Popis
Obecný popis 7 víčko olejové nádrže s měrkou oleje Zobrazení nejdůležitějších funkč- 8 uzávěr palivové nádrže ních dílů naleznete na stranách 9 kryt motoru 2-4. 10 ochrana výfuku 11 koncovka zapalovacího kabelu Objem dodávky 12 2 přední kola 13 vzduchový filtr (není vidět) Vybalte nástroj a zkontrolujte, je-li komplet- 14 kryt vzduchového filtru ní:... -
Page 113: Ochranná Zařízení
Uvedená emisní hodnota vibrací může být také použi- Benzínová sekačka na trávu ......ta k úvodnímu odhadu vystavení emisím........BRM 4613-20 A E-Start Výkon ...........1,9 kW Výstraha: Emisní hodnota vi- Motor ......DAYE DYM1P64FE brací... -
Page 114: Symboly A Piktogramy
Symboly a piktogramy Přístroj nevystavujte dešti Pozor! Doběh nože sekačky Symboly na přístroji na trávu. Varování! Přečtěte si návod k obsluze. STOP Indikace naplnění Nebezpečí poranění odmrštěný- mi částmi. Zabraňte přístupu okolo stojících Nebezpečí! Udržujte si osob k přístroji. přístroj v dostatečné vzdále- nosti od rukou a nohou. -
Page 115: Symboly V Návodu
Symboly v návodu nebo s nedostatkem zkušeností a/nebo znalostí; ledaže jsou pod dohledem Výstražné značky s údaji pro za- osoby zodpovědné za jejich bezpeč- bránění škodám na zdraví anebo nost, nebo budou ní poučení o tom, jak věcným škodám. používat zařízení. •... - Page 116 toru nebo je-li přístroj horký, není • Dbejte vždy na bezpečnou stabilitu, dovoleno otevírat uzávěr nádrže ani zejména na svazích, skládkách, příko- doplňovat benzín. pech nebo nábřežích. To Vám umožní - jestliže benzín přetekl, není dovole- lépe kontrolovat přístroj v neočekáva- no podnikat žádný...
- Page 117 Údržba a skladování: • Motor nespouštějte, jestliže stojíte před vyhazovacím kanálem. • Zajistěte, aby byly všechny matice, • Motor spouštějte podle pokynů a jen čepy a šrouby pevně utaženy a aby se tehdy, jestliže jsou vaše nohy v bez- přístroj nacházel v bezpečném pracov- pečné...
-
Page 118: Uvedení Do Provozu
Uvedení do provozu 4. Připevněte bovdenová lanka pomocí obou kabelových svorek Pozor! Rotující nůž. Práce na pří- (5) na rukojeti. stroji provádějte pouze při vypnu- Montáž/Vyprázdnění sběrného tém motoru a zastaveném noži. koše Dodržujte také návod k obsluze Pozor: Přístroj neprovozujte bez společnosti Briggs &... -
Page 119: Mulčovací Sada
Mulčovací sada 4. Případně rozlitý olej setřete a víčko ole- jové nádrže ( 7) opět zavřete. Připevnění mulčovací sady 1. Sejměte zachytávací koš Výšku hladiny oleje zkontrolujte před 19), je-li namontován. každým sekáním a při dosažení dol- 2. Zdvihněte ochranu před nárazy ního bodu značení... -
Page 120: Nastavení Výšky Sekání
Nastavení výšky sekání 2. Apsauginę apkabą (3) patrau- kite link rankenų strypo (1) ir Přístroj má 10 poloh pro nastavení výšky laikykite. sekání (25-75 mm): 3. Stiskněte spouštěcí tlačítko (27). Variklis užsiveda. 1. Zatáhněte páku (18) směrem Elektrinio variklio (32) akumuliatorius (25) ven a posuňte ji do požadované... -
Page 121: Sekání
Změna počtu otáček motor přes obě polohy nemá žádný nou. Používejte pouze originální vliv na rychlost pojezdu. Ten nelze náhradní díly Grizzly. Hrozí nebez- pečí úrazu! regulovat. Údržbu a čištění provádějte zásad- Indikace naplnění ně při vypnutém motoru a vytaže- né... -
Page 122: Výměna Vzduchového Filtru
K čištění motoru nepoužívejte vodu, 2. Vyšroubujte zapalovací svíčku mohla by znečistit palivové zařízení. (34) pomocí klíče proti směru • Po sekání odstraňte kusem dřívka nebo hodinových ručiček. plastu přichycené zbytky rostlin. Vyčis- 3. Pomocí mezerníku (k dostání ve těte zejména větrací otvory, vyhazovací specializovaných prodejnách) otvor a nožovou oblast. -
Page 123: Nastavení Bovdenu
Nastavení bovdenu • Před skladováním přístroj vyčistěte a proveďte jeho údržbu. Pokud se změnil tah bovdenu pro pohon • Než přístroj odstavíte do uzavřených a má příliš velkou vůli, musíte jej znovu prostor, nechejte motor vychladnout. nastavit. • Pro uskladnění paliva používejte vhod- né... -
Page 124: Odklízení A Ochrana Okolí
- Informujte se u svého prodejce se- které lze odvodit z nedostatečného kačky Grizzly. mazání. • Zlikvidujte akumulátory podle míst- • Následující díly podléhají běžnému ních předpisů. -
Page 125: Náhradní Díly/Příslušenství
• Likvidaci vašich zaslaných poškoze- ných přístrojů provádíme bezplatně. Náhradní díly/Příslušenství Náhradní díly a příslušenství obdr- žíte na stránkách www.grizzly-service.eu Pokud nemáte internet, tak prosím zavolej- te na servisní středisko (viz „ Grizzly Servi- ceCenter “). -
Page 126: Intervaly Údržby
Intervaly údržby Pravidelně provádějte údržbu uvedené v tabulce „Intervaly údržby“. Pravidelnou údrž- bou se prodlužuje životnost přístroje. Navíc dosáhnete optimálního výkonu sekání a zabráníte úrazům. Tabulka intervalů údržby Po prv- Před Po 8 Po 50 Práce údržby ních 5 hodi- hodi- Ročně... -
Page 127: Hledání Chyb
Hledání chyb Problém Možná příčina Odstranění závady Příliš málo benzínu v nádrži Doplňte benzín Dodržujte pokyny pro spuštění Chybné pořadí při startu motoru (viz „Obsluha“) Koncovka zapalovací svíčky Zastrčte koncovku zapalovací svíčky Motor nestartuje 11) není správně zastr- Zapalovací svíčku vyčistěte, seřiďte čena. -
Page 128: Paskirtis
Valdymas ..........137 Originalios EB atitikties Variklio paleidimas ir sustabdymas . 137 deklaracijos vertimas ......152 Pjovimas vejapjove ......138 Grizzly Service-Center ...... 155 Pripildymo lygio indikatorius .... 138 Darbo nurodymai ......138 Paskirtis Šis prietaisas yra skirtas namų vejos ir Prietaisą... -
Page 129: Bendrasis Aprašymas
Bendrasis aprašymas 7 Alyvos bakelio dangtelis su aly- vos lygio matuokliu Paveikslėlius rasite puslapiuose 8 Bakelio dangtelis nuo 2 iki 4. 9 Variklio gaubtas 10 Išmetamojo vamzdžio apsauga 11 Uždegimo žvakės kištukas Pristatomas komplektas 12 2 priekinis ratukai 13 Oro filtras Prietaisą... -
Page 130: Apsauginiai Įrenginiai
Techniniai duomenys išmatuota pagal standartuose patvirtintus patikros metodus ir gali būti taikoma kitam Benzininė vejapjovė ........panašiam elektriniam įrankiui. Nurodyta ......... BRM 4613-20 A E-Start vibracijos emisijos vertė gali būti taikoma Galia ............2,9 kW pradiniam poveikiui įvertinti. Variklis ......DAYE DYM1P64FE Įspėjimas: naudojant elektrinį... -
Page 131: Instrukcijoje Naudojami Simboliai
Pavojus susižeisti dėl išsviedžia- Prietaiso negalima naudoti drėgmė- mų dalių. Aplink veikiantį prietaisą negali Vejapjovės peilis veikia iš inercijos. būti asmenų. Pavojus susižaloti! Pavojus susižaloti dėl aštrių pei- lių! Pavojus! Nekiškite arti kojų ir rankų. Nekiškite arti rankų ir kojų. Atsargiai –... -
Page 132: Saugos Nurodymai
Privalomasis ženklas (vietoje žen- saugumą, juos prižiūrėtų arba nurody- klo su šauktuku pateiktas reikalavi- tų, kaip prietaisu naudotis. mas) su duomenimis, kaip išvengti • Būtina prižiūrėti, kad su įrenginiu ne- žalos materialiniam turtui. žaistų vaikai. • Niekada neleiskite vaikams arba ki- Informacinis ženklas, kuriame pa- tiems asmenims, kurie nėra susipaži- teikiama informacijos, kaip geriau... - Page 133 - jei benzino išbėgo, jokiu būdu ne- - Būkite labai atsargūs, jei stovėdami ant galima bandyti užvesti variklio. Jei šlaisto norite pakeisti važiavimo kryptį. taip įvyktų, prietaisą reikia patraukti - Nepjaukite labai stačių šlaitų (maks. iš benzinu užteršto ploto. Kol neišsi- 10°).
- Page 134 Techninė priežiūra ir laikymas • Niekada nekelkite ir neneškite prietai- so veikiant varikliui. • Pasirūpinkite, kad visos veržlės, sraig- • Išjunkite variklį, ištraukite uždegimo tai ir varžtai būtų tvirtai priveržti ir prie- žvakės kištuką ir įsitikinkite, kad visos taisas būtų saugios darbinės būklės. judančios dalys visiškai sustojo: Daug nelaimingų...
-
Page 135: Eksploatavimo Pradžia
Eksploatavimo pradžia Žolės surinkimo dėžės sumon- tavimas / ištuštinimas Atsargiai! Besisukantis peilis. Darbus prie pritaiso atlikite tik iš- Dėmesio: niekada nenaudokite jungę variklį ir palaukę, kol peiliai prietaiso iki galo nepritvirtinę sustos. surinkimo dėžės arba apsaugos nuo smūgių. Pavojus susižaloti! Prieš... -
Page 136: Paleidimo Lyno Montavimas
3. Įstatykite mulčiavimo rinkinį (23). Prieš kiekvieną pjovimo patikrinkite Raudonas apsauginis mygtukas alyvos lygį ir pripilkite, jei alyvos užsifiksuoja. lygis nesiekia žemiausios žymos. Benzino įpylimas Mulčiavimo rinkinio nuėmimas 4. Pakelkite buferį (6). 5. Žemyn nustumkite raudoną Įspėjimas! Benzinas yra užsi- liepsnojanti ir sveikatai kenks- apsauginį... -
Page 137: Pjovimo Aukščio Nustatymas
Pjovimo aukščio nustatymas Variklio užvedimas (elektrinis užvedimas): Prietaisui galima nustatyti vieną iš 10 pjo- 1. Kai paleidžiate neįšilusį variklį, vimo aukščio padėčių (nuo 25 iki 75 mm): nustatykite droselinę svirtį (26) į padėtį 1. Pastumkite svirtį (18) į išorę ir Kai paleidžiate įšilusį... -
Page 138: Pjovimas Vejapjove
Pripildymo lygio indikatorius Jei akumuliatorius po ilgesnį laiką trukusios iškrovos pjaunant žolę nebeįsikrautų, jį galite įkrauti Žolės surinkimo dėžės ( 19) šone išoriniu įkrovikliu. Tam atjunkite įmontuotas pripildymo lygio indikatorius kištukinę jungtį (31) ir prijunkite 19a). Vožtuvo aerodinaminė oro akumuliatorių prie atitinkamo nukreipimo sistema papildomai užtikrina įkroviklio (tiekiamame rinkinyje optimalų... -
Page 139: Valymas Ir Techninė Priežiūra
Patikrinkite, ar visos veržlės, sraigtai ir kuotiems dirbtuvių darbuotojams. varžtai tvirtai priveržti. Naudokite tik originalias „Grizzly“ • Patikrinkite, ar gaubtai ir apsauginiai atsargines dalis. Antraip gali įvykti įrenginiai nepažeisti ir stipriai pritvirtin- nelaimingas atsitikimas! ti. -
Page 140: Variklio Alyvos Keitimas
specializuotose parduotuvėse). 1. Atlaisvinkite mažą fiksavimo Intervalas tarp uždegimų turi būti veržlę (35). 0,75 mm. 2. - Nustatymo veržlę (36) atsuki- 4. Prireikus nustatykite atstumą ats- te prieš laikrodžio rodyklę: argiai lenkdami uždegimo žvakės Boudeno lynas sutrumpėja. uždegimo lanką. - Nustatymo veržlę (36) sukite 5. -
Page 141: Laikymas, Kai Prietaisas Eksploatuojamas Retai
įstaigai ir ne- pilkite jų į kanalizaciją arba vandens • Benzino bakelį ištuštinkite gerai vėdi- nuotakus. namoje vietoje. - Apie tai teiraukitės „Grizzly“ parda- • Ištuštinkite karbiuratorių: vėjo. užveskite variklį ir leiskite jam veikti • Akumuliatorių utilizuokite pagal tol, kol variklis sustos. -
Page 142: Garantija
Garantija • Šiam prietaisui suteikiama 2 metų ga- • Suremontavus arba pakeitus prietaisą rantija, kuri pradedama skaičiuoti nuo jo arba įmontuotų kitų atsarginių dalių pirkimo datos ir ja gali pasinaudoti tik garantijos laikas nepratęsiamas ir pirmasis pirkėjas. Šis prietaisas nepri- nauja garantija nesuteikiama. -
Page 143: Techninės Priežiūros Intervalai
kibirkščių gesinimo įtaisą Nuvalyti oro aušinimo sistemą jei susikaupia daug dulkių arba nešvarumų reikia valyti dažniau. Atsarginės dalys/Priedai Atsargines dalis ir priedus galite įsigyti interneto svetainėje www.grizzly-service.eu Jei neturite interneto, kreipkitės telefonu į aptarnavimo centrą (žr. „Grizzly Service-Center“). -
Page 144: Klaidų Paieška
Klaidų paieška Problema Galima priežastis Klaidos šalinimas Bakelyje per mažai benzino. Įpilkite benzino. Netinkama paleidimo eilės Atkreipkite dėmesį į variklio paleidi- tvarka. mo instrukciją (žr. „Valdymas“). Netinkamai įkištas uždegimo Įstatykite uždegimo žvakės kištuką. Neužsiveda va- žvakės kištukas, Nuvalykite, nustatykite arba pakeis- riklis aprūko uždegimo žvakės kite uždegimo žvakę... -
Page 145: Original Eg-Konformitätserklärung
Original EG-Konformitäts- erklärung Hiermit bestätigen wir, dass der Benzinrasenmäher Baureihe BRM 4613-20 A E-Start Seriennummern: 20180100001 - 20180100902 folgenden einschlägigen EU-Richtlinien in ihrer jeweils gültigen Fassung entspricht: 2006/42/EG • 2014/30/EU • 2000/14/EG • 2005/88/EC Um die Übereinstimmung zu gewährleisten, wurden folgende harmonisierte Normen sowie nationale Normen und Bestimmungen angewendet: EN ISO 14982:2009 •... -
Page 146: Traduction De La Déclaration De Conformité Ce Originale
Bureau declaré: TÜV SÜD Industrie Service GmbH, Westendstrasse 199, D-80686 München, NB 0036 Le fabricant assume seul la responsabilité d‘établir la présente déclaration de conformité : Grizzly Tools GmbH & Co. KG Stockstädter Straße 20 D-63762 Großostheim, Cristian Frank Germany (Chargé... -
Page 147: Tłumaczenie Oryginalnej Deklaracji Zgodności We
2005/88/EC Placówka zgłoszenia: TÜV SÜD Industrie Service GmbH, Westendstrasse 199, D-80686 München, NB 0036 Wyłączną odpowiedzialność za wystawienie tej deklaracji zgodności ponosi producent: Grizzly Tools GmbH & Co. KG Stockstädter Straße 20 D-63762 Großostheim, Cristian Frank Germany (Osoba upoważniona do sporządzania 15.01.2018... -
Page 148: Vertaling Van De Originele Ce- Conformiteitsverklaring
Traduction de la déclaration de conformité CE originale Hiermede bevestigen wij dat de Benzinegrasmaaier bouwserie BRM 4613-20 A E-Start Serienummer 20180100001 - 20180100902 aan de hierna volgende, van toepassing zijnde EU-richtlijnen 2006/42/EC • 2014/30/EU • 2000/14/EC • 2005/88/EC Om de overeenstemming te waarborgen, werden de hierna volgende, in overeenstem- ming gebrachte normen en nationale normen en bepalingen toegepast: EN ISO 14982:2009 •... -
Page 149: Translation Of The Original Ec Declaration Of Conformity
Registered Office: TÜV SÜD Industrie Service GmbH, Westendstrasse 199, D-80686 München, NB 0036 This declaration of conformity is issued under the sole responsibility of the manufac- turer: Grizzly Tools GmbH & Co. KG Stockstädter Straße 20 D-63762 Großostheim, Germany Cristian Frank (Documentation Representative) 15.01.2018... -
Page 150: Traduzione Della Dichiarazione Di Conformità Ce Originale
+ 2005/88/EC Autorità registrata: TÜV SÜD Industrie Service GmbH, Westendstrasse 199, D-80686 München, NB 0036 Il produttore è il solo responsabile della stesura della presente dichiarazione di conformità: Grizzly Tools GmbH & Co. KG Stockstädter Straße 20 D-63762 Großostheim, Germany... -
Page 151: Překlad Originálního Prohlášení O Shodě Ce
Použitý postup konformitního ohodnocení dle dodatku VI / 2000/14/EC + 2005/88/EC Místo hlášení: TÜV SÜD Industrie Service GmbH, Westendstrasse 199, D-80686 München, NB 0036 Výhradní odpovědnost za vystavení tohoto prohlášení o shodě nese výrobce: Grizzly Tools GmbH & Co. KG Stockstädter Straße 20 D-63762 Großostheim, Cristian Frank Germany (Osoba zplnomocněná... -
Page 152: Originalios Eb Atitikties Deklaracijos Vertimas
Originalios EB atitikties deklaracijos vertimas Šiuo dokumentu mes patvirtiname, kad BRM 4613-20 A E-Start serijos benzininė vejapjovė serijos numeris 20180100001 - 20180100902 atitinka toliau nurodytų numatytųjų ES direktyvų galiojantį leidimą: 2006/42/EC • 2014/30/EU • 2000/14/EC • 2005/88/EC Kad būtų galima užtikrinti atitiktį, taikyti šie darnieji standartai ir nacionaliniai standar- tai bei nuostatos: EN ISO 14982:2009 •... -
Page 155: Grizzly Service-Center
Grizzly Service-Center Grizzly Tools GmbH & Co. KG Krysiak Sp. z o.o. Kunden-Service ul. Rolna 6 Stockstädter Straße 20 62-081 Baranowo D-63762 Großostheim Tel.: 061 650 75 30 Tel.: 06026-9914-0 Fax: 061 650 75 32 Fax: 06026-9914-499 e-mail: krysiak@krysiak.pl e-mail: service-baumarkt@grizzly.biz Homepage: www.krysiak.pl...
Need help?
Do you have a question about the BRM 4613-20 A E-Start and is the answer not in the manual?
Questions and answers