
Related Manuals for VOLTCRAFT V-Charge 200 Duo


Summary of Contents for VOLTCRAFT V-Charge 200 Duo
- Page 1 Operating Instructions Multifunctional charger "V-Charge 200 Duo" Item No. 1539603...
-
Page 2: Table Of Contents
Table of Contents Page Introduction ................................4 Explanation of Symbols ............................4 Intended Use ...............................5 Scope of Delivery ..............................5 Safety Notes ................................6 a) General ................................6 b) Mains cable/mains voltage ..........................6 c) Location for Installation ..........................7 d) Operation ...............................8 Rechargeable Battery Notes ..........................9 a) General ................................9 b) Additional Information about Lithium Batteries ....................10 Usable Rechargeable Battery Types .........................12... - Page 3 Page 13. Lead Batteries (Pb) ............................30 a) General ................................30 b) Charging Batteries ("CHARGE") .........................30 c) Discharging Battery ("DISCHARGE") ......................32 14. Saving/Loading Rechargeable Battery Data ......................33 a) Saving Battery Data .............................33 b) Loading Battery Data ...........................34 15. System settings ..............................35 16. Fixed Voltage Output ............................39 17.
-
Page 4: Introduction
- This name stands for above-average quality products in the areas of measuring, charging and grid tech- ® nology, characterised by technical competence, extraordinary performance and permanent innovation. Whether you are an ambitious hobby electronics technician or a professional user - a product of the Voltcraft brand ®... -
Page 5: Intended Use
3. Intended Use The charger "V-Charge 200 Duo" has two independent charge/discharge channels that each have a two-line lit display and four operating buttons. The charger is used to charge and discharge rechargeable batteries of the type NiMH/NiCd (1 - 15 cells), LiPo/LiIon/ LiFe/LiHV (1 - 6 cells) and lead batteries (1 - 10 cells, 2 V - 20 V). -
Page 6: Safety Notes
5. Safety Notes Read the operating instructions attentively and particularly observe the safety notes. If the safety notes and the information in these operating instructions regarding proper handling are not ob- served, we assume no liability for any resulting injury/property damage. In such cases, the war- ranty/guarantee will also lapse. -
Page 7: C) Location For Installation
c) Location for Installation • The charger is intended for dry indoor use only. It must not become damp or wet. Never set it up near a bathtub, shower or similar! If the charger is operated via the mains cable, there is danger to life from electric shock in case of mois- ture/wetness on the charger/mains cable! •... -
Page 8: D) Operation
d) Operation • The charger may be operated either via the mains voltage (230 V/AC, 50/60 Hz) or via a stabilised direct voltage of 11 - 18 V/DC (e.g. via an external vehicle lead battery or a suitable mains adapter). Use only one of the two connection types, but never both at once. -
Page 9: Rechargeable Battery Notes
6. Rechargeable Battery Notes Although use of rechargeable batteries in everyday life is a matter of course today, there are many dangers and problems. In particular, with LiPo/LiIon/LiFe/LiHV rechargeable batteries with their high energy content (in comparison with conventional NiCd or NiMH rechargeable batteries), vari- ous regulations must be observed in order to avoid the danger of explosion and fire. -
Page 10: B) Additional Information About Lithium Batteries
• The charger has two charging channels that are independent of each other, so that up to two recharge- able batteries/rechargeable battery packs can be charged (or discharged) at once. However, only con- nect a single rechargeable battery/rechargeable battery pack to each of the two charging channels. Never connect the charging channels to each other! •... - Page 11 • Ensure that the battery does not overheat during usage, recharging, discharging, transport or storage. Do not place the battery next to sources of heat (e.g. speed controller, motor), keep the battery away from direct sunlight. There is a risk of fire and explosion if the battery overheats! The battery must never heat up to more than +60 °C (observe any additional information from the manufacturer!).
-
Page 12: Usable Rechargeable Battery Types
7. Usable Rechargeable Battery Types Rechargeable battery type LiPo LiIon LiFe LiHV NiCd NiMH Rated voltage (V/cell) Max. charging voltage 4.35 2.46 (V/cell) Voltage for storage (V/cell) 3.85 Charging current for quick <= 1C <= 1C <= 4C <= 1C 1C - 2C 1C - 2C <= 0.4C... -
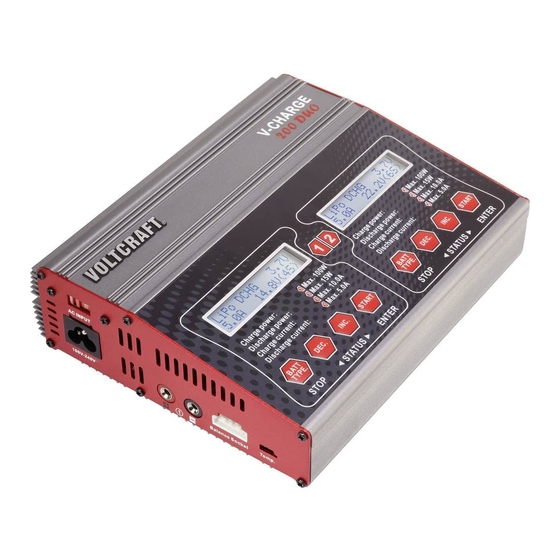
Page 13: Operating Elements
8. Operating Elements 1 Lit two-line LC display 2 Voltage selector switch (if available, it´s pre-set to 230 V and not adjustable) 3 Mains socket for connecting the charger to the mains voltage 4 Round sockets (4 mm) for rechargeable battery connection (red = plus/+, black = minus/-), channel 1 5 Balancer port to connect an external balancer board (enclosed), channel 1 6 Socket for external temperature sensor (not enclosed, can be ordered separately), channel 1 7 "BATT. -
Page 14: Commissioning
9. Commissioning a) Connection to a Voltage/Current Supply Attention! Always connect the charger to the voltage/current supply first; only then must a rechargeable battery be connected to the charger. The charger offers two different options for operation: • Operation via the mains voltage (230 V/AC, 50/60 Hz) •... -
Page 15: B) Connection Of A Rechargeable Battery To The Charger
b) Connection of a Rechargeable Battery to the Charger Please observe the following points before connecting or charging/recharging the battery: • If you have not done so already, please read chapters 5, 6 and 7 completely and ensure that you have understood the information there. - Page 16 Procedure when connecting a battery pack to the charger: 1. Connect the charger to the voltage/current supply. 2. Select one of the two charging channels. First connect the charging cable to the two 4 mm round sockets of the corresponding charging output (#1 or #2). Ensure correct polarity (red cable = plus/+, black cable = minus/-). The charging cable must not be connected to the rechargeable battery yet! There may be a short-circuit of the charger plugs;...
-
Page 17: C) General Information On Operation Of The Menus
c) General Information on Operation of the Menus • Select the desired submenu from the main menu using the "BATT TYPE./STOP" or the "DEC" button as described and confirm your selection with the button "START/ENTER". • In a submenu, you can call the different settings with the buttons "INC" and "DEC". •... -
Page 18: Main Menu
10. Main Menu After connection to the voltage/power supply, the start message will appear briefly. Then the charger is in the main menu. Rechargeable battery programmes for LiPo rechargeable batteries Rechargeable battery programmes for LiIon rechargeable batteries Rechargeable battery programmes for LiFe rechargeable batteries Rechargeable battery programmes for LiHV rechargeable batteries Rechargeable battery programmes for NiMH rechargeable batteries Rechargeable battery programmes for NiCd rechargeable batteries... -
Page 19: Lithium Batteries (Lipo, Liion, Life, Lihv)
11. Lithium Batteries (LiPo, LiIon, LiFe, LiHV) a) General The rechargeable battery programmes for LiPo, LiIon, LiFe and LiHV rechargeable batteries generally differ only in the voltages and the permitted charging current, see table in chapter 7. When charging a lithium battery, there are two different phases. First, the rechargeable battery is charged with a consistent current. -
Page 20: B) Charging Batteries Without Balancer Connection ("Charge")
b) Charging Batteries without Balancer Connection ("CHARGE") Of course, you can also charge multiple-cell lithium rechargeable batteries with a balancer connection with the rechargeable battery programme "CHARGE". However, the individual cell voltages are not reconciled here, so that one or several cells may be over- charged. -
Page 21: C) Charging Rechargeable Batteries With Balancer Connection ("Bal-Chg")
If these two numbers do not match, please check the settings on the charger and the battery itself. It may be that the LiPo battery has been completely discharged, or a cell may be faulty. In this case, the battery should not be charged, as there is a risk of fire and explosion! You can return to the previous configuration menu using the "BATT TYPE./STOP"... - Page 22 Briefly push the "INC" button or the "START/ENTER" button so that the charger will return to the normal display. Important! Only a battery pack with exactly the same voltage for each cell provides the maximum performance and service life for a model airplane/vehicle. Variations in the quality of the materials used and the internal structure of multiple-cell lithium battery packs mean that the cells may have different voltages once discharged.
-
Page 23: D) Discharging Rechargeable Batteries ("Dchg")
d) Discharging Rechargeable Batteries ("DCHG") Normally, it is not necessary to discharge lithium batteries (contrary to NiCd batteries) before charging. The battery can be charged immediately, independent of its current status. If you want to discharge a rechargeable lithium battery anyway, you can set the discharge current. -
Page 24: E) Storing Batteries ("Storage")
• After starting the discharging process, various information about the current Li3S 1.0A 12.3V progress is shown in the display. DSC 012:43 00252 In the upper left, the rechargeable battery type and the cell number are dis- played ("Li3S" = Lithium rechargeable battery with 3 cells); the discharging current is shown in the upper middle and the current rechargeable battery voltage in the upper right. -
Page 25: Nimh And Nicd Rechargeable Batteries
12. NiMH and NiCd Rechargeable Batteries a) General The rechargeable battery programmes for NiMH and NiCd rechargeable batteries generally differ only in the internally used charging procedures. The settings in the menus are the same. The charger must be in the main menu. Select the rechargeable battery type matching the rechargeable battery used PROGRAM SELECT here with the button "BATT TYPE./STOP"... - Page 26 Charge a NiMH or NiCd battery as follows: • First, choose the rechargeable battery type with the button "BATT TYPE./STOP" or "DEC" as described in chapter 11. a) (NiMH or NiCd) and push the button "START/ENTER". • Select the rechargeable battery programme "CHARGE Man" with the but- NiMH CHARGE ton "INC"...
-
Page 27: C) Automatic Charge Mode ("Charge Aut")
c) Automatic Charge Mode ("CHARGE Aut") In automatic charge mode, the charger checks the condition of the connected NiMH CHARGE rechargeable battery (e.g. the inner resistance) and calculates the charging CUR LIMIT 1.0A current from this. You need to set an upper limit for the charging current so that the rechargeable battery is not damaged by a too-high charging current. -
Page 28: E) Cycle Programme ("Cycle")
• When no display is flashing anymore, keep the "START/ENTER" button pushed (approx. 3 seconds), to start discharging. • The charger now examines the connected rechargeable battery. In case BATTERY CHECK of an error, a warning signal is output and the corresponding information is WAIT... - Page 29 • Set the cycle number with the buttons "INC" and "DEC" (1 - 5 cycles are possible). Push the "START/ENTER" but- ton briefly then to confirm the setting. The display stops flashing. • To start cycle programme, keep the "START/ENTER" button pressed for longer (approx. 3 seconds). •...
-
Page 30: Lead Batteries (Pb)
13. Lead Batteries (Pb) a) General Lead batteries are completely different from lithium, NiMH or NiCd batteries. Despite their high capacity they can only provide low currents. The charging process is also different. The charging current for modern lead batteries must not exceed 0.4C; 1/10C is perfect for lead batteries. A higher charging current is not permitted;... - Page 31 The maximum possible charging current depends on the battery type and number of cells. The maximum charging power is 100 W for each channel. Confirm the set charging current with the "START/ENTER" button. • The number of the cells in the lower right of the display flashes. Set the number of the cells with the buttons "INC" and "DEC".
-
Page 32: C) Discharging Battery ("Discharge")
c) Discharging Battery ("DISCHARGE") This rechargeable battery program can be used to put partially charged lead batteries into a defined starting condition or to perform a measurement of the rechargeable battery capacity. The maximum possible discharging current depends on the battery type, battery capacity and number of cells. -
Page 33: Saving/Loading Rechargeable Battery Data
14. Saving/Loading Rechargeable Battery Data The charger has 10 memory slots in which you can store often-used settings. For example, the data (cell number, charging procedures, charging current) for 3 different LiPo flight batteries can be saved there, so that you do not have to set them anew every time. -
Page 34: B) Loading Battery Data
b) Loading Battery Data • Select the function "Memory Load" in the main menu of the charger with the PROGRAM SELECT button "BATT TYPE./STOP" or "DEC". Memory Load • Confirm the selection by pressing the "START/ENTER" button. • Select one of the 10 memories (0..9) with the button "INC" or "DEC". MEMORY LiPo 1.0A The data stored in the memory are displayed, e.g. -
Page 35: System Settings
15. System settings The system settings of the charger summarise various basic settings. They are pre-applied with the most common values in the delivery condition. Depending on the rechargeable batteries you want to charge or discharge, however, certain changes to the values are sensible. - Page 36 Set the voltage for Delta-U-recognition (for NiMH or NiCd only) The charger uses the delta-U charging procedure for NiMH and NiCd re- NiMH Sensitivity chargeable batteries to see if the rechargeable battery is fully charged. D.Peak Default Instead of the internal default settings, the voltage value can be specified manually (in mV per cell).
- Page 37 Automatic deactivation at specific charging capacity This safety function of the charger terminates charging automatically when a Capacity Cut-Off certain capacity has been "loaded" into the battery. 5000mAh However, do not set a capacity which is too low; otherwise the re- chargeable battery cannot be fully charged and charging will be interrupted early.
- Page 38 Loading factory settings (reset) This recovers the factory settings (reset). Factory reset Keep the button "START/ENTER" pressed for more than 2 seconds. Press Enter > 2S Then the charger starts again and will then be in the main menu. Observe that all values set by you are then reset to factory settings; the 10 rechargeable battery memories (see chapter 14) are also deleted.
-
Page 39: Fixed Voltage Output
16. Fixed Voltage Output The charger offers the option of using the charging output (the two 4 mm output sockets) like a conventional control- lable mains unit. In this case, the charger supplies a direct voltage to the output sockets; setting of 5.0 V/DC to 24.0 V/DC is possible. The output current can be set to between 0.1 A and 10.0 A. - Page 40 • To set the output current and the output voltage, briefly push the "START/ENTER" button. Caution, important! A connected consumer can be damaged when changing the output voltage. Therefore, disconnect the connected consumer from the output sockets of the charger before changing the output voltage.
-
Page 41: Warning Messages On The Display
17. Warning Messages on the Display REVERSE POLARITY The polarity of the rechargeable battery connections has been switched. CONNECTION BREAK The connection to the rechargeable battery has been disrupted, e.g. if the battery has been disconnected during the charging process. SHORT ERROR There is a short circuit at the output of the charger. -
Page 42: Information On The Charger
18. Information on the Charger Various information is indicated on the display during a charge/discharge process by repeatedly pressing the button "DEC". If you do not push any button for a few seconds, the charger will return to the normal display. The information that can be displayed depends on the connected rechargeable battery type. -
Page 43: Maintenance And Cleaning
19. Maintenance and Cleaning The product does not require any maintenance. You should never take it apart. The product should only be mainte- nanced/repaired by a specialist or specialist workshop or it may be damaged. Any rechargeable battery connected must be disconnected from the charger before cleaning. If the fixed voltage output is activated, disconnect any connected consumer from the charger. -
Page 44: Technical Data
21. Technical Data Operating voltage ........Mains voltage input: 230 V/AC, 50/60Hz Direct voltage input: 11 - 18 V/DC Never use both inputs at the same time. This may damage the charger. Loss of guarantee/warranty! Charging/discharging channels ....2 Charge current ..........0.1 - 10.0 A (depending on the cell number and rechargeable battery type) Charging output ........... - Page 48 This is a publication by Conrad Electronic SE, Klaus-Conrad-Str. 1, D-92240 Hirschau (www.conrad.com). All rights including translation reserved. Reproduction by any method, e.g. photocopy, microfilming, or the capture in electronic data processing systems require the prior written approval by the editor. Reprinting, also in part, is prohibited. This publication represent the technical status at the time of printing.
Need help?
Do you have a question about the V-Charge 200 Duo and is the answer not in the manual?
Questions and answers