Table of Contents
Advertisement
Quick Links
GUIDE FOR
BASIC OPERATION
Dual Camera
Important note
This manual explains how to safely operate the VPC-CG21EX, VPC-CG21GX,
VPC-CG21PX, VPC-CG21TA and VPC-CG22.
Any information regarding only one of these products will be labeled as such.
Please read these instructions carefully before using the camera.
Make sure to read and understand the separate booklet "SAFETY MANUAL".
Keep this manual in a safe place for later reference.
VPC-CG21EX
VPC-CG21GX
VPC-CG21PX
VPC-CG21TA
VPC-CG22
Advertisement
Table of Contents

Related Manuals for Sanyo VPC-CG21EX


Summary of Contents for Sanyo VPC-CG21EX
- Page 1 VPC-CG21TA VPC-CG22 Important note This manual explains how to safely operate the VPC-CG21EX, VPC-CG21GX, VPC-CG21PX, VPC-CG21TA and VPC-CG22. Any information regarding only one of these products will be labeled as such. Please read these instructions carefully before using the camera.
- Page 2 (page 42). ↓ To use additional features Visit the Sanyo website to learn how to adjust the camera settings for various shooting scenes. There you’ll also find information about the software (page 42). You may find the answers to questions or problems concerning camera operation in the sections “COMMONLY ASKED QUESTIONS”...
- Page 3 SHOOT, PLAY BACK AND SAVE Preparing the camera Insert the battery pack. Battery pack Connector markings Battery cover 1 Push out 3 Insert by matching 2 Open the connector markings 4 Close About saving your recorded data h If you wish to use an SD Memory Card, refer to page 12 to install the card in the camera.
- Page 4 Shooting Press the ON/OFF button for at least 1 second to turn the camera on. h If the screen to set the date and time appears, press the MENU button 2 times to cancel it. For how to set the date and time, see page 20.
- Page 5 Sanyo declines any claim for compensation for recorded contents etc. in case of photographing or recording failure due to a chance camera or card flaw.
- Page 6 Select “DELETE SINGLE”, and press the SET button. Select “DELETE”, and press the SET button. h If you toggle the SET button to the left or right, the screen to delete a different file will appear. When you are finished deleting files, press the MENU button. h Pressing the MENU button 3 times will return you to the screen in step When you are finished using the camera...
- Page 7 Copy data from your camera to the computer Connect your camera to a computer, and copy the desired data to the computer. Turn on the computer, and use the supplied dedicated USB interface cable to connect your camera to the computer. h Connect the cable between the camera’s USB/AV terminal and the computer’s USB connector.
- Page 8 The drive name of the card installed in the camera is [Xacti], and that of the camera’s internal memory is [Xacti_INT]. CAUTION For VPC-CG21EX i It is not possible to copy files from the computer side (a hard disk, etc.) to the camera’s internal memory or installed card.
- Page 9 For information on how to use Xacti Simple Uploader, please refer to the Xacti Simple Uploader user’s manual, which can be obtained from the SANYO website. <How to install Xacti Simple Uploader> 1 Connect your camera to a computer.
-
Page 10: Table Of Contents
CONTENTS HOW TO READ THIS MANUAL ............. i CHECKING THE INCLUDED ACCESSORIES ........3 How to use the accessories ............5 ABOUT THE CARD ................6 Media cards that can be used with this camera ......6 What “card” means in this manual ..........6 SETUP PARTS NAMES .................. - Page 11 CONNECTING TO A TV CONNECTING TO A TV ...............39 Connecting to a video input terminal ..........40 Connecting to the HDMI terminal ..........40 PLAYING BACK ON A TV ..............41 OBTAINING THE INSTRUCTION MANUAL OBTAINING THE INSTRUCTION MANUAL ........42 Contents of the Instruction Manual ..........42 How to obtain the Instruction Manual ..........46 About the Eye-Fi transfer feature About the Eye-Fi transfer feature ............48...
-
Page 12: Checking The Included Accessories
Dedicated AV interface cable cable (page vi): 1 (page 40): 1 i Lens cap (page 5): 1 i GUIDE FOR BASIC OPERATION (VPC-CG21EX, VPC-CG21GX, VPC-CG21PX, VPC-CG21TA only) i SAFETY MANUAL (safety precautions booklet) Please read this booklet carefully before using the camera. - Page 13 i QUICK GUIDE i Obtaining the PDF instruction manual and cautions English...
-
Page 14: How To Use The Accessories
How to use the accessories k Lens cap k Handstrap (Please purchase a commercially available handstrap.) i To avoid dropping the camera, it is recommended that you attach a handstrap. English... -
Page 15: About The Card
ABOUT THE CARD Media cards that can be used with this camera The type of card that can be inserted into and used with this camera is: i SD Memory Card i SDHC Memory Card i SDXC Memory Card What “card” means in this manual i In this manual, SD Memory Cards, SDHC Memory Cards and SDXC Memory Cards that can be used in this dual camera are referred to as “card”. -
Page 16: Setup
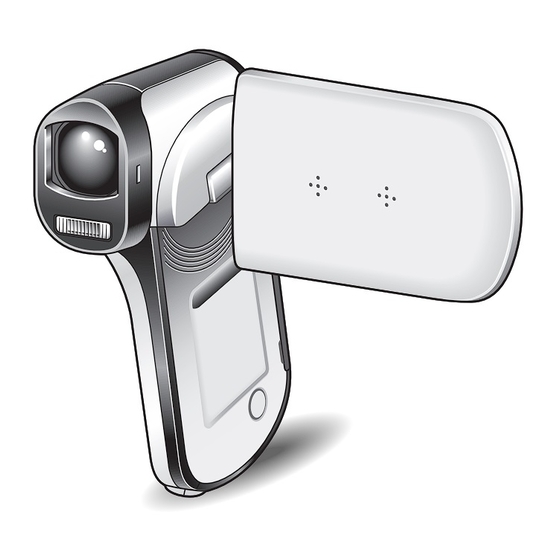
SETUP SETUP PARTS NAMES Front ZOOM RANGE button Monitor unit Stereo microphone Lens Flash ON/OFF button * The tripod mounting hole is on the bottom. English... - Page 17 Rear Multi-indicator Monitor Operation pad DC IN terminal cover Card slot cover Battery cover ON/OFF button USB/AV terminal HDMI terminal Operation pad Zoom switch ] button ] button Photo shooting Video recording button button MENU button REC/PLAY button SET button English...
-
Page 18: Charging The Battery Pack
CHARGING THE BATTERY PACK Please charge the supplied battery pack before using it. Connect the supplied power Battery pack charger cord to the socket on the Power cord battery pack charger. h Insert the connector straight and securely. Insert the battery pack in the Battery pack charger battery charger. -
Page 19: Charging The Battery Pack
Charging the battery pack Be sure to fully charge the supplied or separately sold battery pack before using it in your camera. For charging the battery pack, use the supplied charger. Charge the battery pack if it is being used for the first time, and recharge it whenever the remaining charge is low. - Page 20 About the CHARGE indicator The CHARGE indicator shows the status of the battery pack and the charger. Please refer to the following table if the indicator flashes abnormally. CHARGE indicator Not lit Not connected properly i To recharge the battery pack, the power cord of the charger must be connected to a power outlet, and the plug at the other end inserted in the charger’s power socket (page 9).
-
Page 21: Installing The Card
INSTALLING THE CARD Be sure to format a newly purchased card or one that was used in another device before using it in your camera (page 13). If an unformatted card is used, the card itself may become unusable. Card slot cover 4 Close 1 Raise up 2 Swivel... - Page 22 CAUTION Do not attempt to forcibly remove the card i Doing so may damage the card or the stored files. If the multi-indicator is flashing red... i Never remove the card when the multi-indicator is flashing red, as doing so may result in loss of files stored in the card.
-
Page 23: Installing The Battery Pack
INSTALLING THE BATTERY PACK Please charge the supplied battery pack before using it. Battery pack Connector markings Battery cover 1 Push out 2 Open 3 Insert by matching the connector markings 4 Close English... - Page 24 CAUTION Does the battery pack appear swollen? i The lithium-ion battery used in this camera may expand slightly when stored in a hot environment or repeatedly used, but this is not a safety hazard. However, a battery that is difficult to insert because it has become swollen may then be impossible to extract from the battery compartment.
-
Page 25: About The Temperature Alert Icon
About the temperature alert icon \ During camera use, if the temperature of the battery or inside the camera (excluding the battery) rises, a temperature alert icon \ will appear as described below. k When the battery or internal camera (excluding battery) temperature rises during use h During camera use, if the temperature of the battery or inside the camera (excluding the battery) rises, a \ icon lights on the monitor. -
Page 26: Turning The Camera On And Off
TURNING THE CAMERA ON AND Turning on the camera Open the monitor unit, and press the Monitor unit ON/OFF button for at least 1 second. ON/OFF button h If you briefly press the ON/OFF button, once, the camera will switch to the power save mode. -
Page 27: Turning On The Camera When The Power Save (Sleep) Mode Is Active
Turning on the camera when the power save (sleep) mode is active In order to preserve battery pack power, the power save (sleep) function will automatically turn off the camera after about 1 minute of no use during shooting, or about 5 minutes of no use during playback (factory-preset setting). - Page 28 HINT To immediately activate the power save mode i Press the ON/OFF button briefly to activate the power save function. About the standby mode i To turn off the camera only briefly, you can close the monitor unit to put the camera in the standby mode.
-
Page 29: Date And Time Setting
DATE AND TIME SETTING The camera will record the date and time an image or audio recording is taken so that you can display them during playback. Therefore, before capturing images, make sure the correct date and time are set. h To correct the date and time setting, please see under HINT on page 22. - Page 30 Set the clock. CLOCK SET 1 Select “TIME”. 2 Press the SET button. h The Set Time Screen TIME 19:30 appears. 3 Set the time to “19:30”. h The time is set in the following order: Set the hour → Set the minute. h A 24-hour clock is used for the time display.
- Page 31 Press the MENU button. h The date and time setting is completed. h To display the Recording or Playback Screen, press the MENU button. HINT i Under normal conditions, while the battery pack is being replaced, an internal battery will maintain the date and time settings. However, there is a small chance the settings may be lost (the backup will last for about 7 days).
-
Page 32: Switching Between The Recording Mode And Playback Mode
SWITCHING BETWEEN THE RECORDING MODE AND PLAYBACK MODE Switch between the recording mode (for recording) and the playback mode (for viewing your recorded images). Turn on the camera (page 17). Press the REC/PLAY button. h The mode changes. h The mode changes each time the REC/PLAY button is pressed. Ful l - HD 001:00:14 <Example of the recording mode>... -
Page 33: Switching The Operating Mode
SWITCHING THE OPERATING MODE The “SIMPLE mode” comprises only those functions that are most often used and necessary to operate the camera, while the “NORMAL mode” enables full use of all the camera’s many functions. Select the mode that is suitable for your purposes. -
Page 34: Accessing/Exiting The Simple/Normal Mode Menu Screen
Accessing/exiting the SIMPLE/NORMAL Mode Menu Screen Set the camera to the recording or playback mode (page 23). Select the desired operating mode (page 24). If the Menu Screen is not displayed, press the MENU button. h The Menu Screen appears. h To cancel the Menu Screen, press the MENU button. - Page 35 Using the SIMPLE Mode Menu Toggle the SET button up or down to select the item you wish to change, and press the SET button. h The Setting Screen for the selected item appears. Select an item to change Description of selected item Push up Select video and photo size Push down...
- Page 36 Using the NORMAL Mode Menu Toggle the SET button up or down to select a tab. h The Menu Screen for the selected tab appears. Push up RECORDING MENU 1 Ful l - H D VIDEO PHOTO SCENE SELECT FILTER FLASH SELF-TIMER S S N N...
- Page 37 Toggle the SET button up or down to select the item you wish to change, and press the SET button. h The Setting Screen for the selected item appears. h To return to the Menu Screen, press the MENU button. Select an item to change RECORDING MENU 1...
-
Page 38: Shooting
SHOOTING SHOOTING VIDEO CLIP RECORDING Turn on the camera (page 17), and set it to the recording button mode (page 23). Press the [ ] button. h Recording begins. h It is not necessary to keep the ] button pressed while recording. -
Page 39: Shooting Single Shots
SHOOTING SINGLE SHOTS Capture a still image (single-shot). Turn on the camera (page 17), and set it to the recording button mode (page 23). Press the [ ] button. 1 Press the [ ] button halfway. h The autofocus operates, and the image is focused (focus lock). - Page 40 HINT Adjusting the monitor brightness i While the Recording Screen is active, you can quickly access the screen for adjusting the brightness of the monitor by pressing the MENU button for at least 1 second. What is the camera focusing on? Target mark i A target mark &...
-
Page 41: Shoot A Still Image While Recording A Video Clip
SHOOT A STILL IMAGE WHILE RECORDING A VIDEO CLIP You can capture a still image (a single-shot) while recording a video clip. Turn on the camera (page 17), and set it to the ] button recording mode (page 23). button Press the [ ] button. - Page 42 HINT i When shooting a still image while recording a video clip, the flash does not operate. i When the remaining video recording time becomes approximately 50 seconds, it will no longer be possible to capture a still image while recording a video clip.
-
Page 43: Macro-Photography (Zoom)
MACRO-PHOTOGRAPHY (ZOOM) Your camera has two zoom functions: optical zoom and digital zoom. Point the camera lens at the Zoom switch subject. Push the zoom switch toward [T/]] or [W/P] to compose the desired image. [T/]]: Zoom in on the subject. [W/P]: Zoom out. - Page 44 HINT When the ZOOM RANGE button is pressed... i The magnification is approximately doubled (double-range zoom). Press the button again to return to normal magnification. i The [W] icon is shown on the Recording Screen during normal magnification, and a [T] icon on the double-range zoom Recording Screen. i During video clip recording, the zoom range does not change even when the ZOOM RANGE button is pressed.
-
Page 45: Playback
PLAYBACK PLAYBACK PLAYING BACK VIDEO CLIPS AND STILL IMAGES Set the camera to the playback mode (page 23). Orange frame Select the image to play back. h Toggle the SET button to move the orange frame to the file you wish to play back. h The image information for the 2010.12.24 18:41... - Page 46 Video clip playback operation To do this... Do this Normal forward playback Press the SET button. Stop playback During playback, toggle the SET button down. During playback, press the SET button or toggle the SET button up. Pause During accelerated playback, toggle the SET button up.
-
Page 47: How To Save One Frame From A Video Clip As A Still Image
How to save one frame from a video clip as a still image Play back the video clip. Pause the playback at the point you wish to “snap” a photo. Press the [ ] button. h The screen to select the aspect ratio of the still image appears. Select the desired aspect ratio, and press the [ ] button. -
Page 48: Connecting To A Tv
CONNECTING TO A TV CONNECTING TO A TV CONNECTING TO A TV By connecting the camera to a TV, you can play back the recorded files on the CAUTION Insert and pull out the cable carefully i When connecting the cables, make sure that the cable plugs are correctly oriented and that they match the shapes of the terminal sockets on the devices. -
Page 49: Connecting To A Video Input Terminal
Connecting to a video input terminal Use the supplied dedicated AV interface cable to connect to a TV. Set the input to “VIDEO”. Supplied dedicated AV interface cable To USB/AV terminal White plug: To Audio Input (L) terminal Red plug: To Audio Input (R) terminal Yellow plug:To Video Input terminal Connecting to the HDMI terminal Use a separately sold mini-HDMI cable to connect to a TV. -
Page 50: Playing Back On A Tv
PLAYING BACK ON A TV i After connecting the camera to the television, switch the TV input to the terminal to which the camera is connected. i The playback method is the same as when viewing images on the camera’s monitor. (Use the TV controls to adjust the volume.) i The same playback procedure as when playing back with the camera is used to play back audio recordings as well. -
Page 51: Obtaining The Instruction Manual
OBTAINING THE INSTRUCTION MANUAL OBTAINING THE INSTRUCTION MANUAL OBTAINING THE INSTRUCTION MANUAL The Instruction Manual that explains the features in detail can be downloaded from our website. i “Adobe Reader” is required to view the Instruction Manual. If Adobe Reader is not already installed on your computer, a link to the website from which you can download it can be found on our website. - Page 52 SWITCHING THE OPERATING MODE Switching between the SIMPLE and NORMAL modes Accessing/exiting the SIMPLE/NORMAL Mode Menu Screen Overview of the SIMPLE Mode Setting Screen Overview of the NORMAL Mode Setting Screen SIMPLE SHOOTING BEFORE TAKING PICTURES For best results Using the autofocus Select the recording size Select the focus setting Hints for taking pictures...
- Page 53 Light-measuring mode setting ISO sensitivity setting RECORDING MENU 3 White balance setting Subject chaser settings High sensitivity mode setting Digital zoom setting Exposure compensation Storage folder setting PLAYBACK PLAYBACK MENU 1 Slideshow settings File protect setting Resize Rotate PLAYBACK MENU 2 Correcting the image Editing video clips Printing instructions...
- Page 54 Configuration of directories in the card File formats Cautions when using as a card reader USING AS A PC CAMERA For Windows XP Using as a PC camera USING THE SOFTWARE Operating environment Obtaining the software CONNECTING TO A TV CONNECTING TO A TV Connecting to a video input terminal Connecting to the HDMI terminal...
-
Page 55: How To Obtain The Instruction Manual
How to obtain the Instruction Manual Remove the card from the camera. h The program to access the website is stored in your camera’s internal memory. This program cannot be accessed while a card is installed in the camera. Start your computer, and use the supplied dedicated USB interface cable to connect your camera to the computer. - Page 56 Select “COMPUTER”, and press the SET button. h The screen to select the computer connection mode appears. Select “CARD READER” and press the SET button. <For Windows users> h The screen to access the website for this camera (access menu) appears.
-
Page 57: About The Eye-Fi Transfer Feature
Sanyo website (page 46). * “Adobe Reader” is required to view the Instruction Manual. If Adobe Reader is not already installed on your computer, a link to the website from which you can download it can be found on the Sanyo website. English... -
Page 58: Appendices
APPENDICES APPENDICES COMMONLY ASKED QUESTIONS If you have a question about the camera operation, you might find the answer in this compilation of commonly asked questions. Question Answer Action Why doesn’t the Due to cold Place the camera in power turn on? temperatures, the your pocket to warm battery pack... - Page 59 Question Answer Action Are the settings — All settings except retained even the self-timer and after the camera the exposure is turned off? compensation are retained even after the camera is turned off. Which resolution — Select the resolution setting should I setting according to use? the intended use.
- Page 60 Question Answer Action What is the — Because shooting difference with the optical between the zoom uses the digital zoom and optics of a physical the optical zoom? lens, you can shoot without losing minute details in the image. The digital zoom, on the other hand, works by magnifying a portion...
- Page 61 Question Answer Action When used in Condition due to Not a malfunction. cold weather, why the monitor Spots that appear in does the image characteristics. the monitor only seem to leave appear in the traces as it monitor and will not moves? be recorded with the images.
- Page 62 Question Answer Action Why is there no This may happen Play back images image (z is when trying to that were recorded on a card using this shown)? play back images stored on a card camera. from a different digital camera. Viewing Why is the If the subject...
- Page 63 Question Answer Action Why isn’t the Due to the Not a malfunction. magnified image characteristics of clear? the camera, magnified images appear less clear. Why isn’t the The image was Not a malfunction. captured image captured using clear? the digital zoom. Viewing Can I play back —...
- Page 64 Question Answer Action The “Cannot edit You have Select video clips video clips with attempted to join that have the same resolution or frame unlike settings” video clips having message different rate. appears. resolutions or frame rates. Why is a noise Electromagnetic Move the AC heard from a...
- Page 65 Question Answer Action Can I use my — When the camera is camera abroad? connected to a TV, you can switch the camera’s video output to NTSC or PAL. If you have questions about accessories etc., please consult with a dealer near you for advice.
-
Page 66: Specifications
SPECIFICATIONS Camera Recorded image Still images: file format JPEG format (DCF, DPOF, Exif 2.2 compliant) Note: Designed mainly by the Japan Electronics and Information Technology Industries Association (JEITA), DCF (Design rule for Camera File system) is standard for digital still camera image files to provide interoperability between digital photography devices for the images stored on removable memory cards. - Page 67 I: 4000 × 3000 pixels (approx. 12 million pixels) Still image ;: 4480 × 2520 pixels (approx. 11 million pixels, shooting mode (recording 16:9 aspect ratio) resolution) o: 3648 × 2736 pixels (approx. 10 million pixels, low compression) p: 3648 × 2736 pixels (approx. 10 million pixels, normal compression) N: 3648 ×...
- Page 68 Light-measuring Multi-section measuring, center-weighted mode measuring, spot measuring Range Normal mode: 50 cm (19.69 in.) to infinity Super macro mode: 1 cm (0.39 in.) to 80 cm (31.50 in.) (wide end only) Digital zoom For shooting: 1× to approx. 12× For playback: 1×...
- Page 69 Monitor 2.7" (6.9 cm) low-temperature polysilicon TFT color wide liquid crystal (transmissive), approx. 230,000 dots Flash working GN = 4.0 range Approx. 50 cm (19.69 in.) to 2.3 m (7.55 ft.) (wide) Approx. 80 cm (31.50 in.) to 2.2 m (7.22 ft.) (tele) Flash modes Auto-flash, forced flash, flash off Focus...
-
Page 70: Camera Connectors
Camera connectors USB/AV Dedicated regrouped jack (communication/audio Audio Stereo and video output) output terminal Video Composite video, NTSC color TV output system/PAL TV system (switchable from the Option Setting Menu) USB 2.0 High Speed PC camera: USB video class HDMI terminal Video output Total number of scan lines (effective number of scan lines): 750p (720p)/... -
Page 71: Possible No. Of Images/Possible Shooting Time/Possible Recording Time
Possible No. of Images/Possible Shooting Time/ Possible Recording Time Shooting/ SD Memory Card Resolution Internal recording setting Memory 8 GB 16 GB mode 21 images 2,000 images 3,910 images 22 images 2,120 images 4,150 images 17 images 1,600 images 3,130 images 25 images 2,390 images 4,670 images... -
Page 72: Concerning The Multi-Indicator
Concerning the multi-indicator The camera’s multi-indicator will light, flash, or be off, depending on the different camera operations. Multi-indicator Multi-indicator Color Camera status status Connected to a computer or printer Green Power save Flashing mode active Connected to a Orange Rise in internal Slow temperature... -
Page 73: Supplied Battery Pack Charger
Supplied battery pack charger Part No. VAR-L80 Power source AC 100 to 240 V, 50 to 60 Hz, 5 W Rated output DC 4.2 V, 550 mA Compatible batteries Supplied or separately sold Lithium-ion battery pack (DB-L80) Ambient Temperature 0 to 40 °C (32 to 104 °F) (when charging) environment –20 to 60 °C (–4 to 140 °F) (storage) Humidity... -
Page 74: Others
Others Mac OS is a trademark of Apple Inc., registered in the U.S. and other countries. Microsoft and Windows are registered trademarks of Microsoft Corporation in the USA and other countries. Intel and Pentium are registered trademarks of Intel Corporation (USA). ®... -
Page 75: Before Capturing Those Important Shots, Be Sure To First Take A Test Shot To Confirm That Your Camera Is Set Up And Ready To Go
Sanyo Electric. i Sanyo Electric shall not be held responsible for any losses or loss of revenue resulting from the loss of data caused by the malfunction, or the repairing of a malfunction, of the camera. - Page 76 SANYO Electric Co., Ltd.
Need help?
Do you have a question about the VPC-CG21EX and is the answer not in the manual?
Questions and answers