Advertisement
1
Juice® has built the Juice®#1 power bank with you in
mind. Speed is important when charging and when on
the go, both ports on the Juice®#1 will charge your
device at a speedy 2.4A (12W) and will allow around 1
full charge of an average mobile.
• Micro USB Input and USB C Input
• 2x USB A (2.4A)
Contents
•
Juice®#1 power bank
Micro USB to USB A cable (for charging)
•
User Manual
•
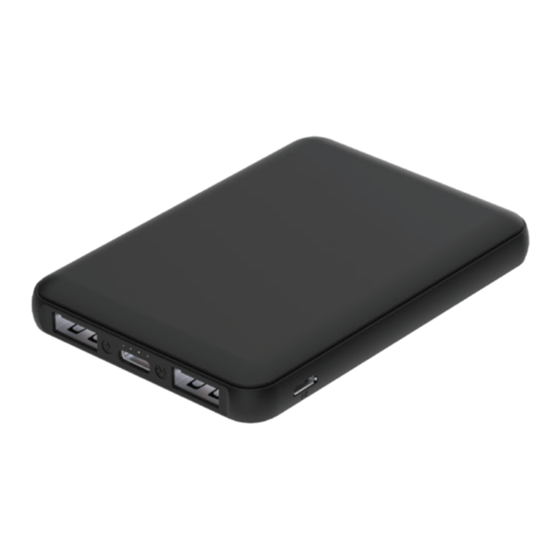
Overview
1. USB A output port
2. USB C input port
3. Micro-USB input port
4. USB A output port 2
5. LED lights indicate battery percentage
6. Power On/O
3
2
1
4
How to charge the Juice®#1 power bank
Ensure to fully charge the Juice®#1 power bank
before rst use, the four LEDs will light up. Do this by
charging and draining the power bank 3 to 4 times,
this will ensure the Juice®#1 is fully optimised. To
charge the Juice®#1 simply connect the supplied
Micro USB cable into the power bank and the other
end into your computer or to a mains plug (plug not
supplied). The LEDs will be white when charging, and
will stay white once fully charged.
Via computer
(not included)
4,000mAh
powerbank
6
5
Via a plug
(not included)
Checking the remaining charge
Charge Time : 3 hrs (DC5V, 2A input)
To check the energy levels press the button on the
side, the four LEDs will indicate the remaining
power.
Note: It is normal for the Juice®#1 and your device
to get warm during charging. They may get even
warmer if you use your device to play videos or for
gaming while charging.
Charging your gadgets
Always check the voltage your device can
except before charging with any Juice
product, this will ensure full compatibility
1. Connect your device via the cable to the
USB A ports or USB C port. For Apple
devices you will need to use your original
cable that was supplied with your device.
The 2.4A ports will charge your device quickly
if you are not charging from both ports.
When using 2 ports, the output from each
port will drop so that the total output is 2.4A,
this ensures safe charging to both devices.
2.
Press the power button to turn the
Juice®#1 on, now you can charge.
device will show you when it is being
charged via the four LEDs on the front. The
numbers on the LEDs lit up will decrease to
show that power is being transferred from
the power bank to your device.
3. When your device is fully charged or
you want to stop charging, disconnect the
cable.
4. In order to charge your device(s), you will
need a cable compatible with your device.
These come included as standard when
purchasing most devices. Plug the device's
standard USB A or USB C end in to the
Juice®#1, then plug the other end of the
cable into the device you wish to charge.
5. Once charged, simply unplug your device
and store your Juice®#1 power bank until
you are ready to use it again, ensure to
charge the power bank fully every 3 months
to ensure it is kept in optimum condition.
NOTE: The maximum output current of the Juice®#1
is 2.4A. This occurs when charging one device from
either the USB A ports, when charging 2 devices from
USB ports the power bank will output a maximum of
2.4A. Power cannot be discharged to your device
requiring an amperage of more than 2.4A.
NOTE: Mobile and gadget device manufacturers have
di erent requirements to charge their products, they
may also use di erent cables to charge their devices.
Your
Advertisement
Table of Contents

Subscribe to Our Youtube Channel
Related Manuals for Juice 1


Summary of Contents for Juice 1
- Page 1 Juice®#1 will charge your 1. Connect your device via the cable to the device at a speedy 2.4A (12W) and will allow around 1 USB A ports or USB C port. For Apple full charge of an average mobile.
- Page 2 (Lithium polymer battery cell) safety. Children should be supervised to ensure that they do not play with the Juice®#1, this is not a toy. Legal liability Safety notes IMPORTANT: Read all information and warnings The Juice®#1 can be used only with compatible products.
Need help?
Do you have a question about the 1 and is the answer not in the manual?
Questions and answers