Advertisement
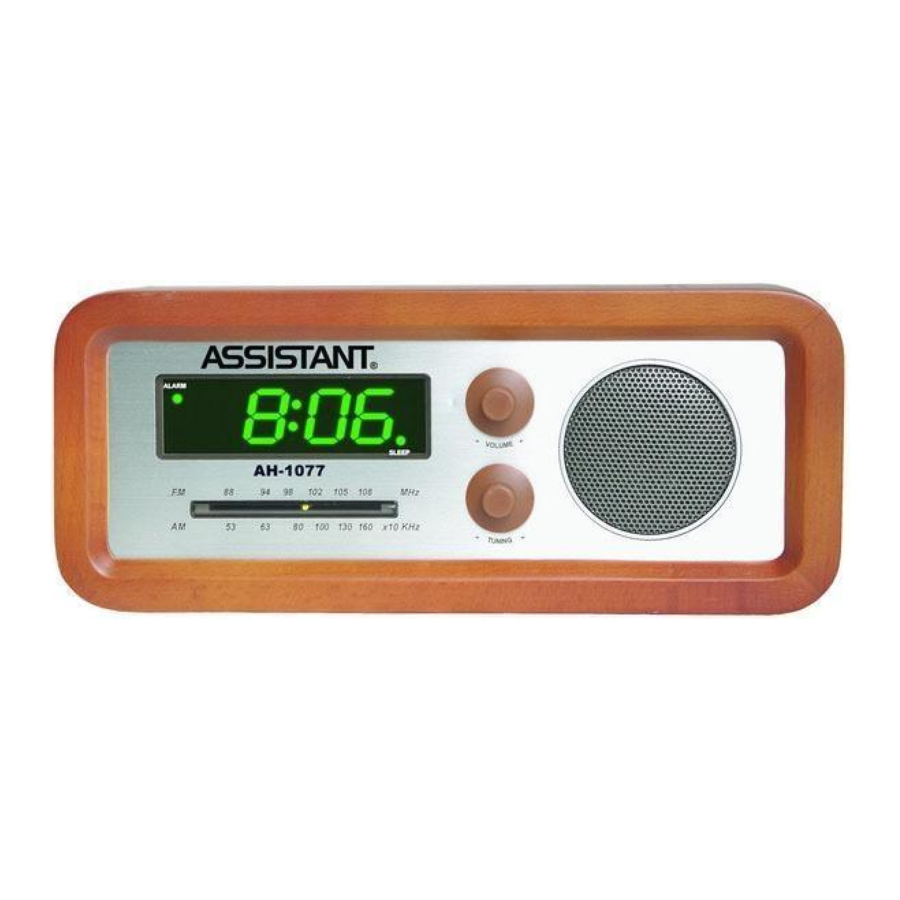
MAIN UNIT OVERVIEW

- ALARM indicator
- SLEEP ON indicator
- [TUNING] knob
- [VOLUME] knob
- [SNOOZE] button
- AM/FM switch
- [ALARM] set button
- [TIME] set button
- [SLEEP] button
- [MINUTE] set button
- [HOUR] set button
- [AUTO/BUZZ/ON/ OFF] switch
- Antenna
- Power socket
TO OPERATE THE CLOCK
BLINKING DISPLAY/ ALARM ON INDICATOR
When the power jet is plugged in, the display will blink on and off meaning the incorrect time is being displayed. You should always check the time when it is indicated. When the Alarm Indicator is on, the alarm will sound at the time set.
SET TIME
Press the Time button and the Hour button and press the Minute button until the correct time is displayed.
SLEEP TIMER
Press the [SLEEP] button to activate the sleep timer function (the default sleep time is 59 minutes). Then sleep indicator will turn on. It will go off after 59 minutes. Press and hold sleep button, then press hour button to set hour for sleep timer (0-1). Press and hold sleep button? Then press Minute button to set minutes of sleep timer (59, 58, 57...).
When the sleep timer reached the count down time, the radio will be switched off. Press [SNOOZE] button to cancel sleep timer function. This function can be activated only when user selected [AUTO/BUZZ/OFF] switch position.
Note: When slide [AUTO/BUZZ/OFF] switch to ON position, press sleep button. Sleep indicator will light on, but the radio will not turn off.
TO OPERATE ALARM AND RADIO
Press and hold the [ALARM] button to show alarm time. Then press the Hour or Minute button as above. When pressing and holding both the Hour and the Minute buttons, alarm time will be reset to 0:00.
Slide the [AUTO/BUZZ/OFF] switch to BUZZ position. The Buzzler alarm will sound at the time set. Switch to AUTO position. The Radio alarm will sound at the time set. When Buzzler alarm is sounding. Press [SLEEP] button to stop Alarm and Radio will be activated. Press [SNOOZE] button to stop Radio, the Alarm will be activated on the next day. Slide the switch to OFF position to turn off alarm and alarm indicator. Slide the switch to ON position to turn on radio, adjust [VOLUME] and select BAND, tune into a station by using [TUNING].
SNOOZE
When alarm sounds, to doze a few more minutes, press the [SNOOZE] button and get an extra 8 minutes of sleep. This can be repeated up to six times within one hour.
BATTERY BACK UP
Insert 4 x 1,5 V AA batteries into the battery compartment on the back side of the clock. The batteries will hold the Alarm and Time setting until power is restored. If there is no buttery and the power is interrupted, the display will fl ash and the Alarm and the Time need to be reset.
MAINTENANCE
A soft cloth or a paper towel can be used to clean your clock. Do not use any corrosive cleanser or chemical solutions on the clock. Keep the clock clean and dry to avoid any problems.
SAFETY INSTRUCTIONS
Do not expose this apparatus to rain or moisture.
No objects fi lled with liquids, such as vases shell be placed on the apparatus.
Ventilation – The appliance should be situated so that its location or position does not interfere with its proper ventilation. For example, the appliance should not be placed on a bad, sofa, rug, or similar surface that may block the ventilation openings; or, placed in a built-in installation, such as bookcase or cabinet that may impede the fl ow of air through the ventilation openings.
The appliance should be situated away from heat sources such as radiators, heat registers, stoves, or other appliance (including amplifi ers) that produce heat.
To avoid the risk of electric shock, do not remove the cover of the apparatus. There are no user serviceable parts inside.
Do not operate this product if the main lead is damaged.
The mains lead must be replaced by the manufacturer or its appointed agent.
Please, read the instruction manual before use and retain for future reference.
The rating label is on unit's back.
During electro static discharge, the product may auto reset then adjust the mode to return normal operation.

Documents / ResourcesDownload manual
Here you can download full pdf version of manual, it may contain additional safety instructions, warranty information, FCC rules, etc.
Advertisement

Need help?
Do you have a question about the AH-1077 and is the answer not in the manual?
Questions and answers