Advertisement
f
Please give us a chance to make it right and do better !
Contact our friendly customer service department for help first.
Replacements for missing or damaged parts will be shipped ASAP!
US office: Fontana
UK office: Ipswich
AU office: Truganina
Contact Us!
Contact our friendly customer service department for help first.
R
US: cs.us@costway.com
@
UK: cs.uk@costway.com
AU: cs.au@costway.com
HOUSE BED WITH TRUNDLE
THIS INSTRUCTION BOOKLET CONTAINS INPORTANT SAFETY INFORMATION. PLEASE READ AND KEEP FOR FUTURE REFERENCE.
R
USER'S MANUAL
HU10292
Advertisement
Table of Contents

Subscribe to Our Youtube Channel
Related Manuals for Costway HU10292


Summary of Contents for Costway HU10292
- Page 1 UK office: Ipswich AU office: Truganina USER'S MANUAL Contact Us! HOUSE BED WITH TRUNDLE HU10292 US: cs.us@costway.com UK: cs.uk@costway.com Contact our friendly customer service department for help first. AU: cs.au@costway.com THIS INSTRUCTION BOOKLET CONTAINS INPORTANT SAFETY INFORMATION. PLEASE READ AND KEEP FOR FUTURE REFERENCE.
-
Page 2: Before You Start
Care and Maintenance Use a soft, clean cloth that will not scratch the surface when dusting. Use of furniture polish is not necessary. Should you choose to use polish, test first in an inconspicuous area. Using solvents of any kind on your furniture may damage the finish. Before You Start Never use water to clean your furniture as it may cause damage to the finish. -
Page 3: Detail View
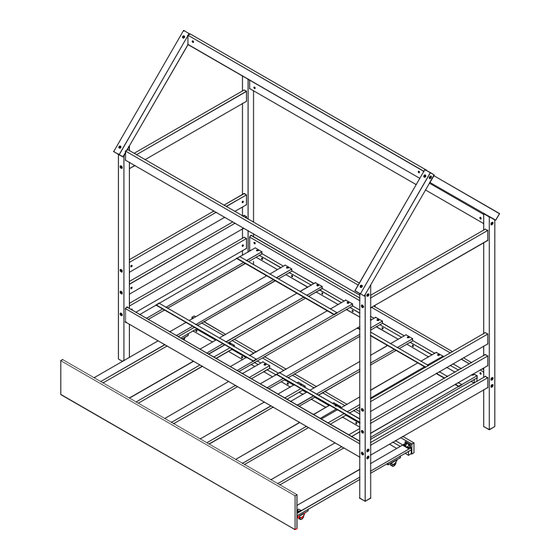
Detail View STEP 10: Push Trundle under the bottom of House bed. -
Page 4: Part List
Part List STEP 9: Leg (Left Front/Right Back)-2pcs Leg (Left Back/Right Front)-2pcs Horizontal bar - 8pcs 8PCS 2PCS Upper horizontal - 3pcs Upper (Left Front) - 1pc Upper (Right Front) - 1pc Upper (Back) - 2pcs Side rail - 2pcs Slats - 8pcs Trundle front panel - 1pc Trundle back panel - 1pc... - Page 5 STEP 1: STEP 7: 14PCS 16PCS 2PCS 16PCS 234mm Note: Do not lock the screws of the bed slats to the outermost edge of the bed slats, you need to leave a certain space at the edges, otherwise it will cause the board to break. Do not lock the bed slats on the edge of the wood, please hold firmly before screwing , hold it in Note:Part 4 will face up with the "x"...
- Page 6 STEP 3: STEP 5: 2PCS 16PCS 193mm 193mm 69,5mm Note: Do not lock the screws of the bed slats to the outermost edge of the bed slats, you Remark: Upper horizontal STEP 4: need to leave a certain space at the edges, otherwise it will cause the board to break. paste stickers WARNING: DO Do not lock the bed slats on the edge of the wood, please hold firmly before screwing , NOT HANG ON THIS BAR!
Need help?
Do you have a question about the HU10292 and is the answer not in the manual?
Questions and answers