Advertisement
Safety Precautions
SAFETY FIRST!
To avoid personal injury, instrument damage and/or damage to your vehicle; do not use the Borescope before reading this manual.
This manual describes common test procedures used by experienced service technicians. Many test procedures require precautions to avoid accidents that can result in personal injury, and/or damage to your vehicle or test equipment. Always read your vehicle's service manual and follow its safety precautions before and during any test or service procedure. ALWAYS observe the following general safety precautions:
- The Borescope is intended for use by adults or under adult supervision only.
- The Borescope is not designed for use in medical applications.
- Use the Borescope only in a clean, well-ventilated area with adequate illumination.
- Do not operate the Borescope in an environment where temperature exceeds 140°F (60°C).
- Fuel and battery vapors are highly flammable. To prevent an explosion, do not use the Borescope near flammable liquids, gasses or dust.
- Do not use the Borescope near corrosive chemicals. These substances can damage the tool's protective coating and reduce the working life of the tool.
- To protect your eyes from propelled objects as well as hot or caustic liquids, always wear approved safety eye protection.
- DO NOT allow the snake camera to bend at an angle greater than 60 degrees.
- Do not allow liquid or foreign matter to enter the Borescope. If condensation is present, allow it to evaporate before using the tool.
- Store the Borescope in a dry, well-ventilated area.
- Clean the Borescope housing with a 70% alcohol solution and lintfree cloth. Clean the LCD display by wiping gently with a clean, dry lint-free cloth.
Introduction
PURPOSE AND USE
The Borescope is a handheld digital camera that lets you perform non-destructive visual inspections of small space, limited access, or low light areas.
 The Borescope supports real-time inspections only. The Borescope DOES NOT support the capture and storage of images.
SPECIFICATIONS
Borescope
- Display Size: 2.7 in. (68.6mm)
- Operating Current: ≤500mA
- Battery Size: AA (qty 4)
Snake Camera
- Image Sensor: CMOS sensor
- Effective Pixels: 720 X 480 pixels
- Focus Distance: 1.18 in. to 3.15 in. (30mm to 80mm)
- View Angle: 60 degrees
- Camera Length: 37.8 in. (960mm)
- Camera LEDs: 6 X 0603; 6 X 0402
- Camera Lens: IP67 Rated Submersible Lens
Accessories Included:
- 90-Degree Mirror
- Magnet
- Hook
Device Controls
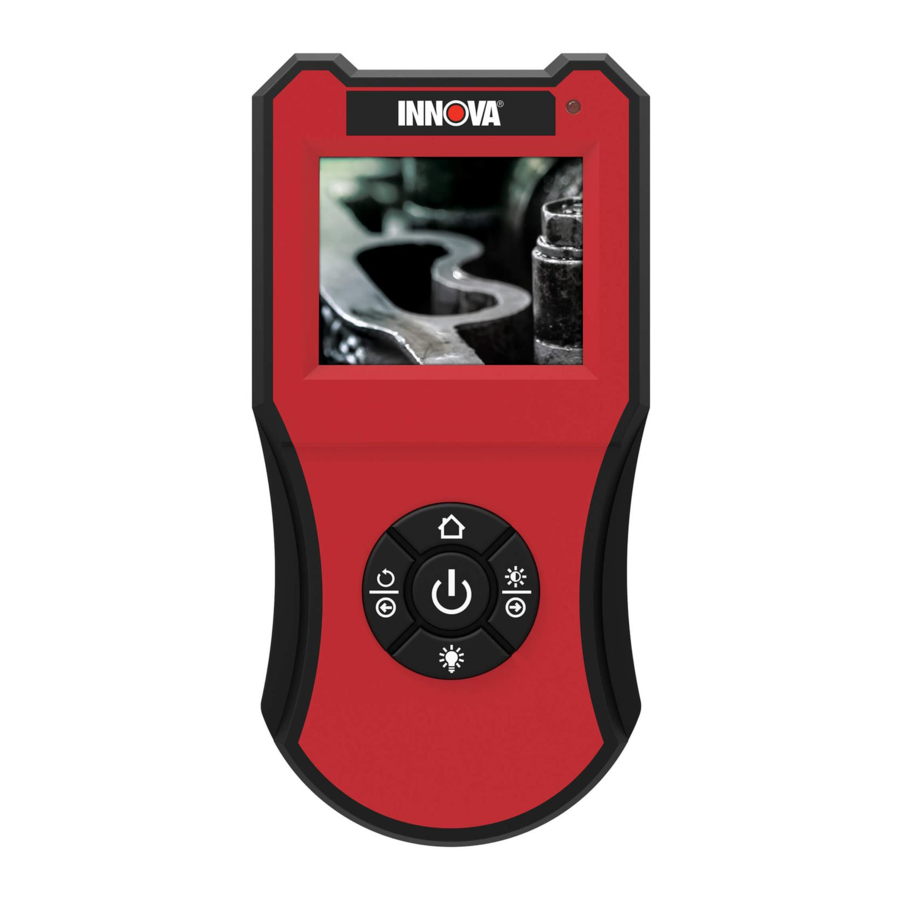
CONTROLS AND INDICATORS

![]() POWER button - Turns the Borescope "ON" and "OFF".
POWER button - Turns the Borescope "ON" and "OFF".![]() HOME button – When pressed while in display mode, lets you adjust LCD color balance using the
HOME button – When pressed while in display mode, lets you adjust LCD color balance using the ![]() and
and ![]() buttons. When pressed while rotating the displayed image or adjusting display brightness, returns the Borescope to display mode.
buttons. When pressed while rotating the displayed image or adjusting display brightness, returns the Borescope to display mode. ![]() LED button – When pressed, lets you adjust LED brightness using the
LED button – When pressed, lets you adjust LED brightness using the ![]() and
and ![]() buttons.
buttons.![]() ROTATE IMAGE button - When pressed, lets you rotate the image shown on the LCD display using the
ROTATE IMAGE button - When pressed, lets you rotate the image shown on the LCD display using the ![]() and
and ![]() buttons.
buttons.![]() BRIGHTNESS button – When pressed, lets you adjust LCD display brightness using the
BRIGHTNESS button – When pressed, lets you adjust LCD display brightness using the ![]() and
and ![]() buttons.
buttons.![]() LEFT/DECREASE button – Depending on the selected operating mode (see items 2 through 5 above), rotates the displayed image to the left or decreases color balance, LED brightness or LCD display brightness, as appropriate.
LEFT/DECREASE button – Depending on the selected operating mode (see items 2 through 5 above), rotates the displayed image to the left or decreases color balance, LED brightness or LCD display brightness, as appropriate.![]() RIGHT/INCREASE button – Depending on the currently selected operating mode (see items 2 through 5 above), rotates the displayed image to the right or increases color balance, LED brightness or LCD display brightness, as appropriate.
RIGHT/INCREASE button – Depending on the currently selected operating mode (see items 2 through 5 above), rotates the displayed image to the right or increases color balance, LED brightness or LCD display brightness, as appropriate.- POWER indicator – Lights when the Borescope is turned ON.
- Camera Connector – Connector for the snake camera.
- LCD Display – Displays the video feed from the snake camera.
- Snake Camera – Routes camera to areas of limited access.
- Camera – Supplies video feed to the LCD display.
- LEDs – Provide illumination in low-light areas.
- Accessory Slot – Attachment point for Borescope accessories.
 POWER button - Turns the Borescope "ON" and "OFF".
 HOME button – When pressed while in display mode, lets you adjust LCD color balance using the
 BATTERY REPLACEMENT
- Locate the battery cover on the back of the Borescope.
- Slide the battery cover off (use your fingers).
- Replace batteries with four AA-size batteries (for longer life, use Alkalinetype batteries).
![]()
- Reinstall the battery cover on the back of the Borescope.

CAMERA INSTALLATION

Thread the snake camera onto the camera connector and tighten finger-tight.
To prevent thread damage to the camera connector or snake camera, DO NOT OVERTIGHTEN.
Using the Device
OPERATION
- Press and hold the POWER
![]() button for approximately two seconds, then release.
button for approximately two seconds, then release.
- The POWER indicator lights to indicate the unit is powered on.
- The LCD display shows the image from the snake camera.
- Carefully route the snake camera into the location to be observed.
![information]() DO NOT allow the snake camera to bend at an angle greater than 60 degrees.
DO NOT allow the snake camera to bend at an angle greater than 60 degrees. - Adjust the camera LED brightness, LCD display brightness and color balance, and/or image orientation as necessary (see ADJUSTMENTS AND SETTINGS, below, for more information.
- When finished viewing, carefully extract the snake camera. Press and release the POWER
![]() button to turn the Borescope off.
button to turn the Borescope off.
ADJUSTMENTS AND SETTINGS
The Borescope lets you make several adjustments and settings to configure the tool to your particular needs or to suit environmental requirements. You can:
- Adjust brightness of the camera LEDs for optimal image quality in low light conditions
- Adjust LCD display brightness and color balance
- Adjust image orientation by rotating the displayed image left or right
Adjustments to the Borescope remain active until subsequently changed, or until the unit is powered off.
Adjusting LED Brightness
- With the Borescope powered ON, press the LED
![]() button.
button.
- The Borescope enters the "setting" mode.
- Adjust the LED brightness as desired:
- Press the LEFT/DECREASE
![]() button to decrease the LED brightness.
button to decrease the LED brightness. - Press the RIGHT/INCREASE
![]() button to increase the LED brightness.
button to increase the LED brightness.
- When the desired LED brightness is obtained, press the LED
![]() button to save your changes and exit the "setting" mode.
button to save your changes and exit the "setting" mode.
Adjusting Display Brightness
- With the Borescope powered ON, press the BRIGHTNESS
![]() button.
button.
- The Borescope enters the "setting" mode.
- Adjust the display brightness as desired:
- Press the LEFT/DECREASE
![]() button to decrease display brightness.
button to decrease display brightness. - Press the RIGHT/INCREASE
![]() button to increase display brightness.
button to increase display brightness.
- When the desired display brightness is obtained, press the HOME
![]() button to save your changes and exit the "setting" mode.
button to save your changes and exit the "setting" mode.
Adjusting the Color Balance
- With the Borescope powered ON, press the HOME
![]() button.
button.
- The Borescope enters the "setting" mode.
- Adjust the color balance as desired:
- Press the LEFT/DECREASE
![]() button to decrease the color balance.
button to decrease the color balance. - Press the RIGHT/INCREASE
![]() button to increase the color balance.
button to increase the color balance.
- When the desired color balance is obtained, press the HOME
![]() button to save your changes and exit the "setting" mode.
button to save your changes and exit the "setting" mode.
Adjusting Image Orientation
- With the Borescope powered ON, press the ROTATE IMAGE
![]() button.
button.
- The Borescope enters the "setting" mode.
- Adjust the image orientation as desired:
- Press the LEFT/DECREASE
![]() button to rotate the displayed image to the left.
button to rotate the displayed image to the left. - Press the RIGHT/INCREASE
![]() button to rotate the displayed image to the right.
button to rotate the displayed image to the right.
- When the desired image orientation is obtained, press the HOME
![]() button to save your changes and exit the "setting" mode.
button to save your changes and exit the "setting" mode.
LIMITED ONE YEAR WARRANTY
The Manufacturer warrants to the original purchaser that this unit is free of defects in materials and workmanship under normal use and maintenance for a period of one (1) year from the date of original purchase.
If the unit fails within the one (1) year period, it will be repaired or replaced, at the Manufacturer's option, at no charge, when returned prepaid to the Service Center with Proof of Purchase. The sales receipt may be used for this purpose.
For service, send via U.P.S. (if possible) prepaid to Manufacturer. Allow 3-4 weeks for service/repair.
SERVICE PROCEDURES
If you have any questions, require technical support or information on UPDATES and OPTIONAL ACCESSORIES, please contact your local store, distributor or the Service Center.
USA & Canada:
1 (800) 544-4124 (6:00 AM-6:00 PM PST, Monday through Saturday)
All others:
(714) 241-6802 (6:00 AM-6:00 PM PST, Monday through Saturday)
FAX:
(714) 241-3979 (24 hr.)
Web:
www.innova.com
TECHNICAL ASSISTANCE
1 800 544 4124
SERVICE IN THE USA
ASE CERTIFIED TECHNICIANS
INNOVA.COM
Innova Electronics Corp.
17352 Von Karman Ave.
Irvine, CA 92614
Copyright © 2019 IEC. All Rights Reserved.

Documents / Resources
References
Download manual
Here you can download full pdf version of manual, it may contain additional safety instructions, warranty information, FCC rules, etc.
Advertisement


Need help?
Do you have a question about the 3380 and is the answer not in the manual?
Questions and answers