Table of Contents
Advertisement
Quick Links
Advertisement
Table of Contents

Related Manuals for Zanussi ZW8F1168MS


Summary of Contents for Zanussi ZW8F1168MS
- Page 1 User Manual GETTING STARTED? EASY. ZW8F1168MS EN User Manual Washing Machine...
-
Page 2: Safety Information
SAFETY INFORMATION Before the installation and use of the appliance, carefully read the supplied instructions. The manufacturer is not responsible for any injuries or damage that are the result of incorrect installation or usage. Always keep the instructions in a safe and accessible location for future reference. -
Page 3: Safety Instructions
areas for communal use in blocks of flats or in launderettes. – Do not exceed the maximum load of 10 kg (refer to the • "Programme chart" chapter). The operating water pressure at the water entry point from the • outlet connection must be between 0.5 bar (0.05 MPa) and 8 bar (0.8 MPa). -
Page 4: Installation
ELECTRICAL CONNECTION • Make sure that there is access to the tap after the installation. WARNING! Risk of fire and electric shock. WARNING! Risk of injury, electric • The appliance must be earthed. shock, fire, burns or damage to the •... - Page 5 2. Remove the cardboard top and the polystyrene 6. . Remove the power supply cable and the drain packaging materials. hose from the hose holders. 3. Open the door. Remove all the items from the It is possible to see water flowing drum .
-
Page 6: Information For Installation
Water drainage We recommend that you keep the The drain hose should stay at a height of no less packaging and the transit bolts for any than 60 cm and not more than 100 cm. transport of the appliance. You can extend the drain hose to INFORMATION FOR INSTALLATION maximum 400 cm. - Page 7 Make sure that the drain hose makes a loop to prevent particles going into the appliance from the sink. ø16 4. To a stand pipe with vent hole - Insert the drain W011 hose directly into a drain pipe. Refer to the Connect the drain hose to the spigot and tighten it illustration.
-
Page 8: Product Description
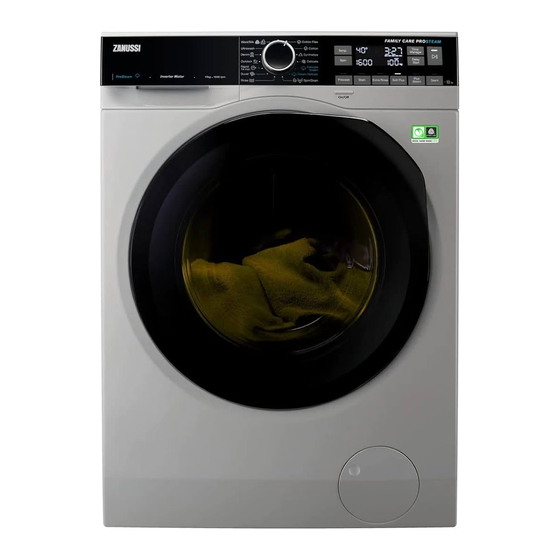
PRODUCT DESCRIPTION APPLIANCE OVERVIEW 11 12 Worktop Drain hose Detergent dispenser Inlet hose connection Control panel Mains cable Door handle Transit bolts Rating plate Hose support Drain pump filter Feet for levelling the appliance CONTROL PANEL SPECIAL FEATURES The Plus Steam option, finishes every cycle with gentle steam that relaxes the fibres and Your new washing machine meets all modern reduces fabric creasing. -
Page 9: Control Panel Description
CONTROL PANEL DESCRIPTION Cotton Flex Wool/Silk Ultrawash Cotton Denim Synthetics Delicate Outdoor Rapid Delicate 14 min Steam Steam & Scent Duvet Spin/Drain Rinse Programme dial Plus Steam touch button Spin touch button Soft Plus touch button Temp. touch button Extra Rinse touch button Display Stain touch button Delay Start touch button... - Page 10 The Temperature area: Temperature indicator . Cold water indicator. Child safety lock indicator. Door locked indicator. Delay start indicator. The digital indicator can show: • Programme duration (e. g. • Delay time (e. g. • Cycle end ( • Warning code (e.g. •...
-
Page 11: Dial And Buttons
DIAL AND BUTTONS INTRODUCTION fabrics from creasing. The washing programme ends with water in the drum. The options/functions are not available The indicator remains on. The door stays with all washing programmes. Check locked and the drum turns regularly to reduce the compatibility between options/ creasing. -
Page 12: Plus Steam
As the programme is very quiet, it is suitable for use This option increases the programme at night time when cheaper electricity tariffs are duration. available. In some programmes the rinses are performed with more water. The corresponding indicator above the touch If you touch the Start/Pause button, the button illuminates and also stays permanently on... -
Page 13: Programme Chart
Time Manager with steam programmes When setting a steam programme, this button allows to chose three steam levels and the programme duration is reduced accordingly: indicator • : maximum. • : medium. • : minimum. ■ ■ ■ In some appliances the programme duration is reduced without showing ■... - Page 14 Programme Reference Default tempera- spin speed Maximum Programme description ture Spin speed load (Type of load and soil level) Temperature range range Steam programmes Steam programmes can be used for reducing wrinkles and odours of garments that just need to be refreshed, avoiding washing.
- Page 15 Programme Reference Default tempera- spin speed Maximum Programme description ture Spin speed load (Type of load and soil level) Temperature range range 800 rpm 3 kg Single synthetic blanket, padded clothes, du- (800 - 400 vets, down jackets and similar items. Duvet rpm) 40 °C...
- Page 16 Programme Reference Default tempera- spin speed Maximum Programme description ture Spin speed load (Type of load and soil level) Temperature range range 1200 rpm 2 kg Machine washable wool, hand washable wool (1200 - and other fabrics with «hand washing» care sym- Wool/Silk 400 rpm) 40 °C...
-
Page 17: Woolmark Apparel Care - Green
Programme ■ ■ ■ ■ ■ ■ ■ Denim ■ ■ ■ ■ ■ ■ UltraWash ■ ■ ■ ■ Wool/Silk 1) Prewash and Stain cannot be selected together. 2) This option is not available with temperature lower than 40 °C. 3) If you set the No Spin option, the appliance performs draining only. -
Page 18: Before First Use
BEFORE FIRST USE 1. Make sure that the electrical power is available 4. Set and start a programme for cotton at the and the water tap is open. highest temperature without any laundry in the 2. Pour 2 litres of water into the detergent drum. -
Page 19: Check The Position Of The Detergent Flap
CHECK THE POSITION OF THE DETERGENT SETTING A PROGRAMME FLAP 1. Turn the programme dial to select the desired 1. Pull out the detergent dispenser until it stops. washing programme. The indicator of the Start/Pause button flashes. The display shows an indicative programme duration and the maximum load. - Page 20 Changing the delay start after the countdown The AutoAdjust detection is carried has started out with complete washing To change the delay start: programmes only and if the 1. Touch the Start/Pause button to pause the programme duration has not been appliance.
-
Page 21: Hints And Tips
In the display the related door lock indicator goes • The door stays locked. off. • You must drain the water to open the door: 2. Open the appliance door. If necessary, add or 1. If necessary, touch the Spin button to decrease remove the items. -
Page 22: Care And Cleaning
• Wash heavy soil stains with a special detergent. – powder detergents for all types of fabric, • Be careful with curtains. Remove the hooks and excluding delicate. Prefer powder put the curtains in a washing bag or pillowcase. detergents containing bleach for whites and •... - Page 23 DESCALING Rust deposits in the drum may occur due to rusting foreign body in the washing or tap water containing If the water hardness in your area is iron high or moderate, we recommend that Clean the drum with special products for stainless you use a water descaling product for steel.
-
Page 24: Cleaning The Drain Pump
cleaning, put the top part back into position. • The drum does not turn. • The appliance makes an unusual noise because of the blockage of the drain pump. • The display shows the alarm code WARNING! • Do not remove the filter while the appliance operates. - Page 25 10. Clean the filter under the water tap. 11. Put the filter back into the special guides by turning it clockwise. Make sure that you tighten the filter correctly to prevent leakages. 5. When the bowl is full of water, turn the filter back and empty the container.
-
Page 26: Troubleshooting
CLEANING THE INLET HOSE AND THE VALVE FILTER 45° 20° EMERGENCY DRAIN 1. Disconnect the mains plug from the mains socket. If the appliance cannot drain the water, carry out 2. Close the water tap. the same procedure, described in 'Cleaning the 3. -
Page 27: Possible Failures
First try to find a solution to the problem (refer to the table). If the problem persists, contact the Authorised Service Centre. WARNING! Deactivate the appliance before carrying out any check. In case of major problems, the acoustic signals operate, the display shows an alarm code and the Start/Pause button may flash continuously: •... - Page 28 Problem Possible solution • Make sure that the water tap is open. • Make sure that the pressure of the water supply is not too low. For this information, contact your local water authority. The appliance does not fill • Make sure that the water tap is not clogged.
-
Page 29: Emergency Door Opening
Problem Possible solution • The AutoAdjust System is able to adjust the programme duration The programme duration according to the type and the laundry load size. Refer to "The Au- increases or decreases toAdjust System load detection" in "Daily Use" chapter. during programme execu- tion. -
Page 30: Technical Data
ONSUMPTION VALUES Stated values are obtained in laboratory conditions with relevant standards. Different cau- ses can change the data: the quantity and type of laundry and ambient temperature. Wa- ter pressure, the supply voltage and the temperature of inlet water may also affect the washing programme duration. -
Page 31: Stacking Kit
Electrical connection Voltage 220 - 240 V Overall power 2200 W Fuse 10 A Frequency 50 Hz Level of protection against ingress of solid particles and IPX4 moisture ensured by the protective cover, except where the low voltage equipment has no protection against moisture Water supply pressure Minimum... -
Page 32: Pedestal With The Drawer
PEDESTAL WITH THE DRAWER To raise your appliance and make loading and unloading laundry easier. The drawer can be used for laundry storage e.g.: towels, cleaning products and more. Read carefully the instructions supplied with the accessory. QUICK GUIDE DAILY USE 3. -
Page 33: Environmental Concerns
CLEANING THE DRAIN PUMP FILTER 180˚ Clean the filter regularly and, especially, if the alarm code appears on the display. ENVIRONMENTAL CONCERNS with the symbol with the household waste. Recycle materials with the symbol . Put the Return the product to your local recycling facility or packaging in relevant containers to recycle it. - Page 36 WWW.ZANUSSI.COM/SHOP...
Need help?
Do you have a question about the ZW8F1168MS and is the answer not in the manual?
Questions and answers