Miele PDR 510 EL Operating And Installation Instructions
Commercial tumble dryer
Hide thumbs
Also See for PDR 510 EL:
- Quick start manual (102 pages) ,
- Installations plan (110 pages) ,
- Installations plan (60 pages)
Table of Contents
Advertisement
Quick Links
Advertisement
Table of Contents

Related Manuals for Miele PDR 510 EL


Summary of Contents for Miele PDR 510 EL
- Page 1 Operating and installation instructions Commercial tumble dryer PDR 510 EL Electrically heated To avoid the risk of accidents or damage to the en-GB machine, it is essential to read these instruc- tions before it is installed and used for the first time. M.-Nr.
-
Page 2: Table Of Contents
Contents Caring for the environment .................... Warning and Safety instructions ................... Appropriate use ......................... Foreseeable misuse......................Technical safety......................... Correct use........................10 Accessories ........................12 Description of the machine .................... 13 Operating the tumble dryer .................... 14 Machines with residual moisture control (ROP) ..............14 Drying levels ........................ - Page 3 Contents Overview of supervisor level ..................... 30 Heater bank temperature ....................35 Process air temperature ....................35 Reversing times......................36 Pauses........................... 38 Quitting programming mode ..................... 38 Connectivity ........................39 Pairing instructions......................39 Technical data ........................40 Terms in network technology .................... 41 Cleaning and care ......................
- Page 4 Contents Payment system ........................ 68 Technical data........................69 Technical data ........................69 EU declaration of conformity..................... 69...
-
Page 5: Caring For The Environment
Caring for the environment Disposal of the packing material The packaging is designed to protect the appliance from damage during transportation. The packaging materials used are selected from materials which are environmentally friendly for disposal and should be recycled. Recycling the packaging reduces the use of raw materials in the man- ufacturing process and also reduces the amount of waste in landfill sites. -
Page 6: Warning And Safety Instructions
If using, do so at your own risk, and follow the instructions provided on the packaging. Any other applications may be dangerous. Miele cannot be held liable for dam- age resulting from incorrect or improper use or operation. -
Page 7: Foreseeable Misuse
Foreseeable misuse Do not make any alterations to the tumble dryer, unless authorised to do so by Miele. Do not lean on the tumble-dryer door. Otherwise, the tumble dryer may tip over, causing injury to yourself or others. -
Page 8: Technical Safety
Do not make any alterations to the tumble dryer, unless authorised to do so by Miele. Do not connect the tumble dryer to the power supply by an extension lead (fire hazard due to overheating). - Page 9 Faulty components may only be replaced by genuine Miele spare parts. Miele can only guarantee the safety standards of the appliance when Miele replacement parts are used.
-
Page 10: Correct Use
This special lamp must only be used for the purpose for which it is intended. It is not suitable for room lighting. Replacement lamps may only be fitted by a Miele authorised technician or by the Miele Customer Service Department. - Page 11 Warning and Safety instructions To ensure problem-free operation of the tumble dryer: - Clean the surface of the fluff filter after each drying cycle. - In addition, the fluff filter and the air passages must be cleaned when prompted by the display.
-
Page 12: Accessories
The appropriate “WTV” stacking kit (available to order) to match your dryer is required. Make sure that you order the correct plinth for this tumble dryer (available from Miele as an optional accessory). Miele cannot be held liable for damage caused by non-compliance with these Warn- ing and Safety instructions. -
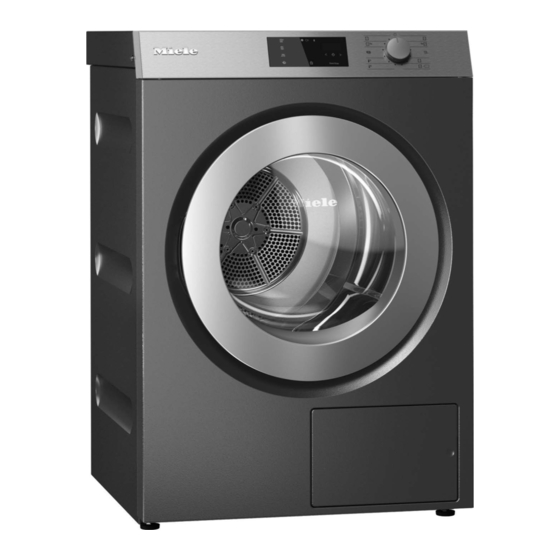
Page 13: Description Of The Machine
Description of the machine PDR 510 (electrically heated) Control panel with rotary control Door Fluff filter flap 4 height-adjustable screw feet Electrical connection Communication module slot Intake vents for drying air Exhaust duct Ø 100 mm Connection for communication box Communication box (optional) For setting up a connection with external systems... -
Page 14: Operating The Tumble Dryer
Activates the Intermittent fan operation to perfectly dry light fabrics, e.g. bed linen and cloths. The function is deactivated as a factory default setting and can only be activated and set by the Miele Customer Service Department. Time display Displays the remaining programme running time in hours and minutes. -
Page 15: Drying Levels
Operating the tumble dryer Drying levels - sensor control = “Normal plus” - sensor control = “Normal” - sensor control = “Hand iron” - sensor control = “Machine iron” - sensor control: “Duvets” function - position = “Cottons” programme Drying pro- grammes For drying cotton and linen fabrics. -
Page 16: Machines With Time Control (Top)
Activates the Intermittent fan operation to perfectly dry light fabrics, e.g. bed linen and cloths. The function is deactivated as a factory default setting and can only be activated and set by the Miele Customer Service Department. Time display Displays the remaining programme running time in hours and minutes. -
Page 17: Temperature Settings (Top)
Operating the tumble dryer Temperature set- - sensor control = “high” temperature setting tings (TOP) - sensor control = “medium” temperature setting - sensor control = “low” temperature setting - sensor control = “cool” temperature setting Timed pro- - position 5 = Timed programme 5 minutes grammes - position 10-55 = Timed programme 10–55 minutes - position 60 = Timed programme 60 minutes... -
Page 18: Machines With Payment Systems (Cop)
Activates the Intermittent fan operation to perfectly dry light fabrics, e.g. bed linen and cloths. The function is deactivated as a factory default setting and can only be activated and set by the Miele Customer Service Department. Time display Displays the remaining programme running time in hours and minutes. -
Page 19: Drying Programmes
Operating the tumble dryer Drying pro- - position range = cool temperature setting grammes For airing fabrics. - position range = “low” temperature setting For drying delicates made from artificial silk or synthetic fibres. - position range = “medium” temperature setting For drying easy-care synthetics and mixed fibres. -
Page 20: How The Control Field Works
Operating the tumble dryer How the control field works The sensor controls react to fingertip contact. If a sensor control is lit, it can be selected. If a sensor control is brightly lit, this means it is currently selected. If a sensor control is dimly lit, this means it can be selected. Sensor controls After selecting a drying level programme with the programme se- for the drying... -
Page 21: Initial Commissioning
Some settings can only be modified during the initial commissioning process. After that, they can only be changed by the Miele Customer Service Department. These settings are also described under “Supervisor level”. -
Page 22: Drying
Drying 1. Notes on correct laundry care Washing before Heavily soiled laundry must be washed particularly thoroughly. Use drying sufficient detergent and select a high wash temperature. If in doubt, wash the items several times. The tumble dryer must not be used for drying items of laundry which have been cleaned using industrial chemicals. -
Page 23: Selecting A Programme
Drying Loading laundry Textiles may be damaged. into the tumble Before loading, read chapter “1. Notes on correct laundry care” dryer first. Open the door. Load laundry into the tumble dryer. Risk of damage with laundry getting trapped. Laundry can be damaged by getting trapped when closing the door. -
Page 24: Selecting The Delay Start Function
Drying Touch the or sensor control repeatedly until the required pro- gramme running time appears in the time display. The drying result is preset by the tumble dryer and cannot be altered. Selecting the With Delay start, you can delay the start of a programme from Delay start func- minutes up to (hours). -
Page 25: Starting A Programme
Drying 4. Starting a programme Starting a pro- Touch the flashing Start/Stop sensor control. gramme The Start/Stop sensor control will light up. Programme sequence - If Delay start has been selected, the Delay start time will start to count down first. - The programme starts. -
Page 26: Programme Overview
Programme overview “Label” programme package Programme name Suitable Selectable Activatable Load size fabrics drying levels extras (residual moisture in %) Cotton items with normal - Machine iron Cottons residual moisture (40 %) - Hand iron (25 %) - Anti-crease* - Normal (0 %) - Normal plus (-2 %) -
Page 27: Standard" Programme Package
Programme overview “Standard” programme package Programme name Suitable Selectable Activatable Load size fabrics drying levels extras (residual moisture in %) Single and multi-layer - Machine iron Cottons cotton/linen items (40 %) - Hand iron (25 %) - *Anti-crease 10 kg - Normal (0 %) - Normal plus (-2 %) -
Page 28: Changing The Programme Sequence
Changing the programme sequence Changing a programme once it has started You cannot change to another programme once a programme has started (this prevents unintentional alterations). You will need to can- cel the current programme before you can select a new one. ... -
Page 29: Time Left
Changing the programme sequence Time left Altering the programme sequence can cause the programme duration shown in the display to be adjusted. -
Page 30: Supervisor Level (Programming Mode)
Supervisor level (programming mode) Requirements for accessing supervisor level - The appliance is switched on. - The appliance door is open. Accessing supervisor level Touch and hold the Start/Stop sensor control and close the door. The Start/Stop sensor control flashes rapidly for 2 seconds. Continue touching the Start/Stop sensor control for at least 4 seconds. - Page 31 Supervisor level (programming mode) Pro- Designation Possible set Standard Explanation gramme value setting Cottons & time in/ex 2 – See “Heater bank temperature” table Heater bank temperature Cottons & time in/ex 2 – See “Process air temperature” table Process air temperature ...
- Page 32 Supervisor level (programming mode) Pro- Designation Possible set Standard Explanation gramme value setting Timed drying warm air – See “Heater bank temperature” table Heater bank temperature Timed drying warm air – See “Process air temperature” table Process air temperature ...
- Page 33 Supervisor level (programming mode) Pro- Designation Possible set Standard Explanation gramme value setting = Off 7 Greeting tone = Normal = Loud = Off Fault tone = On ...
- Page 34 Supervisor level (programming mode) Pro- Designation Possible set Standard Explanation gramme value setting – = 40 °C/104 °F = 41 °C/106 °F = 42 °C/108 °F = 43 °C/109 °F = 44 °C/111 °F = 45 °C/113 °F = 46 °C/115 °F = 47 °C/117 °F Cooling down temperature = 48 °C/118 °F = 49 °C/120 °F = 50 °C/122 °F = 51 °C/124 °F = 52 °C/126 °F = 53 °C/127 °F = 54 °C/129 °F = 55 °C/131 °F = Off Memory ...
-
Page 35: Heater Bank Temperature
Supervisor level (programming mode) Pro- Designation Possible set Standard Explanation gramme value setting = Off Pressure sensor = Normally open contact = Normally closed contact = No External exhaust flap = Yes –... -
Page 36: Reversing Times
Supervisor level (programming mode) Set value in the display Temperature 32 °C/90 °F 33 °C/91 °F 34 °C/93 °F 35 °C/95 °F 36 °C/97 °F 37 °C/99 °F 38 °C/100 °F 39 °C/102 °F 40 °C/104 °F 41 °C/106 °F 42 °C/108 °F 43 °C/109 °F 44 °C/111 °F 45 °C/113 °F 46 °C/115 °F ... - Page 37 Supervisor level (programming mode) Set value in the display Seconds 50 s 55 s 60 s 65 s 70 s 75 s 80 s 85 s 90 s 95 s 100 s 105 s 110 s 115 s 120 s ...
-
Page 38: Pauses
Supervisor level (programming mode) Set value in the display Seconds 270 s 275 s 280 s 285 s 290 s 295 s 300 s Pauses Set value Seconds 2 s 3 s 4 s 5 s Quitting programming mode To quit programming mode, turn the rotary control on the tumble dryer to the position. ... -
Page 39: Connectivity
Press and hold the sensor control until appears briefly on the display. A timer will then start. The tumble dryer now opens the soft AP. Establish the connection with the Device Connector in Miele MOVE. Once a connection is established, dots flash in the word. -
Page 40: Technical Data
Connectivity Establishing the network connection using a LAN cable The optional XKM 3200 WL PLT communication module is required for wired network connection. On the supervisor level, select using the or arrow buttons. Then select the COM module using the or arrow buttons. ... -
Page 41: Terms In Network Technology
DHCP Dynamic Host Configuration Protocol Enables the automatic assignment of IP addresses by a DHCP server (integrated in the router) to all devices in the network (e.g. computers, printers, Miele appliances). The individual devices must be configured for DHCP. dLAN direct Local Area Network Data transmission via the electrical cables in a building. - Page 42 Connectivity Ethernet Ethernet Standardised transmission technology for wired networks with various transmission speeds (10/100/1000 Mbit/s). IEEE Institute of Electrical and Electronics Engineers Global professional organisation of engineers predominantly based in electrical engineer- ing and information technology. IP address Internet Protocol address Each network that is connected to the Internet is assigned a globally unique IP address.
- Page 43 Addresses all queries and responses to all appliances in the network that support this service and report with an identical name. Warning! This service must be explicitly permitted in many routers. Miele appliances can only exchange information with each other when this service has been permitted.
- Page 44 Brand name used for WiFi-enabled or certified devices. Often used synonymously with WLAN. The term WLAN is only really used in German- speaking countries. WiFi is international. Miele has also been a member of the WiFi Alliance since 01.01.2019. WiFi Wireless Local Area Network Wireless data transmission in a network WiFi 802.11b...
- Page 45 Connectivity WiFi Protected Setup Standard for making the process of establishing a connection with a wireless network simple. Standard method: push-button setup If WPS is activated, the connection interface is open for 2 minutes. If WPS has been ac- tivated on another device, the devices will establish a connection independently of one another.
-
Page 46: Cleaning And Care
rungsbereich fängt anfallende Flusen nicht drehen, da sonst ein auf. Es wird zur Reinigung entnommen tage des Flusensiebes erf und demontiert. Cleaning and care Kontrollieren und reinigen Sie Cleaning the fluff filter das Flusensieb spätestens bei der A two-part fluff filter in the air supply area collects fluff released by Prüfmeldung: Luftwege reinigen. -
Page 47: Cleaning The Fluff Filter Parts (Dry)
^ Ziehen Sie das Flusensieb an seinem Griff heraus. Cleaning and care Flusensieb demontieren Dismantling the fluff filter zum Öffnen gegen die der Flusenfilterklappe. Reinigung Flusensiebteile trocken reinigen Flusensieb einsetzen Mit dem Staubsauger können Sie Flu- Hold the fluff filter by the handles. Bei einer starken, ... -
Page 48: Cleaning The Air Supply Area
Cleaning and care Inserting the fluff If there is a lot of visible fluff, clean the air supply area before rein- filter serting the cleaned fluff filter. See next page. Insert the inner fluff filter part into the outer part. ... - Page 49 Cleaning and care Risk of damage due to solvent-based cleaning agents and ab- rasive cleaners. Solvent based cleaning agents, abrasive cleaners, glass cleaners or all-purpose cleaners can cause damage to plastic surfaces and other parts. Clean the tumble dryer with a slightly damp cloth and a mild non- abrasive cleaning agent or soapy water.
- Page 50 Cleaning and care Remove any fluff from the inside of the open fluff filter flap and the rubber seal. Make sure that you do not damage the rubber seal when doing this.
- Page 51 ^ Reinigen Sie den Luftf – Abdeckung im Einfüllbereich Die Abdeckung im Einfüllbereich reich unterhalb der Ab ^ Reinigen Sie den Luftf sollten Sie nur im Falle einer extrem dem Staubsauger. Cleaning and care Die Abdeckung im Einfüllbereich starken Verstopfung entnehmen. reich unterhalb der Ab ^ Reinigen Sie die Abde sollten Sie nur im Falle einer extrem...
- Page 52 Cleaning and care Press down the cover until it engages on the opposite side. Securing the cover Look in the drum. Underneath the cover on the left and right, screw in the Torx screws through the round holes.
-
Page 53: Problem Solving Guide
Problem solving guide Fault diagnosis Message Cause and remedy The display remains dark. There is no power to the tumble dryer. Check the mains plug, main switch and fuses (on site). Problem Cause and remedy Condensate is escaping The drain is dirty. from an unexpected loca- Inspect the drain and remove any soiling if necessary. - Page 54 Problem solving guide Problem Cause and remedy You can remove the cover in the loading area to clean the air guide area underneath. The vent ducting or its openings are clogged with hair and fluff, for example. Check and clean all components in the vent ducting (e.g. ...
-
Page 55: Customer Service Department
Customer Service Department Optional accessories Optional accessories for this tumble dryer are available from your Miele dealer or from the Miele Customer Service Department. Contact in case of malfunction In the event of any faults which you cannot remedy yourself, please contact your Miele Dealer or Miele Service. -
Page 56: Installation
Electrical connection cable Fluff filter flap Control panel with rotary con- Four height-adjustable screw trol feet Seitenansicht Draufsicht Side view Rückansicht Sockelaufstellung Als nachkaufbares Zubehör Sie unterschiedliche Miele S Bei Aufstellung auf ein seitigen Sockel muss der gegen Verrutschen gesich... -
Page 57: Rear View
Communication box (optional) For setting up a connection with external systems Draufsicht View from above Installation on a Various Miele plinths are available as optional accessories. Sockelaufstellung plinth Als nachkaufbares Zubehör erhalten Sie unterschiedliche Miele Sockel. Bei Aufstellung auf einem bau-... -
Page 58: Payment Systems
The plinth must be secured to the floor. Payment systems This tumble dryer can be fitted with a payment system (optional Miele accessory). In this case, a Miele Customer Service technician must programme the relevant settings in the tumble dryer’s electronics and... - Page 59 *INSTALLATION* Schiebetür oder entgegengesetzt angeschlagene Tür installiert wer- Installation den. n Sie den Trockner zum Sie beim Transport des uf dessen Standsicher- Installation Der Trockner muss lotrecht und The tumble dryer must stand perfectly level on all four feet to en- sure safe and proper operation.
-
Page 60: Electrical Connection
If more than one voltage is specified on the data plate, the tumble dryer can be converted for connection to the relevant input voltage. This conversion must be performed by the Miele Customer Service Department or by an authorised dealer. During the conversion, the wiring instructions given on the wiring diagram must be followed. -
Page 61: Supply Air And Exhaust Air Management
*INSTALLATION* Installation Supply air and exhaust air management Ventilation The air required for drying is taken from the room where the tumble dryer is installed. Ensure sufficient room ventilation, e.g. by means of ventilation openings that cannot be closed in the exterior wall. - It must not be possible to seal off ventilation openings. -
Page 62: Calculating The Total Ducting Length
*INSTALLATION* Installation The air required for drying is taken from the room where the dryer is installed. You must therefore ensure that the room is sufficiently vent- ilated. Otherwise, there is a risk of suffocation due to exhaust gases being sucked back from other technical systems or fuel-burning in- stallations, and the drying time will be much longer. -
Page 63: Exhaust Duct Dimensions
*INSTALLATION* Installation Table I Components Relative pipe length Exhaust air hose (flexible aluminium)* / pipe (temperature resistance min. 80 °C) – 1 m laid straight or 1 m straight pipe 1.0 m – 45° bend (radius of bend = 0.25 m) 0.6 m – 90° bend (radius of bend = 0.25 m) 0.8 m Non-return flap* 14.3 m... -
Page 64: Exhaust Air Management With Plug-In Pipes
Bemaßung Abluftanschluss spiel *INSTALLATION* Bemaßung Abluftanschluss spiel bei der Auslegung Draufsicht Installation bei der Auslegung Draufsicht ng sind gemäß Bau- ng sind gemäß Bau- nder auszuführen. nder auszuführen. Bezirksschornstein- Bezirksschornstein- e Bezirksschornstein- e Bezirksschornstein- Rückansicht Rear view Rückansicht t Gittereinsatz t Gittereinsatz gleichsrohrlänge = 3,8 m rgleichsrohrlänge = 3,8 m... -
Page 65: Exhaust Air Management With Flexible Aluminium Hose
Es dürfen nur wärmebeständige Ma- *INSTALLATION* terialien mit einer Temperaturbestän- digkeit von min. 80°C verwendet Installation werden. ^ Installieren Sie den Ad den Alu-Flex Abluftsch rung und Abluftführung Steckstellen müss festen Metallklebeban ung mit gesteckten Abluftführung mit Alu-Flex werden. Install the connector (1) and the pipe (2). ... - Page 66 *INSTALLATION* fegermeister/die Bezirksschornstein- 1,25 4 - 5 fegermeisterin. Installation Sie müssen pro Trockner eine Rückstauklappe installieren! If 3–5 tumble dryers are installed on one shared exhaust air duct, the pipe diameter D must be increased. Bei Nichtbeachten können Number of tumble dryers Factor for increasing the pipe durch zurückfließendes Kondens- diameters from Table II...
-
Page 67: Optional Accessories
Optional accessories Accessory parts may only be fitted when expressly approved by Miele. If other parts are used, warranty, performance and product liability claims will be invalidated. Communication box The optional communication box allows external hardware from Miele and other suppliers to be connected to the Miele Professional machine. - Page 68 Copyright and licences For the purpose of operating and controlling the communication module, Miele uses pro- prietary or third-party software that is not covered by open source licensing terms. This software/these software components are protected by copyright.
- Page 69 Maximum transmission power < 100 mW EU declaration of conformity Miele hereby declares that this PT 013 tumble dryer complies with Directive 2014/53/EU. The complete text of the EU declaration of conformity is available from one of the following Internet addresses: - Under “Products”, “Download” at www.miele.de/professional/index.htm - Or go to http://www.miele.de/professional/gebrauchsanweisungen-177.htm and enter...
- Page 70 United Kingdom Malaysia Miele Sdn Bhd Miele Co. Ltd., Fairacres, Marcham Road Suite 12-2, Level 12 Abingdon, Oxon, OX14 1TW Menara Sapura Kencana Petroleum Professional Sales, Tel: 0845 365 6608 Solaris Dutamas No. 1, Jalan Dutamas 1 E-mail: professional@miele.co.uk 50480 Kuala Lumpur, Malaysia Internet: www.miele.co.uk/professional...
Need help?
Do you have a question about the PDR 510 EL and is the answer not in the manual?
Questions and answers