Advertisement
- 1 Welcome
- 2 Cautions
- 3 What's In The Box
- 4 Before Charging
- 5 Locating Battery Charger
- 6 Battery Specs
- 7 Ignition Protected
- 8 Connecting To The Battery
- 9 How To Start Charging
- 10 Charger Maintenance
- 11 Understanding The LED
- 12 Symbols Explanation
- 13 Charging Times
- 14 Charging Steps
- 15 Battery Testing And Diagnostics
- 16 Technical Specifications
- 17 Troubleshooting
- 18 Troubleshooting Tips
- 19 Documents / Resources
Welcome
Thank you for buying a NOCO Genius® GEN Mini Series
On-Board Battery Charger. SAVE THESE INSTRUCTIONS. This User Guide contains important safety and operating instructions. www.no.co
Cautions

Risk of SERIOUS INJURY OR DEATH. ELECTRICAL SHOCK, EXPLOSION, FIRE, AND EYE INJURY HAZARDS.
PROTECT YOURSELF AND OTHERS.

Before use, READ AND UNDERSTAND Owner's Manual.
Failure to read and understand this information could result in SERIOUS INJURY or DEATH.
DO NOT REMOVE OR COVER THIS INFORMATION.

ELECTRICAL SHOCK HAZARD
CHARGER IS AN ELECTRICAL DEVICE THAT CAN SHOCK AND CAUSE SERIOUS INJURY.
DO NOT CUT POWER CORDS.
 EXPLOSION HAZARD
UNMONITORED, INCOMPATIBLE, OR DAMAGED
BATTERIES CAN EXPLODE IF USED WITH CHARGER.
DO NOT LEAVE CHARGER UNATTENDED WHILE IN USE.
DO NOT ATTEMPT TO CHARGE DAMAGED OR FROZEN BATTERIES.
USE CHARGER ONLY WITH BATTERIES OF RECOMMENDED VOLTAGE.
OPERATE CHARGER ONLY IN WELL-VENTILATED AREAS.

 FIRE HAZARD
CHARGER IS AN ELECTRICAL DEVICE THAT EMITS HEAT AND CAN BURN.
DO NOT COVER CHARGER.
DO NOT SMOKE OR USE ANY OTHER SOURCE OF ELECTRICAL SPARK OR FIRE WHEN OPERATING CHARGER.
KEEP CHARGER AWAY FROM COMBUSTIBLE MATERIALS.
BATTERY POSTS, TERMINALS, AND RELATED ACCESSORIES CONTAIN CHEMICALS, INCLUDING LEAD, KNOWN TO THE STATE OF CALIFORNIA TO CAUSE CANCER AND BIRTH DEFECTS OR OTHER REPRODUCTIVE HARM.
ALWAYS WASH YOUR HANDS AFTER HANDLING THESE PRODUCTS.
 EYE INJURY HAZARD
BATTERIES CAN EXPLODE AND CAUSE FLYING DEBRIS.
BATTERY ACID CAN CAUSE EYE IRRITATION.
WEAR EYE PROTECTION WHEN OPERATING CHARGER.

AVOID CONTACT WITH EYES AND WASH HANDS AFTER USING CHARGER.
IN CASE OF EYE CONTACT, FLUSH AFFECTED AREA WITH PLENTY OF WATER.
RISK OF EXPLOSIVE GASES
WORKING IN VICINITY OF A LEAD-ACID BATTERY IS DANGEROUS. BATTERIES GENERATE EXPLOSIVE GASES DURING NORMAL BATTERY OPERATION.
FOR THIS REASON, IT IS OF UTMOST IMPORTANCE THAT YOU FOLLOW THE INSTRUCTIONS EACH TIME YOU USE THE CHARGER.
To reduce risk of battery explosion, follow these instructions and those published by battery manufacturer and manufacturer of any equipment intended to be used in vicinity of battery. Review cautionary markings on these products and on engine.
Use of an attachment not recommended or sold by the battery charger manufacturer may result in a risk of fire, electric shock, or injury to persons.
To reduce risk of damage to electric plug and cord, pull by plug rather than cord when disconnecting charger.
Do not operate charger with damaged cord or plug – replace the cord or plug immediately.
Do not operate charger if it has received a sharp blow, been dropped, or otherwise damaged in any way; take it to a qualified service facility.
Do not disassemble charger; take it to a qualified service facility when service or repair is required. Incorrect reassembly may result in a risk of electric shock or fire.
To reduce risk of electric shock, unplug charger from outlet before attempting any maintenance or cleaning. Turning off controls will not reduce this risk.
EXTERNAL CONNECTIONS TO CHARGER SHALL COMPLY WITH THE UNITED STATED COAST GUARD ELECTRICAL REGULATIONS (33CFR183, SUB PART I)
DO NOT USE EXTENSION CORDS unless absolutely necessary.
Using an improper extension cord could result in a risk of fire and electric shock and may result in property damage, personal injury or death. If extension cord must be used, make sure that:
- The pins on the extension cord plug have the same number, size, and shape as those of the AC power cord plug on the charger.
- The extension cord is properly wired and is in good electrical condition.
- The wire size is as specified in Table 1 below:
TABLE 1: RECOMMENDED MINIMUM AWG SIZE FOR EXTENSION CORDS FOR BATTERY CHARGERS
| AC INPUT RATING, AMPERES* | AWG SIZE OF CORD | ||||
| Equal To Or Greater Than | But Less Than | Length Of Cord, Feet (f) | |||
| 25 (7.6) | 50 (15.2) | 100 (30.5) | 150 (45.6) | ||
| 0 | 2 | 18 | 18 | 18 | 16 |
| 2 | 3 | 18 | 18 | 16 | 14 |
| 3 | 4 | 18 | 18 | 16 | 14 |
| 4 | 5 | 18 | 18 | 14 | 12 |
| 5 | 6 | 18 | 16 | 14 | 12 |
| 6 | 8 | 18 | 16 | 12 | 10 |
| 8 | 10 | 18 | 14 | 12 | 10 |
| 10 | 12 | 16 | 14 | 10 | 8 |
| 12 | 14 | 16 | 12 | 10 | 8 |
| 14 | 16 | 16 | 12 | 10 | 8 |
| 16 | 18 | 14 | 12 | 8 | 8 |
| 18 | 20 | 14 | 12 | 8 | 6 |
*If the input rating of a charger is given in watts rather than amperes, the corresponding ampere rating is to be determined by dividing the wattage rating by the voltage rating - for example: 1250 watts/125 volts = 10 amperes
Use The Following Precautions When You Work Near Lead-Acid Batteries
- Someone should be within range of your voice or close enough to come to your aid if you have an accident.
- Have plenty of fresh water and soap nearby in case battery acid contacts skin, clothing, or eyes.
- Wear complete eye protection and protective clothing. Avoid touching your eyes while working near a battery. If battery acid contacts your skin or clothing, wash immediately with soap and water. If acid enters an eye, immediately flood the eye with running cold water for at least ten (10) minutes and seek medical attention as soon as possible.
- Be extra cautious when handling metal tools around a battery. If you drop a metal tool near a battery it might spark or create a short circuit between the battery terminals and some other metal part. Either event may cause a dangerous electrical shock hazard, a fire, or even an explosion, resulting in property damage, personal injury, or death.
- Never smoke or allow an open spark or flame in the vicinity of the battery or engine.
- Remove all personal items made of metal, such as, rings, bracelets, necklaces, and watches when working with a lead-acid battery. A leadacid battery can produce a short-circuited current high enough to weld a metal ring or other piece of jewelry, causing a severe burn.
- This battery charger is for charging LEAD-ACID BATTERIES ONLY. DO NOT USE THE BATTERY CHARGER FOR DRY-CELL BATTERIES THAT ARE COMMONLY USED WITH HOME APPLIANCES. THESE TYPES OF BATTERIES MAY BURST AND MAY CAUSE PROPERTY DAMAGE, PERSONAL INJURY OR DEATH.
- NEVER charge a frozen battery.
What's In The Box
- GEN Mini Series On-Board Battery Charger
- User Guide
- Hardware Kit
Before Charging
- To avoid an electric arc (or spark), turn off or disconnect all of the accessories in the boat or vehicle. Always remove the cable that is connected to grounded terminal from battery first.
- Make sure the area around the battery is well-ventilated while the battery is being charged. If necessary, use a non-metallic material to fan away the gas in the area.
- If necessary, clean the battery terminals. Be careful to keep the corrosion and other debris from coming in contact with your skin or eyes.
- If the battery is not a sealed battery, add distilled water to each cell (if necessary) until the battery acid solution reaches the level specified by battery manufacturer. Do not overfill. For a battery without cell caps, such as a valve regulated lead-acid battery (VRLA), carefully follow the battery manufacturer's charging instructions.
- Before charging, carefully read the battery manufacturer's specific precautions and recommended rates of charge.
- Determine the voltage of the battery by referring to the boat's or vehicle's owner's manual and make sure that the battery charger has compatible voltages.
- If using an extension cord, always connect to the battery charger first, before connecting to an electrical outlet. When disconnecting, always disconnect from the electrical outlet first. Make sure the electrical outlet is a 120VAC GFCI (Ground Fault Circuit Interrupt) outlet.
Locating Battery Charger
- Locate the battery charger as far away from the battery as possible.
- Never place the battery charger directly above the battery; gases from battery will corrode and damage battery charger.
- When reading electrolyte specific gravity or filing battery, never allow battery acid to come in contact with the battery charger.
- Do not operate the battery charger in a closed-in area or an area with restricted ventilation.
- Do not set a battery on top of battery charger.
Battery Specs
The following recommendations should ONLY be considered as guidelines. Always refer to the battery manufacturer's recommendations for battery charging. The GEN Mini Series On-Board Battery Chargers are suitable for charging all types of 12V lead-acid batteries, including Wet (Flooded), Gel, MF (Maintenance-Free) and AGM (Absorption Glass Mat) batteries. The GEN Mini Series On-Board Battery Chargers can be used on battery sizes from 20 to 100Ah, but can also maintain all battery sizes.
Ignition Protected
Conforms to UL 1236 marine ignition protection. This device is ignition protected in accordance with USCG-33 CFR183.410 requirements.
Connecting To The Battery
Before you connect to the battery(s), make sure that the AC power plug is not connected to an electrical outlet. DO NOT CONNECT
THE BATTERY CHARGER AC POWER PLUG TO THE ELECTRICAL OUTLET UNTIL ALL OTHER CONNECTIONS ARE MADE. Make sure you have identified the correct polarity of the battery terminals on the battery(s). The POSITIVE battery terminal is typically marked by these letters or symbols (POS,P,+). The NEGATIVE battery terminal is typically marked by these letters or symbols (NEG,N,-). If you are having difficulty determining the polarity of the battery terminals, contact the battery manufacturer before proceeding.
- Confirm that you have a 12V battery(s). This battery charger is for 12V LEAD-ACID BATTERIES ONLY.
- Connect the POSITIVE (Red) eyelet terminal connector to the POSITIVE (POS,P,+) battery terminal.
- Connect the NEGATIVE (Black) eyelet terminal connector to the NEGATIVE (NEG,N,-) battery terminal.
- Repeat steps 2 and 3 for each battery bank.
- When disconnecting the battery charger, disconnect in the reverse sequence, removing the NEGATIVE first.
How To Start Charging
- Confirm that you have connected the eyelet terminal connectors properly.
- Connect the battery charger's AC power plug into a suitable electrical outlet. DO NOT FACE THE BATTERY WHEN MAKING THIS CONNECTION.
- Charge battery(s) until fully charged. A Green LED will illuminate solid when the battery is fully charged.
- The battery charger can be left connected to the battery at all times to provide maintenance charging. However, it is good practice to check the battery periodically.
Charger Maintenance
GEN Mini Series On-Board Battery Chargers do not require any maintenance. Do not attempt to open or repair the battery charger as it will invalidate the limited warranty. A damp cloth may be used to clean dust, dirt, or other debris off of the battery charger. BEFORE
ATTEMPTING TO CLEAN THE BATTERY CHARGER, MAKE SURE YOU REMOVE THE AC POWER PLUG FROM THE POWER SOURCE.
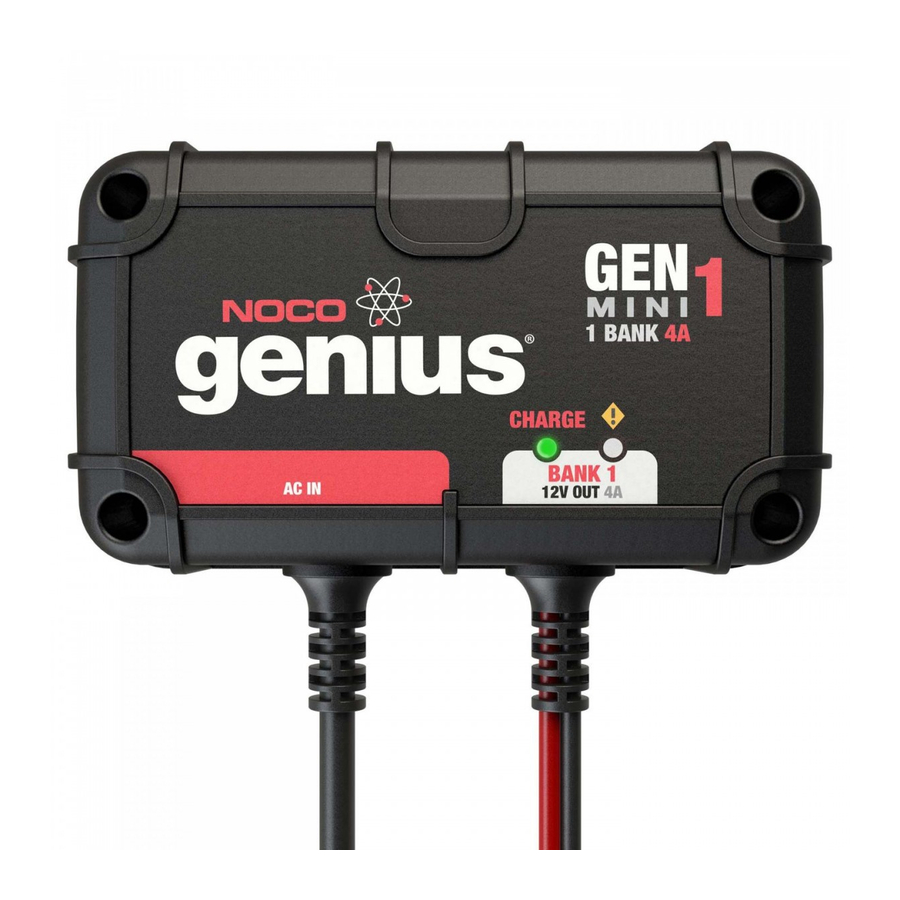
Understanding The LED
Each battery bank contains two (2) LEDs - a CHARGE LED and an ERROR LED. The CHARGE LED indicates the charging process (Red when charging, Green when charged) and the ERROR LED displays a Reverse Polarity or Error Condition. To understand the LED Light configuration better, see the chart below:
| LED | Explanation |
When Charging RED | When the battery is charging, the CHARGE LED will be illuminated RED. The CHARGE LED will remain a solid RED color (not blinking) until the battery is fully charged. |
When Charged GREEN | When the battery is fully charged, the CHARGE LED will be illuminated GREEN. The CHARGE LED will remain a solid GREEN color (not blinking) until either the battery charger is disconnected or the battery becomes discharged. |
Reverse Polarity ORANGE | If a Reverse Polarity condition exists, the ORANGE ERROR LED will illuminate. This ERROR condition will be displayed whether the charger is plugged in or disconnected from an AC power source. Reverse the battery connections to fix this ERROR. |
Error Condition FLASHING | If an ERROR condition exists, all LEDs will flash. There are several reasons an ERROR condition could exist. For help troubleshooting ERROR conditions, see the section entitled TROUBLESHOOTING. |
Symbols Explanation
 | Firewall. Multi-level safety barrier prevents unsafe and abnormal conditions. |
 | Optimization. Stabilizes internal battery chemistry for increased performance and longevity. |
 | Maintenance Plus.™ Keeps the battery fully charged without overcharging, indefinitely. |
 | Energy-Save. Minimizes energy consumption when full power is not needed. |
 | Interactive. Alters the charging process based on organic battery feedback. |
 | Safe. Protects against reverse polarity, sparks, overcharging, overcurrent, open-circuits, short-circuits and overheating. |
 | Recovery. Applies a high-voltage pulse charge when low-voltage, sulfation or lost capacity is detected. |
 | Rugged. Dirt, water, UV, impact and crush resistant. |
 | Ignition Protected. Non-igniting and temperature controlled for safe and worry-free operation. |
Charging Times
The time required for the GEN Mini Series to charge a normally discharged battery is shown below. Deeply discharged batteries may take longer to charge depending on the depth of discharge (DOD). The charge time is based on an average depth of discharge to a fully charged battery.
| Battery Size (Ah) | Approximate Time To Charge* (Hours) |
| 20 | 2.5 |
| 30 | 3.7 |
| 40 | 5.0 |
| 50 | 6.2 |
| 60 | 7.5 |
| 70 | 8.7 |
| 80 | 10.0 |
| 90 | 11.2 |
| 100 | 12.5 |
| 110 | 13.7 |
| 120 | 15.0 |
*Note: The above table is for reference purposes only. Actual data may differ due to battery conditions. The time required to charge a normally discharged battery is based on an average DOD of 50%.
Charging Steps

- Step 1 & 2: Analyze & Diagnose
Checks the battery's initial condition, including voltage, stateof-charge and health, to determine if the battery is stable before charging.
- Step 3: Recovery
Initializes the Recovery desulfation process (if needed) for deeply discharged or sulfated batteries by pulsing small amounts of current.
- Step 4: Initialize
Starts the charging process with a gentle (soft) charge.
- Step 5: Bulk
Begins the Bulk charging process based on the condition of the battery and returns 80% of the battery's capacity.
- Step 6: Absorption
Brings the charge level to 90% by delivering small amounts of current to provide a safe, efficient charge. This limits battery gassing and is essential to prolonging battery life.
- Step 7: Optimization
Finalizes the charging process and brings the battery to maximum capacity. In this step, the charger utilizes multi-layered charging profiles to fully recapture capacity and optimize the specific gravity of the battery for increased run time and performance. The charger will switch to Maintenance if the battery tells the charger that more current is needed.
- Step 8: Maintenance
Continuously monitors the battery to determine when a maintenance charge should be initiated. If the battery voltage falls below its target threshold, the charger will restart the Maintenance cycle until voltage reaches its optimal state and then discontinues the charge cycle. The cycle between Optimization and Maintenance is repeated indefinitely to keep the battery at full charge. The battery charger can be safely left connected indefinitely without the risk of overcharging.
Battery Testing And Diagnostics
The battery charger will not begin delivering any current to the battery(s) until the battery charger detects a 'stable' battery. A 'stable' battery means the eyelet terminal connectors are connected to the battery with the correct polarity (POSITIVETO-POSITIVE, NEGATIVE-TO-NEGATIVE) and have a tight, clean connection to the battery being charged. If the battery is not stable for at least three (3) seconds, the battery charger will not begin charging the battery and the battery charger will go into an ERROR condition. If the battery is connected in reverse polarity, it is considered an 'unstable' battery and the ERROR LED will illuminate until the ERROR is cleared by reversing the eyelet terminal connectors.
Technical Specifications
| GEN Mini 1 | GEN Mini 2 | GEN Mini 3 | |
| Battery Banks | 1 | 2 | 3 |
| Amps/Bank | 4A | 4A | 4A |
| Total Amps | 4A | 8A | 12A |
| Input Voltage AC | 110-120VAC, 50-60Hz | ||
| Working Voltage AC | 70-130 VAC, 50-60Hz | ||
| Nominal Voltage | 12VDC | 12VDC x 2 | 12VDC x 3 |
| Efficiency | ~90% | ||
| Charging Voltage | 14.4V | ||
| Back Current Drain | <5mA | ||
| Ripple | <2% | ||
| Charger Type | 8 Step, Fully Automatic, Switch-Mode | ||
| Type of Batteries | 12V Lead-Acid | ||
| Battery Chemistries | Wet, Gel, MF & AGM | ||
| Battery Capacity | 20-120Ah; Maintains All Battery Sizes | ||
| Housing Protection | IP68 | ||
| Cooling | Natural Convection | ||
| Output Leads (Length) | 6.3 Feet | ||
| AC Cord (Length) | 6.0 Feet | ||
| Dimensions (L x W x H) | 6.6 x 3.8 x 2.2" | 7.9 x 5.5 x 2.2" | 8.9 x 6.9 x 2.6" |
| Weight | 3.3 Pounds | 5.8 Pounds | 8.6 Pounds |
Troubleshooting
When Flashing Leds Illuminate.
When the battery charger detects an ERROR condition, the CHARGE LED and ERROR LED will flash. If you are seeing this ERROR condition, it could be the result of one of the following situations:
- Battery Voltage Incompatibility.
Check to make sure you have a 12V battery. This battery charger is for 12V batteries only. If you attempting to charge a battery that is other than 12V, it could cause this ERROR condition. Charge the appropriate battery to resolve this ERROR condition.
- Low Voltage Battery.
If the battery voltage is below 2.0VDC (12V), it could cause this ERROR condition. In this situation, the battery charger has determined that the battery voltage is too low to begin a normal charge cycle. To increase the battery voltage and allow the battery charger to begin charging, you will need to jump start the battery.
- Abnormality Protection.
This ERROR condition is the result of the battery charger being in the Bulk mode for more than eighty (80) hours. This ERROR condition is the result of a bad battery. To resolve this ERROR condition, take the battery to a local battery store for an evaluation.
- Blown Fuse In Battery Connector Harness.
Check the fuse in the battery connector harness. If the fuse in the battery connector harness has blown, it could cause this ERROR condition. Replace the fuse with a 15A Automotive Blade Fuse to resolve this ERROR condition.
- Corrosion On Battery Terminals.
Check the battery connections for battery corrosion. If battery corrosion is present on the battery connections, it could cause this ERROR condition. Remove the battery corrosion to resolve this ERROR condition.
- Loose Battery Connections.
Check the battery connections to the battery. If the battery connections are loose, it could cause this ERROR condition. Tighten the battery connections to resolve this ERROR condition.
- Sulfated, Damaged, Or Weak Battery.
If you have checked all other possible ERROR conditions and cannot clear the ERROR, it is probably the result of a sulfated, damaged, or weak battery. To properly diagnose a sulfated, damaged, or weak battery, take the battery to a local battery store for an evaluation. The battery store will advise if the battery can be charged or needs replaced.
When No Lights Come On When The Battery Charger Is Plugged Into An Electrical Outlet.
- Weak AC Connection.
Check if the AC outlet has power. If the AC outlet has no or limited power, it could cause this condition. Plug a light into the AC outlet to check if the outlet has power. If the light is extremely dim, this could be the result of limited AC power. The battery charger is designed for use at 70-130VAC. If there is no power or the power is below 70VAC, locate another AC outlet that has sufficient power to resolve this ERROR condition.
Troubleshooting Tips
Testing To See If Charger Is Charging.
Before applying AC power to the charger, measure the battery voltage with a digital voltmeter and write the value down. Plug the battery charger into an electrical outlet. Wait at least thirty (30) seconds and measure the battery voltage again with the digital voltmeter. The battery voltage should be higher than the previous value and slowly moving up.
Abnormality Protection.
If the battery charger is in the Bulk mode for more than 80 hours, the battery charger will go into an ERROR condition. This feature prevents damage if the battery is faulty.
Low Battery.
If you have a severely discharged battery, a battery that is below 9.0VDC, it could be the result of a defective battery. Batteries that have been severely discharged as a result of an accidental load should respond quickly when current is applied to the battery, resulting in a sharp increase in battery voltage.
Contacting NOCO:
Phone: 1.800.456.6626
Email: support@no.co
Mailing Address: 30339 Diamond Parkway, #102
Glenwillow, OH 44139
United States of America

Documents / Resources
References
Download manual
Here you can download full pdf version of manual, it may contain additional safety instructions, warranty information, FCC rules, etc.
Download NOCO GEN Mini 1, GEN Mini 2, GEN Mini 3 - GEN Mini Series On-Board Battery Chargers Manual
Advertisement


Need help?
Do you have a question about the GEN Mini 1 and is the answer not in the manual?
Questions and answers