Table of Contents
Advertisement
Available languages
Available languages
Quick Links
Рук
Рук
ов
ов о о о о о дств
ов
дств
дств
Рук
Рук ов
Рук
ов
дств
дств о по
эк эк сплу
эк эк
сплу
сплу а а а а а т т т т т ации
сплу
эк
сплу
EN
RU
English, 15
Русский, 1
Русский, 1
Русский, 1
Русский, 1
Русский, 1
LFT 21677
о по
о по
о по
о по
ации
ации
ации
ации
ПОСУ У У У У ДОМОЕЧНАЯ МАШИНА
ПОС
ПОС
ПОС
ПОС
ДОМОЕЧНАЯ МАШИНА
ДОМОЕЧНАЯ МАШИНА
ДОМОЕЧНАЯ МАШИНА
ДОМОЕЧНАЯ МАШИНА
Содержание
Содержание
Содержание
Содержание
Содержание
Монтаж, 2-3-4
Монтаж, 2-3-4
Монтаж, 2-3-4
Монтаж, 2-3-4
Монтаж, 2-3-4
Предупреждения по первому использованию машины
Технические данные
Ecodesign Regulation
Описание изделия, 5
Описание изделия, 5
Описание изделия, 5
Загрузка корзин, 6
Загрузка корзин, 6
Включение и эксплуатация, 7
Включение и эксплуатация, 7
Дополнительные функции мойки
Программы, 8
Программы, 8
Программы, 8
Программы, 8
Программы, 8
Таблица программ
Ополаскиватель и регенерирующая соль, 9
Ополаскиватель и регенерирующая соль, 9
хническ
хническ
ое об
ое об
слу
слу
жив
жив
хническ ое об
хническ
ое об
ое обслу
слу жив
слу
жив
живание и ух
Отключение воды и электрического тока
Чистка посудомоечной машины
Средства против неприятных запахов
Чистка оросителей
Чистка фильтров
Предупре
Пре
Пре
Пре
Пре
дупреждения и рек
дупре
дупре
дупре
ждения и рек
ждения и рек
ждения и рекомендации, 1
ждения и рек
Неисправности и методы их устранения, 12
Неисправности и методы их устранения, 12
Сервис Т
Сервис Те е е е е хническ
Сервис Т
Сервис Т
Сервис Т
хническ
хническ
хническ
хническ ог ог ог ог ого Об
о Обслу
о Об
о Об
о Об
ание и ух
ание и ух
д, 10
д, 10
ание и ух
д, 10
д, 10
омендации, 1
омендации, 1
омендации, 1
слу
слу
слу
жив
живания, 13
ания, 13
ания, 13
ания, 13
ания, 13
1
Advertisement
Chapters
Table of Contents

Related Manuals for Hotpoint Ariston LFT 21677


Summary of Contents for Hotpoint Ariston LFT 21677
-
Page 1: Table Of Contents
Загрузка корзин, 6 Загрузка корзин, 6 Загрузка корзин, 6 Нижняя корзина Корзинка для столовых приборов Верхняя корзина LFT 21677 Включение и эксплуатация, 7 Включение и эксплуатация, 7 Включение и эксплуатация, 7 Включение и эксплуатация, 7 Включение и эксплуатация, 7 Запуск посудомоечной машины... -
Page 2: Монтаж
Монтаж Монтаж Монтаж Монтаж Монтаж Важно сохранить данное руководство для его Не используйте б/у трубы. последующих консультации. В случае продажи, передачи Трубы подачи воды и слива и кабель электропитания или переезда проверьте, чтобы данное техническое должны располагаться слева или справа от для руководство... - Page 3 * * * * * Пленка защиты от конденсата Пленка защиты от конденсата Пленка защиты от конденсата Пленка защиты от конденсата Пленка защиты от конденсата ВНИМАНИЕ: ОПАСНОЕ НАПРЯЖЕНИЕ! ВНИМАНИЕ: ОПАСНОЕ НАПРЯЖЕНИЕ! ВНИМАНИЕ: ОПАСНОЕ НАПРЯЖЕНИЕ! ВНИМАНИЕ: ОПАСНОЕ НАПРЯЖЕНИЕ! ВНИМАНИЕ: ОПАСНОЕ НАПРЯЖЕНИЕ! После...
- Page 4 Изделие: Посудомоечная машина Торговая марка: Торговый знак изготовителя: Модель: LFT 21677 Изготовитель: Indesit Company Страна-изготовитель: Сделано в Италии (made in Italy) Загрузка 12 столовых наборов ширина 59,5 см Размеры высота 82 см глубина 57 см Номинальное значение напряжения электропитани 220-230 V ~ я...
-
Page 5: Описание Изделия
Описание из Описание из де де лия лия Описание из де де лия лия Описание из Описание из де лия Общий вид Общий вид Общий вид Общий вид Общий вид 1 . 1 . 1 . 1 . Верхняя корзина 2. -
Page 6: Загрузка Корзин
Загр Загр узк узк а к а к ор ор зин зин Загр узк узк а к а к ор ор зин зин Загр Загр узк а к ор зин Верхняя корзина Верхняя корзина Верхняя корзина Верхняя корзина Верхняя корзина Перед... -
Page 7: Включение И Эксплуатация
Вк Вк лю лю чение и чение и Вк лю лю чение и чение и Вк Вк лю чение и эксплуатация эксплуатация эксплуатация эксплуатация эксплуатация Запуск посудомоечной машины Запуск посудомоечной машины Загрузка моющего вещества Загрузка моющего вещества Загрузка моющего вещества Загрузка... -
Page 8: Программы
Программы Программы Программы Программы Программы Описание ДОПОЛНИТЕЛЬНЫХ ФУНКЦИЙ смотрите в таблице Дополнительных функций на странице разделов Запуск и эксплуатация. Количество и тип программ и дополнительных функций варьирует в зависимости от модели посудомоечной Количество и тип программ и дополнительных функций варьирует в зависимости от модели посудомоечной Количество... -
Page 9: Ополаскиватель И Регенерирующая Соль
Опо Опо ласкив ласкив ласкив а а а а а т т т т т е е е е е ль и ль и ль и Опо ласкив ль и Опо Опо ласкив ль и регенерирующая соль регенерирующая соль регенерирующая соль регенерирующая... -
Page 10: Т Т Т Т Т Е Е Е Е Е Хническ
Т Т Т Т Т е е е е е хническ хническ хническ ое ое хническ ое ое хническ ое обслуживание и уход обслуживание и уход обслуживание и уход обслуживание и уход обслуживание и уход Периодически очищайте водный фильтр, расположенный на выходе... -
Page 11: Общие Требования К Безопасности
Пре Пре дупре дупре ждения и рек ждения и рек омендации омендации Пре Пре дупре Пре дупре дупре ждения и рек ждения и рек ждения и рек омендации омендации омендации За более подробной информацией о правильной Изделие спроектировано и изготовлено в утилизации... -
Page 12: Неисправности И Методы Их Устранения
Неисправности и Неисправности и Неисправности и Неисправности и Неисправности и методы их устранения методы их устранения методы их устранения методы их устранения методы их устранения В случае обнаружения аномалий в работе изделия проверьте следующие пункты перед тем, как обратиться в Сервис технического... -
Page 13: Сервисное Обслуживание
Сервисное Сервисное Сервисное Сервисное Сервисное обслуживание обслуживание обслуживание обслуживание обслуживание Мы заботимся о своих покупателях и стараемся сделать сервисное обслуживание наиболее качественным. Мы постоянно совершенствуем наши продукты, чтобы сделать Ваше общение с техникой простым и приятным. У У У У У х х х х х о о о о о д за т д... -
Page 15: English
Control panel Loading the racks, 19 Lower rack Cutlery basket Upper rack Start-up and use, 20 LFT 21677 Starting the dishwasher Measuring out the detergent Wash options Wash cycles, 21 Table of wash cycles Rinse aid and refined salt, 22... -
Page 16: Installation
Installation Keep this instruction manual in a safe place for Connecting the water inlet hose future reference. If the appliance is sold, given away or • To a suitable cold water connection point: before moved, please ensure the manual is kept with the attaching the hose, run the water until it is perfectly machine, so that the new owner may benefit from the clear so that any impurities that may be present in the... -
Page 17: Advice Regarding The First Wash Cycle
Anti-flooding protection Anti-condensation strip After installing the dishwasher, open the door and stick To ensure floods do not occur, the dishwasher: - is provided with a special system which blocks the the adhesive transparent strip under the wooden shelf in water supply in the event of anomalies or leaks from order to protect it from any condensation which may inside the appliance. -
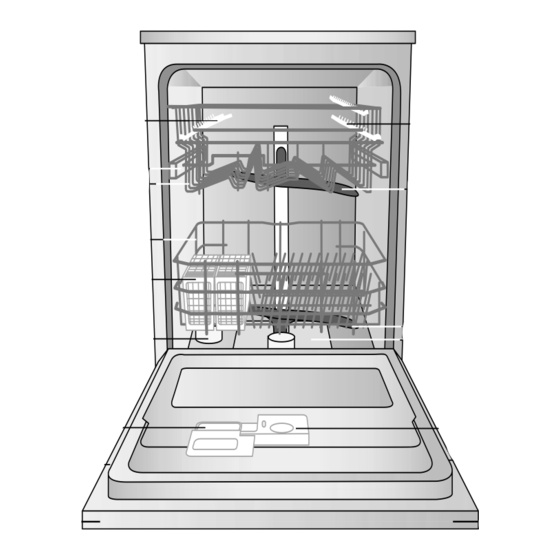
Page 18: Description Of The Appliance
Description of the appliance Overall view Upper rack Upper sprayer arm Tip-up compartments Rack height adjuster Lower rack Lower sprayer arm Cutlery basket Washing filter Salt dispenser Detergent and rinse aid dispensers Data plate Control Panel Control panel Select wash cycle button Low salt indicator light... -
Page 19: Loading The Racks
Loading the racks Upper rack Before loading the racks, remove all food residue from Load this rack with delicate and lightweight crockery: glasses, crockery and empty liquids from glasses and cups. cups, saucers and shallow salad bowls. After loading the appliance, make sure that the sprayer arms can rotate freely. -
Page 20: Lft 21677 Start-Up And Use
Start-up and use Starting the dishwasher Measuring out the detergent 1. Turn the water tap on. A good wash result also depends on the correct 2. Open the door and press the ON/OFF button: you will amount of detergent being used; exceeding the hear a short beep and the ON/OFF and wash cycle stated amount does not result in a more effective indicator lights switch on for a few seconds. -
Page 21: Wash Cycles
Wash cycles If the crockery is only lightly soiled or if it has been rinsed with water before being placed in the dishwasher, reduce the amount of detergent used accordingly. The number and type of wash cycles and options may vary depending on the dishwasher model. Wash cycle Detergent duration... -
Page 22: Rinse Aid And Refined Salt
Rinse aid and refined salt level has been reached (1-2-3-4-5 see Water hardness Only use products which have been table ). specifically designed for dishwashers. E.g. hardness 1 (indicator light 1 flashing) Do not use table salt or industrial salt, or hardness 2 (indicator light 1 illuminated, indicator light 2 washing up liquid. -
Page 23: Care And Maintenance
Care and maintenance Clean the water inlet filter at the tap outlet regularly. - Turn off the water tap. - Unscrew the end of the water inlet hose, remove the filter and clean it carefully under running water. - Replace the filter and screw the water hose back into position. -
Page 24: Precautions And Advice
Precautions and advice This appliance was designed and manufactured in For further information relating to the correct disposal compliance with current international safety standards. of household appliances, owners may contact the The following information has been provided for safety relevant public authority or the local appliance reasons and should therefore be read carefully. -
Page 25: Troubleshooting
Troubleshooting Whenever the appliance fails to work, check for a solution from the following list before calling for Assistance. Problem: Possible causes / Solutions: The dishwasher does not start or • Switch off the appliance by pressing the ON/OFF button, switch it back on after cannot be controlled approximately one minute and reset the program. -
Page 26: Assistance
Assistance We care about our consumers and we always try to provide the highest level of service. We keep improving our products to make your contact with the appliance simple and pleasant. Accessories Extend the life of your appliance and decrease the possibility of its breakdown. Try out the Indesit Professional accessories range for an easy and effective care about your domestic appliances. - Page 28 195082778.02 02/2012 - Xerox Fabriano...