Table of Contents
Advertisement
Advertisement
Table of Contents

Related Manuals for Dong Gu Co VENUSTA MASTER

Summary of Contents for Dong Gu Co VENUSTA MASTER
- Page 1 VENUSTA MASTER Model : VENUSTA MASTER-E VENUSTA MASTER-S...
-
Page 2: Table Of Contents
Contents 1. Contents / Accessories ‥‥‥‥‥‥‥‥‥‥‥‥‥‥‥‥‥‥‥‥‥‥‥‥‥‥‥‥ 1 2. Note ‥‥‥‥‥‥‥‥‥‥‥‥‥‥‥‥‥‥‥‥‥‥‥‥‥‥‥‥‥‥‥‥‥‥‥ 2 3. Description of part ‥‥‥‥‥‥‥‥‥‥‥‥‥‥‥‥‥‥‥‥‥‥‥‥‥‥‥‥‥‥‥ 3 4. Installation – Bean hopper ‥‥‥‥‥‥‥‥‥‥‥‥‥‥‥‥‥‥‥‥‥‥‥‥‥‥‥ 4 5. Installation – Canister and Milk cooler ‥‥‥‥‥‥‥‥‥‥‥‥‥‥‥‥‥‥‥‥‥ 5 6. Installation – How to install the machine ‥‥‥‥‥‥‥‥‥‥‥‥‥‥‥‥‥‥‥‥ 6 7. -
Page 3: Note
Note This section refers all instruction to use product in safe and correct way. Be sure to follow all instructions to prevent any accidents and danger. The warning mark refers possibility The caution mark refers possibility of significant danger, death and fire of damage, injury and loss if user Caution if user do not follow instructions. -
Page 4: Description Of Part
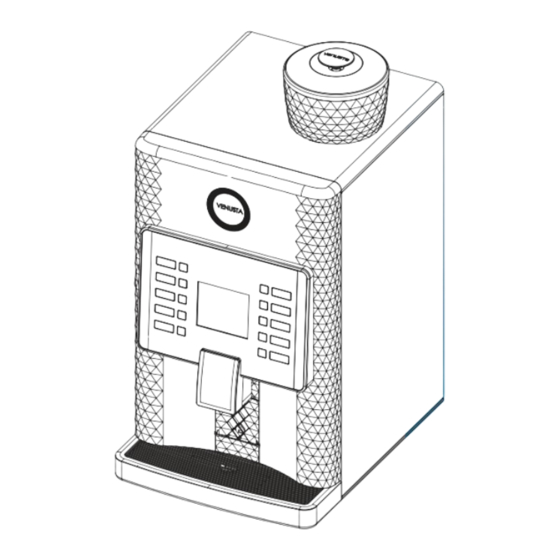
Brewer cleaning button Water tray ④Decrease button Mixing ball cleaning button Drinks name panel cover Inside [VENUSTA MASTER / VENUSTA MASTE-E] [VENUSTA MASTER-S] Canister Bean hopper *VENUSTA MASTER-E: canister 4pcs / mixing bowl 3pcs *VENUSTA MASTER: canister 3pcs / mixing bowl 2pcs... -
Page 5: Installation - Bean Hopper
I n stal l a ti o n-Bean H opper How to fit and fill bean hopper Press bean hopper connecting pipe downward and fit to the worm lever. Bean hopper connecting pipe Worm lever Fit the bracket into the bean hopper connecting pipe as figure. Then screw THM Screw (2pcs) to the hole of main chassis and the fixing bracket tightly. -
Page 6: Installation - Canister And Milk Cooler
I n stal l a ti o n-Cani s ter a nd M i l k c ool e r How to fit and fill powder canisters Grab the handle and lift the canister up slightly and pull front part of canister toward user. -
Page 7: Installation - How To Install The Machine
I n st a l l a t i o n- ※Depending on the water used might cause calcification inside of internal components. How t o i n st a l l t h e m achi n e Recommended to check it in every 6 months to prevent any problem in machine working. -
Page 8: Installation - Adjust Coffee Bean Grind Level/How To Use Setting Button
* Fill water sign: Press “Setting/Reset” button when displayed “Fill water sign”. * Milk line cleaning: Prepare a cup of pure water under Milk nozzle (Connecter-N1) to clean milk line.(Only VENUSTA MASTER-S) Press Setting/Cancel button more than 3 seconds. [Mode / B r e wer R eset ] * Press Mode button/Brewer Reset button more than 3 seconds to initialize the brewer mech. -
Page 9: Display Icons
Di s pl a y i c ons ※It’s displayed machine operating & setting values. [Expl a nat i o n o f d i s pl a y i c ons] Figure Explanation of Icon Figure Explanation of Icon * When Grinding or Bean volume setting. -
Page 10: Ingredients Setting
Ingredients setting Press the Setting/Reset button inside door. Display will be shown “SET”. When displayed “SET”, press dinks menu button to adjust ingredient volume and water volume. Press Increase/Decrease button inside door to adjust menu’s recipe. It goes for next recipe if you press same drink menu again. -
Page 11: Price Unit Setting
Price unit setting 설정 모드 Press the Setting/Reset button inside door. Display will be shown “SET”. Press Mode / Brewer Reset button to move price unit setting. ※ Price unit setting -1(Un1): Setting for minimum unit price ※ Price unit setting -2(Un2): Setting for maximum unit price Press Mode / Brewer Reset button one time to set Price unit setting -2(Un2) after Price unit setting -1(Un1) setting. -
Page 12: Price Setting
Price setting ※ If the machine has no coiner, selling price should be set 000(free). Press the Setting/Reset button inside door. Display will be shown “SET”. Press Mode / Brewer Reset button inside door to move price setting mode. First menu’s price will be shown. Display will show “P r i.”... -
Page 13: Hot Water Temperature Setting
Hot water temperature setting ※ It’s setting for inside machine hot water temperature, it’s not drinks temperature. 설정 모드 Press the Setting/Reset button inside door. Display will be shown “SET”. Press Mode / Brewer Reset button inside door to move Hot water temperature setting mode. Press “Increase / Clean brewer button”, “Decrease / Clean Mix button”... -
Page 14: Counting Sales Cups
Counting sales cups Press the Setting/Reset button inside door. Display will be shown “SET”. Press Mode / Brewer Reset button inside door to move counting sales cups mode. Total sales cups counting will be shown. Display will show “q- - - ->” → “counting sales cups” in rotation. -
Page 15: Counting Sales Amount
Counting sales amount 설정 모드 Press the Setting/Reset button inside door. Display will be shown “SET”. Press Mode / Brewer Reset button inside door to move counting sales amount mode. Total sales amount will be shown. Display will show “P- - -“(first) -> “0000”(second) in rotation. -
Page 16: Cake Counting Setting
Cake counting setting 설정 모드 Press the Setting/Reset button inside door. Display will be shown “SET”. Press Mode / Brewer Reset button inside door to move cake setting mode. Display will show “C.C n t.” -> “counting value” in rotation. * CAKE counting range: 0 ~ 200 times Press “Increase / Clean Brewer button”, “Decrease / Clean Mix button”... -
Page 17: Cup Sensor Setting
Cup sensor setting 설정 모드 Press the Setting/Reset button inside door. Display will be shown “SET”. Press Mode / Brewer initialization button inside door to move cup sensor setting mode. * Cup sensor using: CS-y * Cup sensor no using: CS-n Press “Increase / Clean Brewer button”, “Decrease / Clean Mix button”... -
Page 18: Cup Volume Setting
Cup volume setting ※ The receipt will be adjusted automatically by cup volume setting 설정 모드 Press the Setting/Reset button inside door. Display will be shown “SET”. Press Mode / Brewer Reset button inside door to move cup volume setting mode. Display will show “CUP”... -
Page 19: Initialization Of Recipe / End Mode
Initialization of recipe 설정 모드 Press the Setting/Reset button inside door. Display will be shown “SET”. Press Mode / Brewer Reset button inside door to move Initialization of ingredient mode. Press “Increase / Clean Brewer button”, “Decrease / Clean Mix button” . Drinks recipe will be returned to factory setting if you press Setting/Cancel button more than 5 seconds. -
Page 20: Error Messages & Checking / Part Disassembly
Error messages & checking ※ If this symptom happened frequently, call to the A/S center. Display Symptom Checking point Check the thermistor connection. Thermistor – heater tank ● ● Check the thermistor’s resistance. ● Thermistor – heater tank for steam Check the connecting of thermistor. -
Page 21: Part Disassembly
Part disassembly How to disassemble brewer mech 1. Turn the chute as blow picture 2. While rotating the handle brewer ejector upward, remove brewer by lifting it up. Chute The handle brewer ejector How to Assemble Brewer mech 1. Fit brewer into the hole of brewer motor. 2. -
Page 22: How To Clean And Cleaning Schedule
How to clean and cleaning schedule ※Be sure to unplug the power cord before cleaning. Cup station / Sensor Wipe it with damp cloth. •Remove moisture completely. •Clean it more than once a day. •Clean the nozzle and keep clean every time. Canister Put the canister into water and soak ingredients solid and stuck... - Page 23 Multi tool ※To keep better taste and quality of espresso coffee, need to clean and maintain brewer periodically. Chute middle ※Recommended to clean brewer frequently. 1. Refer to the page 21, how to remove brewer. While putting the multi tool on brewer, turn it anticlockwise to the end then the lower pistion move up to be easy to clean.
-
Page 24: How To Replace Fuse / Specification
With unstandardized fuse might cause fire. ● Specification Model VENUSTA MASTER VENUSTA MASTER-E VENUSTA MASTER-S E l e c t r i c i t y P o w e r C o n s u m p t i o n 1,400W 2,950W T h e r m o s t a t 125℃... - Page 25 MEMO...
- Page 26 MEMO...
- Page 27 MEMO...
- Page 28 MEMO...
- Page 29 MEMO...
- Page 30 MEMO...
- Page 31 MEMO...
- Page 32 500-5, Sangdaewon-Dong, Sungnam, Gyeonggi-Do, Korea Tel. 82-31-731-3600 ext. 730 / 731 Fax. 82-31-733-1155 Email. info@venusta.net...
Need help?
Do you have a question about the VENUSTA MASTER and is the answer not in the manual?
Questions and answers