Table of Contents
Advertisement
Quick Links
IMPORTANT INSTRUCTIONS:
product. Failure to follow these instructions may result in serious personal injury.
TOOLS REQUIRED:
7/16" socket or nut driver, 7/16" open end wrench, measuring tape, phillips/star & flat head screwdriver,
hammer, 5/16" & 1/8" drill bit , drill, saw and a pencil
• • • •
This pool ladder (Model SLI) has a 300 lbs. load capacity - one person - when properly assembled & installed
• • • •
Your above ground pool has SHALLOW WATER - Absolutely NO DIVING or NO JUMPING into the pool at any time
• • • •
Follow attached instruction for assembly & installation of the ANTI-ENTRAPMENT BARRIER (MUST BE UTILIZED)
• • • •
For entry / exit of the pool, face ladder at all times
• • • •
This ladder is designed for use by one person at all times
• • • •
Make certain ladder is adjusted properly to pool floor depth & deck height
• • • •
Ensure ladder base tread is securely fastened, has no sharp edges and is free of debris so it will not damage pool liner
• • • •
Secure ladder to deck surface and / or top rail of pool (depending on how deck is constructed in relation to your pool)
• • • •
Assemble and install ladder as per manufacturer's instructions. Do not deviate from these instructions - injury can occur
• • • •
Keep top platform and treads of the ladder free from obstructions to avoid possible injury. Do not secure any items to the ladder. Such
objects (eg. thermometer, play toys, safety ropes) may create the potential for tripping or entanglement
• • • •
This product conforms to the latest revision of the ANSI/APSP standard for aboveground/on ground swimming pool ladders
• • • •
This ladder is designed and intended for use as an above ground pool ladder only - do not use for any other purpose
• • • •
NEVER SWIM ALONE / REMEMBER, NOTHING REPLACES PARENTAL SUPERVISION / SWIM SAFELY
1.
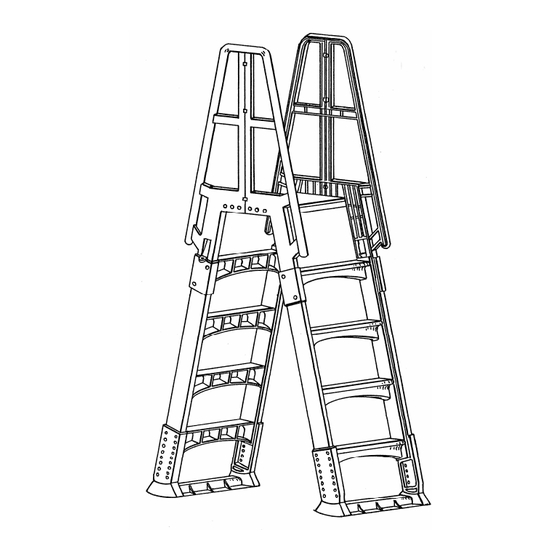
This CONVERSION KIT is to be used with / for Model SLA a-frame ladder ONLY. The conversion kit is used to convert the a-frame
ladder into Model SLI in-pool deck ladder for use with / on a pool deck
2.
If you have already built your pool deck it would be wise to read ALL the instructions contained within to better familiarize yourself with
the proper and intended use of these products. It may help in designing your deck if it has not yet been built for proper fit & function
3.
This instruction assumes that the a-frame ladder is already assembled and has been used with your pool. If this is not the case, please
go directly to the assembly instructions for Model SLI in-pool deck ladder (later pages included)
4.
Refer to Detail 1.1, 1.2 and 1.3 (ladder parts, hardware parts and finished appearance) for assistance during the assembly / disassembly
5.
Disconnect both sides of the handrail sets A1+A2 by loosening the three (3) H1 bolts, washers and nuts on each side (see Detail 2). Set
this hardware aside for later use / requirements
6.
GENTLY, using a flat head screwdriver, pry the handrails for the EXTERIOR PORTION of the ladder from the top platform (A1 and A2
from platform E). The exterior portion of the a-frame ladder is the side that "slides" up and down and locks (portion used outside the
pool) - (see Detail 3). It is important to be gentle as not to break the locking tabs that hold these in place. It is easiest to pry from the
bottom, on the underside of the top platform E (see Detail 4). Repeat for both sides of the exterior portion only
7.
Once separated, snap the in-pool ladder flanges (G1 and G2), packaged with the conversion kit, to the top platform where you had just
removed the A1 and A2 handrails. NOTE: the G1 gets placed where the A1 was removed and the G2 gets placed where the A2 was
removed. Make certain the button-lock tabs on the sides of platform E protrude through the flanges and lock securely in place. Secure
using H1 bolts, washers and nuts for both G1 and G2 flanges (see Detail 5)
8.
To ensure the top platform E does not come apart from the remaining handrails, predrill a 1/8" pilot hole and secure using the 3/4"
screws provided. Repeat at four (4) locations (see Detail 6)
9.
Once you have completed Step 8, please refer to Model SLI instructions included )following pages). This instruction will outline the
proper assembly and use of your desired in-pool deck ladder
10. NOTE: additional / extra hardware has been included for your use. Some hardware may be remaining / left over as some hardware
would have been removed from the a-frame ladder
11. It is important to follow all instructions closely and do not deviate from them - serious personal injury may result. Please
review all safety instructions and proper use with all individuals using this pool ladder to prevent possible injury
Please do not hesitate to contact our customer service if you have any questions, comments or concerns regarding this or any of our products
Read all instructions completely to become familiar with assembly, safety and proper use of this
SAFETY INSTRUCTIONS AND PROPER USE
DISASSEMBLY / ASSEMBLY & INSTALLATION
QUESTIONS ? ~ COMMENTS ? ~ CONCERNS ?
(email cserv@vinylworkscanada.com)
877-VINYL WK
MODEL SLC
A-FRAME LADDER CONVERSION KIT
( to be used with / for Model SLA Slide-Lock Ladder)
ASSEMBLY INSTRUCTIONS
www.vinylworkscanada.com
Advertisement
Table of Contents

Related Manuals for VinylWorks SLC


Summary of Contents for VinylWorks SLC
- Page 1 MODEL SLC A-FRAME LADDER CONVERSION KIT ( to be used with / for Model SLA Slide-Lock Ladder) ASSEMBLY INSTRUCTIONS IMPORTANT INSTRUCTIONS: Read all instructions completely to become familiar with assembly, safety and proper use of this product. Failure to follow these instructions may result in serious personal injury.
- Page 2 A-FRAME - DETAIL 1.1 PARTS - DETAIL 1.2 IN-POOL - DETAIL 1.3 DETAIL 2 REMOVE H1 HARDWARE (3 x BOTH SIDES) WASHER #8x3/4 SCREW PRY WITH DETAIL 3 FLAT HEAD HARDWARE SCREWDRIVER EXTERIOR DETAIL 1.4 DETAIL 4 PORTION “SLIDE” SECTION DETAIL 6 DETAIL 5...
- Page 3 MODEL SLI IN-POOL DECK LADDER (With Barrier) ASSEMBLY INSTRUCTIONS IMPORTANT INSTRUCTIONS: Read all instructions completely to become familiar with assembly, safety and proper use of this product. Failure to follow these instructions may result in serious personal injury. TOOLS REQUIRED: 7/16" socket or nut driver, 7/16" open end wrench, measuring tape, phillips screwdriver, hammer, 5/16" drill bit , drill, saw and a pencil SAFETY INSTRUCTIONS AND PROPER USE SAFETY INSTRUCTIONS AND PROPER USE...
- Page 4 ASSEMBLY & INSTALLATION (CONTINUED) • Position the ladder in the pool at the desired location with the deck. Slide the ladder toward the top rail of the pool or deck (See Detail 7). Make certain the anti-entrapment barrier does not touch the pool wall but is relatively close, reducing the gap / opening between the barrier and the pool wall to prevent entrapment / children from swimming behind.
- Page 5 LOCKING MECHANISM (INSIDE) LEAVE H2 (INSIDE) EMPTY LEAVE FOR NOW EMPTY FOR NOW DETAIL 2 DETAIL 3 DETAIL 4 DETAIL 5 DETAIL 6 H2 BOLTS or SCREWS DETAIL 8A SLIDE LADDER BLOCK DECK DETAIL 7 DETAIL 8B...
- Page 6 MODEL SLA / SLI - ANTI-ENTRAPMENT BARRIER INSTRUCTION IDENTIFY IDENTIFY IDENTIFY IDENTIFY BARRIER BARRIER BARRIER BARRIER PARTS PARTS PARTS PARTS BA + BC BB + BD 1. Fit parts together ( BA + BC & BB + BD ), align small screw holes and secure with 1/2"...
Need help?
Do you have a question about the SLC and is the answer not in the manual?
Questions and answers