Table of Contents
Advertisement
Advertisement
Table of Contents

Related Manuals for Volvo Penta SX-A


Summary of Contents for Volvo Penta SX-A
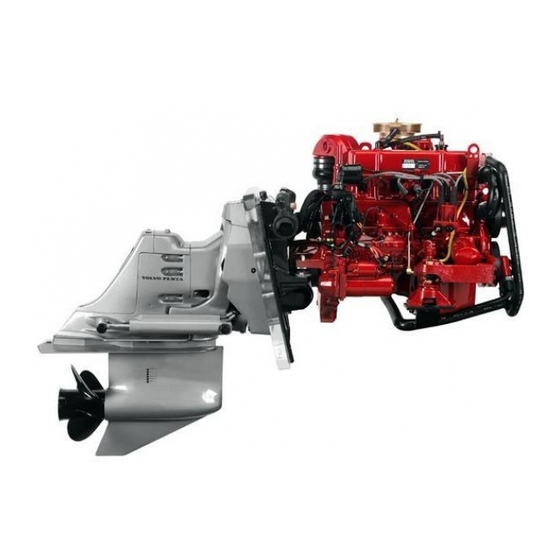
- Page 1 OPERATOR’S MANUAL 5.0L, 5.7L, 8.1L SX-A, DPS-A...
- Page 2 Copyright © 2009 Volvo Penta of the Americas, Inc. All rights reserved. This publication may not be copied, photocopied, reproduced, or converted to any electronic or machine-readable form in whole or in part without the express written consent from...
-
Page 3: Table Of Contents
Content Foreword ...................... 2 Safety Information ..................4 Introduction ....................12 Presentation ....................14 Instruments and Controls ................ 17 Optional ..................... 55 Starting ...................... 57 Operation ....................66 Engine Shutdown ..................83 Fault Code Register .................. 88 In Case of Emergency ................91 Troubleshooting .................. -
Page 4: Foreword
This manual applies to the following engines and sterndrives: Raw Water Cooled Engine Model Spec. No. Drive Displacement 5.0L 5.0 GXiE-J 3869446 SX-A & DPS-A 5.7 GiE–300-J 3869447 5.7L SX-A & DPS-A 5.7 GXiE-J 3869448 8.1 GiE-J 3869449 8.1L SX-A & DPS-A 8.1 GXiE-J... - Page 5 Volvo Penta product. Volvo Penta continually commits a considerable part As an owner of a Volvo Penta marine engine, we of its development resources toward minimizing the would also like to welcome you to a worldwide net- environmental impact of its products.
-
Page 6: Safety Information
If you do not understand or are uncertain about any operation or information in this owner’s manual, please contact your Volvo Penta dealer. Your dealer will be able to help you with an explanation or will demonstrate the operation. Federal law requires manufacturers to notify owners in the event that a safety related defect is discovered on any of their products. - Page 7 Safety Information Maintenance Performing maintenance on the engine can be a dangerous undertaking. We strongly recommend that you con- sult your dealer. Find the correct information in the following publications: this operator’s manual, any applicable Do it Yourself manual, and any applicable workshop manuals. Engine Decals Check that the warning decals on the engine are always clearly visible.
- Page 8 Safety Information Serpentine Belt and Pulley System CAUTION! Working around the serpentine belt and pulley system can be dangerous. To prevent possible injury caused by pinching, crushing or entanglement, always observe these precautionary measure when working around the engine: ● Ensure that the engine cannot be started by removing the ignition keys from each starting location. This hazard is especially likely to occur if the engine room or engine compartment cannot be seen from various remote starting positions such as a flybridge or enclosed cabin.
- Page 9 Safety Information Carbon Monoxide DANGER! Do not run the engine while there are people located on or near the swim platform and transom. DANGER! Do not tow anyone using water sports equipment (such as skis and inner tubes) closer than twenty feet (6 meters) from the boat.
- Page 10 Safety Information How is a Person Affected by Carbon Monoxide? Carbon monoxide is absorbed by the lungs and reacts with blood hemoglobin to form carboxyhemoglobin, which reduces the oxygen carrying capacity of the blood. The result is a lack of oxygen for the tissues, with subsequent tissue death and, if exposure is prolonged, death of the individual.
- Page 11 Safety Information Stationary Operation A boat operator should be aware that dangerous con- centrations of CO can accumulate when propulsion engines and/or an auxiliary generator is operated while the boat is stationary. This is especially true when rafted or moored in a confined area such as boat- houses, or when in close proximity to seawalls or other boats.
- Page 12 Safety Information Underway Operation Do not sit on, occupy or hang on any stern appendages (e.g., swim platforms, boarding ladders, etc.) while underway. Do not body surf, commonly known as “teak surfing” or “platform dragging,” in the wake of the boat. Do not tow persons in close proximity to the stern of the boat.
- Page 13 Refer to the Maintenance Schedule and Main- tenance sections of this manual for instructions on keeping your engine and sterndrive in good condition. NOTICE! Be sure to see your Volvo Penta dealer for regular inspections. 47700033 02-2009...
-
Page 14: Introduction
Penta. Your dealer should provide you with proof of ownership in the form of an Owner's Registration Card or a print-out of the Volvo Penta computer on-line reg- istration screen. This provides proof of ownership and is required to validate warranty, should warranty serv- ice become necessary. - Page 15 Volvo Penta dealer, Volvo Penta on the Internet is the web site to visit. Additionally, you will find a wealth of infor- mation related to our company and all the new and innovative products we have to offer.
-
Page 16: Presentation
EVC Diagnostic Function. If you want to supplement the instrumentation, if your boat is equipped with instruments not described here, or if you are unsure about the functionality of your instrumentation, please contact your Volvo Penta dealer. Main EVC Components... - Page 17 EVC system. controls and monitors the engine. B. Helm Station Control Unit (HCU) – This compo- H. Volvo Penta options (not shown) – The following nent handles communication between the instrumen- components can be connected to the EVC system to tation and the controls.
- Page 18 Presentation Main Station The boat always has one main helm control station. It is the only station equipped with ignition keys. The system voltage must be turned on here to allow sec- ondary stations to be used. Standard instrumentation and controls: 1.
-
Page 19: Instruments And Controls
NOTICE! If you want to supplement the instrumenta- tion, your boat is equipped with instruments not descri- bed here, or you are not sure about their functionality, please contact your Volvo Penta dealer or boat dealer. Start/Stop Panel The start/stop panel is situated on stations other than the main station. - Page 20 Instrument panels can also be supplemented with extra Volvo Penta instruments such as: synchronization tach- ometers, fuel gauge, fresh water gauge, clock, speedometer, or rudder indicator.
- Page 21 Instruments and Controls Optional Gauges There is one gauge (of each type) for each engine. All gauges are optional; however, the boat is always equipped with either an EVC System Tachometer with LCD display or an EVC System Display, since at least one of these instruments is needed when modifying EVC settings.
- Page 22 Instruments and Controls Alarm Display (Optional) There is one alarm display for each engine. A start-up test checks that all lamps are working when the ignition key is first turned to RUN/ON. All the warn- ing lamps should light up during this test. Check that all lamps function.
- Page 23 Instruments and Controls Water in Fuel Functionality not available for gasoline engines. 50833 Battery: Amber Indicator The battery lamp lights up if the alternator is not charg- ing. Stop the engine if this lamp lights up during oper- ation. If the lamp lights up, this can be due to a fault in the electrical system or because the alternator drive 50834 belt is slack.
- Page 24 Instruments and Controls Oil Level Functionality not available for gasoline engines. 50837 Control Panel Panel for single engine installations Panel for twin engine installations The buttons on the EVC control panel command the following functions: 1. ACTIVATION BUTTON – This button activates and locks/unlocks a station.
- Page 25 Instruments and Controls EVC System Display There are two types of displays: ● EVC System Tachometer Display – An LCD display integrated into the EVC System Tach- ometer. It displays the EVC Basic Window. 51274 ● EVC System Display – A multiple window dis- play–meaning that several windows can be monitored simultaneously–of which the EVC Basic Window (of the tachometer) is one of the...
- Page 26 Instruments and Controls EVC Basic Window In the EVC Basic Window, operating information items can be monitored one at a time. It is also in this window that all EVC settings and calibration functions are found. The EVC Basic Window is operated with buttons on the EVC Control Panel.
- Page 27 Instruments and Controls Multiple Window Display The EVC System Display instrument offers the possi- bility to view multiple windows with operating informa- tion simultaneously. The display has four different pages to choose from: ENGINE, MULTI, TRIP and GRAPH. The five buttons (1–5) on the front of the display are used to operate the four pages.
- Page 28 Instruments and Controls Engine Page (Button 1) Enter the ENGINE page by pushing button 1. This page shows windows with engine speed, boat speed, and trip information. If information about boat speed is not available, coolant temperature is shown instead. If there is a tank sender installed, a fuel level gauge is shown in the trip window.
- Page 29 Instruments and Controls MULTI Page (Button 2) Enter the MULTI page by pushing button 2. There are three window types available on the MULTI page: EVC Basic Window. For additional informa- tion, please see EVC Basic Window. Pointer Instrument Window Digital Number Window 51278 Alternate between these (or combinations of these)
- Page 30 Instruments and Controls Trip Page (Button 3) Single engine installations Enter the TRIP page by pushing button 3. This display mode shows: ● TRIP FUEL – Total amount of fuel used since last time reset (l, Gal). ● TRIP RATE – Average fuel consumption since last time reset (l/h, Gal/h).
- Page 31 Instruments and Controls Settings – EVC System Display Settings for the “EVC system display” are performed using the buttons (1–5) on the display. The engine(s) must have the ignition switched on when display settings are performed. Display Contrast Adjust the display contrast by pushing button 5. Then push the “contrast buttons”...
- Page 32 Instruments and Controls Engine This setting is usually performed by the boat builder. Set which engines are connected to the display. Choices relevant to gasoline engine installations are SINGLE, PORT, STARBOARD, or TWIN (two engines to one display). 1. Enter the (hidden) CONFIGURATION MENU by 50869b pressing button 5 for 5 seconds (or more).
- Page 33 Instruments and Controls EVC Menu The MAIN MENU is the top level of the information available in the EVC Basic Window. Some information requires optional accessories. If the boat does not have this equipment installed, the information will not be available in the menus.
- Page 34 EVC System and to calibrate various parameters. CAUTION! If the boat is equipped with fuel level sender and/or multisensor from Volvo Penta, make sure that the set- tings for fuel tank calibration and depth alarm are per- formed before starting to operate. 50841 Some EVC settings, such as language and units, can be set according to personal preferences.
- Page 35 Instruments and Controls Trip Menu The TRIP MENU provides information from the trip computer. The selection displayed in the MAIN MENU can be set to any available trip information. For some trip information to be available, the boat must be equipped with a multisensor and/or NMEA 0183/NMEA 2000 compatible component (plotter, GPS, paddle wheel, etc.) and a fuel level sender.
- Page 36 Instruments and Controls Gauges Menu The GAUGES MENU provides operating information from the EVC system. The selection shown in the MAIN MENU can be set to any of the available gauge displays. You may scroll through gauge sub-menus by turning the SELECTION WHEEL. To return to MAIN MENU while simultaneously setting the current view as the GAUGES MENU entrance, push the SELECTION WHEEL.
- Page 37 This chapter contains instructions for using the settings menu. NOTICE! If using a Volvo Penta fuel level sensor and/or multisensor, ensure that fuel tank calibration and depth alarm settings are performed correctly before starting to operate the boat for the first time.
- Page 38 Instruments and Controls Entering the Settings Menu Most settings can only be performed if the station is activated. Activate the station with the ACTIVATION BUTTON 1. For additional information, please see Station Handling. Settings for each engine must be done independently of one another in a twin installation.
- Page 39 Instruments and Controls Settings Menu Structure Use SETTINGS MENU to set various options for the EVC system and to calibrate various parameters. For all settings and calibration procedures: Activate helm station by pushing the ACTIVATION BUTTON. For twin installations always perform the settings on the port side system.
- Page 40 Instruments and Controls PTA (On/Off) Power Trim Assist, which adjusts trim angle automat- ically according to engine speed (RPM), can be turned on and off. PTA settings can be calibrated according to preferences other than default. For additional infor- mation, please see Settings Menu: PTA Calibration. NOTICE! PTA must be turned off before taking the boat out of the water.
- Page 41 Instruments and Controls Depth Alarm (Optional) If your boat is equipped with a Volvo Penta depth sounder (multisensor) the following settings need to be performed. These settings need to be performed only on one display (twin installation) at one station for the set- tings to apply to all displays in the boat.
- Page 42 Instruments and Controls Depth Offset – Adjust the depth offset so it corre- sponds to the lowest point or the water line of the boat (depending on what depth you want to monitor). The depth sounder may be placed anywhere between these points.
- Page 43 Instruments and Controls Units Select which units to display. These settings need to be performed only on one display (twin installation) at one station for the set- tings to apply to all displays in the boat. These instructions are a continuation of the section entitled Settings Menu: Entering the Settings Menu.
- Page 44 Instruments and Controls Fuel Tank Calibration If your boat is equipped with a fuel level sensor, check to see if you can monitor the trip data “FUEL REMAIN- ING (l, Gal)." If not, a fuel tank calibration must be per- formed.
- Page 45 Instruments and Controls Fuel Full Tank Calibration When the approximate FUEL FULL TANK CALIBRA- TION is selected, the fuel level sender is calibrated in one step. This only gives an approximate value of the fuel level. Therefore all trip data concerning and based on remaining fuel volume should be recognized as approximate values only.
- Page 46 Instruments and Controls Select Language The displays can show information in 10 different lan- guages. This setting needs to be performed only on one display (twin installation) at one station for the set- tings to apply to all displays in the boat. These instructions are a continuation of the section entitled Settings Menu: Entering the Settings Menu.
- Page 47 Instruments and Controls PTA Calibration The PTA (power trim assistant) adjusts trim angle automatically according to engine speed (RPM). It is possible to set five trim angles at five different engine speeds (including idle speed). For twin installations, the PTA CALIBRATION can be performed on either display (engine side). These instructions are a continuation of the section entitled Settings Menu: Entering the Settings Menu.
- Page 48 Instruments and Controls Speed Factor (Optional) If your boat is equipped with a Volvo Penta speed sensor (multisensor), this setting needs to be per- formed. The speed factor for the boat’s paddle wheel speed sensor can be adjusted with a resolution of ± 1% (-100%–100%) to apply a correction to the output...
- Page 49 Instruments and Controls Faults Faults set in the system during a trip can be viewed in the FAULTS MENU of the EVC Basic Window (the LCD display of the tachometer). The EVC Basic Win- dow is operated with buttons on the EVC Control Panel.
- Page 50 Instruments and Controls Power Trim Power trim in an EVC installation is operated from the main or secondary station using the power trim buttons on the power trim control panel or on the con- trol lever(s). The position of the drive is shown on the trim instrument (digital or analog) or in the display(s).
- Page 51 Instruments and Controls The drives can be operated separately by pressing button 2 on the control panel for the port drive and but- ton 3 for the starboard drive. Trimming in the Drive Press button 4 on the control panel or the trim button(s) on the control lever to lower the bow of the boat (drive trimmed in).
- Page 52 Instruments and Controls Trim Range Trim range, for a drive with a single prop, is any angle between -5° and 12°. For a drive with twin props, it is any angle between -5° and 5°. This range is used to obtain the best comfort at all running speeds (from start to maximum speed).
- Page 53 Instruments and Controls Analog Instrument This instrument shows the current position of the drive. Beach range is marked with an orange zone and Tilt range with a red zone. 1. Trim range 2. Beach range (orange). 3. Tilt range (red). 50897 Tachometer LCD Display The trim angle may also be viewed in the LCD display...
- Page 54 Instruments and Controls Power Trim Assistant The power trim assistant (PTA) adjusts the trim angle automatically according to engine speed (RPM). PTA will not move the drive if it is manually trimmed above 6°. The PTA is turned on and off in the SETTINGS menu of the “single information view.”...
- Page 55 Your boat may be equipped with remote controls other than those described below. If Volvo Penta controls are not used, ask your dealer for operating instructions for the remote control used in your boat since operation and function may differ from Volvo Penta remote controls.
- Page 56 Generally, the remote control has a friction brake, which can be adjusted as necessary, to provide lighter or heavier lever action. If you are using a Volvo Penta shift control and you wish to make adjustments to the friction brake, follow the instructions below to make the necessary changes.
-
Page 57: Optional
Active Corrosion Protection System Your boat may be equipped with a Volvo Penta active corrosion protection system (APCS). This system operates with very little current drain from the boat’s electrical system. It keeps the voltage potential in the area around the drive unit in a range that is not corrosive to aluminum. - Page 58 ● Broken anode or reference sensor unit. Replace damaged unit. Follow the installation instructions included with the replacement unit, or see your authorized Volvo Penta dealer for service. If any of the malfunction conditions continue to exist after completing the steps above, see your authorized Volvo Penta dealer for further service.
-
Page 59: Starting
Starting Static Water Line Static water line is a measurement of the water level in the boat engine's exhaust system. The exhaust pas- sages of a sterndrive propulsion system are open to the water surrounding the boat A. When the engine is not running, the water level in the exhaust system will settle at the same level as the surrounding water B. - Page 60 3. Bring plugged end of hose inside the hull C 6. If the static water line does not meet these and hold next to–and above–the manifold B. specifications, contact your Volvo Penta dealer for information on high rise extension kits. Make sure one is installed before the engine is started for the first time.
- Page 61 Starting Before Starting WARNING! To prevent a possible explosion hazard, operate the engine compartment bilge blower as recommended by the boat manufacturer before starting the engine. Do not operate the engine without a fully functioning bilge blower. ● Only start the engine in a well-ventilated area. If operating the engine in an enclosed space, ensure that there is proper ventilation in order to remove exhaust gases from the area.
- Page 62 Starting 6. If your engine is equipped with a closed cooling system, check the reservoir for coolant level. Coolant level must be between MAX 1 and MIN 2. 51444 7. Check engine oil level. See Checking Engine Oil Level in the section entitled Technical Data. 51533 8.
- Page 63 Safety Equipment: Check that all required and recommended equipment is on board NOTICE! Your Volvo Penta product has been shipped with Aluminum anodes. The table below provides replace- ment information and also specifies which anodes should be used, depending on water conditions.
- Page 64 The alarm remains operational until the key is either turned to OFF or the engine is started up. 5. While Volvo Penta provides an audible alarm with every engine, its installation is determined by the manufacturer of your boat. If your boat does not have an audible alarm available, we strongly recom- mend that you contact your dealer to have one installed.
- Page 65 Starting EVC Engines EVC engines are equipped with an auto-crank feature. Momentarily turning the key to the start position, then releasing it back to the ON position I will cause the engine to continue to crank for up to 5 seconds or until the engine starts.
- Page 66 Starting Flooded Engine EVC Engines To clear a flooded engine: 1. Turn the key to ON I (RUN). 2. On the EVC control panel, press and hold the NEUTRAL BUTTON 3 while moving the control lever 2 forward to the shift position F. 3.
- Page 67 Starting Non-EVC Engines To clear a flooded engine: 1. Advance the remote control lever to the FULL THROTTLE T position. NOTICE! Be prepared to quickly move the control handle to IDLE once the engine starts. This will avoid over-speeding and possibly damaging the engine.
-
Page 68: Operation
Volvo Penta. If you have non Volvo Penta equipment installed on your boat or if the Volvo Penta equipment installed is not covered in this manual, please refer to any additional documentation that came with your boat. - Page 69 Operation Reading the Instruments NOTICE! Check instruments regularly. Stop the engine if there is an abnormal reading or if the engine alarm sounds. NOTICE! If oil pressure is too low: Stop the engine immediately and investigate. Operating the engine with oil pressure too low will damage the engine.
- Page 70 Operation Maneuvering Power Trim/Tilt Your Volvo Penta sterndrive is equipped with a power trim/tilt system as standard equipment. The power trim/tilt allows you to change the angle of the drive unit from the helm. Changing the angle of the drive unit in relation to the boat bottom is called trimming.
- Page 71 Operation Operating Trim Controls Control Panel The control panel has two standard buttons for tilt con- trol: ● The top button moves the drive trim out while raising the boat’s bow. ● The lower button moves the drive trim in while lowering the boat’s bow.
- Page 72 Operation Determining the Proper Trim The effect of the maximum “bow-up” and “bow-down” positions will be similar for most boats. The bow posi- tion best for your operating conditions could be at any trim setting between the maximum “bow-up” and “bow- down”...
- Page 73 “bow-up” or “bow-down” positions. Boat stability and steering torque can also vary due to changing water conditions. If you experience boat instability and/or high steering torque, see your Volvo Penta dealer to correct these conditions. 47700033 02-2009...
- Page 74 If there is damage, operate the boat at low RPM and 50406 take it to a Volvo Penta dealer for inspection. Operating a damaged unit could cause additional damage and could become very costly to repair. Have necessary repairs made immediately. Only operate your boat if absolutely necessary.
- Page 75 Operating the engine at wide open throttle (WOT) should be avoided since it is both uneconomical and uncomfortable. Volvo Penta recommends a cruising speed 25% lower than maximum RPM at WOT. Depending on hull type, choice of propeller, load and conditions, etc., the maximum engine speed at top...
- Page 76 If you suspect there is a problem, see your Volvo Penta dealer as soon as possible for proper diagnosis and required service or adjustment. Continued operation...
- Page 77 Operation Twin Unit Maneuvering When leaving or approaching the dock, or for any close maneuvering at slow speed, place the port engine con- trol lever 3 in neutral N (on standby) and use the star- board engine. The use of one control is very effective and more convenient.
- Page 78 Operation Neutral Interlock Button The neutral interlock button 1, available on the side- mount control only, prevents accidentally moving the throttle out of neutral. This button must be depressed to shift the throttle out of neutral. To move the control lever away from neutral: 1.
- Page 79 Operation If the PADLOCK SIGN 2 flashes, the station can not be activated. Another station is either active and locked or active with the gear engaged. If the LED above the NEUTRAL BUTTON flashes it indicates that the gear is in neutral but the control lever (on the station that is activated) is not in the neutral position.
- Page 80 Operation Locking/Unlocking Stations If an active station is locked, it is impossible to change stations and stop/start the engine from another station. Lock an active station by pushing the ACTIVATION BUTTON 1. Unlock an active locked station by pushing the ACTIVATION BUTTON. The PADLOCK SIGN 2 on the control panel indicates whether a station is locked (lit) or unlocked (off).
- Page 81 You will be able to steer the boat, but with increased effort. See your authorized Volvo Penta dealer as soon as possible to correct your power steering system. At slow speeds (no wake), your boat may tend to wan- der due to wind and current.
- Page 82 ● Boats with sensitive steering ● Boats where the distance from the top of the gunwale down to the driver’s seat is less than one foot (30 cm). Contact your Volvo Penta dealer for installation of an emergency stop switch. 47700033 02-2009...
- Page 83 NOTICE! Freeze damage to the engine package is not covered by your Volvo Penta limited warranty. Upon completion of engine operation, drain the engine as described below: 21199 ●...
- Page 84 Volvo Penta Limited Warranty. 22799 Salt Water Operation You can use your Volvo Penta sterndrive in either fresh or salt water. We recommend that you use fresh water to flush out the engine and drive after you use your boat in polluted or salt water.
-
Page 85: Engine Shutdown
Engine Shutdown Before Engine Shutdown WARNING! Never abruptly change speed. Sudden changes in speed may cause passengers to be thrown about in the boat. Power Tilt Operation Tilting is normally used for raising the drive unit to obtain clearance when beaching or launching from a trailer. - Page 86 Engines or Draining Raw Water Side of Closed Cooling System Engines. Engine Flush Volvo Penta engines incorporate an engine flushing port designed to flush the engine with fresh water while the engine is running. Flushing the engine with fresh water after each use will increase the longevity of com- ponents.
- Page 87 Engine Shutdown Trailering Your Boat 1. Before loading your boat on the trailer, tilt the drive unit up. 2. After your boat is on the trailer, completely lower the drive unit until the drive drains thoroughly. 3. Rinse the entire drive exterior with fresh water. NOTICE! Before moving the trailer, tilt the drive as high as possible and secure it in place.
- Page 88 Engine Shutdown Draining the Engine Draining Raw Water Cooled Engines 1. With the engine turned off, locate and open all drains located on both sides of the engine. Raw water drains are blue, hardened plastic plugs. NOTICE! Be sure that all water is drained from the engine.
- Page 89 Engine Shutdown Draining Raw Water Side of Closed Cooling System Engines 1. With the engine turned off, locate and open all drains located on the manifolds on both sides of the engine. Do not drain engine block! NOTICE! Be sure that all water is drained from the manifolds.
-
Page 90: Fault Code Register
EVC Action: Engine power is reduced. 50903 50831 Operator Action: Please contact a Volvo Penta 50904 workshop. Coolant Temperature: Coolant temperature too high. EVC Action: Engine power is reduced. Operator Action: ●... - Page 91 Amber – ● Check battery fluid level. ● Check belt tension. 50909 ● Please contact a Volvo Penta workshop if the fault persists. 50834 Start Relay: Faulty relay. EVC Action: None while engine is operating. If engine is off, engine will not start.
- Page 92 ● Restart engine(s). ● If the engine cannot be operated from the chosen control panel, use an alternative control panel. 50915 ● Please contact a Volvo Penta workshop if the fault persists. System Failure: Miscellaneous fault. EVC Action: None Operator Action: ●...
-
Page 93: In Case Of Emergency
Lift the boat ashore. Check the drive oil level and qual- ity. If the oil is milky-white, water has entered the drive and it must be inspected by an authorized Volvo Penta workshop. Replace the propeller if it is damaged. - Page 94 In Case of Emergency Starting Using Auxiliary Batteries DANGER! Never allow an open flame or electric sparks near the battery or batteries. Never smoke in proximity to the batteries. The batteries give off hydrogen gas during charging which, when mixed with air, can form an explosive gas.
-
Page 95: Troubleshooting
● Did the trouble occur suddenly or did it become apparent gradually? Whether servicing the boat’s systems yourself or having your product serviced by a certified Volvo Penta dealer, you will need this record of information to identify potential causes of the malfunction. - Page 96 ● Secondary circuit wiring, from coil to spark plug. ● Spark plugs–for proper gap, fouling, burned electrodes, or cracked/dirty insulator. ● Low battery voltage. ● Call for assistance or see Volvo Penta authorized dealer. Fuel System – Check: ● Fuel level.
- Page 97 ● Fuel pump pressure. ● Water or contaminants in fuel. ● Manifold vacuum leak. ● Call for assistance or see Volvo Penta authorized dealer. If At High Speed – Check: ● Air leak on suction side of fuel system. ● Too low octane fuel.
- Page 98 ● Water leaks on pressure side of supply pump. ● If equipped with a heat exchanger, check to be sure that it is free of debris. ● Call for assistance or see Volvo Penta authorized dealer. Engine Dies Out ● Refer to the section entitled Engine Protection Mode.
- Page 99 To Prevent: ● All electrical accessories including ignition circuit are turned off. ● Turn battery switch off and disconnect main battery negative cable from battery. ● If problem persists, call for assistance or see Volvo Penta authorized dealer. 47700033 02-2009...
- Page 100 A great number of environmental factors, such as baro- metric pressure, ambient temperature, humidity, the quality of fuel, and exhaust back pressure can affect engine performance. All Volvo Penta engines are tested and certified using the following fixed values or common conditions for determining the rating of the engine.
- Page 101 Troubleshooting Engine Protection Mode In a low oil pressure, low voltage, engine overheat, or lack of exhaust cooling water situation, the Electronic Fuel Injection (EFI) system will enter an Engine Pro- tection Mode (EPM). In such cases, if an acoustic alarm has been installed with your engine, the alarm will sound to notify you of a malfunction.
- Page 102 If a pump does not function, check the fuses and replace them if necessary. See your Volvo Penta dealer if further service is required. NOTICE! A loud whining noise at idle may be due to a restricted fuel filter causing a noisy fuel pump. Oper- ating the engine with a restricted filter may damage the pressure regulator or fuel pumps.
- Page 103 ● Replace any blown fuses. NOTICE! Circuit breakers or fuses that repeatedly fail indicate a problem that requires immediate attention. See your Volvo Penta dealer. Fuse and Relay Box Layout Several spare fuses and relays are located on the inside of the fuse and relay box cover. In case of malfunctioning or faulty fuses and relays, use the spares provided.
- Page 104 Troubleshooting EVC Diagnostic Function Despite regular maintenance (in accordance with the maintenance schedule) and perfect operation, faults may occur which must be addressed before the boat can be operated any further. This chapter describes the purpose of the EVC’s diagnostic function, the types of alarms and messages the operator can get from the EVC system, and how to address problems when they occur.
- Page 105 Troubleshooting Alarm for Fuel or Depth (Optional) These alarms appear as a “fuel left in %” or “depth in m/ft” pop-ups that alternate between “data symbol” and “warning triangle.” The depth alarm pop-up is also accompanied by a buzzer. 51282a Fuel/Depth Alarm Signal Lost Message This message appears as a pop-up when the Fuel or Depth alarm is out of order.
- Page 106 2. Make sure remote control is in NEUTRAL. 3. Coat full length of prop shaft and inside of prop hub with Volvo Penta prop shaft grease; removal of prop will be difficult if this is not done. 4. Ensure thrust bushing 1 is on prop shaft with inner taper toward gearcase to match taper on prop shaft.
- Page 107 Troubleshooting Removing the DPS-A Propeller NOTICE! This “get home” (emergency) procedure This procedure requires you to use Volvo Penta spe- will require you to have tools and spare prop(s) cial tools. and nuts on hand. 1. Turn ignition switch to RUN I (key on, engine off).
- Page 108 Engine Submersion 1. Remove the engine from the water as quickly as possible. 2. Contact your local Volvo Penta dealer for service. ● Your dealer will need to drain all water from the engine and immediately lubricate all internal parts.
- Page 109 Troubleshooting Steering If you experience difficulty steering the boat, check for the following possible problems: ● Check the fluid level in the power steering pump reservoir. The level must be between the “Min” and “Max” lines. ● Check that all hose clamps on the power steering system are securely tightened.
-
Page 110: Maintenance Schedule
Maintenance Schedule The operation, maintenance, and care of the Volvo Penta engine and power package, as outlined in this manual, are the owner’s responsibility. The owner must keep records of all maintenance services performed. This record of proper maintenance may be required to determine warranty coverage on certain repairs and should be trans- ferred to each subsequent owner. - Page 111 . This 50-hour check will prevent a minor problem from getting worse and helps ensure a trouble-free boating season. This is a perfect time to discuss, with your Volvo Penta dealer, any questions about your engine(s) that may have arisen during the first 50 hours of operation and to establish a routine preventive maintenance schedule.
- Page 112 Distributor cap and rotor: – worn or damaged ● ● Engine mounting screws ● Engine oil, mineral ● Engine oil, synthetic – non-Volvo Penta ● Engine oil filter ● Exhaust manifold, risers – corrosion, damage, and ● blockage Fuel filter ●...
- Page 113 Change/ Check Clean Perform 100 hours service PLUS the following: Lube Tighten Replace Engine: Engine oil, synthetic – Volvo Penta ● Drive/Transmission: Universal joint bellows and clamps ● Miscellaneous: EVC System – dealer inspection with diagnostic tool ● 250 Hours or Every Two Years: Perform 150 hours service...
-
Page 114: Maintenance
If you are uncertain about any procedures described in the manual or you would like to purchase a workshop or Do it Yourself manual, please contact your Volvo Penta dealer or visit Volvo Penta on the Internet. Keep in mind, however, that there are certain tasks which should only be performed by your Volvo Penta dealer. - Page 115 We recommend that all servicing with the engine running be undertaken by an authorized Volvo Penta workshop. Starting the Engine After Service Reinstall all protective parts removed during service operations before starting the engine.
- Page 116 Maintenance Batteries Incorrect connection of the battery can cause a spark, which would be sufficient to cause an explosion. Do not disturb battery connections when starting the engine (spark risk) and do not lean over batteries. Always ensure that the positive and negative battery leads are correctly installed on the corresponding ter- minal posts.
- Page 117 Otherwise the general instructions contained in this Operator’s Manual concerning operation, service, and main- tenance must be followed. NOTICE! Late or inadequate maintenance/service or the use of spare parts other than Volvo Penta original spare parts will invalidate Volvo Penta’s responsibility for the engine specification being in accordance with the certified variant.
- Page 118 ● Exposed cords or excessive fraying ● Oil or grease 51535 If you suspect the belt needs replacing, please refer to the Do it Yourself manual for the procedure or take your boat to a Volvo Penta dealer. 47700033 02-2009...
- Page 119 Engine Alignment Because of the special tools required, a Volvo Penta dealer must do the engine alignment. This should be done during off-season storage preparations.
- Page 120 Maintenance Fuel System Engine Fuel Filter Replacement Before you begin this procedure, be sure you have the following on hand: ● Fuel Filter ● Wrench ● Oil ● Container and absorbant rags for catching fuel spills 1. If possible, remove all passengers from the boat. If this is not feasible, ensure that all passengers are above-decks and away from confined com- partments.
- Page 121 Maintenance Cooling System NOTICE! Do not run the engine without the thermostat as the engine is likely to overheat. Replacing the Engine Thermostat For instructions on replacing the engine thermostat on closed cooling engines, please see the Do It Your- self manual.
- Page 122 Replace as necessary. 4. Lubricate the pump housing with non-petroleum based lubricant, suitable for rubber, such as glyc- erine. If you have purchased the Volvo Penta impeller kit, a packet of glycerine is included. 5. Reinstall the impeller. Reinstall the housing.
- Page 123 Maintenance Electrical System Battery Maintenance and Replacement DANGER! Never allow an open flame or electric sparks near the battery or batteries. Never smoke in proximity to the batteries. The batteries give off hydrogen gas during charging which, when mixed with air, can form an explosive gas.
- Page 124 Maintenance Spark Plugs Your engine comes equipped with high quality spark plugs that require infrequent maintenance. Please see Maintenance Schedule for replacement frequency. WARNING! 23172-e Ensure that plug wires are in good condition to avoid sparking. Sparking could potentially cause a fire or explosion.
- Page 125 No regular oil level check is required unless trim system performance is poor. If system performance is poor, refer to the Do it Your- self manual or consult your Volvo Penta dealer. 50408 47700033 02-2009...
- Page 126 Maintenance Pitot Tube (Speedometer Port) The pitot tube, located at the leading edge of the lower unit, provides pressure input for the speedometer. If the pitot tube becomes clogged (e.g. the boat runs aground or the sterndrive drags through silt as the boat is loaded onto the trailer), the speedometer may stop functioning.
- Page 127 Painting the Drive The sterndrive and transom shield require a unique paint repair procedure. Please refer to the Do it Your- self manual or see your Volvo Penta dealer for addi- tional information regarding painting the drive. Anti-fouling Paint: Drive and Transom...
- Page 128 Under these conditions, stop the engine and check the propeller for damage. If the propeller appears damaged, have it checked by your Volvo Penta dealer. Always carry a spare propeller and replace the damaged propeller as soon as possible.
- Page 129 The fluid level must be above the “Min” line and below the “Max” line. If needed, add Volvo Penta Power Trim/Tilt and Steering Fluid. Do not overfill the pump reservoir. NOTICE! Never fill the steering system with oil of unknown quality.
-
Page 130: Storage
Storage Laying Up (Winterization) Be sure that your Volvo Penta equipment is properly prepared for long or short term storage. Engine or drive damage can result if some simple maintenance steps are overlooked prior to storage. Winterizing gives you the assurance that your engine will be protected during storage and will run more reliably when you put your boat back in the water. - Page 131 Storage Long Term Storage More than two months: Fuel stabilizer (1 oz per gallon of fuel). Fuel and 2-cycle motor oil mixture, 50:1 ratio (one pint to 6 gallons). Fog engine (carburetted only). Replace engine oil and oil filter. Replace sterndrive oil. Flush engine with fresh water.
- Page 132 Storage Bringing Out of Storage When launching your boat for the first time or when starting out a new season, always carry out the steps provided in the following checklist: Reinstall all engine drain plugs. Reconnect any hoses removed for storage. Check condition of hoses;...
-
Page 133: Technical Data
Technical Data Engines Disclaimer Volvo Penta of the Americas, Inc., reserves the right to make changes in weight, construction, materials, or specifications without notice or obli- gation. 47700033 02-2009... - Page 134 Ethylene glycol OIL FILTER Engine oil filter ... . . Volvo Penta, replaceable paper element OIL CAPACITY NOTICE! Overfilling the oil can cause engine and/or sterndrive damage. We urge you to use the dipstick to check the oil level whenever you are changing or topping up the oil.
- Page 135 Ethylene glycol OIL FILTER Engine oil filter ... . . Volvo Penta, replaceable paper element OIL CAPACITY NOTICE! Overfilling the oil can cause engine and/or sterndrive damage. We urge you to use the dipstick to check the oil level whenever you are changing or topping up the oil.
- Page 136 Ethylene glycol OIL FILTER Engine oil filter ... . . Volvo Penta, replaceable paper element OIL CAPACITY NOTICE! Overfilling the oil can cause engine and/or sterndrive damage. We urge you to use the dipstick to check the oil level whenever you are changing or topping up the oil.
- Page 137 The oils are available at Volvo Penta dealers. If the Volvo Penta oils are not available, use a high quality oil that meets API SM and/or ILSAC GF-4 specifications. Viscosity should be SAE 10W30 or higher (examples;...
- Page 138 Engine Oil Specifications. Always change the filter when changing the engine oil. If Volvo Penta full synthetic gasoline engine oil is used, a longer interval is allowed between oil changes (see Maintenance Schedule). When an engine has been changed to synthetic oil, it is not recommended to change back to mineral.
- Page 139 Technical Data Changing the Oil and Filter Engine oil and the oil filter are important factors affect- ing engine life. They affect ease of starting, fuel econ- omy, combustion chamber deposits, and engine wear. Replace the engine oil according to the intervals pro- vided in the Maintenance Schedule.
- Page 140 Technical Data Replace the oil filter whenever the engine oil is changed. CAUTION! Hot oil and hot surfaces can cause burns. 1. To remove, unscrew filter canister cap A coun- terclockwise. Wait a few minutes to allow any remaining oil to drain. 2.
- Page 141 22823 the warranty. All Volvo Penta gasoline engines are engineered to operate on AKI 87 (RON 90) octane fuel. Mid-grade and premium fuels contain injector cleaners and other additives that protect the fuel system and provide improved performance.
- Page 142 Volvo Penta gasoline engines are equipped with a water separating fuel filter (see Engine Fuel Filter Replacement in the section entitled Maintenance). The use of an additional water separating fuel filter between the fuel tank and the engine is recommended.
- Page 143 The EFI system is controlled by a microprocessor, and requires no periodic mainte- nance or adjustment. If operational problems occur, see your Volvo Penta dealer. Detonation (Spark Knock) Detonation, or spark knock, is continually monitored by the electronic fuel injection (EFI) system. The EFI’s...
- Page 144 Technical Data Electrical System Battery Cables When replacing battery cables, always use multi- strand copper cables of the same gauge (or better) as those already installed in your boat by the boat builder. If you are unsure of the gauge to be used, consult your dealer.
- Page 145 Technical Data Sterndrive Drive Components The drive unit is filled at the factory with Volvo Penta Synthetic Gear Oil. Change lubricant as specified in Maintenance Schedule. Use Volvo Penta SAE 75W/90 API service GL 5 synthetic gearcase lubricant. Sterndrive Oil Capacity All SX-A Models: 2.58 quarts (2.44 liters)
- Page 146 Technical Data Identification Numbers Informational Decals and Identification Plates The following images provide graphical representations of various engine decals. The areas described are gen- eral locations and are intended to be guides only. Engine models and configurations do vary and, depending on the amount of space available, the exact locations of engine decals tend to vary also.
- Page 147 Technical Data The Emission Control Information sticker is located on the flat outside face (port side of engine) of the alternator support bracket. 22776 The tune-up and color code decal is located on the engine cover. 22775 47700033 02-2009...
- Page 148 Technical Data Identification Numbers Always provide the engine, transom shield, and drive identification numbers when ordering service or replace- ment components. The engine identification numbers are on informational decals located in the spots described on the previous page. Make a note of the information on the lines provided below. Make a copy of this page and store the information so that it is available in event of the boat being stolen.
- Page 149 Technical Data Declaration of Conformity Recreational Craft Propulsion Engines Declaration of Conformity for Recreational Craft Pro- pulsion Engines with the sound and exhaust emission requirements of Directive 94/25/EC as amended by 2003/44/EC 47700033 02-2009...
- Page 150 Technical Data 5.0 Litre Engine Manufacturer Volvo Penta of the Americas, Inc., 1300 Volvo Penta Drive, Chesapeake, VA 23320, USA Body for exhaust emission assessment Body for sound emission assessment International Marine Certification Institute International Marine Certification Institute Rue Abbé Cuypres 3 Rue Abbé...
- Page 151 Technical Data 5.7 Litre Engine Manufacturer Volvo Penta of the Americas, Inc., 1300 Volvo Penta Drive, Chesapeake, VA 23320, USA Body for exhaust emission assessment Body for sound emission assessment International Marine Certification Institute International Marine Certification Institute Rue Abbé Cuypres 3 Rue Abbé...
- Page 152 Technical Data 8.1 Litre Engine Manufacturer Volvo Penta of the Americas, Inc., 1300 Volvo Penta Drive, Chesapeake, VA 23320, USA Body for exhaust emission assessment Body for sound emission assessment International Marine Certification Institute International Marine Certification Institute Rue Abbé Cuypres 3 Rue Abbé...
-
Page 153: Alphabetical Index
Alphabetical index EVC System Display..........23 5.0 GXiE-J, 5.0 GXiE-JF........132 5.0 Litre..............148 Faults..............47 5.7 GiE-300-J, 5.7 GiE-300-JF, 5.7 GXiE-J, 5.7 Flooded Engine............64 GXiE-JF..............133 Friction Brake............54 5.7 Litre..............149 Fuel System..........118, 139 8.1 GiE-J, 8.1 GiE-JF, 8.1 GXiE-J, 8.1 GXiE- Gauges.............. - Page 154 Trailering Your Boat..........85 Trim Ranges............49 Trim/Tilt Motor Protection........ 72, 106 Twin Unit Maneuvering..........75 Twin Unit Steering........... 79 Warranty Information..........12 Washing the Engine..........115 Volvo Action Service (VAS)........12 Volvo Penta Dealer Network........13 Volvo Penta on the Internet........13...
- Page 155 NOTE: This free-of-charge Operator’s Manual offer is valid for 12 months after engine delivery. Fill in your name, postal address, email address and desired language. Publication Reference: 47700033 Name: Address: Country: E-mail: English Dansk Svenska Soumi Deutsch Português Français Ελληνικά Español Русско...
Need help?
Do you have a question about the SX-A and is the answer not in the manual?
Questions and answers