Page 1
GER = Original operating manual language Other languages = Translation of the original operating manual 
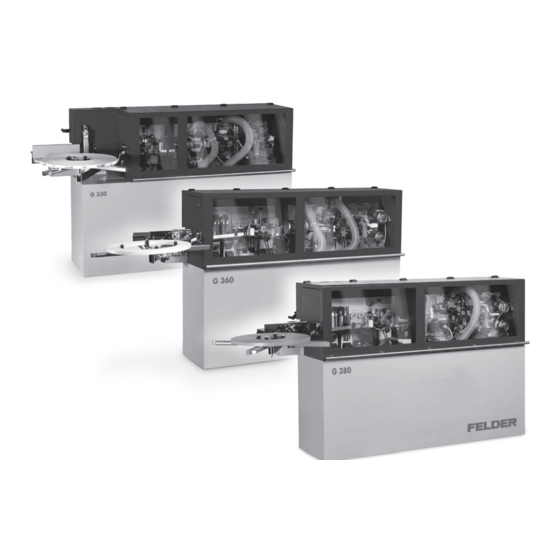
Throughfeed edgebander with chain feeder and glue pot G 330 / G 360 / G 380 Keep this manual handy and in good condition for continual reference!
Page 2
Edgebander G 330 / G 360 / G 380 FELDER A product of the FELDER GROUP! FELDER KG...
Page 3
Edgebander G 330 / G 360 / G 380 Note: Year of construction The machine number of this machine will be printed on this operating manual The final two digits of the machine number show the year of construction of this machine e.g.
Edgebander G 330 / G 360 / G 380 Table of contents 1 General ......................6 2 Safety ......................8 3 Declaration of Conformity ................12 4 Specifications ....................13 5 Assembly ..................... 17 6 Transport, packaging and storage ..............19...
Page 5
Edgebander G 330 / G 360 / G 380 Table of contents 8 Inspecting and adjusting settings - Units ............28 9 Using the controls ..................45 10 Service ....................... 47...
Edgebander G 330 / G 360 / G 380 General 1 General 1.1 Symbol legend Warning! Risk of injury or death! Warning! Danger! Electric current! Attention! Risk of material damage! Note: 1.2 Information about the manual 1.3 Spare parts Attention! Non genuine, counterfeit or faulty spare parts may result in damage, cause malfunction or complete breakdown of the machine.
Page 7
Edgebander G 330 / G 360 / G 380 General 1.4 Liability and warranty 1.5 Copyright 1.6 Warranty notice 1.7 Disposal Attention! Used electrical materials, electronic components, lubricants and other auxiliary substances must be treated as hazardous waste and may only be disposed of by specialised, licensed firms.
Edgebander G 330 / G 360 / G 380 Safety 2 Safety 2.1 Intended use Attention! Any use outside of the machine‘s intended purpose shall be considered improper and is there- fore not permitted. All claims regarding damage resulting from improper use that are made against the manufacturer and its authorised representatives shall be rejected.
Page 9
Edgebander G 330 / G 360 / G 380 Safety 2.4 Responsibilities of the operator 2.5 Personnel requirements 2.6 Work safety...
Page 10
Edgebander G 330 / G 360 / G 380 Safety 2.7 Personal protective equipment Persons with long hair who are not wearing a hairnet are not permitted to work on or with the machine! Protective clothes Protective footwear Hearing protection...
Page 11
Edgebander G 330 / G 360 / G 380 Safety 2.8 Machine hazards Warning! Danger! Electric current! Electrical energy can cause serious bodily injury. Damaged insulation mate- rials or defective individual components can cause a life-threatening electrical shock. • •...
Edgebander G 330 / G 360 / G 380 Declaration of Conformity 3 Declaration of Conformity FELDER KG KR-FELDER-STR.1 A-6060 Hall in Tirol Edgebanding machine with chain feed FELDER G 330 / G 360 / G 380 2006/42/EG 2014/30/EU EN ISO 18217...
Edgebander G 330 / G 360 / G 380 Technical specifications 4 Specifications 4.1 Dimensions and weight Ø120 mm Absauganschluß Ø120 mm Absauganschluß 1158 Connection dust-extraction Connection dust-extraction Anschluss Pneumatik Anschluss Pneumatik Compressed air connection Compressed air connection 2444 2 x Ø80 mm Absauganschluß...
Page 14
Edgebander G 330 / G 360 / G 380 Technical specifications 4.3 Technical features (G330 / G 360 / G 380) (G 330) (G 360 / G 380) Workpiece dimensions Attention! Risk of material damage! When processing very narrow workpieces, the workpiece may tilt slightly. This means that the workpiece will not be processed evenly.
Page 15
Edgebander G 330 / G 360 / G 380 Technical specifications 4.3.3 End trimming saw unit 4.3.4 Radius trimming unit 4.3.5 Buffing unit 4.4 Particle emission...
Page 16
Edgebander G 330 / G 360 / G 380 Technical specifications 4.5 Noise emission Attention! Authorised noise emissions depend on the specific country regulations in which the machine is operated. If on a rare occurence, the noise emission should exceed the country specific limits as a result of particular circumstances, the operator is obliged to provide additional protection against the noise.
Edgebander G 330 / G 360 / G 380 Assembly 5 Assembly 5.1 Overview " $ % & / Fig. 5-1: Overview " & 5.2 Data plate KR-Felder-Straße 1, 6060 HALL in Tirol AUSTRIA, Tel. +43 (0) 5223 58500 www.felder-group.com info@felder-group.com...
Page 18
Edgebander G 330 / G 360 / G 380 Assembly 5.3 Electrical control panel - Standard equipment " % & / * Choice switch ON/OFF: ON / Active: LED lights up Fig. 5-3: Electrical control panel OFF / Deactivated: Light off Thermoregulator to control the temperature of the glue &...
Edgebander G 330 / G 360 / G 380 Transport, packaging and storage 6 Transport, packaging and storage 6.1 Safety instructions Warning! Risk of injury! There is a risk of injury as a result of falling parts while transporting, loading or unloading the machine.
Page 20
Edgebander G 330 / G 360 / G 380 Transport, packaging and storage 6.2 Transport inspection 6.3 Packaging Attention! Dispose of the packaging materials in an environmentally friendly way and always in accordance with local waste disposal regulations. If applicable, contract a recycling firm to dispose of the packaging materials.
Page 21
Edgebander G 330 / G 360 / G 380 Transport, packaging and storage 6.5 Transport Attention! Transport the machine according to the enclosed transport and assembly instructions! Attention! Before lifting the machine, ensure that moveable machine parts are blocked for transport purposes.
Edgebander G 330 / G 360 / G 380 Setup and installation 7 Setup and installation 7.1 Safety instructions Warning! Risk of injury! Improper assembly and installation can lead to serious physical injury or equip- ment damage. For this reason, this work may only be carried out by authorised, trained personnel who are familiar with how to operate the machine and in strict observance of all safety instructions.
Page 23
Edgebander G 330 / G 360 / G 380 Setup and installation 7.2 Setup Installation site requirements: • 7.2.1 First cleaning of the machine 7.2.2 Setting up the edgebander Fig. 7-1: Setting up the edgebander...
Page 24
Edgebander G 330 / G 360 / G 380 Setup and installation 7.3 Compressed air supply connection Attention! Compressed air must be free of oil, condensate and particles according to: ISO 8573-1 5-4-3 Maximum limit pressure: 7 bar > 7 bar : The pneumatic system is being vented.
Page 25
Edgebander G 330 / G 360 / G 380 Setup and installation " Fig. 7-3: Electrical connection " Attention! Risk of material damage! The glue spreading roller is powered by the chain feeding system. Therefore, when testing the correct sense of rotation of the chain feeder, it is necessary to wait until the temperature of the glue pot reaches 190°C.
Page 26
Edgebander G 330 / G 360 / G 380 Setup and installation 7.6 Dust extraction port The quality of the edgebanding, the good functioning and durability of the machine all depend on the quality of the dust extraction system used.
Page 27
Edgebander G 330 / G 360 / G 380 Setup and installation...
Page 28
Edgebander G 330 / G 360 / G 380 Inspecting and adjusting settings 8 Inspecting and adjusting settings - Units 8.1 Safety instructions Warning! Risk of injury! Improper adjustment and setup work can lead to serious physical injury or material damage. For this reason, this work may only be carried out by authorised, trained personnel who are familiar with how to operate the machine and in strict observance of all safety instructions.
Page 29
Edgebander G 330 / G 360 / G 380 Inspecting and adjusting settings 8.2 Adjusting the height of the pressure bar Attention! Risk of material damage! 1) This setting has to be exact. 2) If the panel thickness is set incorrectly, the working cycle is changed and the workpieces may be damaged! "...
Page 30
Edgebander G 330 / G 360 / G 380 Inspecting and adjusting settings 8.3 Edge tape feeding " Fig. 8-3: Edge tape feeding Attention! Risk of material damage! The edging material may end up not being glued properly if these units are not set correctly.
Page 31
Edgebander G 330 / G 360 / G 380 Inspecting and adjusting settings 8.4 Solid wood edging > 4 mm " § Fig. 8-3.2: Edge tape feeding " Fig. 8-3.3: Edge tape feeding...
Page 32
Edgebander G 330 / G 360 / G 380 Inspecting and adjusting settings 8.4 Glue pots and settings Fig. 8-4.1: Glue pot Note: The glue pot heating system switches itself on once the machine is connected to a power supply, the main switch is on I/ON and the selector switch is on ON.
Page 33
Edgebander G 330 / G 360 / G 380 Inspecting and adjusting settings 8.4.1 Setting the glue quantity Warning! Risk of burns and serious injuries! Many parts of the machine are very hot, in particular the glue pot! Use all suitable methods of protection to prevent severe injury.
Page 34
Edgebander G 330 / G 360 / G 380 Inspecting and adjusting settings 8.5 Teflon coated changable gluepot Warning! Risk of burns and serious injuries! Many parts of the machine are very hot, in particular the glue pot! Use all suitable methods of protection to prevent severe injury.
Page 35
Edgebander G 330 / G 360 / G 380 Inspecting and adjusting settings 8.6 Side Trimming Unit (Optional) Note: Exchanging Shaper - See chapter entitled: Maintenance/Service 8.6.1 Operation " " Fig. 8-8.1: Setting the premilling unit 8.6.2 Setting the premilling unit "...
Page 36
Edgebander G 330 / G 360 / G 380 Inspecting and adjusting settings 8.7 Setting the guillotine shears Fig. 8-9: Setting the guillotine shears Note: For solid wood edges, the guillotine shears may not be used and must be deactivated.
Page 37
Edgebander G 330 / G 360 / G 380 Inspecting and adjusting settings Inspecting and adjusting settings 8.9 Setting the protruding edging - End trimming unit Note: This unit is used to remove the protruding tape (at the outset and the end).
Page 38
" " Fig. 8-14: Flush trimming unit Warning! Risk of injury!/Risk of material damage! Shaping tools must be handled with special care. We recommnend using exclusively original FELDER tooling (see FELDER Catalogue). Note: Exchanging Shaper - See chapter entitled: Maintenance/Service...
Page 39
Inspecting and adjusting settings 8.10.2 Height adjustment - Setting the protruding edge Note: The setting is carried out by FELDER employees on delivery. Note: Proceed very cautiously with the settings described here. The given values are recommended values and must be tested using sample workpieces.
Page 40
Inspecting and adjusting settings 8.10.3 Setting the cutting depth Note: The setting is carried out by FELDER employees on delivery. Note: Proceed very cautiously with the settings described here. The given values are recommended values and must be tested using sample workpieces.
Page 41
Inspecting and adjusting settings 8.10.4 Flush milling adjustment Note: The setting is carried out by FELDER employees on delivery. Note: Proceed very cautiously with the settings described here. The given values are recommended values and must be tested using sample workpieces.
Page 42
Edgebander G 330 / G 360 / G 380 Inspecting and adjusting settings 8.11 Radius scraping unit, glue scraping unit (Optional) 8.11.1 Radius scraping unit Attention! Risk of material damage! 1) This setting has to be exact. 2) Only use this unit on PVC edging! The scraping knives and/or the workpieces may be damaged if the setting is incorrect or if material other than PVC is used.
Page 43
Edgebander G 330 / G 360 / G 380 Inspecting and adjusting settings 8.11.2 Flush scraping unit (Optional) Attention! Risk of material damage! 1) This setting has to be exact. 2) Only use this unit on PVC edging! The scraping knives and/or the workpieces may be damaged if the setting is incorrect or if material other than PVC is used.
Page 44
Edgebander G 330 / G 360 / G 380 Inspecting and adjusting settings 8.12 Setting the buffing unit (Optional) Attention! Risk of material damage! The edging material and/or the workpieces may be damaged if the buffing brushes are too inclined.
Page 45
Edgebander G 330 / G 360 / G 380 Using the controls 9 Using the controls Note: The following value appears in the display >LUB<: See chapter entitled: Cleaning and lubrication --> Maintenance/Service 9.1 General information " " Fig. 9-1: Electrical control panel...
Page 46
Edgebander G 330 / G 360 / G 380 Using the controls 9.3 Setting the glue temperature Note: The machine has an automatic temperature reduction system: " Fig. 9-2: Setting the glue temperature Setting the glue temperature: " 9.3 Setting the end trimming unit G380 "...
Page 47
Edgebander G 330 / G 360 / G 380 Maintenance/Service 10 Service Attention! The guarantee will be rendered invalid in the case of incorrect maintenance. 10.1 Safety instructions Warning! Risk of injury! Improper maintenance can cause serious injury or damage. For this reason, this work may only be carried out by authorised, trained personnel who are familiar with how to operate the machine and in strict observance of all safety instructions.
Page 48
Edgebander G 330 / G 360 / G 380 Maintenance/Service 10.3 Cleaning and lubrication Attention! Risk of material damage! The following maintenance has to be carried out according to the instructed time intervals! Note: The following value appears in the display >LUB<. (Display of the maintenance intervals) Lubricate the machine after every 24 to 32 operating hours of intensive use.
Page 49
Edgebander G 330 / G 360 / G 380 Maintenance/Service 10.3.1 Lubrication - End trimming unit Fig. 10-3 : Lubrication End trimming unit 10.3.2 Lubricating the glue roller bearing Warning! Risk of burns and serious injuries! Many parts of the machine are very hot, in particular the glue pot! Use all suitable methods of protection to prevent severe injury.
Page 50
Edgebander G 330 / G 360 / G 380 Maintenance/Service 10.3.3 Cleaning and lubrication - Chain feeder Items required: • • • " Fig. 10-5: Cleaning and lubrication Chain feeder " 10.3.4 Check the chain tension/Set " ...
Page 51
Edgebander G 330 / G 360 / G 380 Maintenance/Service 10.3.5 Cleaning the units Attention! Risk of material damage! Do not use compressed air as this will blow dust and shavings into the diverse ball bearings and guides. Remove dust and shavings with a dust extractor.
Page 52
Edgebander G 330 / G 360 / G 380 Maintenance/Service 10.4 Replacing the burnt glue Warning! Risk of burns and serious injuries! During filling and re-filling, periodic maintenance and whilst cleaning the glue pot, be aware that the glue has an operational temperature of 200°C.
Page 53
Edgebander G 330 / G 360 / G 380 Maintenance/Service 10.4.3 Safety instructions about the hot melt adhesives Excerpt from the safety data sheets Please read the complete data sheet of each hot melt adhesive! Application purpose: EVA - Glues (ethylene vinyl acetate) -...
Page 54
Edgebander G 330 / G 360 / G 380 Maintenance/Service 10.5 Changing the saw blade - End trimming unit Warning! Risk of injury!/Risk of material damage! Handle the saw blades carefully to avoid injuring your hands and damaging the cutting edges.
Page 55
Warning! Risk of injury! Be wary of sharp edges to avoid cutting yourself, in particular when changing the tooling. We recommnend using exclusively original FELDER tooling (see FELDER Catalogue). Note: Once the tools have been changed: Check the flush trimming unit calibration and/or adjust.
Page 56
Warning! Risk of injury! Be wary of sharp edges to avoid cutting yourself, in particular when changing the tooling. We recommnend using exclusively original FELDER tooling (see FELDER Catalogue). Note: once the tools have been changed: Control or adjust the scraping unit calibration.
Page 57
10.8 Exchanging Shaper - Premilling unit Warning! Risk of injury! Be wary of sharp edges to avoid cutting yourself, in particular when changing the tooling. We recommnend using exclusively original FELDER tooling (see FELDER Catalogue). Note: See technical data for the authorised milling tools.
Page 58
Edgebander G 330 / G 360 / G 380 Maintenance/Service 10.9 Guillotine unit - Replacing, sharpening and lubricating the blades Respect the general safety rules. To replace or sharpen a shear knife which cuts from the roll, proceed as follows: Fig.
Page 59
Edgebander G 330 / G 360 / G 380 Maintenance/Service 10.10 Replacing the buffing pads - Buffing unit Attention! Risk of material damage! Remove one set of buffers at a time to avoid putting the motors back in the wrong place.
Need help?
Do you have a question about the G 330 and is the answer not in the manual?
Questions and answers