Prodigy AutoCode - Blood Glucose Monitoring System Quick Reference Guide
- Owner's manual (148 pages) ,
- Reference manual (42 pages) ,
- Quick reference manual (4 pages)
Advertisement
Introduction
Thank you for choosing the Prodigy AutoCode® Blood Glucose Monitoring System.
This quick reference offers easy instructions on how to use the Prodigy AutoCode® meter effectively.
Blood Glucose Testing
Wash your hands and the intended testing site before using the system and after obtaining a blood sample.
Only use fresh capillary blood samples for testing. Always use a new, sterile lancet and keep the lancing device clean.
Applying Blood Correctly
With the test strip inserted into the meter, bring it to the test site and place the tip next to the blood drop.

Blood will automatically be drawn into the absorbent channel once the test strip is close enough.
Do not smear blood onto the test strip or place the blood on top of the test strip.

Confirmation Window
If the absorbent channel is not full, add more blood. The meter will beep once the channel is full.

Performing a Blood Glucose Test
- Insert Test Strip
Insert the test strip and the meter will power on automatically. No Coding Required.
![]()
![]() " Your Prodigy meter is on... Please apply blood into the test strip."
" Your Prodigy meter is on... Please apply blood into the test strip."
- Apply the Blood Sample
When "![]() " appears, apply blood.
" appears, apply blood.

The meter will beep.
![]() "Testing."
"Testing."
The meter will count down from 6 to 1.
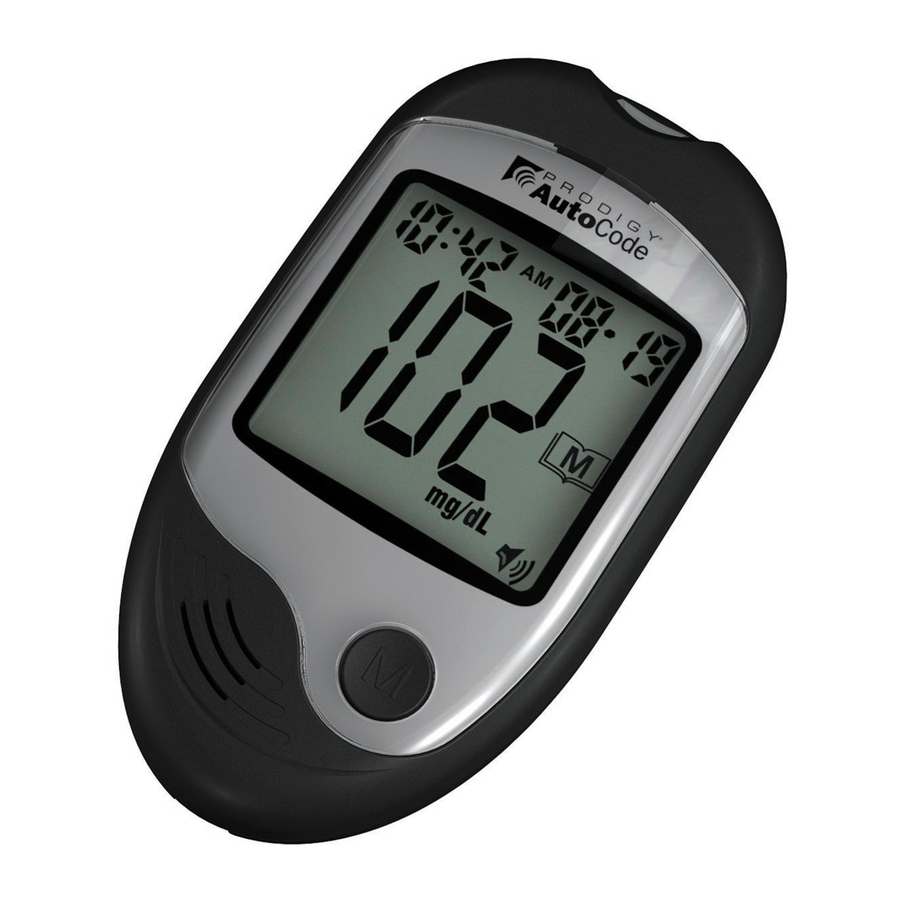
- Hear and See Test Results
![]() " Blood glucose, 103 milligrams per deciliter."
" Blood glucose, 103 milligrams per deciliter."
![]()

 " Your Prodigy meter is on... Please apply blood into the test strip."
 " appears, apply blood.

Recalling Test Results
The meter stores 450 of the most recent blood glucose test results, with date and time (in it's memory).
With the meter turned off, press and hold the "M" button to turn the meter on. Press the "M" button again to enter memory mode and the 7-day average will appear.
If you continue to press the "M" button, the 14 and 28 day averages will appear.

After the averages, you will be able to review the individual test results stored in the memory.
Adjustable Depth Lancing Device

- Twist off the Lancing Device Cover.
![]()
- Insert a sterile Lancet firmly into the Lancet Carrier.
![]()
- Hold the Lancet Needle Cover and gently twist it off the Lancet.
![]()
- Re-cap the Lancing Device Cover.
![]()
- The Adjustable Tip offers 10 levels of skin penetration.
![]()
To select the desired depth, twist the Adjustable Tip in either direction until the preferred setting lines up with the arrow.
TO SELECT THE BEST DEPTH
1 - 3 For soft or thin skin
4 - 6 For average skin
7 - 10 For thick or calloused skin
- Slowly pull the Loading Barrel away from the Lancing Device until you hear a click, indicating that the Lancet Carrier is locked into position.
![]()
Release the Loading Barrel to return it to its original position.
- Position the end of the Adjustable
![]()
Tip against the side-tip of the finger or alternate testing site. Press the Trigger Button and then lift the Lancing Device away from the testing site after the puncture is complete.
- Wait a few seconds for a blood drop to form. To help form a blood drop, gently massage the testing area.
![]()
- Remove the Lancing Device Cover and push the Lancet Ejector to release the Lancet from the Lancet Carrier. Dispose of the used Lancet into the appropriate Sharps or Bio-hazard container.
![]()


Taking Care of your Adjustable Depth Lancing Device

- Wipe your Prodigy Lancing Device with a PDI Super Sani-Cloth Germicidal Disposable Wipe.
- Do not immerse the lancing device in any liquids.
- Do not use bleach.
- Disinfect your lancing device twice a week.
After cleaning the device, unscrew the Lancing Device Cover; wipe it with a PDI Super Sani-Cloth Germicidal
Disposable Wipe for two (2) minutes. Make sure the Device Cover is completely dry before reattaching it to the device.

To reduce the risk of infection, DO NOT share or re-use a lancet. Always use a new, sterile lancet.
DO NOT share the lancing device with another person. If you are assisting someone with the process of obtaining a blood sample, it is recommended that you wear protective gloves to reduce the risk of contact with blood-born pathogens.
IMPORTANT
- All parts of the system are considered biohazardous and can potentially transmit infectious diseases, even after cleaning and disinfection.
- Do not use the Prodigy AutoCode® Blood Glucose Monitoring System during or after a Xylose Absorption Test. This may falsely raise glucose results. Please check with your Doctor before using the Prodigy AutoCode® Blood Glucose Monitoring System.
- The system exhibits interference from Acetaminophen, ascorbic acid and Ibuprofen. If you are taking acetaminophen containing drugs (Tylenol, etc., >8.0 mg/dL in your blood), or ibuprofen containing drugs (Advil, etc., > 50.0 mg/dL in your blood) or vitamin C (ascorbic acid, > 5.0 mg/dL in your blood), you may obtain inaccurate readings from this blood glucose monitoring system. Please check with your doctor before using the Prodigy Autocode® Blood Glucose Monitoring System.
- High uric acid concentrations (>8 mg/dL in your blood) may interfere with the glucose measurements with this device. If you have medical conditions that are associated with high uric acid level or hyperuricemia (e.g. gout), then please check with your Doctor before using the Prodigy AutoCode® Blood Glucose Monitoring System.
- Refer to the Prodigy AutoCode Blood Glucose Monitoring System Owner's Manual for complete list of warnings, limitations and error messages.

Documents / ResourcesDownload manual
Here you can download full pdf version of manual, it may contain additional safety instructions, warranty information, FCC rules, etc.
Download Prodigy AutoCode - Blood Glucose Monitoring System Quick Reference Guide
Advertisement


Need help?
Do you have a question about the AutoCode and is the answer not in the manual?
Questions and answers