Table of Contents
Advertisement
Quick Links
Advertisement
Table of Contents

Related Manuals for Pioneer AVH-5200DVD


Summary of Contents for Pioneer AVH-5200DVD
- Page 1 Operation Manual DVD RDS AV RECEIVER AVH-5200DVD AVH-5200BT English...
-
Page 2: Table Of Contents
Contents Thank you for purchasing this PIONEER product. To ensure proper use, please read through this manual before using this product. It is especially important that you read and observe WARNINGs and CAUTIONs in this manual. Please keep the manual in a safe and accessible place for future refer- ence. -
Page 3: Handling Guideline 65
Contents Changing audio language during playback Menu operations (Multi-audio) 30 Introduction of menu operations 39 Changing the subtitle language during Audio Adjustments 40 playback (Multi-subtitle) 30 Setting up the DVD player 43 Changing the viewing angle during playback System settings 47 (Multi-angle) 30 Entertainment settings 53 Return to the specified scene 31... -
Page 4: Precautions
Section Precautions IMPORTANT SAFEGUARDS WARNING Please read all of these instructions regarding ! Do not attempt to install or service your your display and retain them for future refer- display by yourself. Installation or servi- ence. cing of the display by persons without 1 Read this manual fully and carefully be- training and experience in electronic fore operating your display. -
Page 5: To Avoid Battery Exhaustion
Section Precautions ! When no power is supplied to this unit, To watch a DVD or Video CD on the front dis- play, park your vehicle in a safe place and such as when the vehicle battery is being apply the parking brake. replaced, the microcomputer of this unit re- turns to its initial condition. -
Page 6: Before You Start
Refer all servicing to qualified person- nel. ! The Pioneer CarStereo-Pass is for use only in If you want to dispose this product, do not mix Germany. it with general household waste. There is a se-... -
Page 7: Resetting The Microprocessor
Section Before You Start ! You can turn off the warning tone. Refer to Resetting the microprocessor Switching the warning tone on page 50. By pressing RESET, you can reset the micro- processor to its initial settings without chan- Important ging the bookmark information. -
Page 8: Feature Demo Mode
Section Before You Start Feature demo mode The feature demo automatically starts when you select Off for the source and continues while the ignition switch is set to ACC or ON. To cancel the feature demo, press and hold MUTE/ . Press and hold MUTE/ again to restart. -
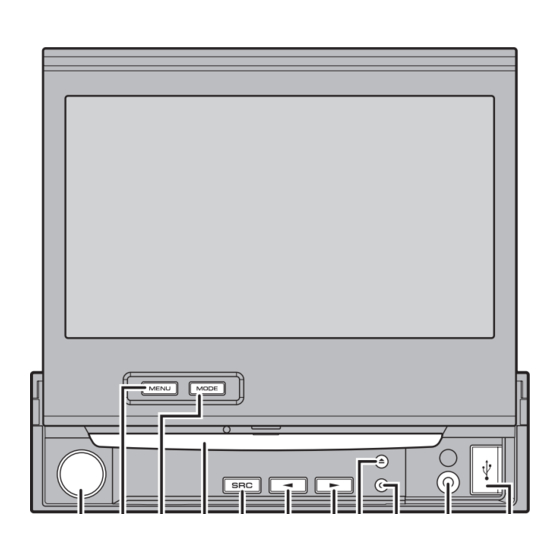
Page 9: What's What
Section What’s what Head unit CAUTION ! Use an optional Pioneer USB cable (CD-U50E) to connect the USB audio player/USB mem- ory as any device connected directly to the unit will protrude out from the unit and may be dangerous. -
Page 10: Basic Operations
Section Basic Operations Basic Operations Selecting a source using the buttons 1 Press SRC/OFF to cycle through the sources 1 1 1 2 2 2 listed below: Selecting a source using the touch panel keys Wed 28 may 1 Touch the source icon and then touch the desired 12:45 source name. -
Page 11: Operating The Scroll Bar And The Scrubber Bar
Section Basic Operations Operating the scroll bar Activating the touch panel and the scrubber bar keys 1 1 1 Audio Wed 28 may Fader/Balance F/R 0 L/R 0 12:45 Graphic EQ Super Bass Abcdeabcdeabcdeabcdeab Auto EQ Sonic Center Control L/R:0 Loudness Subwoofer 01:45... -
Page 12: Common Operations For Menu Settings/Lists
Section Basic Operations — Removing or attaching the front panel Common operations for will automatically close or open the LCD menu settings/lists panel. (Refer to page 50.) ! When the ignition switch is turned OFF (AVH-5200BT only) after the LCD panel has been closed, turn- Starting the Bluetooth telephone ing the ignition switch ON again (or turning menu. -
Page 13: Ejecting A Disc
Section Basic Operations Display the system menu. Ejecting an SD Refer to Introduction of menu operations on Removing the front panel page 39. Refer to Removing the front panel on page 7. Touch Display Tilt. Push an SD. Touch the Display Tilt keys to adjust the Ejecting an SD LCD panel to an easily viewable angle. -
Page 14: Tuner
Section Tuner Introduction of tuner Recalling radio station fre- operations quencies assigned to preset tuning keys. Refer to Storing and recalling 1 2 3 stations on page 25. Wed 28 may Local News Radio 12:45 Displaying radio text Refer to Displaying radio text Abcdeabcdeabcde 87.50 on page 25. - Page 15 Section Playing moving images 1 Touch panel keys Introduction of video playback operations Selecting the repeat range. Refer to Repeating playback You can view DVD/DVD-R/DVD-RW/CD/CD-R/ on page 28. CD-RW/USB/SD/iPod. During playback, touch the point at which you want to re- sume playback the next time Wed 28 may the disc is loaded.
-
Page 16: Switching The Media File Type
Section Playing moving images Starting the search function. Speeding down the playback Refer to Searching for the part speed in four steps, during you want to play on page 29. slow motion playback on Refer to Selecting files from Video CD. the file name list on page 31. - Page 17 Section Playing moving images tails, refer to Resume playback (Bookmark) on Playing back videos page 29. 1 Insert the disc into the disc loading slot with the ! Some operations may not be available while label side up. Playback will automatically start. watching a DVD due to the programming of ! If you are playing a DVD or Video CD, a menu the disc.
- Page 18 Section Playing audio Introduction of sound Switching the equalizer curves. playback operations Refer to Using the equali- zer on page 40. You can listen to DVD-R/DVD-RW/CD/CD-R/ Touch and hold for more CD-RW/USB/SD/iPod sound files. than two seconds to turn the auto-equalizer on or 1 1 1 2 2 2 3 3 3 4 4 4 5 5 5...
- Page 19 Section Playing audio Changing the speed of Playing back sound 1 Insert the disc into the disc loading slot with the audiobook playback on the iPod. label side up. Refer to Changing audio- Playback will automatically start. book speed on page 32. 1 If a disc has already been inserted, press SRC/ OFF or touch the source icon to select the source.
- Page 20 Section Playing audio ! USB storage device that can be charged via USB will be recharged when plugged in and the ignition switch is set to ACC or ON. However, the USB storage device that can be charged via USB will not be recharged when you select an SD as the source.
Need help?
Do you have a question about the AVH-5200DVD and is the answer not in the manual?
Questions and answers