Advertisement
BEFORE YOU BEGIN
THIS TOOL WORKS BY DETECTING A HIGH-POWERED MAGNET ON THE OTHER SIDE OF A WALL. IT DOES NOT DETECT STUDS, PIPES, OR ELECTRICAL WIRES. USE OTHER TOOLS TO DETECT STUDS, PIPES OR ELECTRICAL WIRES BEFORE DRILLING.
- Always use new alkaline AAA (LR03) batteries with extended expiration dates at least 3 years beyond the current date. Match the direction of batteries to the images inside of battery cavity.
- Before drilling, use a Zircon stud finding scanner to scan for studs at several different heights on the wall and mark the location of every target indicated by the stud finder. This is called "mapping the wall." Pipes and other objects will likely not give consistent readings from floor to ceiling like a stud would.
- Readings should always be consistent and repeatable.
- Studs normally run from floor to ceiling, except above and below windows, and above doors.
- Other objects commonly contained in walls, floors, or ceilings are water pipes, gas lines, firestops, and electrical wiring.- Sensing depth and accuracy can vary depending on scanning environment conditions such as mineral content, moisture, texture and consistency of the wall materials.
- Always turn off power when working near electrical wires.
- Caution should always be used when nailing, cutting, or drilling in walls, floors, and ceilings that may contain these items.
- Studs and joists are normally spaced 16 or 24" (40 or 60 cm) apart, are normally 11⁄2" (38 mm) wide, and may be separated by firestops. Anything closer together, or of a different width, may not be a stud or joist.
- Materials more than 11.8" (30 cm) thick may not be detected.
- Keep away from children, pacemakers, and medical devices.
- Fingers can get severely pinched between two attracting magnets.
- Do not dismantle magnet housings. Magnets can peel, crack, or shatter if allowed to slam together.
- Do not expose to magnetic media and other electronics. The strong magnetic fields can damage these items.
- Keep magnets away from heat and fire.
TROUBLESHOOTING & CONSTRUCTION TIPS
| SITUATION | LIKELY CAUSE | SOLUTION |
| Battery PULL Tab not removed. | Remove PULL Tab from battery compartment. |
| Battery level too low for proper operation. | Replace with (3) brand new alkaline AAA batteries. | |
| Solid red indication flickers (blue LEDs momentarily turn on) when Receiver is believed to be over Target Magnet. | Receiver needs to be recalibrated. | Move Receiver away from suspected target location, recalibrate, then restart search for Target Magnet. |
| Solid red indication continues to flicker after several recalibration attempts. | Receiver is unable to locate Target Magnet in this particular location. | Change to DeepScan® Mode (Large Target Magnet) and rescan for Target Magnet. |
Unable to locate Target Magnet | Target Magnet is oriented the wrong direction (north pole). | Orient Target Magnet in other direction (south pole). |
| Receiver is within approximately 1" (25 mm) of Target Magnet. | If the Receiver is too close to the Target Magnet, the magnetic lines wrap around magnet. Move Receiver further away from Target Magnet and rescan. | |
| Target Magnet distance exceeds scan mode specifications. | Check scan depth, Target Magnet size, and scan mode. |
DISPLAY INDICATIONS
| DISPLAY | INDICATES |
Single triangle illuminated.  | Receiver is in Normal Scan Mode. Use Small Target Magnet. |
Double triangle illuminated.  | Receiver is in DeepScan Mode. Use Large Target Magnet. |
| Red and blue LEDs flash in a circular motion. | Receiver is calibrating. Wait for it to finish before moving. |
| Blue LEDs on (steady), red LEDs off. A short beep sounds. | Calibration is complete. Receiver is ready to scan. |
| Blue LEDs on (steady), while red LEDs flash. |
|
| Red LEDs on (steady) / Blue LEDs off. | Magnetic field strength is very strong. |
| Both blue and red LEDs flash. | Calibration failed. Recalibrate again. |
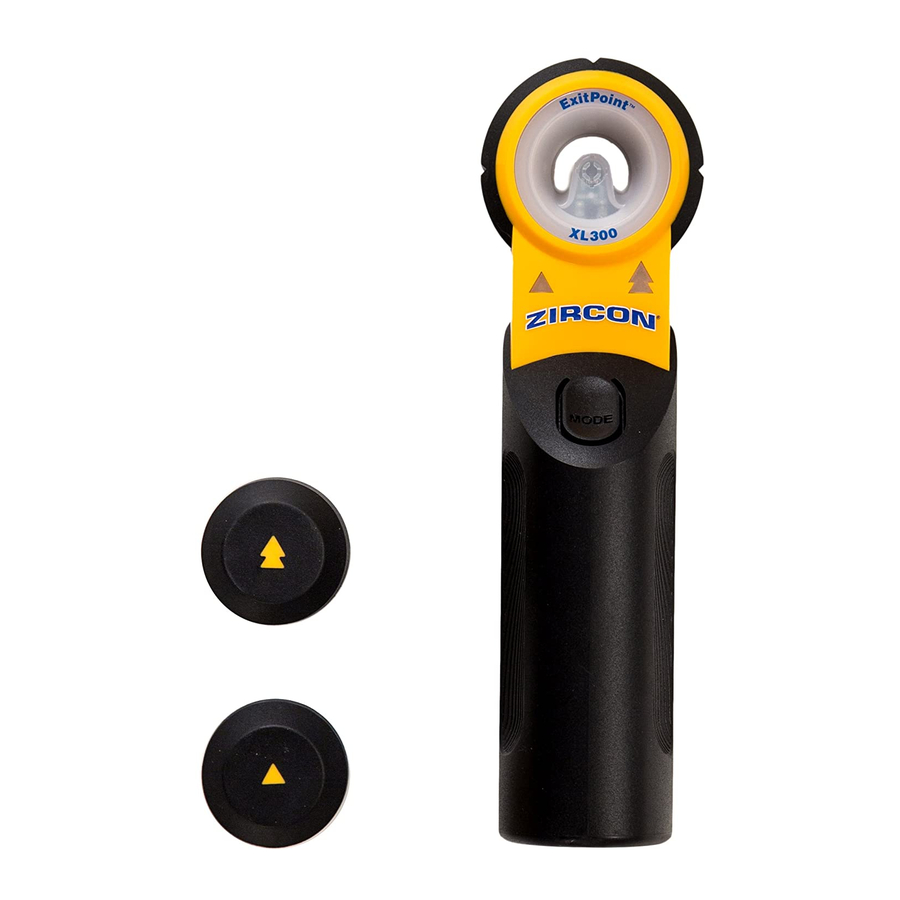
OVERVIEW

NOT SHOWN:
- 3 AAA (LR03) batteries
- 9 reusable adhesive discs
- Padded pouch for storage and carrying
This tool is designed to help locate a through-hole point for drilling through walls. It operates in one of two modes:
- Normal Scan is optimized for interior walls with 1⁄2" (1.3 cm) sheetrock on both sides, up to 4.5" (11.5 cm) thick
- DeepScan is for use with thicker walls, up to 11.8" (30 cm)
Depth can vary due to wall material and construction.
INSTALLING THE BATTERIES
Before first use, remove the PULL tab in the battery compartment.
Always use new alkaline AAA (LR03) batteries with extended expiration dates at least 3 years beyond the current date. Match the direction of batteries to the images inside of battery cavity.
Low battery: When the battery level is too low for proper operation, the Receiver will automatically power off. If Receiver does not light upon pressing the Power / MODE Button, please replace all three batteries with a brand new set.
POWER UP
To activate Receiver, hold the tool flat against the surface being scanned and press the Power / MODE Button. Lights will flash as tool automatically calibrates, then a beep will sound and a blue light will hold steady once calibration is complete.
A failed calibration is indicated by a rapid pulsing of both red and blue LEDs at the same time. Move the Receiver away from the suspected location of the Target Magnet and it will automatically recalibrate.
POWER DOWN
To power off the Receiver, press and hold the Power / MODE Button down for approximately 2 seconds. Lights will turn off.
The Receiver will automatically power off approximately 3 minutes after last calibration.
SCAN IN NORMAL SCAN MODE
The Receiver powers up in Normal Scan Mode, indicated by the Normal Scan Mode Indicator light. Always use the Small Target Magnet when scanning in this mode.

Use Normal Scan Mode for scanning through materials up to 4.5" (11.5 cm) thick.


DO NOT ASSUME THERE ARE NO LIVE ELECTRICAL WIRES IN THE WALL. DO NOT TAKE ACTIONS THAT COULD BE DANGEROUS IF THE WALL CONTAINS A LIVE ELECTRICAL WIRE. ALWAYS TURN OFF THE ELECTRICAL, GAS, AND WATER SUPPLIES BEFORE PENETRATING A SURFACE. FAILURE TO FOLLOW THESE INSTRUCTIONS MAY RESULT IN ELECTRIC SHOCK, FIRE, AND/OR SERIOUS INJURY OR PROPERTY DAMAGE.
- Determine where the drill exit hole should be. Clean the surface of any dust or oils, and make sure the surface is dry.
- Remove the protective plastic from both sides of an adhesive disc, then use the disc to affix the Small Target Magnet to the location, with yellow side facing away from wall.

- Grasp grips with thumb on one and fingers on the other. Place the Receiver flat against the opposite surface from the Target Magnet, but in an area not likely to be over it.
- Power up the Receiver and let it calibrate until the blue light is steady (not flashing).
- Move the Receiver horizontally. As it approaches the target, red LEDs will flash slowly. When the red lights go steady, mark the location through the reticle groove.

- Continue scanning in the same direction until the red and blue LEDs flash, then reverse direction.
- Mark the location where the red LED shines steadily. The approximate midpoint of the target is between the two marks.

- Without recalibrating, move the Receiver to the midpoint, then scan vertically until the top and bottom limits are marked. The center of the Target Magnet should be the midpoint between the top and bottom marks.


This Receiver does NOT detect hidden objects behind surface. Use other information sources to locate, and avoid, objects behind surface before drilling.
USE DEEPSCAN MODE
Use DeepScan Mode for scanning through materials more than 4.5" (11.5 cm) but less than 11.8" (30 cm) thick.
For DeepScan, always use the Large Target Magnet.

- Determine where the drill exit hole should be. Affix the Large Target Magnet to the location with a reusable adhesive disc, yellow side facing away from wall.
- Power up Receiver, then press Power / MODE Button twice to switch from Normal to DeepScan Mode. The DeepScan Mode Indicator light will illuminate as indicated by icon to the right.
![]()
- Follow steps 4–8 under SCAN IN NORMAL SCAN MODE.

STORING REUSABLE ADHESIVE DISCS
This tool comes with 9 double-sided, reusable adhesive discs. With repetitive use or exposure to dust particles, discs may lose stickiness. Gently wash with soapy water, rinse, air dry, and reuse.
The discs can be stored within the battery compartment by stacking within the designated, circular template.

To order more, email techsupport@zircon.com.
STORING YOUR TOOL
- Padded pouch holds and protects scanner
- Before storing, use a dry cloth to clean all parts. Do not expose the tool to liquid
- Pouch flap securely closes
- D-rings on end of flap and bottom of pouch can be used to lock pouch
- Clear front pocket holds ID for company or individual
- Hook and loop straps on back can be used as a shoulder strap, strapped around waist, or hung from belt loops
- D-ring on back can be used to hang pouch when not in use
- Exterior elastic loops conveniently hold pencils, pens or small tools
- Interior elastic loops can hold 3 AAA batteries

VideosZircon ExitPoint XL300 How to Use Video
Documents / ResourcesDownload manual
Here you can download full pdf version of manual, it may contain additional safety instructions, warranty information, FCC rules, etc.
Download Zircon ExitPoint XL300 - Through-Hole Drill Guide Manual
Advertisement


Need help?
Do you have a question about the ExitPoint XL300 and is the answer not in the manual?
Questions and answers