Table of Contents
Advertisement
Advertisement
Table of Contents

Related Manuals for Mantis Rawrr


Summary of Contents for Mantis Rawrr
- Page 2 This publication includes the latest production information available before printing. Rawrr Inc. reserves the right to make changes at any time without notice and without incurring any obligation. No part of this publication may be copied, translated, reproduced, or transferred without written permission from Rawrr Inc.
- Page 3 California Proposition 65 Warning WARNING: Operating, servicing, and maintaining a passenger dirt bike (All-Terrain Bike) or off-highway motor dirt bike (All-Terrain Bike) can expose you to chemicals, including engine exhaust, carbon monoxide, phosphates, and lead, which are known to the State of California to cause cancer and birth defects or other reproductive harm. To minimize exposure, avoid breathing exhaust gases, do not idle the engine except as necessary, service your dirt bike (All-Terrain Bike) in a well-ventilated area and wear gloves or wash your hands frequently when servicing your dirt bike (All-Terrain Bike).
-
Page 4: Table Of Contents
Catalogue 1. Safety Notice……………………………………………………….. 1 2. Function Schematic………………………………………………… 8 3. Quick Installation Guide…………………………………………….13 4. Ride Preparation…………………………………………………….21 5. Learn to Ride……………………………………………………..…22 6. Vehicle use instructions……………………………………………..26 7. How to charge……………………………………………….………28 8. Dirt bike (All-Terrain Bike) Parameters Table……………………...31 9. Other Notes……………………………...…………………………..33 Annexes (Dirt Bike Electrical Schematic)......……34 Controller Alarm Code list………………………………………35 10. -
Page 5: Safety Notice
This dirt bike (All-Terrain Bike) is not a children's toy. Be sure to use Rawrr's special lithium battery charger. The input AC voltage is 90 ∽ 260 V. Before charging, check the charging port and charger to see if there is moisture or water. - Page 6 Ask an authorized dealer to check for you or call customer service if you need help. Brake Check the brake for proper function. When you squeeze the lever, the brake should provide positive braking action. When you apply the brake with the speed control on, the brake cut-off switch will stop the motor.
- Page 7 riding pants with knee and hip pads, a jersey with elbow pads, and a chest/ shoulder protector. Avoid wearing loose or baggy clothes that could get caught on any part of the dirt bike (All-Terrain Bike). Do not let anyone else ride your dirt bike (All-Terrain Bike) on their own unless, after carefully reading this manual, they understand the features, functions, capacities, abilities, and risks of this dirt bike (All-Terrain Bike).
- Page 8 through intersections, motorways, turnings, doorways, etc. When riding at high speed for a long time, it is recommended to use ECO mode and select the appropriate gear to meet the riding needs; using SPORT mode for a long time will shorten the range and affect the battery life. ...
- Page 9 easy access for the rider. Parking procedures. To park: 1. Stop the motor. 2. Step down the side stand. 3. Slowly lean the dirt bike (All-Terrain Bike) to the side stand until it's firmly stood. 4. Turn the handlebar fully in the same direction as the side stand. 5.
- Page 10 Accessories & Modifications Adding accessories not designed or authorized by Rawrr for the dirt bike (All-Terrain Bike) is not encouraged. We do not recommend any personal or unauthorized modifications to your dirt bike (All-Terrain Bike). Doing so may break the original design and make the dirt bike (All-Terrain Bike) unsafe.
- Page 11 Warning Riding a dirt bike (All-Terrain Bike) on a rainy day will reduce the friction between the tires and the road and reduce braking performance and visibility, substantially increasing the risk. Special Warning: If the dirt bike (All-Terrain Bike) smokes or burns when damaged by external forces, put it out with a dry-chemical fire extinguisher or sandy soil.
-
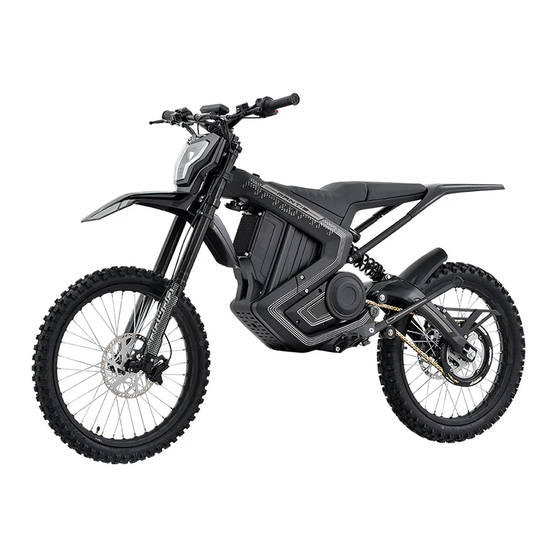
Page 12: Function Schematic
2、Function Schematic 1-Headlight 2-Front turn 3-Front 4-Front 5-Horn 6-Front fork signal reflector mudguard (optional) (optional) 7-Rear 8-License 9-Tail light 10-Rear 11-Rear turn 12-Rear taillight plate light bracket reflector signal mudguard (optional) (optional) (optional) (optional) (optional) 13-Rear 14-Rear 15-Rear 16-Motor 17-Front 18-Charging fork cushion... - Page 13 1-Mirror 2-Rear brake handle 3-Gauge 4-Front brake handle 5-Left handle set 6-Left combination function switch 7-Right combination function switch High and low Left and right Horn switch Seat cushion Left beam turn signal lock switch (to switches switching switch be used with (headlights are power on) required to be...
- Page 14 Function Symbol Note Speed Current speed display while riding Total mileage ODO display, metric mileage switchable Single Mileage Single mileage is re-calculated every time you turn on the power Gear indication ECO/SPORT mode according to the actual display ECO mode includes 1/2/3 gears Operating status Working indication, speed off, no...
- Page 15 Reverse gear Display in reverse gear indication Fault code Display fault codes (see controller display specification for code content)
- Page 16 Recommended torque for installation of important parts Installation Location Recommended torque for installation Front wheel axle fastening 25-30N.m Switch lock cover fastening 3-5N.m Rear wheel sprocket fastening 18-20N.m Front and rear wheel disc fastening 5-7N.m Front and rear brake caliper fastening 7-9N.m Tension Wheel Fastening 18-20N.m...
-
Page 17: Quick Installation Guide
3、Quick Installation Guide ASSEMBLE, UNPACK, PACK THIS DIRT BIKE (ALL-TERRAIN BIKE) ALONE. TEAMWORK IS REQUIRED. Mounting Handlebars 2、Put the handlebar on the headlight bracket, align the holes, and lock the 4 1 、 Place the headlight bracket on the screws with a 5# Allen wrench. upper coupling plate, align the four 4 Note: 4 screws should be added with holes, and snap the clamp nut in the slot... - Page 18 Installation of brake handle and speed control handle 1、 As shown in the figure, adjust the front brake handle and speed control handle to the right angle. 2. Use 4# hexagonal wrench and Phillips screwdriver to lock speed control handle front brake handle respectively.
- Page 19 Mounting the front wheel 1. Loosen the front wheel lock nut 2 . Install the front axle bushings on with two 8# Allen wrenches and each side take out the shaft and nut. Note: Do not crush the seal. 3. Remove the brake caliper clamping block, place the front wheel inside the fork, install the front axle so that it passes through the fork and the front wheel in turn, and fasten the front axle with two 8# Allen wrenches.
- Page 20 Installation of front mud fender Secure the front fender to the lower coupling plate with 3 screws including flat pad and spring pad lock using 4# Allen wrench. Installation of front reflector Install the front reflector on each side of the fork by turning clockwise.
- Page 21 Installation of headlights 1. Place the headlight on the front fender positioning pin adjustment spacer between the headlight and the bracket. 2. Adjust the position and tighten the middle fixing screw with 5# hexagonal wrench. Headlight adjustment Adjust the light height by twisting adjusting screw left and right with a...
- Page 22 Installing the battery 1. Insert the key into the round hole under the rear cushion (this method is in the absence of battery or battery damage when the whole bike cannot be energized, and needs emergency treatment. Under normal circumstances, you only need to open the switch lock to energize the whole bike, press the cushion switch on the handlebar, you can open the cushion), open the front cushion, check the air switch to ensure that it is in the off state.
- Page 23 2. Battery charging port towards the right side of the frame, put into the battery compartment; install the discharge plug, open the air switch to the left, close the seat, and close the switch lock to remove the key. Open the cushion when the whole bike power on 2、Press the seat cushion button on the 1.
- Page 24 Rear shock mount 1.Lift the rear tailstock to reach the installation stroke of the rear shock absorber. 2. Align the front end of the shock absorber with the fixing hole slot of the frame, and screw in the fixing bolt from the left side to the bottom. 3.Align the shock absorber with the mounting hole slot of the frame, and the fixing bolt passes through the bottom...
-
Page 25: Ride Preparation
4、Ride Preparation Please ensure you have carefully read all the items in Chapter P01 (Safety Instructions) of this manual before riding and focus on the following items. Check the front and rear tires: 1. Tires are in good condition, with no abnormalities. 2. -
Page 26: Learn To Ride
5、Learn to Ride Start Check whether switches, 1. Insert the key into the electric lock instruments, horn, front and rear brakes hole and rotate clockwise to power it are working properly. 3. Hold the front (rear) brake handle and release the P-gear bike function. 4. - Page 27 Warning: Please operate the brake handle according to the actual situation and gradually increase the force. To prevent the wheel from locking and slipping and resulting in injury, do not grip it suddenly. Try to prejudge and avoid sharp braking, hard steering, and other operations that can easily cause side slips and falls.
- Page 28 Parking Pay attention to the road conditions and slow down to approach the parking place. After the body is stable, close the switch lock, and remove the key. Put the side bracket down to fix the vehicle. Warning: when parking (before leaving the dirt bike), please make sure to stand the side bracket, enter the P-gear parking function, and ensure the dirt bike has lost power to avoid touching the speed control handle and causing accidents.
- Page 29 Please do not attach or Do not use cell phones, cameras, tow other vehicles or headphones, ear plugs, etc. when bikes. riding. Do not drive in bad weather or when extremely tired. And do not Ride slowly and carefully wade deeply into the water, complicated road otherwise the battery will be...
-
Page 30: Vehicle Use Instructions
6、Vehicle use instructions P-gear parking function 1、Enter P-gear parking at power-on. 2、Automatically enter P-gear parking after the vehicle is stationary for 10 seconds. 3、Enter P-gear parking when the side bracket is supported. Note: Make sure the side bracket is open before you pinch the brake to lift the P-gear parking function! ... - Page 31 About water wading The dirt bike (All-Terrain Bike) can occasionally wade (not more than 24cm / 9inches depth) but cannot spend too long soaking in water, especially if the motor is in a high-temperature state because the cooling of the water and internal air contraction, will lead to water being absorbed by the oil seal and cable position causing internal damage.
-
Page 32: How To Charge
7、How to Charge Charging the whole dirt bike (All-Terrain Bike) Connect the charger output to the vehicle charging port, then connect the other end to the power supply. Warning: do not charge the battery below 31F, otherwise the battery will be damaged. - Page 33 Portable Charging 1、Remove the battery (1) Make sure the switch lock is in the open state, press the left combination function switch unlock button, open the seat and close the air switch. The picture is only a reference schematic, the actual product appearance and function may differ.
- Page 34 2、Battery Charging (2) The charger indicator flashes red to indicate that it is charging. (1) Connect the output of the When the power is full, the green charger to the Li-ion battery light is always on; when the charging port first, and then power is full, please power off in connect the other end to the time.
-
Page 35: Dirt Bike (All-Terrain Bike) Parameters Table
8、Dirt bike (All-Terrain Bike) Parameters Table Item Parameter Brand RAWRR Basic Overall vehicle size 1935*795*1200mm Information (L*W*H) Overall vehicle weight 60V/74Kg 72V/76Kg (including battery weight) Maximum load capacity 100Kg Wheelbase 1290mm Seat height 850mm Major Min. ground clearance 310mm Parameters of Max. - Page 36 Charger type Lithium charger Rated output voltage Charger Input voltage 100~264VAC 100~264VAC 50/60HZ 50/60HZ Output voltage 67.2V Output current Handlebar specifications Φ22~Φ32 reducer goose handle Communication port CAN / One line through Other Lamp system Instrument type VA black and white Cell phone charging port USB-5V standard interface 1000mA Note: The range may vary greatly depending on the testing environment.
-
Page 37: Other Notes
2. RAWR reserves the right to interpret and explain this product statement to the extent permitted by law. 3. If you ever want to resell or transfer your RAWRR dirt bike, please do not forget to forward this manual with it, as it is part of the product. If you have any questions about RAWRR, we will be glad to serve you at any time. -
Page 38: Annexes (Dirt Bike Electrical Schematic)
Annexes (Dirt Bike Electrical Schematic) -
Page 39: Controller Alarm Code List
Controller Alarm Code List Alarm Code (Buzzer Fault Name Protective Action Reason Beep) Current exceeds predetermined 1 (1 short) Software overcurrent Shutdown limit Motor speed exceeds 2 (2 short) Motor over speed Shutdown predetermined limit Battery cell exceeds 3 (3 short) Battery over-voltage Shutdown predetermined limit... -
Page 40: Fault Phenomena And Solutions
10、Fault phenomena and solutions Item Cause of failure Troubleshooting method Turn on the 1. Battery connection 1. Check whether the connection line is power and wire is loose connected firmly 2. The speed control 2. Repair the plug to connect firmly motor does connector is off 3. - Page 41 Abnormal 1.Unreasonable chain 1.Adjust the chain tightness rattling from tightness 2.Adjust the left and right jacks to center the dirt bike 2.Tire deflection tires (All-Terrain Bike) body during riding After Battery over-discharge Connect the charger's output to the battery connecting protection due to a long charging port, connect the input plug of the the power...
-
Page 42: Maintenance Guide
11、Maintenance Guide In principle, with normal riding, you can do the first check at 10~30Km (can also be understood as the first warranty). Inspection content. 1. front and rear wheel wire spokes tightness. 2. whether there is a gap in the front steering column bearing. 3. - Page 43 Inspection of operating parts 1. Check if the shock absorber is bent, deformed, or damaged. If the front shock absorber is damaged or leaking oil, shake the handlebar up and down to check if the front shock absorber causes any abnormal sound. 2.
- Page 44 Battery check 1. Check the power The bike uses a sealed ternary lithium battery. Check the battery needs to be full, and then use a multimeter to measure the positive and negative voltage of the electric port. The full voltage should be between 66.2 ~ 67.2V for normal operation. 2.
- Page 45 connecting the charger to the grid for a long time. The maximum time after a full charge should not exceed 6 hours. 4. It is strictly forbidden for users to disassemble the battery to avoid damage and danger. 5. When the battery over-discharged protection has occurred, it needs to be activated by charging with the charger.
- Page 46 Maintenance and repair of motor 1. During operation, if the controller does not work properly, the dirt bike (All-Terrain Bike) cannot be started directly. 2. During operation, there should be no intermittent or abnormal sound or vibration. 3. During operation, if the gear oil is not filled (fill GL-4 85W-90 oil, about 100mL), the dirt bike (All-Terrain Bike) should not be started directly.
-
Page 47: Warranty Policy
12、 Warranty Policy RAWRR dirt bike after-sales service Specific services are as follows: Warranty rules. One-year warranty for the entire dirt bike (All-Terrain Bike): including motor, controller, battery and charger, and other difficult-to-damage parts; non-human damage performance failure, can enjoy free repair. Refer to this manual. -
Page 48: Regular Maintenance Record Card
13、Regular Maintenance Record Card Regular Maintenance Record Card Maintenance period Maintenance Maintenance Person/unit requirements seal 300Km/1 month Whole dirt bike (All-Terrain Bike) fasteners, check chain, tension wheel tensioning check (motor, brake, spokes, etc.) 1000Km/3 months after Whole dirt bike the first warranty (All-Terrain Bike) safety parts fastening inspection, high current circuit... -
Page 49: Maintenance Record Card
Maintenance Record Card Maintenance Date Maintenance Details Maintenance Person / Dept Stamp...
Need help?
Do you have a question about the Rawrr and is the answer not in the manual?
Questions and answers
Charging issues
The Mantis Rawrr has a charging issue where the battery does not charge and the charger light turns green immediately, even though the battery is only at 17%. This has been happening for several days. Possible causes include a loose battery connection, a faulty charger, or internal battery/BMS failure. Normally, the charger light should flash red while charging and turn solid green when fully charged. If it stays green without charging, it may indicate a problem with the battery or charger.
This answer is automatically generated
what is the chain tension spec?
The chain displacement (tension) specification for the Mantis Rawrr is 15–20 mm under normal circumstances.
This answer is automatically generated