Table of Contents

Related Manuals for PowerTap Joule GPS+


Summary of Contents for PowerTap Joule GPS+
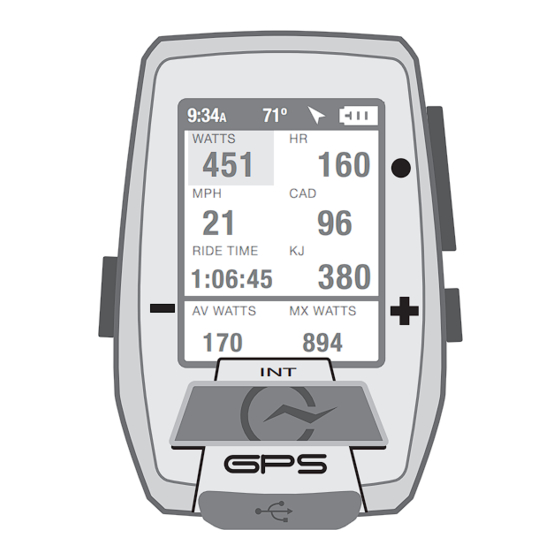
- Page 1 PowerTap Joule GPS+ ™ User Guide 9:34 71º WATTS RIDE TIME 1:06:45 AV WATTS MX WATTS Joule GPS+ is compatible with any ANT+ power meter, speed sensor, cadence sensor, or heart rate sensor.
- Page 2 Saris Cycling Group, Inc. Trademarks Saris Cycling Group, Inc., PowerTap, and PowerTap logo, are all registered trademarks of Saris Cycling Group, Inc. All other product, brand, or trade names used in this manual may be trademarks or registered trademarks of their respective owners.
-
Page 3: Table Of Contents
TABLE OF CONTENTS CHAPTER CHAPTER 1. STARTING OUT _____________ 4 7. Training ___________________ 37 Unpacking Workouts Compatibility Auto Lap Installation Countdown Charging 8. DEVICE____________________ 42 2. OVERVIEW & SETUP _________ 6 Date & Time Dashboards Display nd Screen Record Control Buttons a Main Menu Memory... -
Page 4: Starting Out
CHAPTER 1: STARTING OUT Thank you for purchasing the PowerTap Joule GPS+. This user guide is just one of the resources to help you understand all the features the Joule GPS+ has to offer. Please visit www.PowerTap.com to: • Learn more about the Joule GPS+ and the PowerTap system of products •... -
Page 5: Installation
CHAPTER 1: STARTING OUT INSTALLATION Installing the PowerTap Joule GPS+ OUT-FRONT MOUNT STEM/HANDLEBAR MOUNT O-Rings: Crisscross under Zip tie around stem, stem/handlebar, latch on hooks through slots CHARGING The Joule GPS+ is powered by a high-capacity rechargeable battery. To charge the battery, plug into a computer or AC wall adapter (#7060 not included). -
Page 6: Overview & Setup
CHAPTER 2: Joule GPS+ OVERVIEW & SETUP DASHBOARDS and BUTTONS Press any button on the Joule GPS+ to turn the unit on. The display will briefly show the date, time, some user totals and the firmware version, then begin acquiring the GPS fix on your current location. One of 5 Dashboard screens will be displayed at this time. - Page 7 CHAPTER 2: Joule GPS+ OVERVIEW & SETUP more BUTTON and DASHBOARD DETAIL There are three buttons on the sides of the Joule GPS+ and one large button below the screen. The screen is divided into 3 display areas. The Title Bar, displays time, temperature, compass, and battery level.
-
Page 8: Workouts
CHAPTER 2: Joule GPS+ OVERVIEW & SETUP MAIN MENU The Main Menu is your home base. Enter the Main Menu to stop and save rides; review ride history; create, edit, select, and pair Sensors; activate Training features; define individual Users; and configure the Device. - Page 9 Rachel, Jim, Bob). Each user can have multiple bikes (e.g. TT bike, Road bike, MTB); each bike can have multiple sensors associated with it (e.g. PowerTap, Cadence, HR strap, Speed). A default User is already defined within the Joule GPS+. You can either edit the settings associated with that User or create a new user by selecting Add a User.
- Page 10 ANT+ signal (e.g. a PowerTap hub, a Heart Rate strap, a remote cadence sensor, a remote speed sensor, etc.). Sensors can be shared between bikes (e.g. a heart rate strap). Each User can define multiple bikes. Each bike may have one or more sensors associated with it.
- Page 11 Bluetooth Pairing To enjoy the full capabilities of the Joule GPS+ including wireless downloading and Over-the-Air firmware updates you must download PowerTap Mobile App from App Store. You must have Bluetooth turned “on” in Once Bluetooth is turned “on” use the...
-
Page 12: Appendix C, Metrics
CHAPTER 3: DASHBOARDS DASHBOARD 1 The Dashboards display various metrics, summaries and navigation information that can be easily customized. When a new metric is highlighted, the detailed view changes to show the related complimentary metrics. Selected metric is Detail Views Selected Metric DASHBOARD 1 highlighted in gray... - Page 13 CHAPTER 3: DASHBOARDS DASHBOARD 2 Dashboards can be customized to display from 3 to 6 metric windows. The example on previous page displayed 6. The example below, Dashboard 2, displays 4 metric windows. Each window can display any of 23 metrics, plus related/complimentary metrics. See Appendix C for a full list of metrics. Selected metric is DASHBOARD 2 Detail Views...
- Page 14 CHAPTER 3: DASHBOARDS DASHBOARD 3 Dashboard 3 is configured to display 3 metric windows (default configuration). Press the PLUS (+) or MINUS (-) button to highlight a different metric. See Appendix C for a full list of metrics. Selected metric is DASHBOARD 3 Detail Views Selected Metric...
- Page 15 CHAPTER 3: DASHBOARDS INTERVALS DASHBOARD Intervals are useful for viewing ride data specific to a section of a ride, such as a hill or other period of high intensity riding. The Interval Summary dashboard contains a summary of each interval completed up to that point in the ride. Interval number [ENTER] 9:34...
- Page 16 Record Control section of the Device menu (see chapter 8). • Lap Mode refers to the traditional way the interval button has operated on all computers from PowerTap: Pressing the [INTERVAL] button completes one interval (or Lap) and begins the next interval (Lap). Interval 0 (zero), or Lap 0, is the time recorded from the start of the ride to the first [INTERVAL] button press.
- Page 17 CHAPTER 3: DASHBOARDS NAVIGATION DASHBOARD The Navigation dashboard displays the path ridden from the start of the ride to your current position. Additionally, the screen displays two configurable metric windows, interval markers (), waypoints (), and a pacing icon (), depending upon which navigation feature is being used. This Dashboard is also used when navigating to a Waypoint or following a route.
- Page 18 CHAPTER 4: SENSORS SENSOR OVERVIEW The Sensor section of the Main Menu is the gateway to all bicycle and sensor associations. In this area you can: • Define and pair various sensors (e.g. power meter, heart rate strap, speed, cadence, PowerCal, PowerBeam, etc.). •...
- Page 19 CHAPTER 4: SENSORS DEFINING A BIKE Display the bike definition screen by selecting an existing bike to “edit” or by adding a “new Bike.” The definition contains the bike name, weight of the bike, and links to any associated sensors. Also, the bike definition can be deleted here. 9:34 9:34 Sensors...
- Page 20 CHAPTER 4: SENSORS ASSOCIATING SENSORS For sensor association, there are two options: Pair All or Pair Individually. PAIR ALL PAIR INDIVIDUALLY 9:34 9:34 9:34 Bike1 Bike1 Power Sensor Name Name Activate Sensor Bike1 Bike1 Start Pairing Weight Weight Name 17.0 17.0 Power2 Pair All...
Need help?
Do you have a question about the Joule GPS+ and is the answer not in the manual?
Questions and answers