Table of Contents
Advertisement
Quick Links
Advertisement
Table of Contents

Related Manuals for XAG ACS2G

Summary of Contents for XAG ACS2G
- Page 2 To Users Dear user, thank you for choosing XAG products. For safety purposes and better user experience, it is highly recommended that you read this manual carefully and strictly follow the instructions hereof. Contact Us If you have any questions about this document, please contact our Technical Support team via...
-
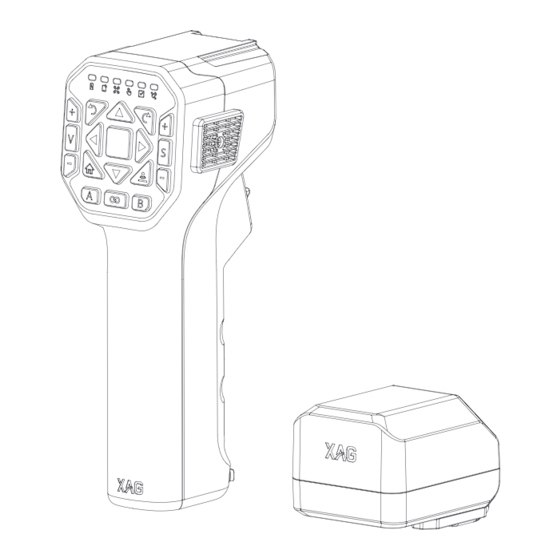
Page 3: List Of Items
ACS2G ControlStick RTK module Adapter ×1 ×1 ×1 USB-A To Type-C Micro USB To Type-C Type-C To Type-C Cable Cable Cable ×1 ×1 ×1 Note ACS2G ControlStick is only compatible with P40 Agricultural Drone and V40 Agricultural Drone. www.xa.com/en... - Page 4 Introduction Overview Front View Bottom View www.xa.com/en...
- Page 5 Back View 11 Backward 1 Hover 21 Turn Right 2 UAV Connection Indicator 12 A 22 Frontward 13 Smart 3 Device Connection Indicator 23 RTK Status Indicator 4 Power Indicator 14 B 24 Task Status Indicator 15 Terrain-Following Mode 5 Turn Left 25 Control Status Indicator 6 Speed+ 16 Decrease Spraying/Spreading Rate...
-
Page 6: How To Use
How to Use Charge ACS2G Connect the Type-C connector to the charging port of the ControlStick and the USB connector to the adapter, then connect the adapter to a power outlet. While charging with the fast charging adapter, there is a fast flashing power indicator, accompanied by a voice prompt saying "fast charging". - Page 7 Warning DO charge the battery with the charging device provided by XAG, or the user shall be held liable for the failure or damage arising from charging with other devices. Not being water-resistant, the ControlStick shall never be doused with or immersed in water during operation and charging.
- Page 8 Height Control • Press and hold the "Ascend" button to have the drone climb up. Release to make it hover. • Press and hold the "Descend" button" to have the drone descend. Release to make it hover. • While pressing and holding the "Descend" button, the drone will descend to a height of around 2m at most.
- Page 9 Pitch/Roll • Short press the "Forward/Backward" button to control the pitch of the drone. Release to make it hover. • Short press the "Left/Right" button to control the roll of the drone. Release to make it hover. Hover • Short press the "Hover" button to have the drone hover.
- Page 10 • Short press the "Turn Left" button to swivel the head of the drone to left. Release to make it hover. • Short press the "Turn Right" button to swivel the head of the drone to right. Release to make it hover. Speed Control •...
- Page 11 Spraying/Spreading Control • Short press the "Increase Spraying/Spreading Rate" or the "Decrease Spraying/Spreading R ate " b u tto n to i n c r ea s e o r d e c r ea s e spraying/spreading rate. • Short press the "S" button to enable or disable Spraying/Spreading Mode.
- Page 12 When equipped with the differential positioning module (RTK module), the ACS2G ControlStick will be able to assist with mapping. • Insert the differential positioning module (RTK module) into the top of the ACS2G ControlStick. When "Module inserted" is heard, and after a few seconds "Positioning module connected", the positioning module is now properly inserted.
- Page 13 51%-99% Flashing Green Light (rapid) Solid Green Light Full Flashing Red Light (slow) 1%-20% 21%-50% Flashing Yellow Light (slow) Slow Charging 51%-99% Flashing Green Light (slow) Full Solid Green Light When the remote control is on, check each indicator for the status of the remote control and the drone.
-
Page 14: Specifications
Specifications Model ACS2G Dimensions 76mm×60mm×177mm Operating Frequency 2.400GHz-2.4835GHz 2.400GHz-2.4835GHz EIRP CE:≤ 17dBm、FCC:≤ 26dBm CE:GSM 900: 880 – 915 MHz, 925 – 960 MHz;DCS 1800: 1710 – 1785, 1805 – 2G Operating Frequency 1880 MHz FCC:GSM850;PCS1900 Class 4(33dBm ±2dB)for EGSM900, 2G Maximum transmit power Class 1 (30 dBm ±2 dB) for DCS1800... -
Page 15: Rf Exposure Information
For limb operation, Remote Controller (model:ACS2G) has been tested and meets the FCC/ISEDC RF exposure guidelines when used with an accessory designated for this product or when used with an accessory that Contains no metal and that positions the product a minimum of 0 cm from the limb. - Page 16 des membres, membre.
- Page 17 Warning: Operation of this equipment in a residential environment could cause radio interfer- ence. “Hereby, [Guangzhou Xaircraft Technology CO.,LTD.], declares that this [ACS2G Agricultural Control Stick] is in compliance with the essential requirements and other relevant provisions of 2014/53/EU. The full text of the EU declaration of conformity is available at the following internet address: www.xa.com/en”...
- Page 18 Warning: Changes or modifications to this unit not expressly approved by the party responsible for compliance could void the user’s authority to operate the equipment. NOTE: This equipment has been tested and found to comply with the limits for a Class B digital device, pursuant to Part 15 of the FCC Rules.
- Page 19 XAG is not held legally accountable. 4. To the maximum extent permitted by law, XAG shall not be reliable for all losses caused by the user's failure to operate under the guidance of the "User Manual/ Quick Start Guide".
Need help?
Do you have a question about the ACS2G and is the answer not in the manual?
Questions and answers