Advertisement
Quick Links
4D -V32
Suitable for age 14 +
User Manual for Four Axis Aircraft
WIFI
VERSION
To ensure the electromagnetic environment requirements of aviation radio stations, it is
●
prohibited to operate within a range of 10 kilometers on both sides of the airport runway
centerline and 20 kilometers on both ends of the runway, as well as civil aviation routes
and routes. Stop using various models and drones. Stop using all kinds of models and
UAVs in the no fly zone issued by relevant national departments.
Advertisement

Related Manuals for 4DRC 4D -V32


Summary of Contents for 4DRC 4D -V32
- Page 1 4D -V32 Suitable for age 14 + User Manual for Four Axis Aircraft WIFI VERSION To ensure the electromagnetic environment requirements of aviation radio stations, it is ● prohibited to operate within a range of 10 kilometers on both sides of the airport runway centerline and 20 kilometers on both ends of the runway, as well as civil aviation routes and routes.
- Page 2 WARNING 1. The packaging and instructions contain important information and should be retained. 2. It is your responsibility to ensure that this aircraft does not cause harm to the personal and property of others. 3. When debugging and installing the aircraft, it is necessary to strictly follow the operation manual, and pay attention to maintaining a distance of 2-3 meters from the user or others during the flight of the aircraft to avoid colliding with the head, face, and body of people during flight and landing, causing injury.
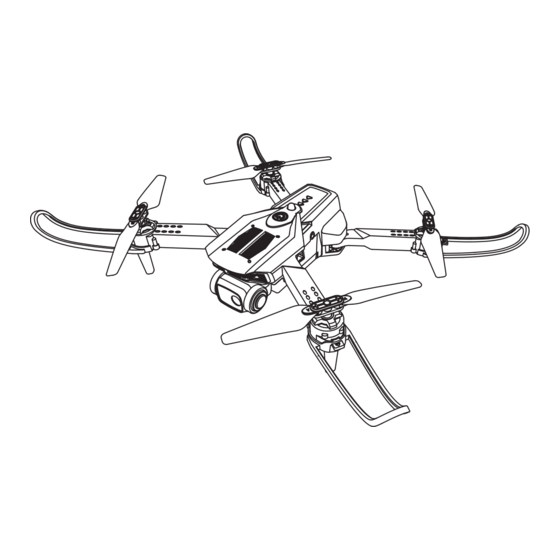
- Page 3 1. Includes a list of accessories Aerocraft*1 Usb Charging Wind Protective Lithium Bolt Driver*1 Instructions*1 Cable*1 Blade*4 Frame*4 Battery*1 2. Names of various parts of the aircraft Aircraft power switch Battery Electrical machinery Wind blade Casing Camera Blade clamp LED lamp Protective frame Bottom camera (optional) 3.
- Page 4 5. Deployment steps of the aircraft (stored at the factory) 5.1 Follow the steps to deploy the aircraft: A1/A2 B1/B2 B1/B2 A1/A2 6. Instructions for charging and using lithium batteries 6.1 Secure the aircraft battery latch. 6.2 Remove the battery. Notebook Desktop Portable...
-
Page 5: Remote Control Battery Installation
7. Names of various parts of the remote control Three speed regulation Power switch 360 ° roll Obstacle avoidance mode (Short press) One click takeoff Normal mode One click landing (Long press) Left joystick Right joystick Headless mode One click emergency stop (Short press) (Short press) One click return... -
Page 6: Flight Environment Requirements
9. Flight environment requirements Please choose an outdoor open environment with no wind, snow, and low wind. When flying, please stay away from people, trees, power lines, tall buildings, airports, and signal transmission towers. Don't fly indoors in a small and crowded environment. When using the remote control to operate, the app can only watch (take Warn photos/videos). - Page 7 10.3 Horizontal calibration: Long press the calibration button on the remote control , and the LED lights on the aircraft will flash quickly. The calibration of the LED light on the aircraft is completed, and the remote control emits a "beep" sound (Figure 1). Note: The calibration must be completed by placing the aircraft on a horizontal plane! Figure 1...
- Page 8 11. Remote control control method When the left joystick (throttle) is pushed up, the main fan speed increases and the aircraft rises. When the left joystick (throttle) is pushed down, the main fan speed slows down and the aircraft descends. When the left joystick (rudder) is pushed to the left, the aircraft nose turns left.
- Page 9 12.2 Right side 360 ° roll Short press the 360 ° roll button, then push the right joystick to the right, and the aircraft will flip 360 ° to the right accordingly. 12.3 Rolling 360 ° Forward Short press the 360 ° roll button, then push the right joystick upwards to flip the aircraft forward 360 °...
- Page 10 13.2 One click return: When the flight distance of the aircraft is too far, the return function can be used to recall the aircraft. When turning on the frequency control, the remote control must be facing the tail of the aircraft. During flight, long press and hold the return button (Figure 6).
- Page 11 "4DRC *********" name in the wireless network search list, and connect. After successful connection, exit the settings option. ② Open the "4DRC FPV" software icon on your phone to enter the control interface. (Try to stay away from other signal source environments during flight).
- Page 12 15. Introduction to the functions of the APP control interface Three speed acceleration Library Fixed height Photograph Control panel Return More function Video recording Image flipping Cut-away Gravity induction Accelerator/ Direction control Left Right Rotation Front and rear fine tuning Zoom Fine adjustment Fine adjustment...
- Page 13 16.2 APP application startup frequency: Turn on the WiFi function in the mobile device, select "4DRC ***********" in the WiFi list (Figure 9), and open the APP after successful connection. Click START to enter (as shown in Figure 10), click OFF (as shown in Figure 11), open the touch joystick, and click on more functions (as shown in Figure 12).
- Page 14 17. APP application manipulation methods When the left joystick (throttle) is pushed up, the main fan speed increases and the aircraft rises. When the left joystick (throttle) is pushed down, the main fan speed slows down and the aircraft descends. When the left joystick (rudder) is pushed to the left, the aircraft nose turns left.
- Page 15 18.2 Speed switching: APP application operation: Click on the "three speed acceleration" icon in the APP control interface (Figure 17), and you can also switch the flight speed of the aircraft. Figure 16 18.3 Fine tuning function: 【 Aircraft forward/backward fine tuning】 When the aircraft leaves the ground and shifts towards the rear, click the fine adjustment joystick ①...
- Page 16 【 Gesture photography】 About 2m in front of the aircraft lens, lift the palm of one hand (palm facing forward) flat on the side of the body; After the aircraft recognizes the gesture, it starts a 3-second countdown and takes a photo (at this point, the arm can be lowered) (the time difference between two consecutive recognition should be greater than 3 seconds) (Some models do not support this function, and turning on the function will cause a delay in the...
Need help?
Do you have a question about the 4D -V32 and is the answer not in the manual?
Questions and answers