Advertisement
Quick Links
Advertisement

Related Manuals for Saris Glide EX


Summary of Contents for Saris Glide EX
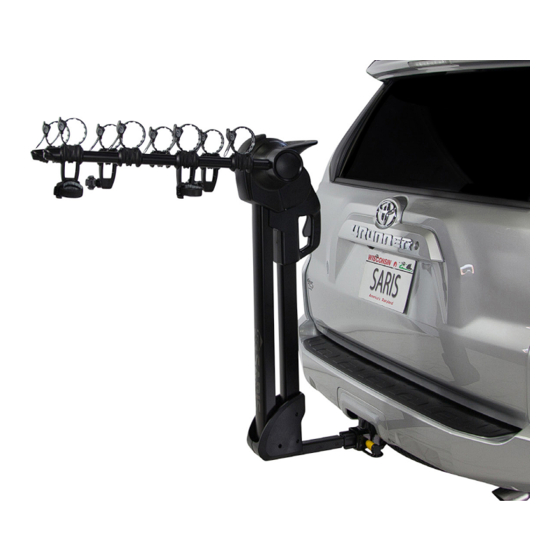
- Page 1 Glide EX 774 | 774BLU | 774BRZ | 775...
-
Page 2: Tell Us What You Think
TELL US WHAT YOU THINK REGISTER YOUR PRODUCT FOR UPDATES... - Page 3 LONG FOR THE RIDE Just as no garage is complete without a bicycle, at Saris, we believe no car is complete without a bike rack. Since setting off on this journey nearly 30 years ago, Saris racks have freed millions of bike-lovers to explore new territory and terrain, take part in group rides, bike pool to races, and commute to and from work.
- Page 4 Specifications: GLIDE EX For use with receiver hitches Class II or higher. 5-bike model designed for 2’’ Class II or higher. Max = 35 lbs/kg 16 Max = 140 lbs/63.5kg BIKE Guide Max = 30 lbs/kg 13.5 Max = 150 lbs/68 kg...
- Page 5 Tools Needed: Items Included: Optional Accessories: Adjustable or 3/4” Wrench 3040 – Bike Beam 5mm Hex Key...
- Page 6 INSTALL RACK Install receiver tube into hitch. Hitch pin should enter in on the driver’s side. Tighten hitch pin with wrench. Secure with lock. Note: If your receiver is 1.25” remove the adapter block as shown (A/B). Tools Required: 3/4’’ Wrench, 5mm Hex Key (to remove adapter block).
- Page 7 Raise rack arms up by lifting the lever at the top of the rack, then rotate arms up. You will hear an audible click when the arms are in locked position.
- Page 8 LOAD BIKES Load bikes, heaviest to lightest, with heaviest bikes closest to car. The rear of each bike should be on the same side as the anti-sway strap that hangs below the rack arm. Load bikes on the arms alternating directions.
- Page 9 Insert straps through buckles and pull tightly around bike frame. The top straps secure the top tube of bicycle. The anti-sway straps that hang below the rack arms secure the bike’s vertical seat tube.
- Page 10 LOCK BIKES To lock bikes with integrated lock, pull cable lock out of housing, loop over top of bikes and insert cable into end of right arm. Turn key to lock.
- Page 11 HATCH ACCESS While standing between the rack and vehicle, hold handle on back of rack and press trigger to push rack away from vehicle. Rack can be extended with or without bikes installed.
- Page 12 Access hatch. *Arms cannot be articulated in extended position.
- Page 13 To bring rack back to transport position, pull back on handle until an audible click is heard. *Do not operate vehicle while rack is tilted away from the vehicle.
- Page 14 CAUTIONS: • All requirements for compatability/fit as stated in the current Saris vehicle/carrier compatability guide must be followed. • Read and follow instructions carefully. Save owner’s manual for future reference or parts information. Ensure that any other users of the bicycle carrier are familiar with its content.
- Page 15 (3) there was no failure to follow instructions or warnings in Owner’s Manual; (4) no alterations or modifications were made; and (5) the product or part is delivered, freight prepaid, to Saris Cycling Group or an authorized service center. Please call to obtain return authorization prior to return. SCG reserves the right to inspect any product before issuing a...
- Page 16 LIMITATIONS The foregoing warranties are in lieu of and exclude all other warranties not expressly set forth herein, whether expressed or implied by operation of law or otherwise. Other than as set forth above, SCG makes no warranty, whether express, implied or statutory, with respect to any product, including, but not limited to, warranties of reliability, merchantability fitness for a particular purpose, or those arising from any course of performance, dealing, usage or trade.
- Page 17 RECOMMENDED RACK MAINTENANCE Each use: · Wipe down trunk rack feet · Check straps for signs of wear · Check bike cradles and wheel scoops · Check for loose bolts Every 90 days actions · Clean with water and mild soap ·...
Need help?
Do you have a question about the Glide EX and is the answer not in the manual?
Questions and answers