Advertisement
Quick Links
Advertisement

Related Manuals for Cuckooland Lars MG 7777


Summary of Contents for Cuckooland Lars MG 7777
- Page 1 Lars Low Cabin Assembly Instructions...
- Page 2 Thank you for purchasing this product. Before starting assembly we suggest you spend a short time reading through this leaftlet, then follow the simple step by step guide.Two people are needed to assemble this product. 1061mm [41.77"] 1966mm [77.40"] 953mm [37.52"] 970mm [38.19"] Page : 1 of 30 www.cuckooland.com | +44 (0)1305 231231...
- Page 3 19. Never attach or hang items to any part of the bunk bed that are not designed for use with the bed for example, but not limited to hook, belt and jump ropes. Page : 2 of 30 www.cuckooland.com | +44 (0)1305 231231...
- Page 4 | +44 (0)1305 231231...
- Page 5 Front Panel (Trundle) Top Panel (Cabinet) Back Panel (Cabinet) Back Panel (Cabinet) Ladder Step Panel Back Panel (Drawer) Left Panel (Drawer) Right Panel (Drawer) Bottom Panel (Drawer) Front Panel (Drawer) Page : 4 of 30 www.cuckooland.com | +44 (0)1305 231231...
- Page 6 Part List Model : MG 7777 LVL Slats x15 Page : 5 of 30 www.cuckooland.com | +44 (0)1305 231231...
- Page 7 M6 x 25mm Allen Bolt Metal L Braket M6 x 13mm Baller M6 Round Nut M6 JCN NUT 40mm Nylon Caster (White) M6 Allen Wrench Felt Pads (45 x 14mm) Sticker 25mm 31+1 Page : 6 of 30 www.cuckooland.com | +44 (0)1305 231231...
- Page 8 To Assembly the Drawer Slide, Please Follow Step as Below G x 8 Second Hole Last Hole H x 3 FRONT BACK To Assembly the Drawer Slide, Please Follow Step as Below Third Hole Last Second Hole FRONT BACK Page : 7 of 30 www.cuckooland.com | +44 (0)1305 231231...
- Page 9 To Assembly the Drawer Slide, Please Follow Step as Below G x 8 Last Hole Second Hole H x 3 BACK FRONT To Assembly the Drawer Slide, Please Follow Step as Below Last Second Hole Third Hole BACK FRONT Page : 8 of 30 www.cuckooland.com | +44 (0)1305 231231...
- Page 10 Model : MG 7777 WHEN FITTING CAMS A x 10 ENSURE STARTING POSITION IS CORRECT BEFORE YOU INSERT CONNECTING BOLT TURN CLOCKWISE UNTIL SECURE B x 12 D x 24 WRONG CORRECT Page : 9 of 30 www.cuckooland.com | +44 (0)1305 231231...
- Page 11 Guide To Assembly Model : MG 7777 x 10 Page :10 of 30 www.cuckooland.com | +44 (0)1305 231231...
- Page 12 Guide To Assembly Model : MG 7777 E x 10 Page : 11 of 30 www.cuckooland.com | +44 (0)1305 231231...
- Page 13 Guide To Assembly Model : MG 7777 B x 12 C x 12 D x 8 R x 12 Page : 12 of 30 www.cuckooland.com | +44 (0)1305 231231...
- Page 14 Guide To Assembly Model : MG 7777 X x 4 W x 6 Page : 13 of 30 www.cuckooland.com | +44 (0)1305 231231...
- Page 15 Guide To Assembly Model : MG 7777 X x 4 W x 6 Page : 14 of 30 www.cuckooland.com | +44 (0)1305 231231...
- Page 16 Guide To Assembly Model : MG 7777 M x 5 T x 3 D x 2 R x 4 K x 8 S x 8 Page : 15 of 30 www.cuckooland.com | +44 (0)1305 231231...
- Page 17 Guide To Assembly Model : MG 7777 P x 4 T x 4 E x 3 Page : 16 of 30 www.cuckooland.com | +44 (0)1305 231231...
- Page 18 Guide To Assembly Model : MG 7777 K x 4 L x 5 T x 3 Page : 17 of 30 www.cuckooland.com | +44 (0)1305 231231...
- Page 19 WHEN FITTING CAMS A x 6 ENSURE STARTING POSITION IS CORRECT BEFORE YOU INSERT CONNECTING BOLT TURN CLOCKWISE UNTIL SECURE B x 4 D x 8 WRONG CORRECT R x 4 Page : 18 of 30 www.cuckooland.com | +44 (0)1305 231231...
- Page 20 Guide To Assembly Model : MG 7777 M x 8 X x 8 X x 3 Page : 19 of 30 www.cuckooland.com | +44 (0)1305 231231...
- Page 21 Guide To Assembly Model : MG 7777 J x 4 N x 2 T x 2 Page : 20 of 30 www.cuckooland.com | +44 (0)1305 231231...
- Page 22 Guide To Assembly Model : MG 7777 K x 4 R x 4 N x 30 LVL Slats x15 Page : 21 of 30 www.cuckooland.com | +44 (0)1305 231231...
- Page 23 Guide To Assembly Model : MG 7777 X x 6 X x 5 Page : 22 of 30 www.cuckooland.com | +44 (0)1305 231231...
- Page 24 X x 1 WHEN FITTING CAMS A x 6 ENSURE STARTING POSITION IS CORRECT BEFORE YOU INSERT CONNECTING BOLT TURN CLOCKWISE UNTIL SECURE B x 6 D x 12 WRONG CORRECT Page : 23 of 30 www.cuckooland.com | +44 (0)1305 231231...
- Page 25 Do This Step 3 Times Do This Step 3 Times G x 12 H x 3 sets Right Slide Left Slide Do This Step 3 Times Do This Step 3 Times Page : 24 of 30 www.cuckooland.com | +44 (0)1305 231231...
- Page 26 A x 3 ENSURE STARTING POSITION IS CORRECT BEFORE YOU INSERT CONNECTING BOLT TURN CLOCKWISE UNTIL SECURE B x 6 C x 3 WRONG CORRECT D x 20 R x 3 Page : 25 of 30 www.cuckooland.com | +44 (0)1305 231231...
- Page 27 Guide To Assembly Model : MG 7777 G x 24 U x 12 Page : 26 of 30 www.cuckooland.com | +44 (0)1305 231231...
- Page 28 Guide To Assembly Model : MG 7777 E x 8 E x 7 Page : 27 of 30 www.cuckooland.com | +44 (0)1305 231231...
- Page 29 Guide To Assembly Model : MG 7777 K x 4 S x 4 Page : 28 of 30 www.cuckooland.com | +44 (0)1305 231231...
- Page 30 Guide To Assembly Model : MG 7777 G x 12 Q x 3 Page : 29 of 30 www.cuckooland.com | +44 (0)1305 231231...
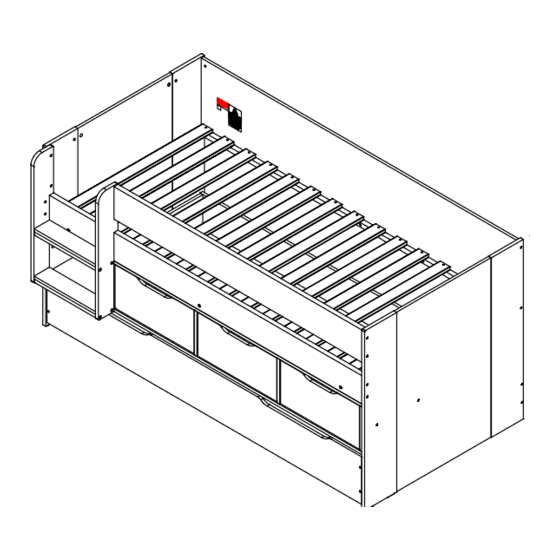
- Page 31 Guide To Assembly Model : MG 7777 Page : 30 of 30 www.cuckooland.com | +44 (0)1305 231231...
Need help?
Do you have a question about the Lars MG 7777 and is the answer not in the manual?
Questions and answers